
This post and photos may contain Amazon or other affiliate links. If you purchase something through any link, I may receive a small commission at no extra charge to you. Any supplies used may be given to me free of charge, however, all projects and opinions are my own.
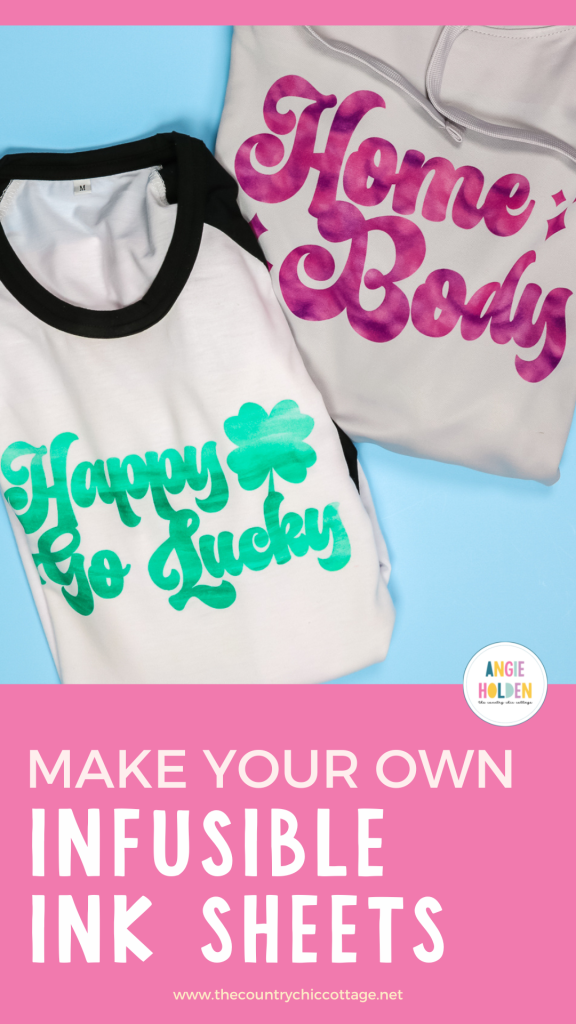
Have you ever been unable to find the right color of Infusible Ink? Does the price of Infusible Ink keep you from making projects with it? Today I’m going to teach you how to make Infusible Ink sheets using sublimation stamp pads or sublimation paint.
With these options, you’ll be able to create customized patterns and colors to fit the project you’re making.
If you’ve never used Infusible Ink, read my post all about how to use Infusible Ink the right way to get started.

How to Make Infusible Ink Sheets
I’m going to make my own Infusible Ink sheets using two different methods. I am going to use Artesprix Sublimation Stamp Pads and Artesprix Sublimation Paints. To make Infusible Ink sheets, you will need some form of sublimation ink but it does not require a sublimation printer.
I’m also using two different options for transferring the design to a shirt as well. We’ll try a heat transfer mask and a new heat mask from Artesprix. We’ll look closely at each of those options.
These options are proof that you can get amazing sublimation results without a sublimation printer. You can watch me use all of these products to make Infusible Ink sheets and see all my tips and tricks for getting the best results by pressing play on the video below.
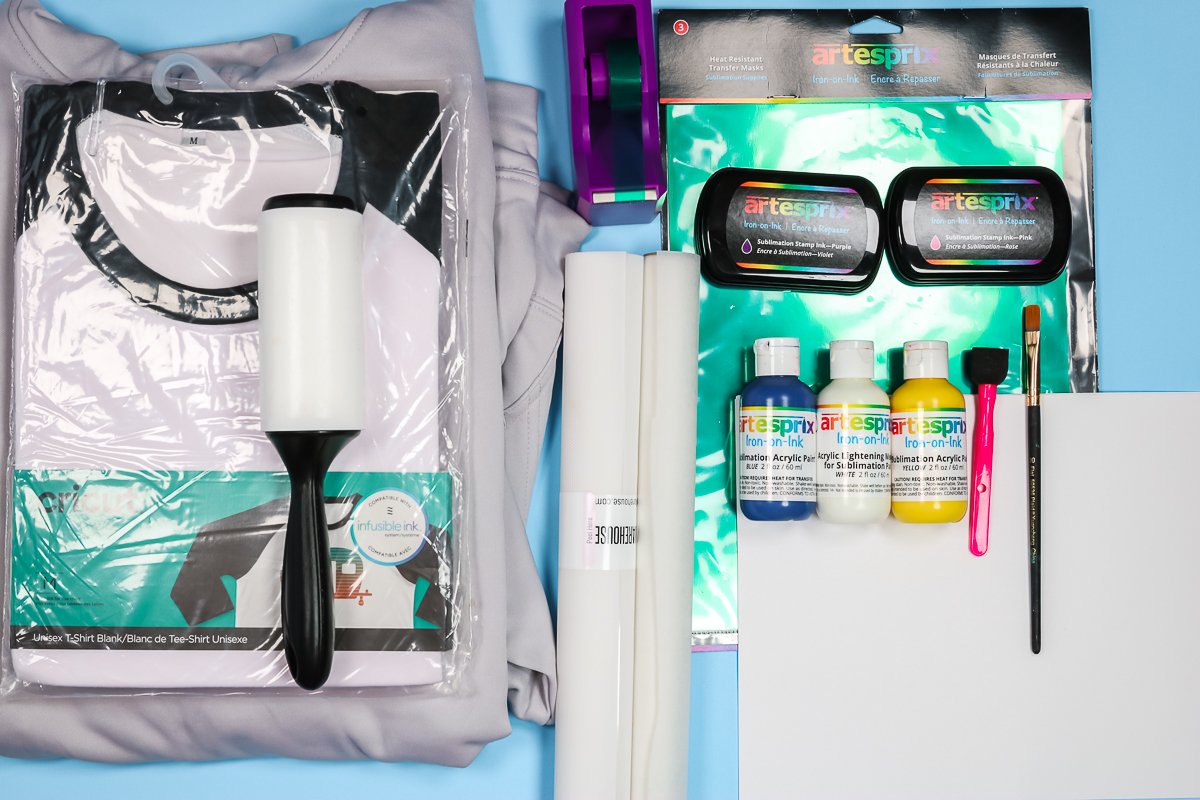
Supplies Needed to Make Infusible Ink Sheets
Now let’s look at the supplies needed to make our own sublimation sheets.
Designs Used
Home Body and Happy Go Lucky Free Cut Files (You can get them free from this link!)
Supplies
NOTE: I am using both Artesprix sublimation paint and their sublimation stamp ink pads. You don’t have to have both of those but I want to show you a couple of different options for creating your own Infusible Ink sheets.
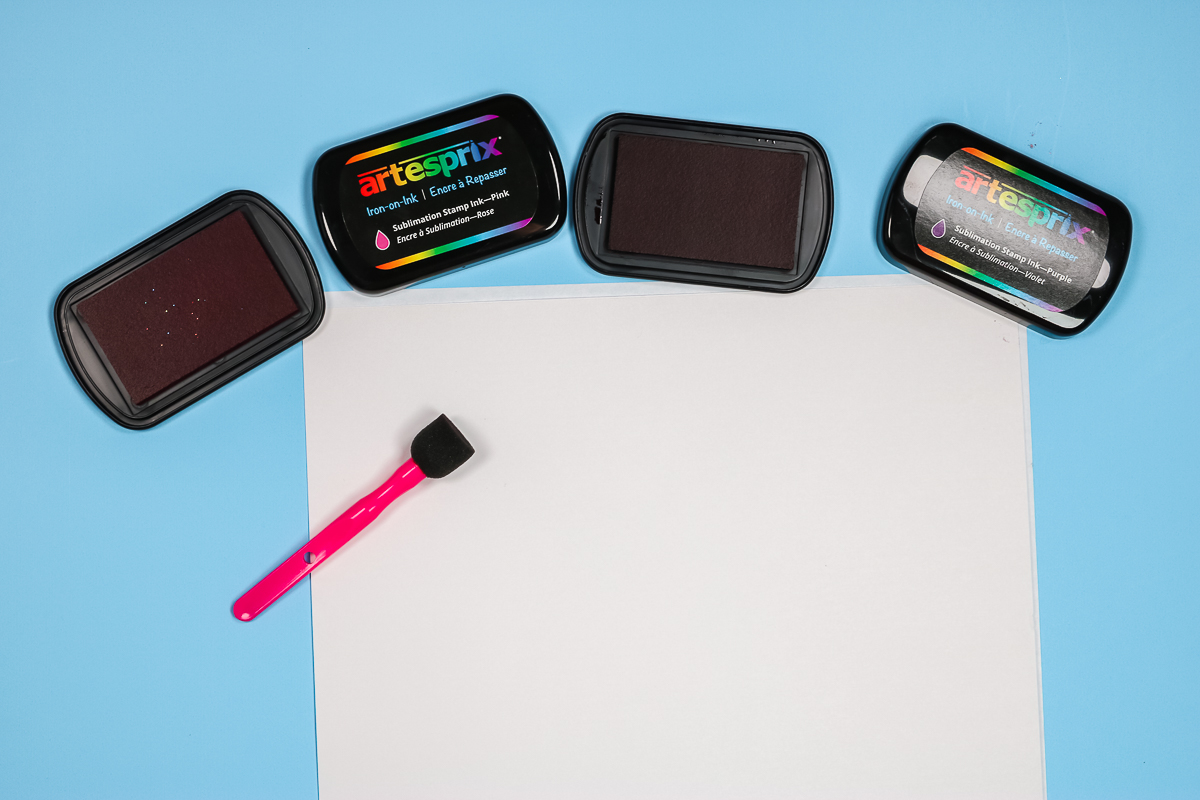
How to Use Sublimation Ink Stamp Pads
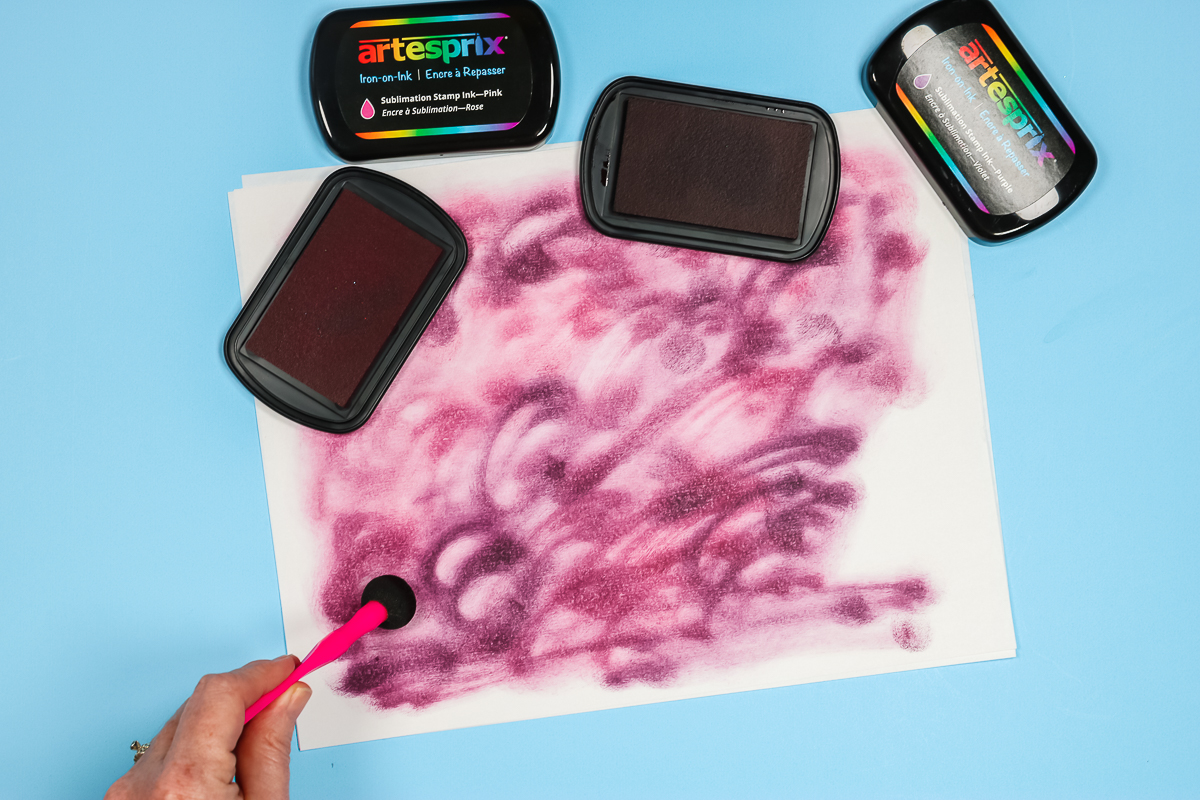
With a pouncer paintbrush and a pink and purple stamp pad, I’m going to add ink onto the copy paper.
Dab the pouncer paintbrush onto the stamp pad to transfer ink to the sponge. Rub the sponge over the paper in a random pattern. Mixing and matching the inks makes a really cool watercolor effect.
You can use whatever color combination you would like and add as much ink to the paper as you want. If you add ink lightly, you will get a more distressed rustic look. More ink will give you a more complete design on your blank.
The ink from the stamp pads will dry much more quickly than the painted option. With both of these projects, I am going to use shirts as my example. This same method will work on other sublimation blanks just like Infusible Ink.
You can literally make any sublimation project with these techniques. If you have a blank idea in mind, you can definitely use this if you don’t have a sublimation printer, or even if you do and you’re wanting a different look or are looking to get a little bit creative.
How to Add Heat Transfer Mask
To turn my stamped sheet of paper into an Infusible Ink sheet I am going to add a heat transfer mask to it. My favorite is from Heat Transfer Warehouse. If you prefer a different heat transfer mask, you can use that.
Next, we are going to cut the mask to fit the entire back of the stamped paper. Adding the heat transfer mask to the back is what will turn the sublimation page into an Infusible Ink sheet.
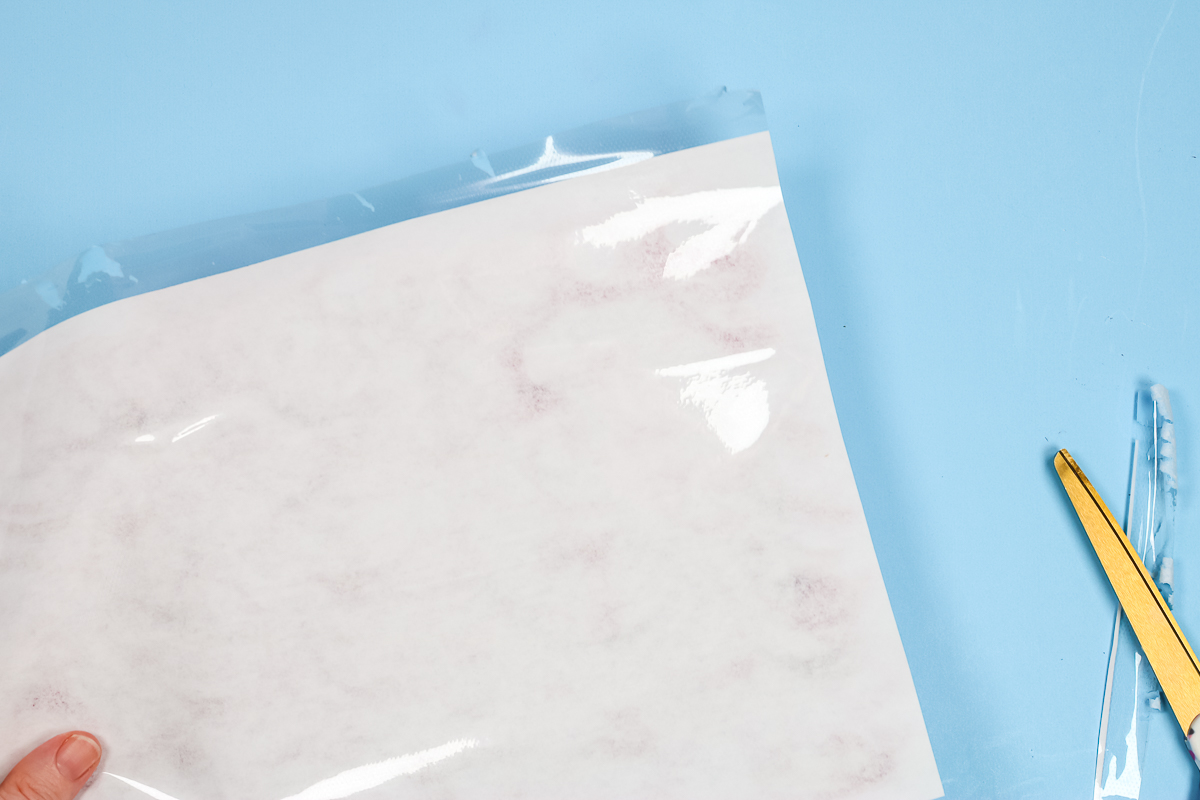
Use a scraper tool to scrape the mask down really well to the back of the stamped paper. Use a pair of scissors to trim any excess mask or any of the paper that didn’t have the mask on it. We want to make sure the entire paper has a heat transfer mask on the back of it.
How to Cut Stamped Sublimation Sheet
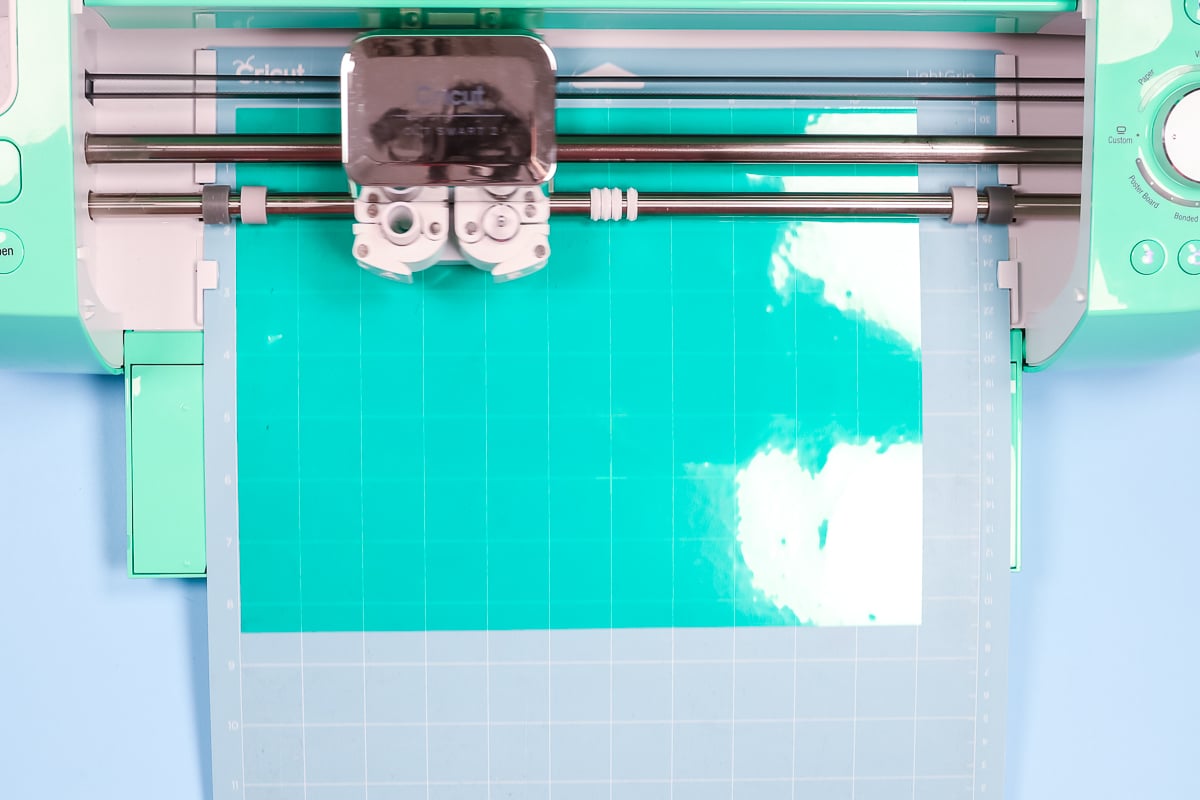
To cut the sublimation sheet we made using the stamp pads add the sheet ink side up onto a LightGrip mat and press it down really well.
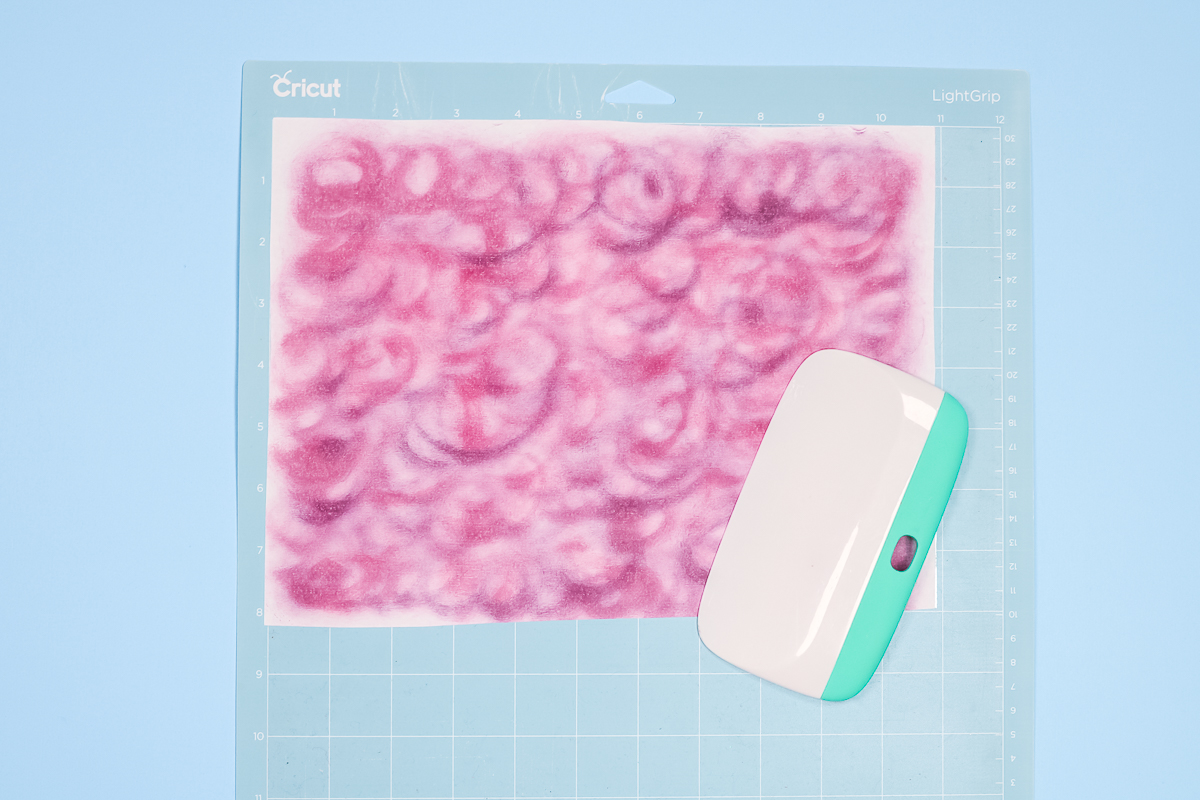
Because we made this sheet ourselves I suggest double-checking the location of your design in Design Space on the mat screen to ensure it’s cutting on the portion you want. My page wasn’t painted side to side so I located my design away from the edges so it won’t cut in that area.
Click Make it and then, since we’re using this like Infusible Ink, we will need to mirror the image before cutting, then click Next. From this screen, you need to choose the material setting for the paper you’re using. I chose copy paper 20 pounds. The goal is to cut through the paper but not the mask.
You can use any Cricut machine to cut this material. I am using an Explore Air 2 with a fine-point blade installed. Load the mat and press Go to cut.
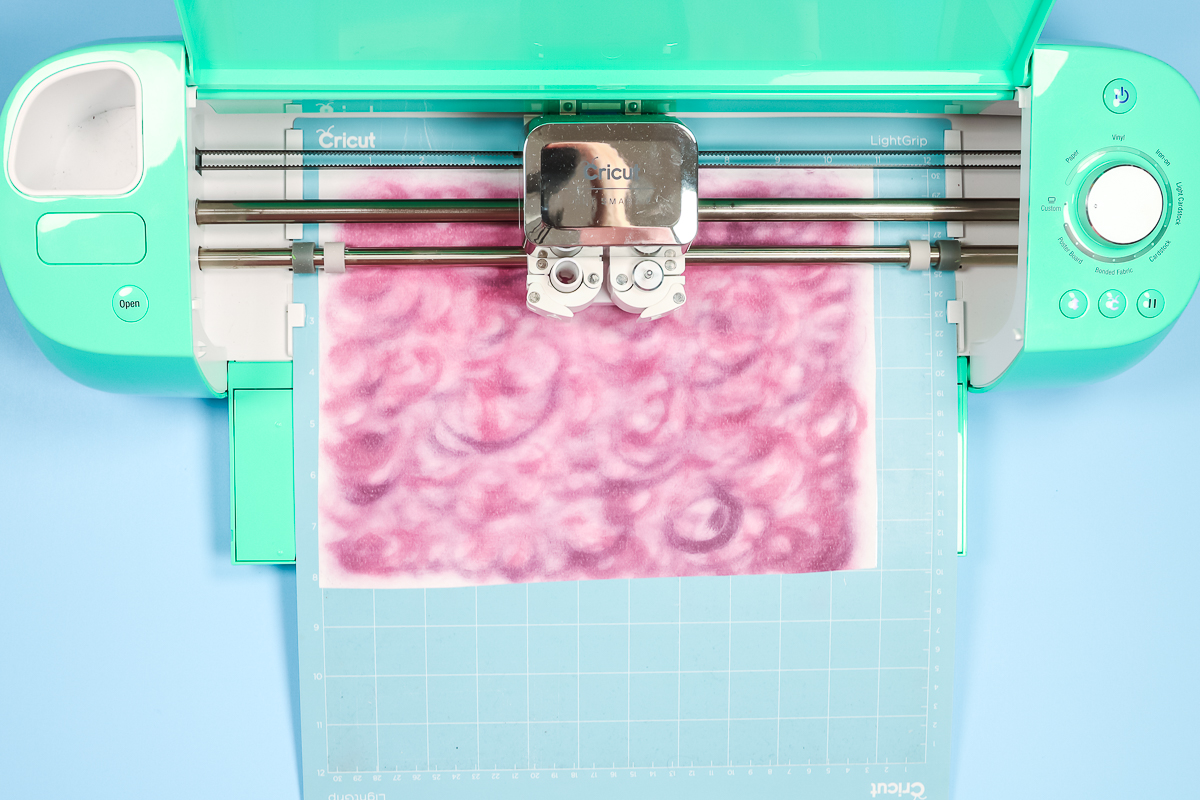
After cutting, before removing the mat from the machine you can check your cuts to make sure they’re cut through the paper. Mine cut well with the copy paper 20-pound setting.
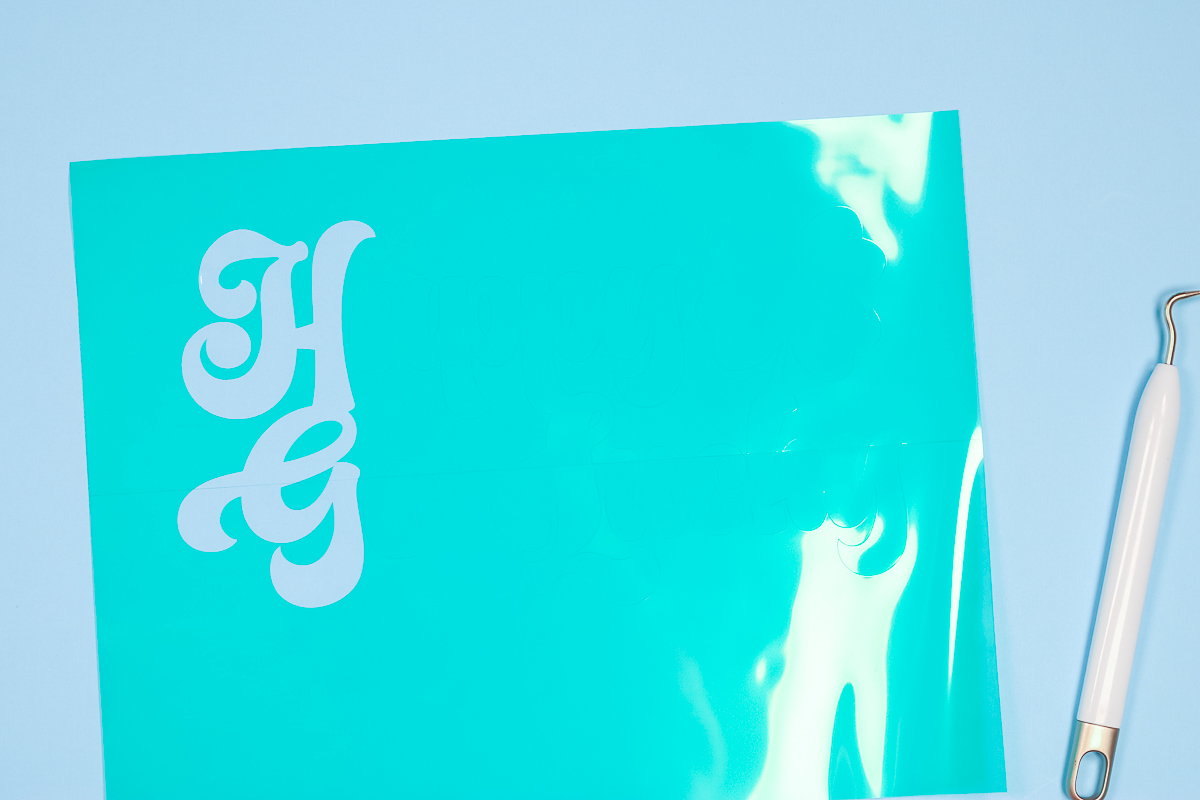
How to Weed Stamped Infusible Ink
If you’ve ever used Infusible Ink the process for weeding the sheet we made ourselves is similar. Peel the outer area away starting from the corner. Remove all the excess including the centers of letters.
I prefer to weed my sheets off the mat so I can bend and move the material around as needed.
As you get to the cut lines, take your time to make sure your cuts are clean. With the heat transfer mask on the back of the paper, everything you want to keep should stay on the sticky liner.
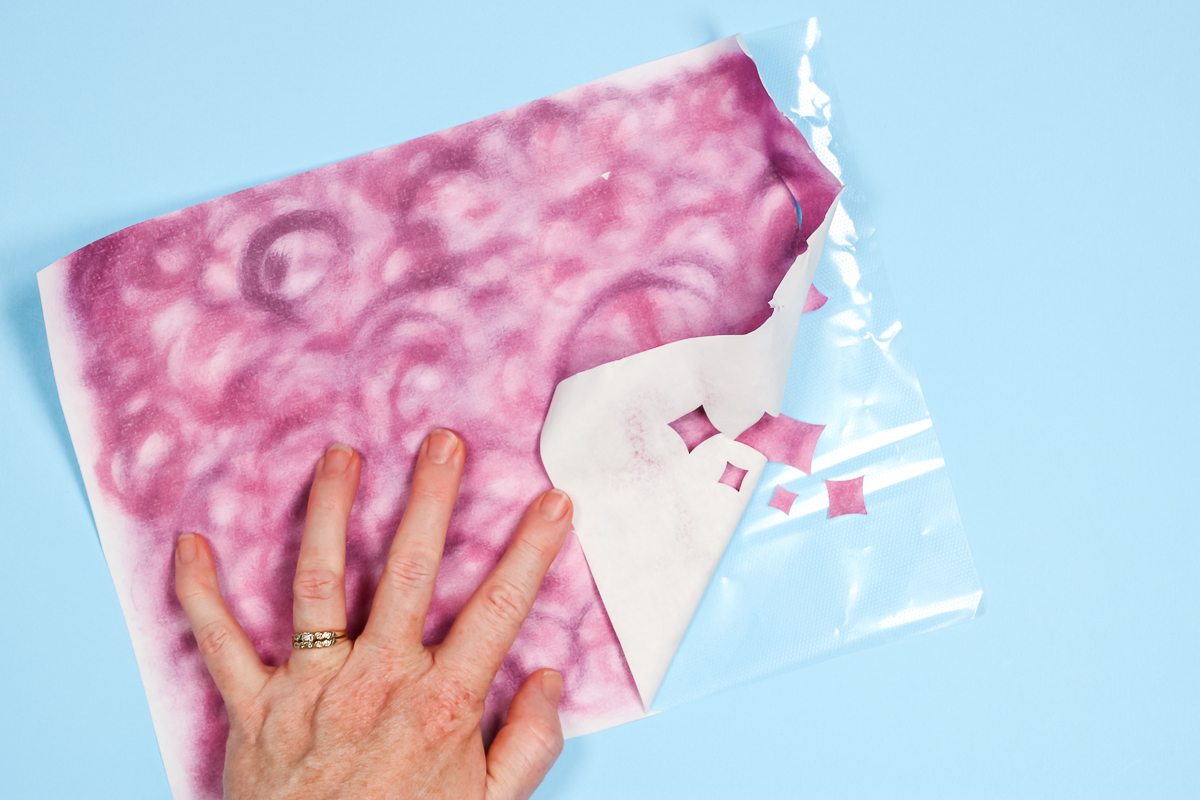
Remember, we want all of the centers of the letters, and other excess removed. We only want to keep our design on the mask.
I do think this is easier to weed than Cricut Infusible Ink. You don’t have to crack it or anything. It just sort of peels off. But it is like peeling copy paper away from a huge sheet of tape. You do need to go slow as it is easier to weed, but still not as easy as vinyl or HTV.
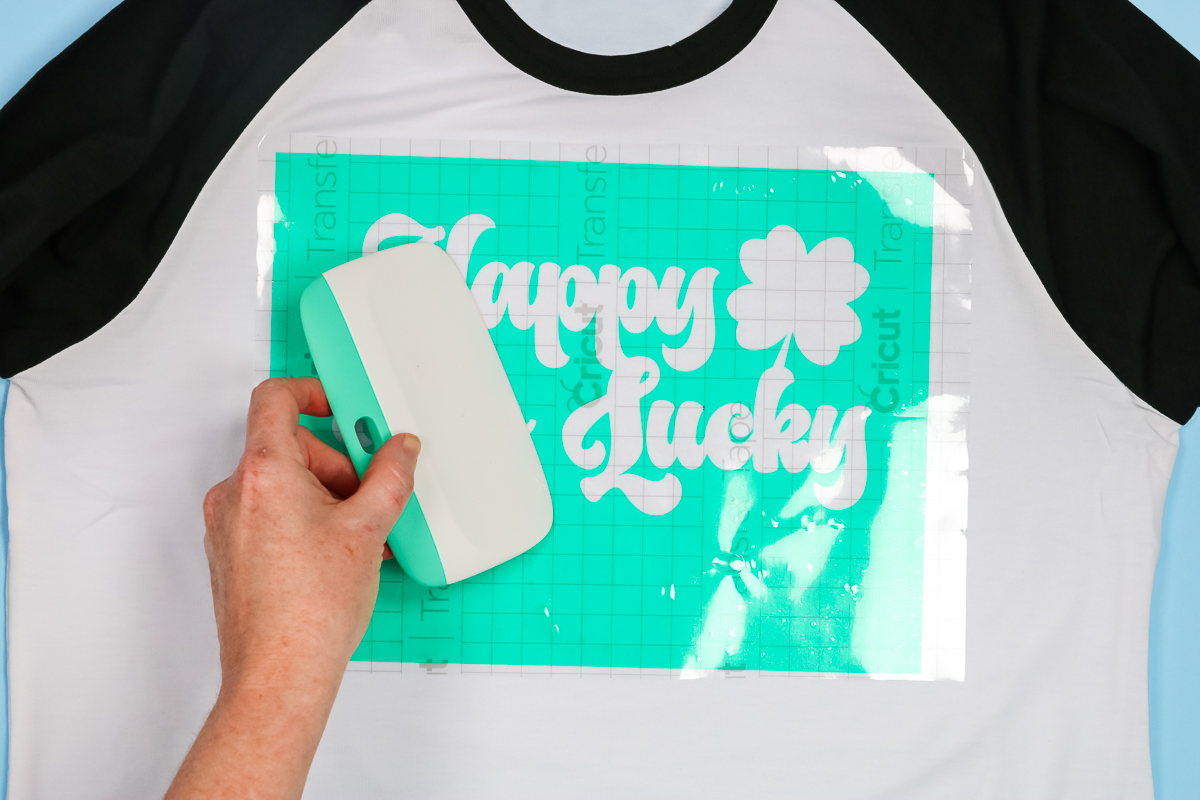
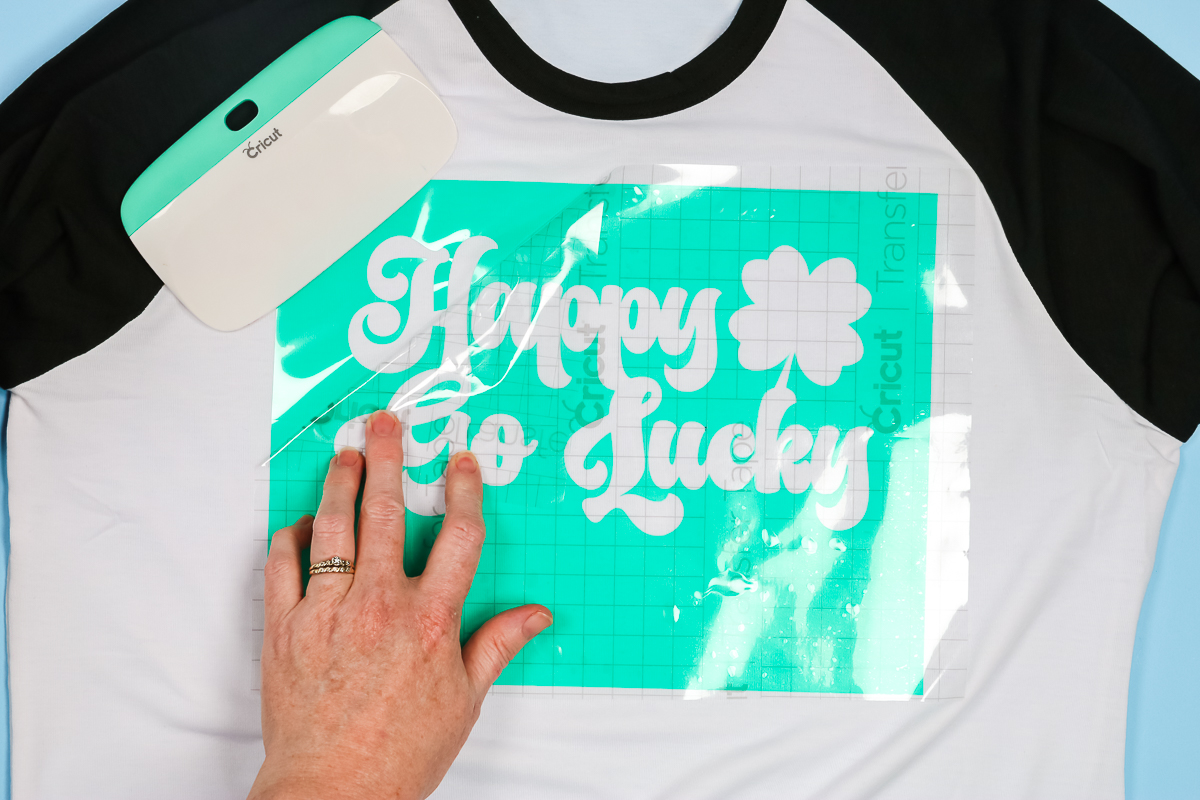
How to Apply Stamped Infusible Ink Sheet
Before we apply our Infusible Ink sheet we need to prepare our blank. I am using a hoodie so I am going to pre-press to remove any moisture and then lint roll to remove any lint, hair, dust, etc. Applying the stamped Infusible Ink sheet is pretty simple with this method.
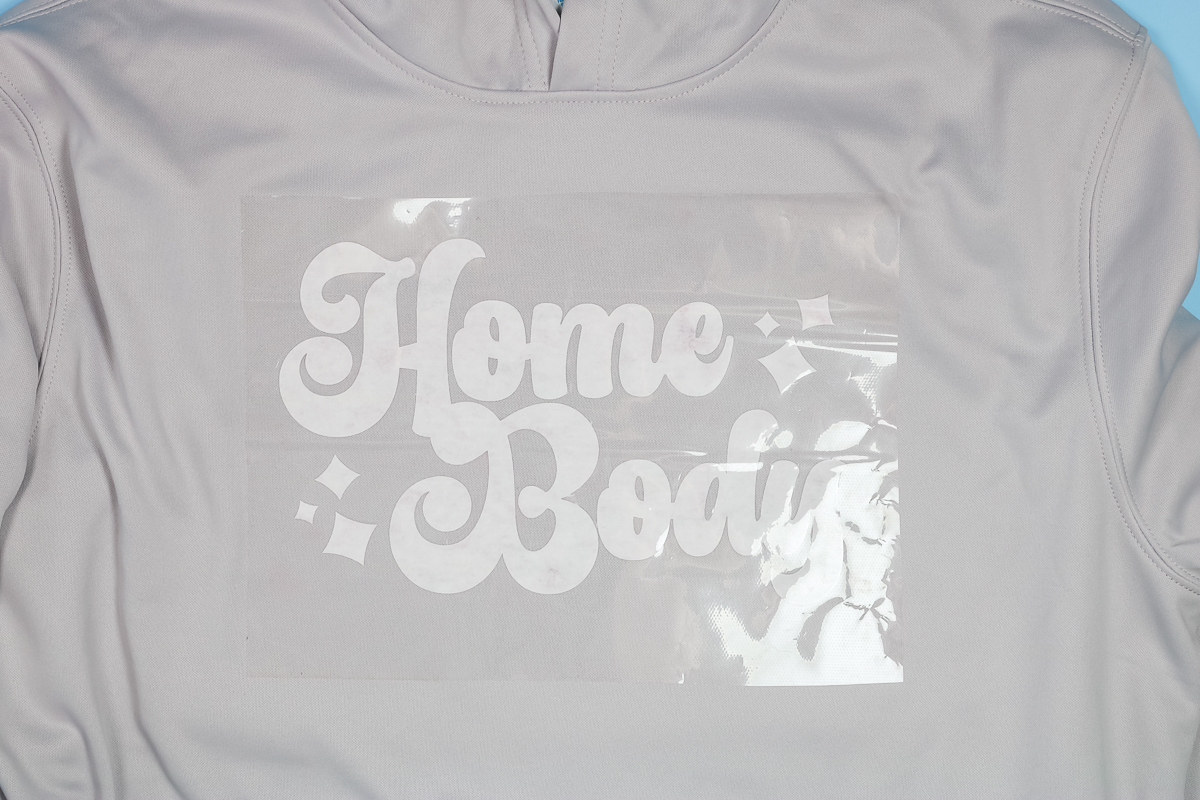
Because the heat transfer mask is sticky we simply need to locate the design on our sweatshirt and press it down.
Even though I have the heat transfer mask on top of my Infusible Ink sheet, I am going to add a protective paper inside the shirt to protect the back and on top of the design for some extra protection. I can always reuse that top piece if no ink gets on it.
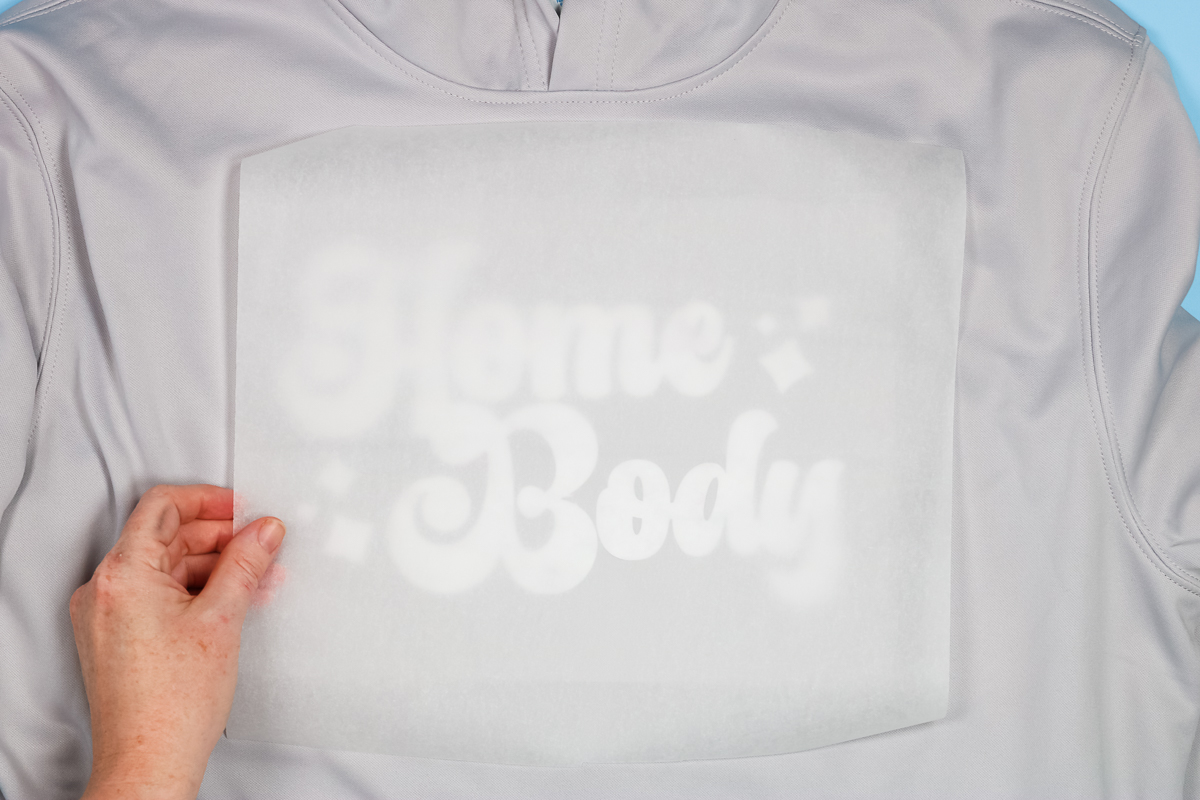
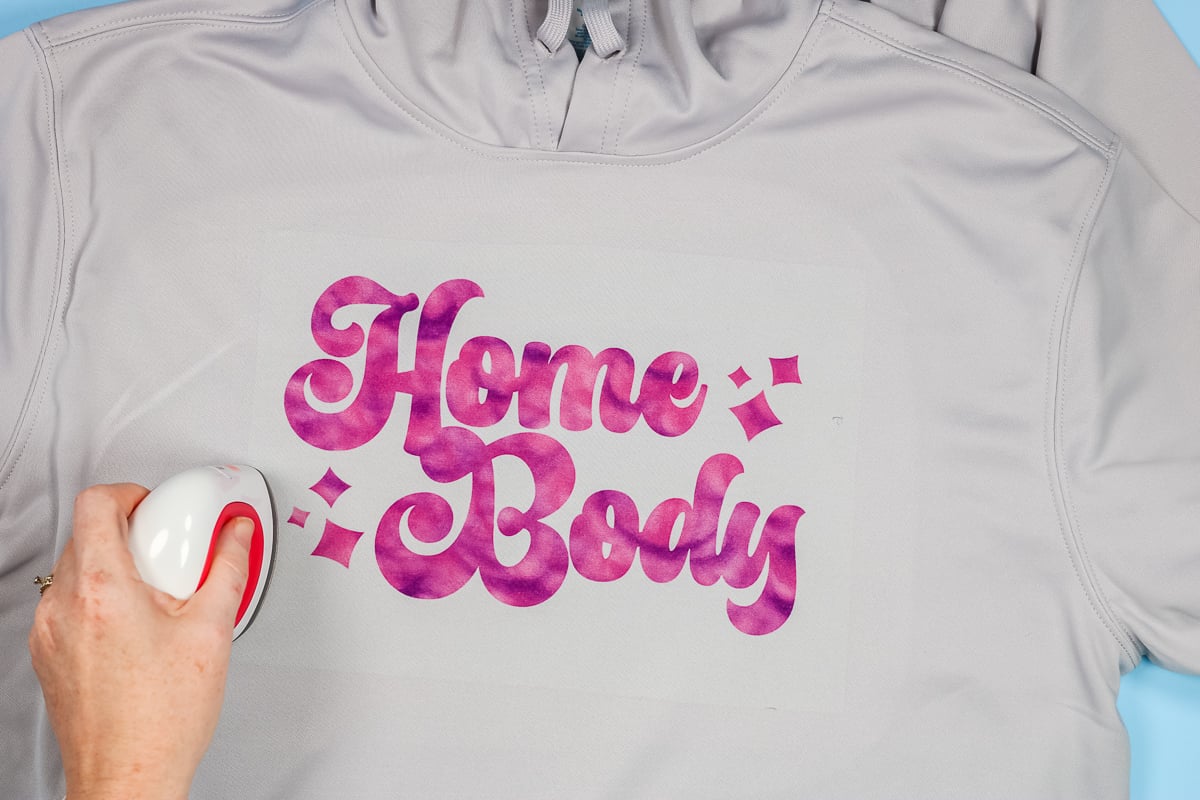
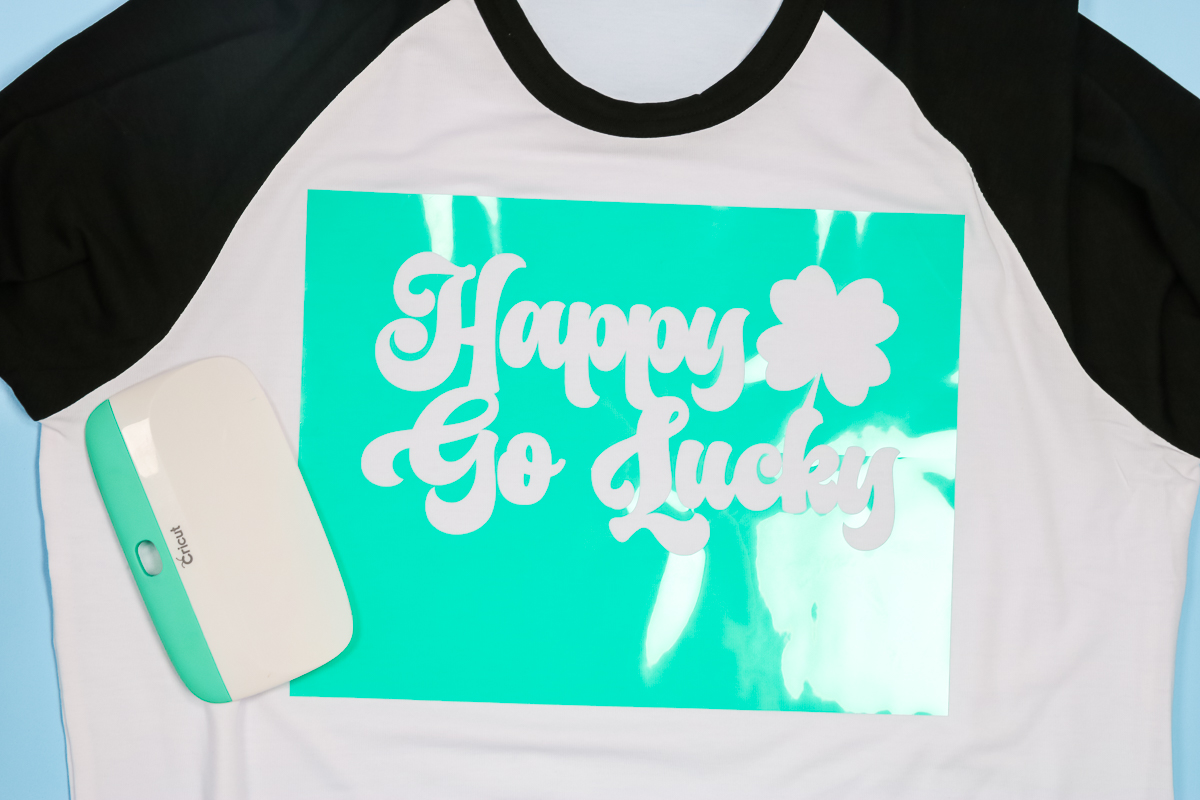
How to Press Stamped Infusible Ink Sheet
I am using an Auto Press as my heat source. You can use any heat source that gets up to 400 degrees.
I placed my hoodie inside the press making sure the hood is outside the press so it doesn’t affect the sublimation. Press at 400 degrees for 60 seconds.
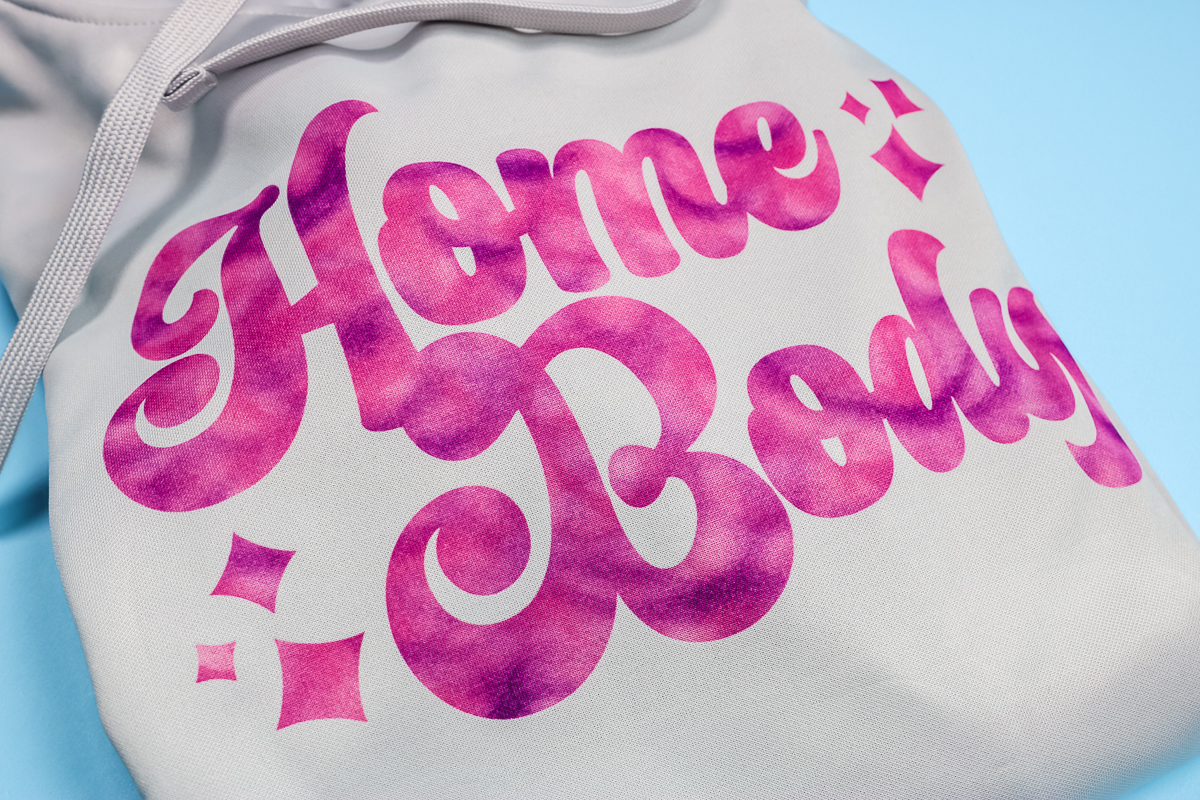
With this method, I like to remove everything while it’s hot. I am really happy with how this design transferred.
How to Remove Press Marks
With this method, you may end up with press marks on your shirt. Polyester is prone to getting press marks which can include some discoloration.
Since we can’t rip the edges of the heat transfer mask to help with those press marks I like to use my EasyPress to go over the press marks and blend them in. All this is doing is making the color of the sweatshirt and the color where the heat transfer mask was located not as jarring where they meet. Taking the time to do this will basically make that line disappear.
How to Use Sublimation Acrylic Paint
If you haven’t seen sublimation acrylic paint before, I’ll show you a few methods for adding to your copy paper. Artesprix has a mixing chart that I am going to use to help me get my colors right. I used both the yellow and blue sublimation paint and mixed them to get the colors Emerald and Sea Glass.
With the Sea Glass, I also used the Artesprix Lightening Medium. There is no such thing as white sublimation ink. Artesprix provides a lightening medium to help get those more pastel colors.
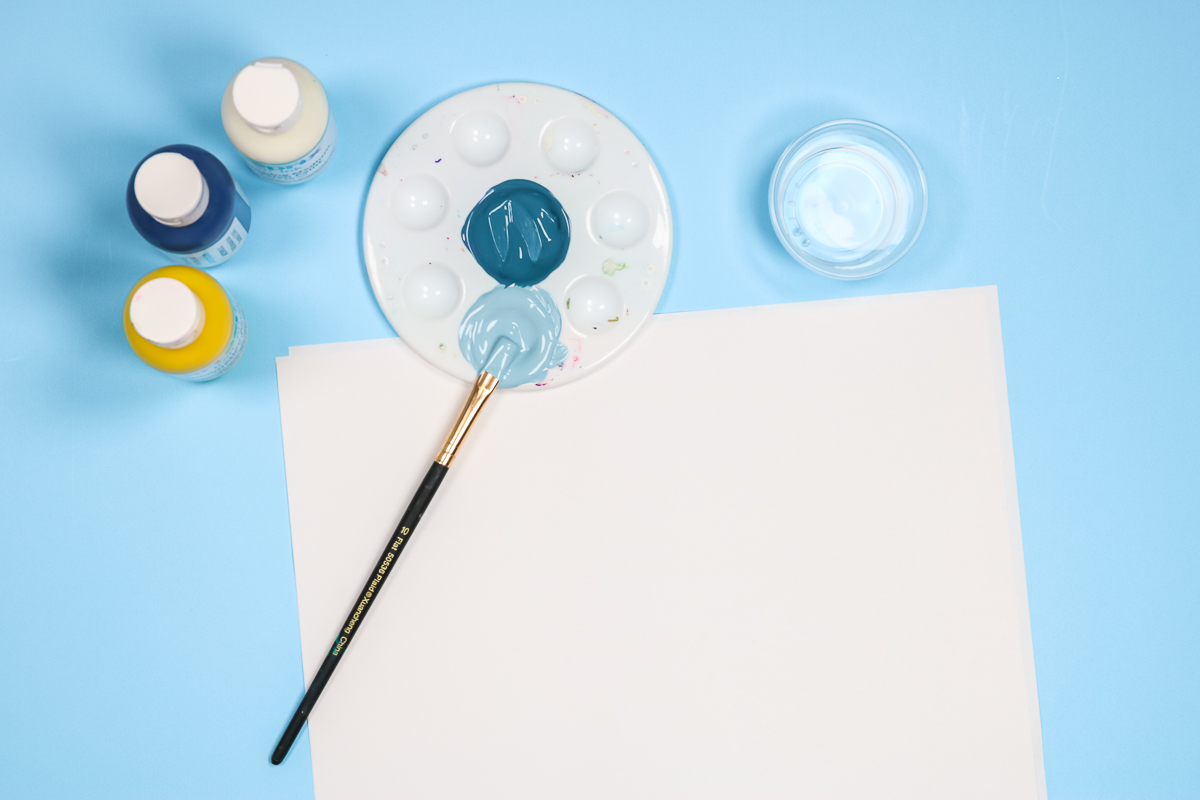
The Artesprix Sublimation Acrylic paint is a water-based paint. You can add water to help you get more of a watercolor effect with your print. You can even leave some areas unpainted for a more distressed look if you wanted.
Using a paintbrush with water added I’m going to randomly paint all over a sheet of copy paper. By going back and forth across the paper with both colors, I will get a watercolor effect in a variety of greens.
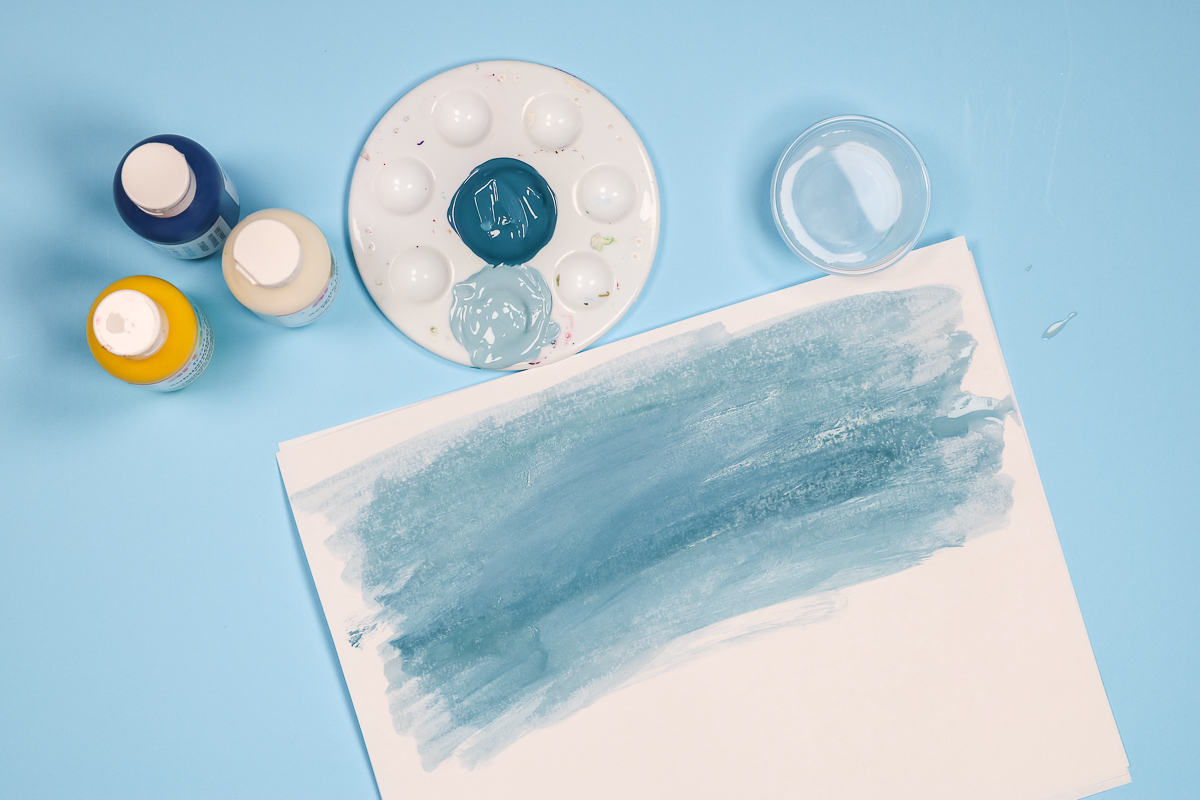
When you’re done painting, set aside the paper and allow it to dry completely. You may want to heat up your heat press and hover the heat press over the paper to dry it. That can help dry the paper and get it so it’s ready for sublimation.
How to Make a Sublimation Stencil
For this idea, I am using the sublimation paint sheet made above and the Artesprix Heat Mask.
This heat mask has a slit down the center and a clear liner on the back. Place the mask liner side down on the mat with the green side up. Press it down really well and we’ll cut it like we would adhesive vinyl.
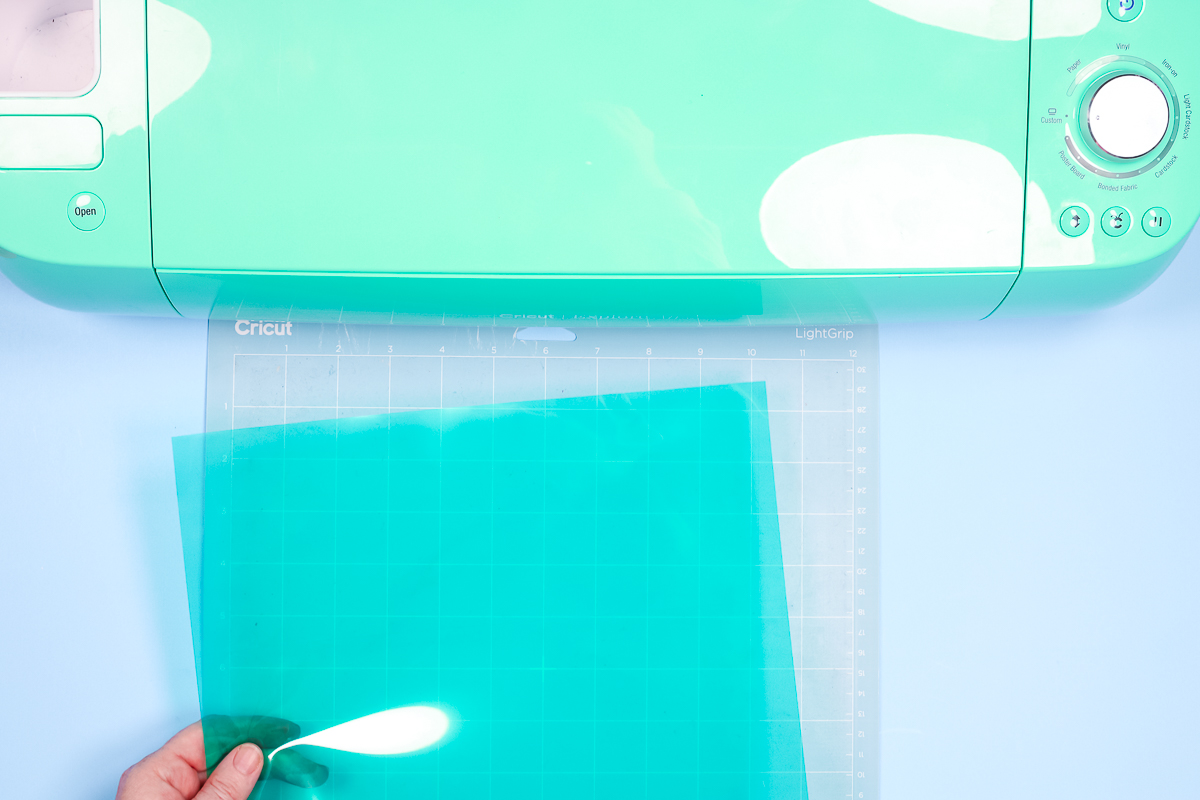
I have my design ready in Design Space. I’m not going to mirror it for this technique. Because I am using this as a stencil I want to make sure I have some excess mask around the design as a buffer. I moved my design closer to the center of the sheet and then clicked Next.
How to Cut a Sublimation Stencil
I am using the Premium Vinyl setting and leaving it on default pressure. Press Go to cut the heat mask. You can cut this with any Cricut machine, it uses the fine-point blade. Load the mat, press Go, and then unload the mat.
How to Weed Artesprix Heat Mask
Because we’re using this as a stencil we want to weed it differently than we did the first technique.
We want to remove the portion of the design we want to have pressed onto our shirt. Because the backing is still on the material you can use a weeding tool but it also weeds well with your fingers.
Make sure you leave things like the centers of letters on the backing. This material weeds so easily that I didn’t even use a weeding tool. The cut was perfect. I really like this material.
How to Apply Transfer Tape to Heat Mask
For this example, I chose a design that has some inside pieces to show you how to transfer it to the shirt using transfer tape. I’m using regular transfer tape because it’s going to be removed before we apply heat.
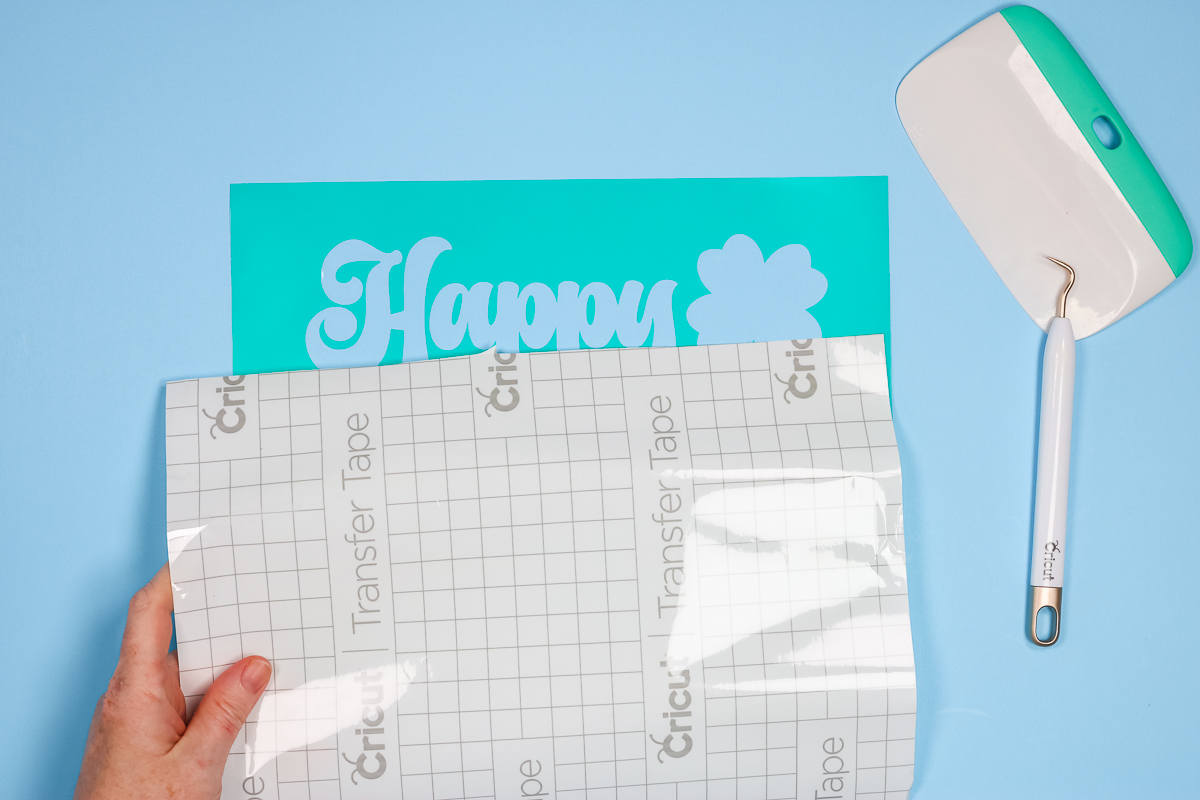
Using transfer tape allows me to place the whole design onto the shirt at once without having to place the inside pieces one at a time. This design isn’t really intricate, with an intricate design placing pieces piece by piece could get tricky.
Apply the transfer tape to the mask and burnish it down really well, just like you would transferring vinyl.
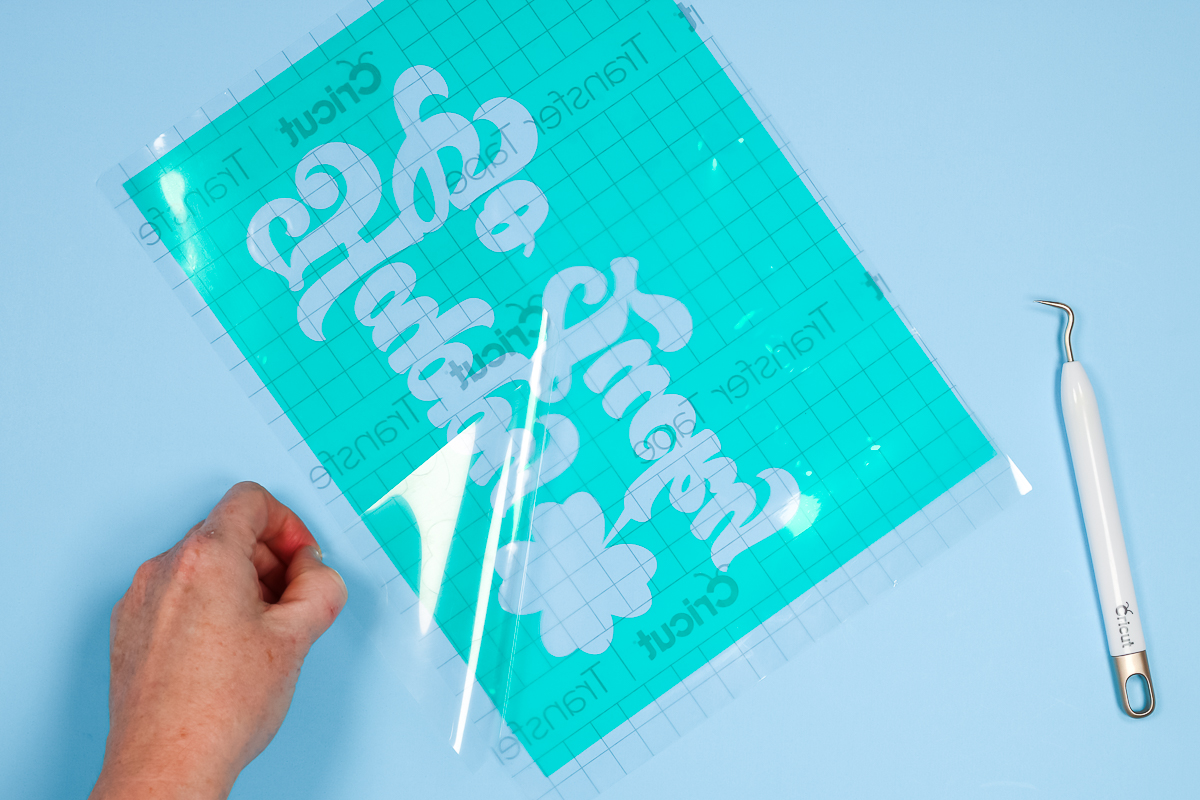
Remember the slit in the middle of the carrier sheet? This makes removing the carrier sheet easier. We can start in the middle and slowly lift it away from the mask and make sure all the pieces are sticking to the transfer tape.
Once all of the mask stencil is on the transfer tape, we’re ready to apply it to our shirt.
Remember – this is going to be an Infusible Ink project. Make sure you prepare your blank before applying the mask. I pre-pressed my shirt to remove any moisture. Pre-pressing also removes any wrinkles so I have a smooth surface to place my stencil on. Lint roll the surface to remove any hair, lint, dust, etc.
How to Apply Sublimation Stencil to Blank
To apply the stencil to the shirt we need to locate where we want it to be. Once you know where you want it, press it down onto the fabric, and then using a scraper tool really press it onto the fabric.
You’ll want to do this a few times to make sure your design is stuck down really well. Because I’m sticking this to fabric it’s not going to stick as well as it would to vinyl, wood, or plastic.
How to Remove the Transfer Tape
Once the design is located we need to remove the transfer tape. Since I’m applying the mask to fabric, I need to be careful that the mask stays stuck down as I peel back the transfer tape.
Start in the corner and peel back the transfer tape. I found that using the scraper to hold the mask into place was helpful especially as I got to the small pieces. The mask is sticking down pretty well but you will need to go slowly and be careful that pieces stay stuck down.
Preparing Sublimation Paint Infusible Ink Sheet for Heat
Now that we have the mask in place we can add our Infusible Ink sheet. The Heat Mask is going to act as a barrier. The sublimation ink will not go through the mask and the mask can withstand the heat.
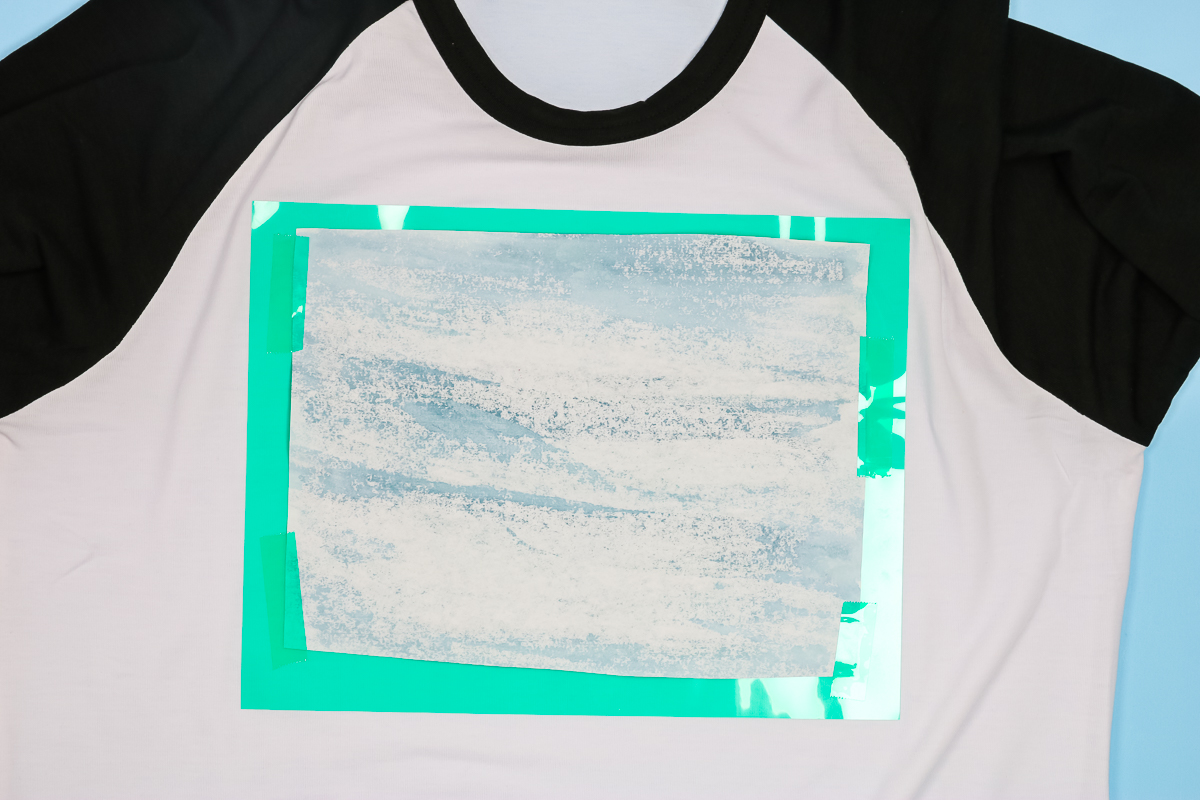
Take the Infusible Ink sheet you made and trim it so it does not extend outside the mask area.
Make sure the Infusible Ink sheet covers the whole design area and place it ink side down over the stencil and then use heat-resistant tape to tape it into place. It’s important that the sheet not move.
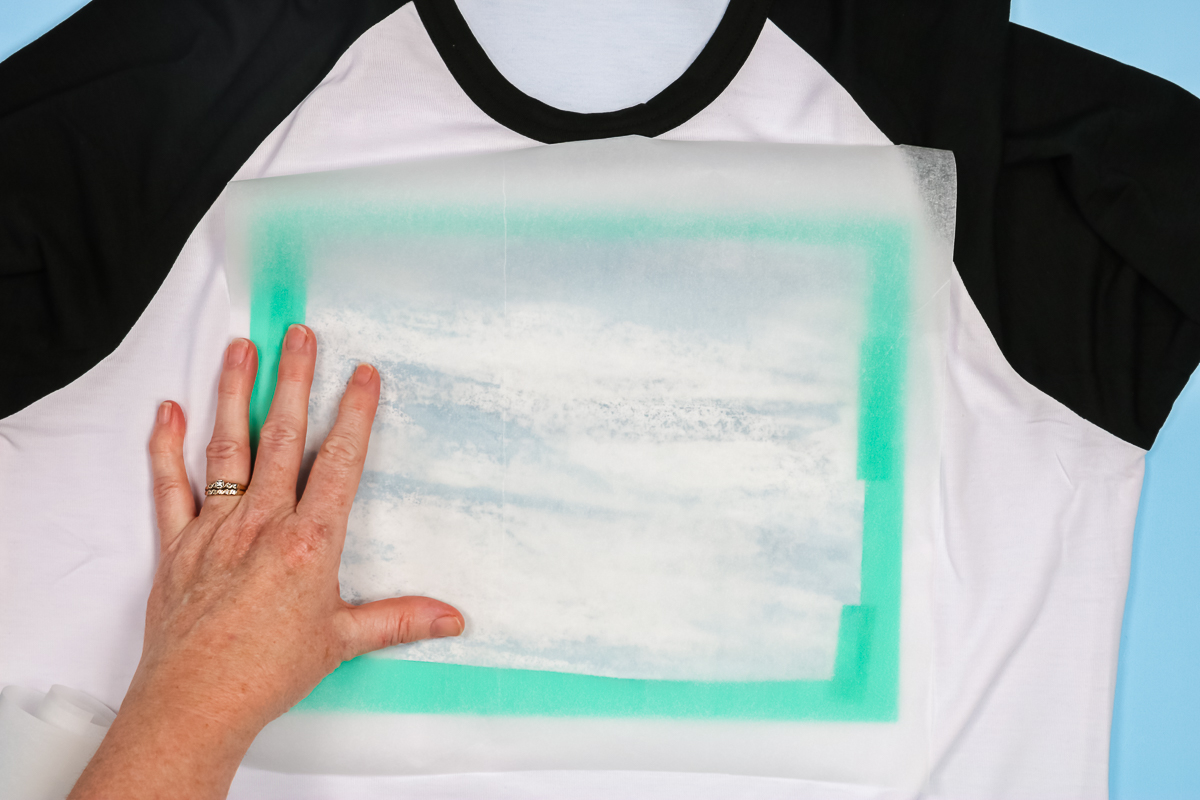
Add protective paper inside the shirt to prevent any ink from transferring to the back. Add another sheet of protective paper over the top to protect your heat source.
Applying Heat to Sublimation Stencil
I pressed this shirt at 400 degrees for 60 seconds. I’m using my Auto Press but this can be done with an EasyPress or any heat press that goes up to 400 degrees.
I added my shirt to the press, making sure none of the seams or anything were inside of the press to hold my press up off of the sublimation. Press for the full time. I peeled back the sublimation print while it was still warm and let the heat mask cool before removing it.
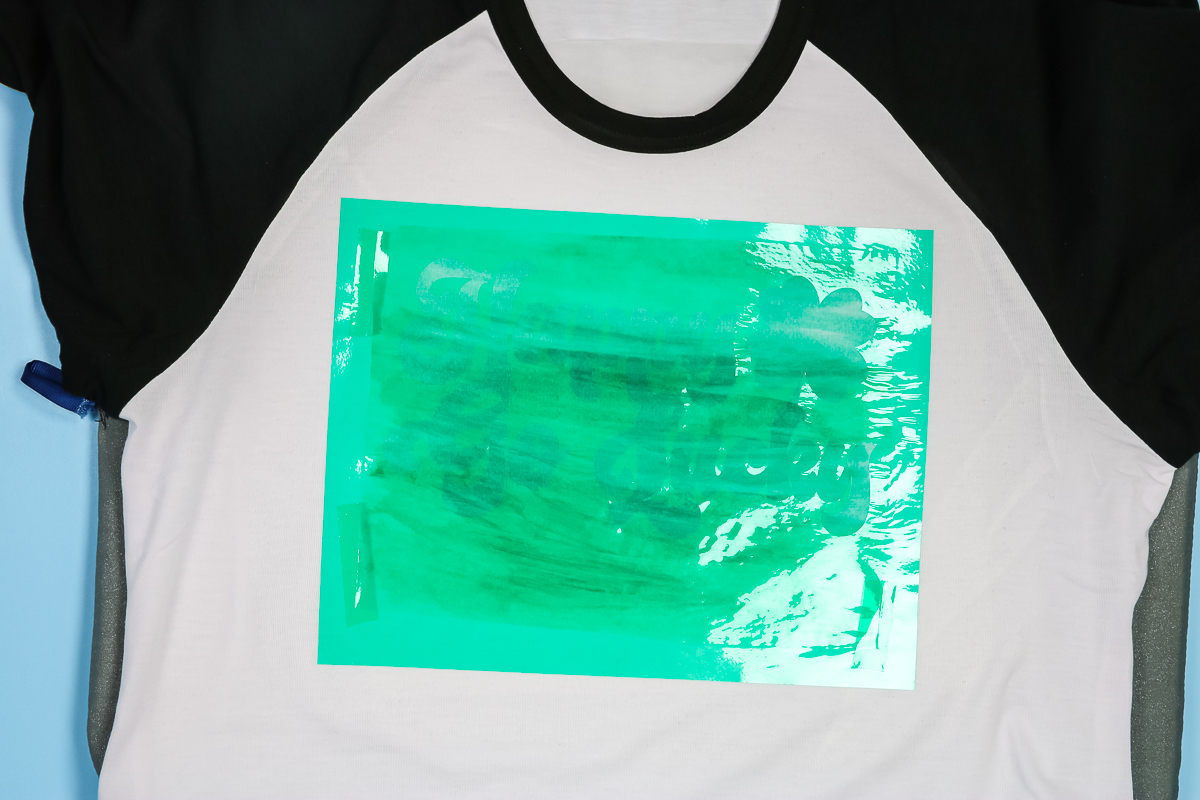
Because the heat mask is sticky you’ll have to peel it off the shirt. Don’t panic when you see nothing under the corner. That’s what we want. When we get to the actual design area you should see your ink there.
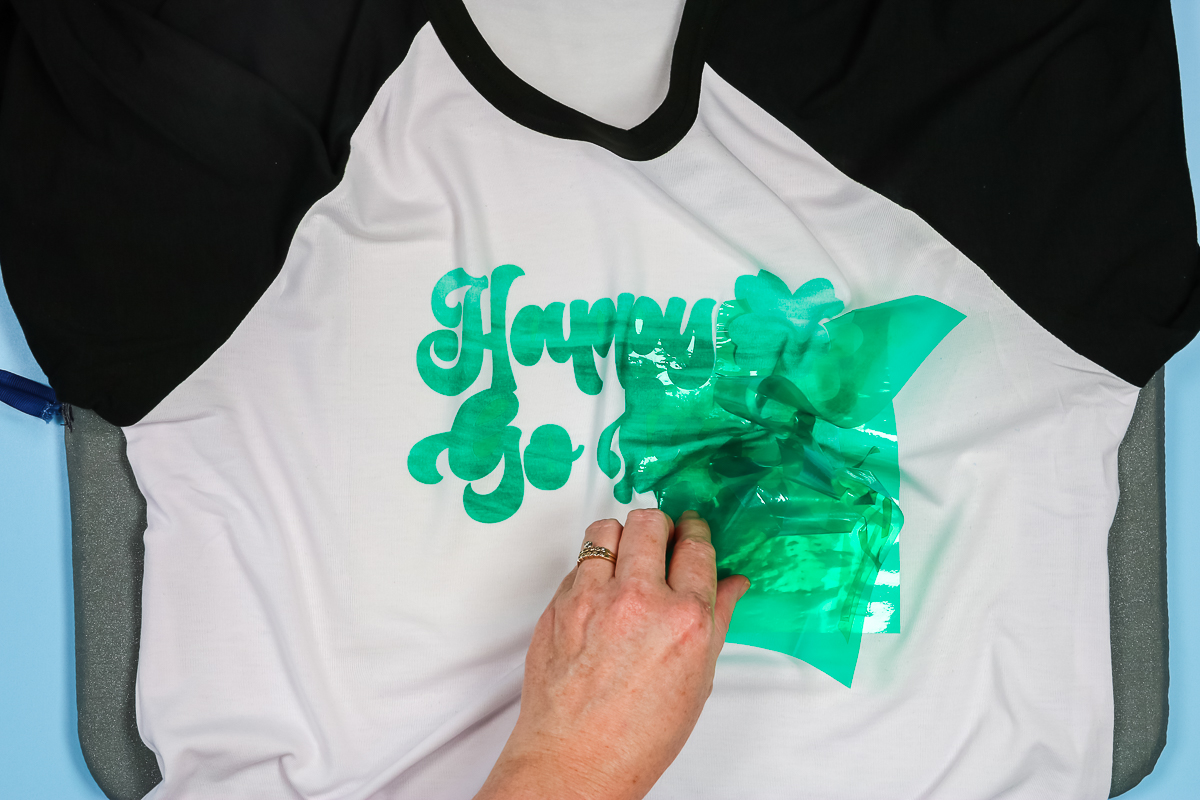
The Artesprix Heat Mask worked great for me, just like a stencil for sublimation. I went with a more vintage/worn look and by painting some areas lighter than others.
The heat mask did a great job, my lines are clean which makes all the details easy to see. I did notice a little outgassing between the two lines making it a little yellow on the white.
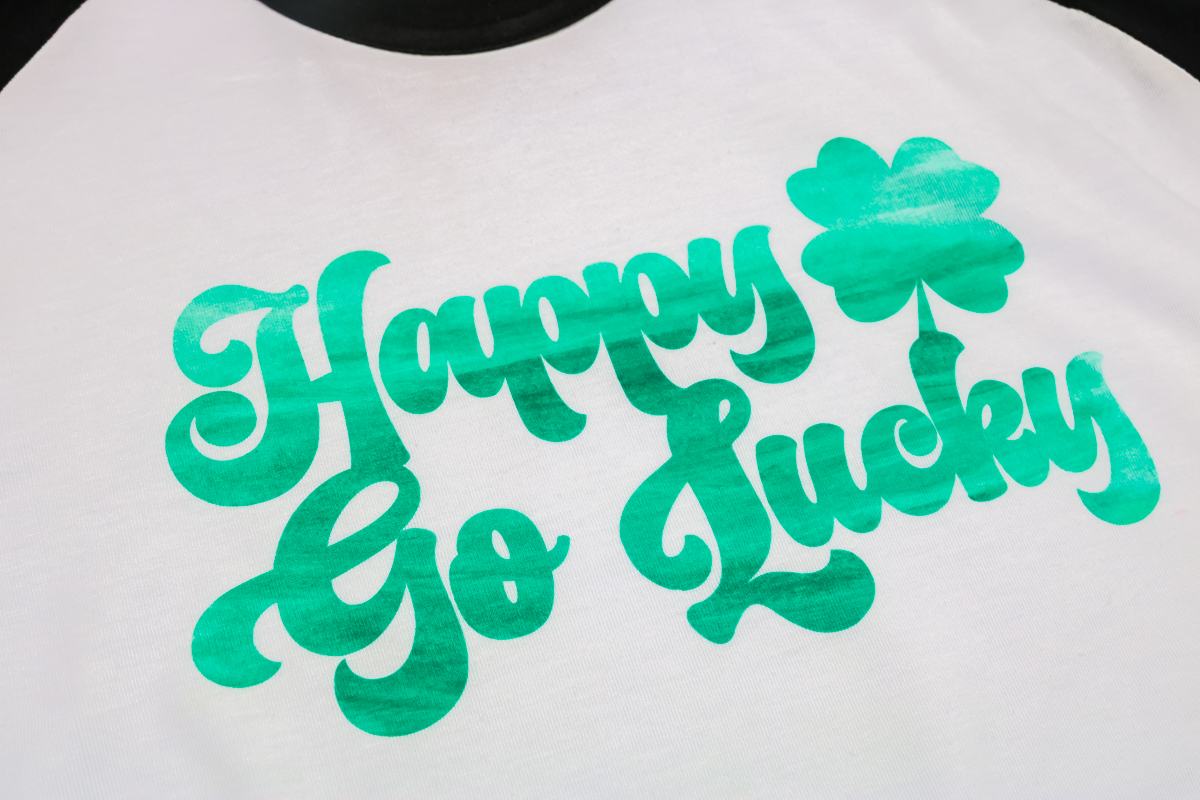
Even with that little outgassing, I am really really pleased with how this shirt turned out. If you notice any press marks from the heat mask, I like to use the EasyPress Mini to go over those marks and blend them out. Just rub the Mini over those lines and you should see them blend in.
Pros and Cons of Making Your Own Infusible Ink Sheet
Now that you’ve seen how to make Infusible Ink sheets two different ways, what are the pros and cons? How do these homemade Infusible Ink sheets compare to regular Infusible Ink?
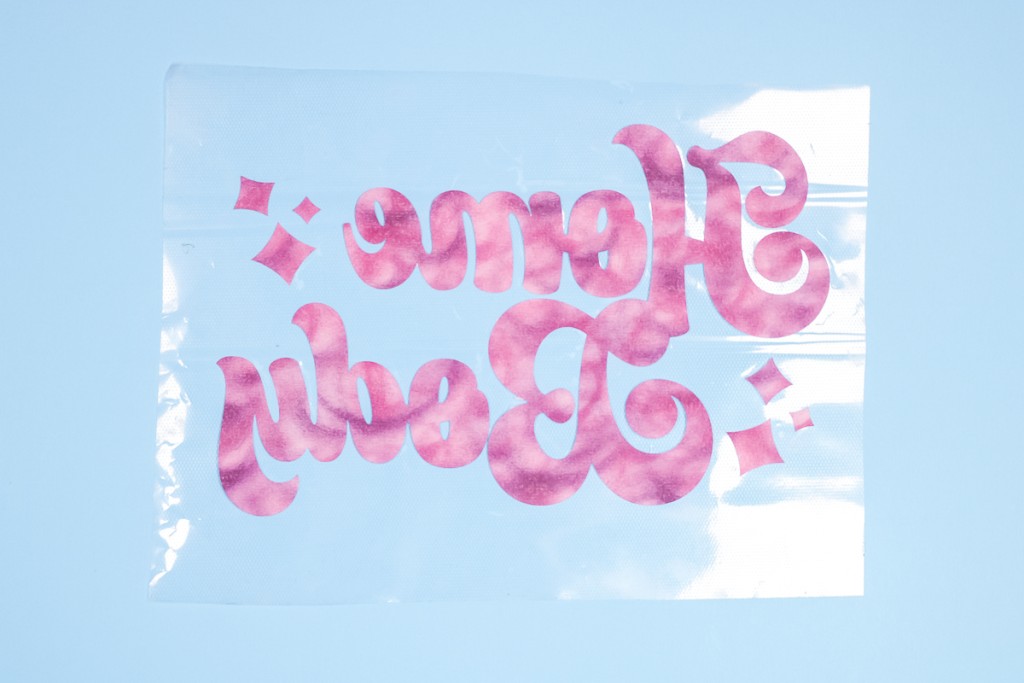
Sublimation Stamp Version
Let’s talk about the heat transfer mask version with the HomeBody design. This version cuts really well which is something I don’t think always happens with Infusible Ink. I also think this version weeds really easily, way better than Infusible Ink.
I do want to remind you that this process will be significantly slower than weeding HTV or vinyl. That being said, it is faster than weeding Infusible Ink.
I chose a watercolor pattern for this process. If you wanted a graphic pattern or something with a design or drawing, you would need to use a sublimation printer instead of the stamps.
There are some limitations to what you can do with making your own Infusible Ink sheet. However, if you don’t have a sublimation printer or you can’t find an Infusible Ink sheet in the color you want, this method just might be for you.
Sublimation Paint Version
What are the benefits of the method I showed with the sublimation stencil? I think the main benefit is that it cuts like a dream, just like vinyl. It also weeds way easier than even vinyl I felt like.
The weeding process was so easy. If you want something that’s easy to cut and easy to weed, a sublimation stencil might be for you.
The drawback of this method would be trying to transfer an intricate design to a shirt. As you saw, I was able to transfer my design with transfer tape but it was a pretty slow process. A more intricate design would be even slower.
You might get frustrated at how slow you have to go. I know personally, sometimes I just want to get to the end result a little bit faster. If you are like me, that might be a concern for you.
I find both of those methods and using regular Infusible Ink a bit slow when it comes to crafting. That being said, both of these are great alternatives and probably less expensive than infusible ink.
Final Thoughts on How to Make Infusible Ink Sheets
The main reason I like Infusible Ink is that it’s a great option for people that don’t have a sublimation printer. Using sublimation paint and sublimation stamp pads is a great way to customize the design or make the perfect color for your project.
While I used the traditional heat transfer mask with the stamp pads and the sublimation stencil method with the sublimation paint, you could use either method with both materials. If you just want to play around with sublimation paint or you don’t have a sublimation printer, this is a perfect way to do so if you have a Cricut machine.
I absolutely adore crafts that combine sublimation and Cricut crafting. So these are definitely projects for me.

How to Tackle Press Marks
I do want to talk about press marks for a moment. The fact is, some shirts just get press marks.
I’ve found that Cricut shirts don’t really get press marks but they don’t have a lot of different colors or options. In my experience, any polyester surface that is a color ends up with press marks.
With the hoodie, I actually had to steam the area with a pressing cloth. In the end, I think it took longer to make the press lines look close to acceptable than it did to actually make the hoodie.
I was determined to use that hoodie, I really wanted that grey color and although it’s polyester it’s really soft. I was determined to have it for spring. You could do this same design with this same method on a different shirt, like a Cricut shirt and probably not even notice the press marks.
My tip for removing any press marks is the EasyPress Mini. Going over the marks and blending them in works really well. If that isn’t working, steam can help remove them. Sometimes, however, they just won’t come all the way out.
I recommend choosing your sublimation blanks wisely. Definitely test one before planning to do a bulk order or something.
If you have any questions about how to make Infusible Ink sheets, leave them in the comments and we’ll get them answered for you.