
This post and photos may contain Amazon or other affiliate links. If you purchase something through any link, I may receive a small commission at no extra charge to you. Any supplies used may be given to me free of charge, however, all projects and opinions are my own.

If you’ve ever wanted to make white sublimation projects, this is the post for you! Keep reading to learn how to use HTV with sublimation on your projects to get images that pop! While there is no such thing as white sublimation ink, you can get a similar look with this simple hack and your Cricut machine.
New to sublimation? Check out my Sublimation Beginner’s Guide here.
White Sublimation Hack
Since you cannot sublimate white onto anything (it will just end up the same color as your base), I am going to show you how to create a sublimated shirt that looks like it has white sublimation on it. You can watch me make 3 different shirts and learn all my tips by pressing play on the video below:
The Best Way to Make Custom Shirts
I love making shirts with sublimation. Sublimation on a polyester shirt is the most permanent bond you can get. A 100% polyester shirt with sublimation on it will last the longest of any method you may try for making custom shirts.
You’ve probably heard of people adding sublimation on top of HTV. This can be a great way to add sublimation to dark-colored blanks. I’ve tested multiple materials to see which ones work best, you can learn more about them here.
When you add HTV to a shirt and sublimate on top of the HTV, you lose some of the permanency of the sublimation. That means your shirt will only last as long as the life of the HTV. Sublimation will last the life of the shirt itself. So, this white sublimation hack gives you that permanency with adding a splash of white as an accent with HTV.
Why Can’t I Sublimate White?
Because sublimation is translucent you can see through it. Any white areas on an image are going to essentially be blank space that shows the color of the base material. When you use something like a grey shirt (like I am in my examples) the grey will also alter the colors slightly from the sublimation design.
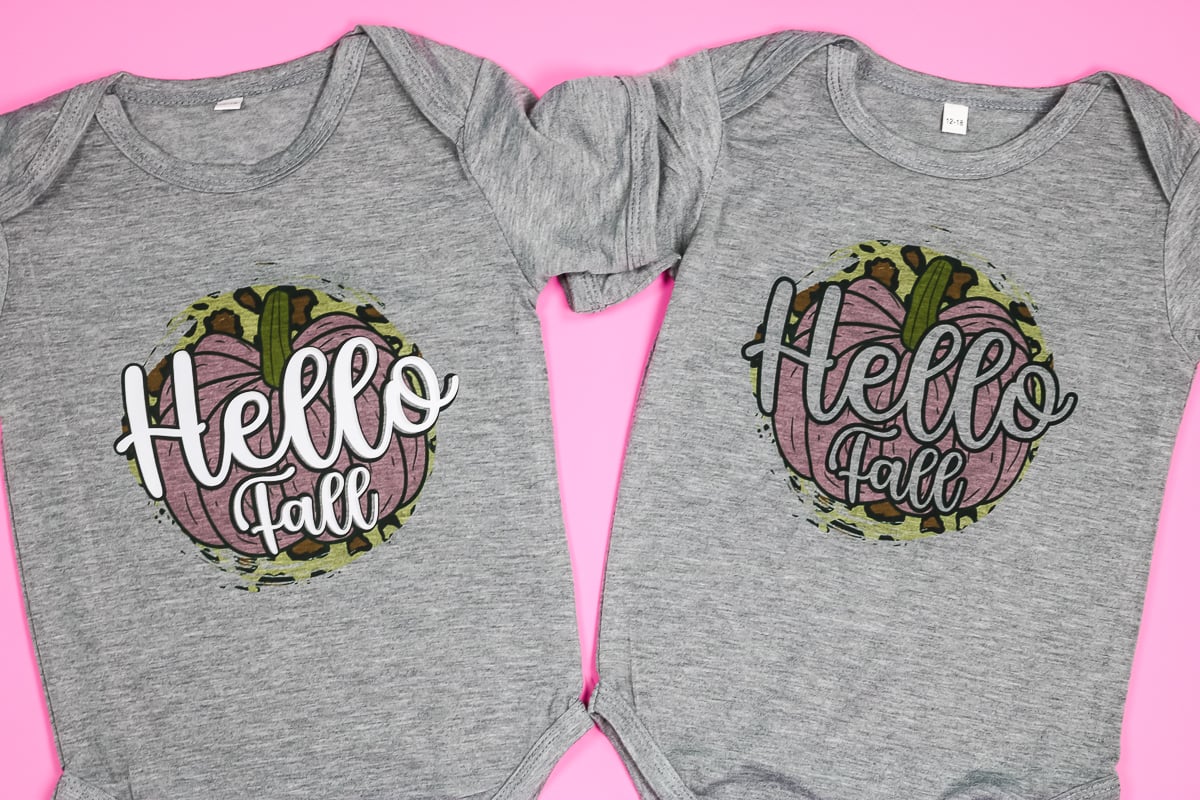
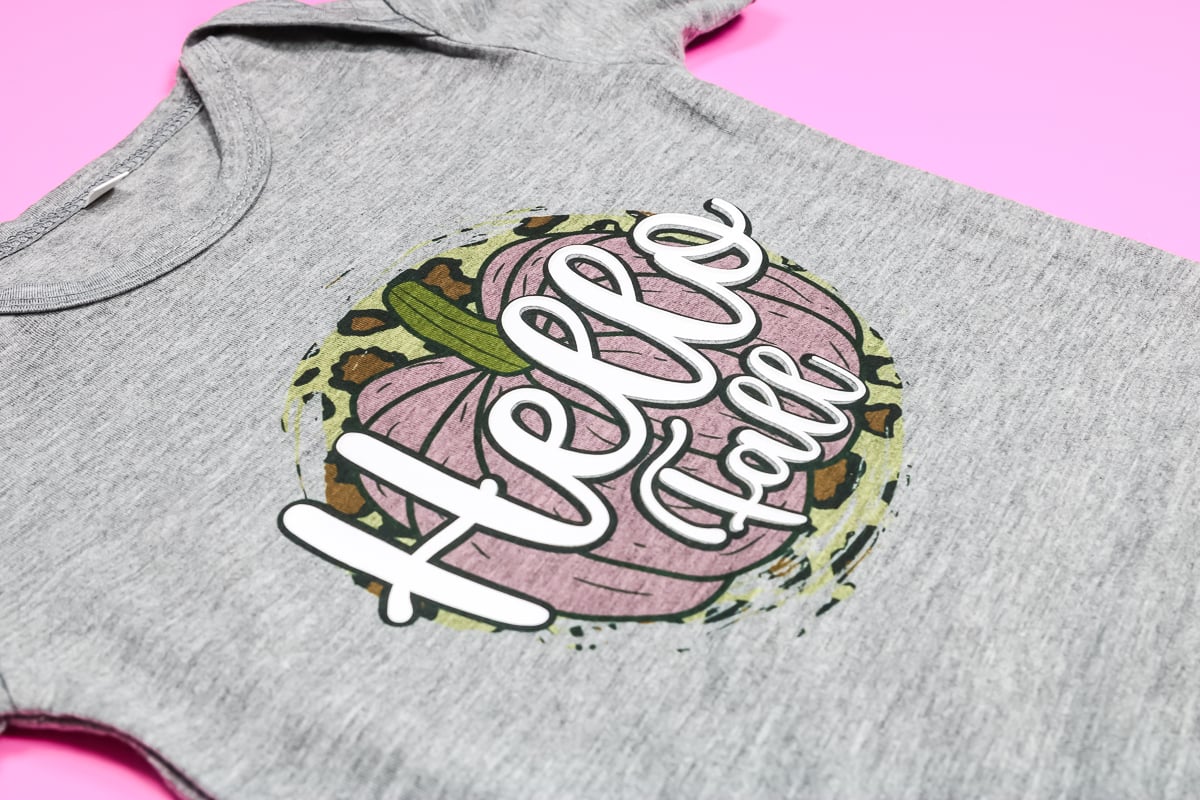
As you can see in the photo above, the right onesie has no white in the finished product. Even though my printed sublimation image shows white in the hello fall space. To get the look on the left, we’re going to combine white HTV with our sublimation image and get that great look that pops right off the onesie!
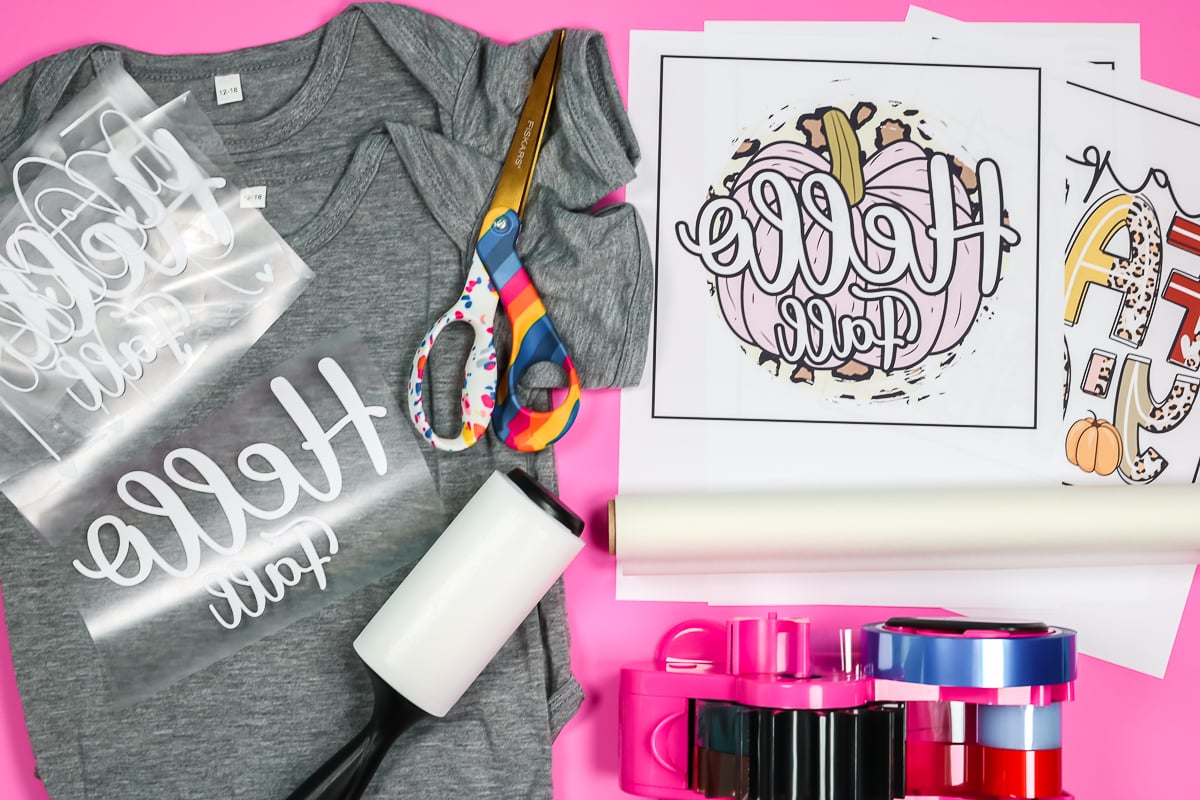
Supplies needed:
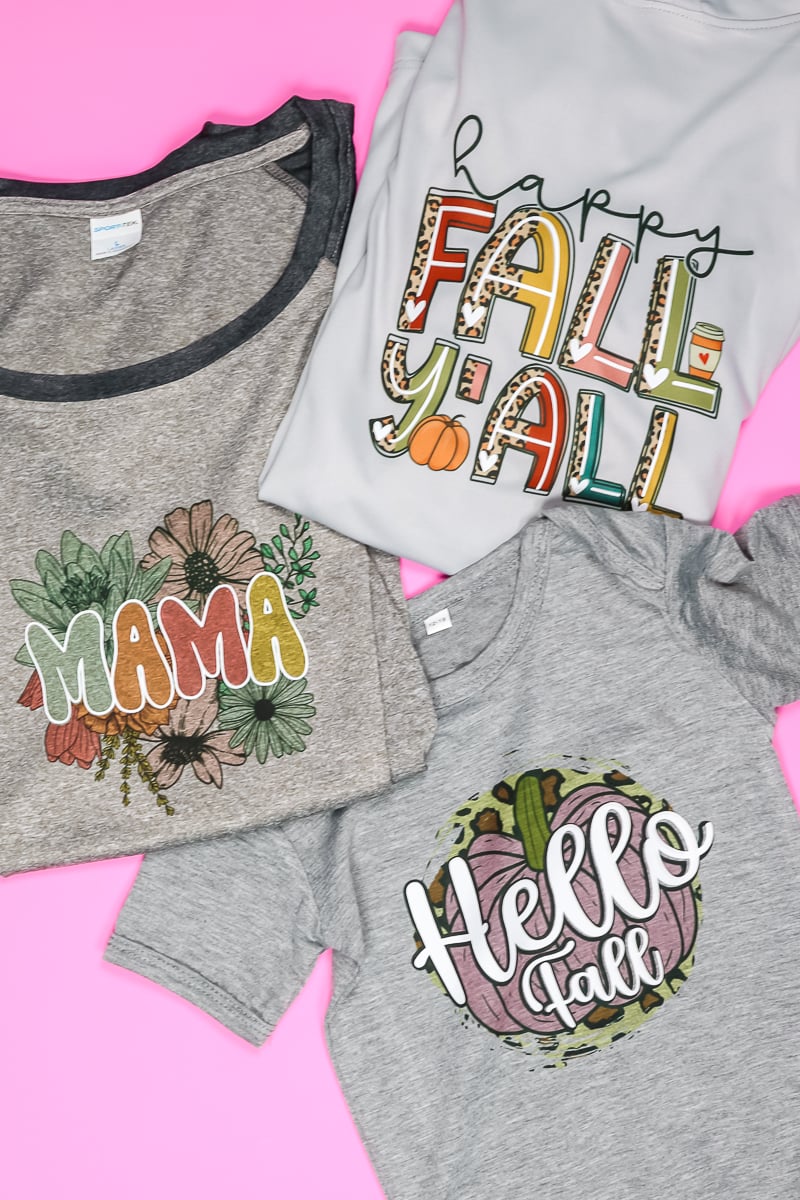
Blanks used:
Designs used:
3 Ways to Make Designs in Cricut Design Space
To create sublimation shirts that look like they have white on them, we’re going to combine HTV with sublimation. We aren’t layering sublimation on top of HTV as I’ve done before. This time we’re adding HTV to a sublimation print. To do this we need to create a design that has both a print layer and a cut layer. You may run into a few different scenarios depending on your image and I have three of those below.
Using the Selection Eraser to Isolate Layers
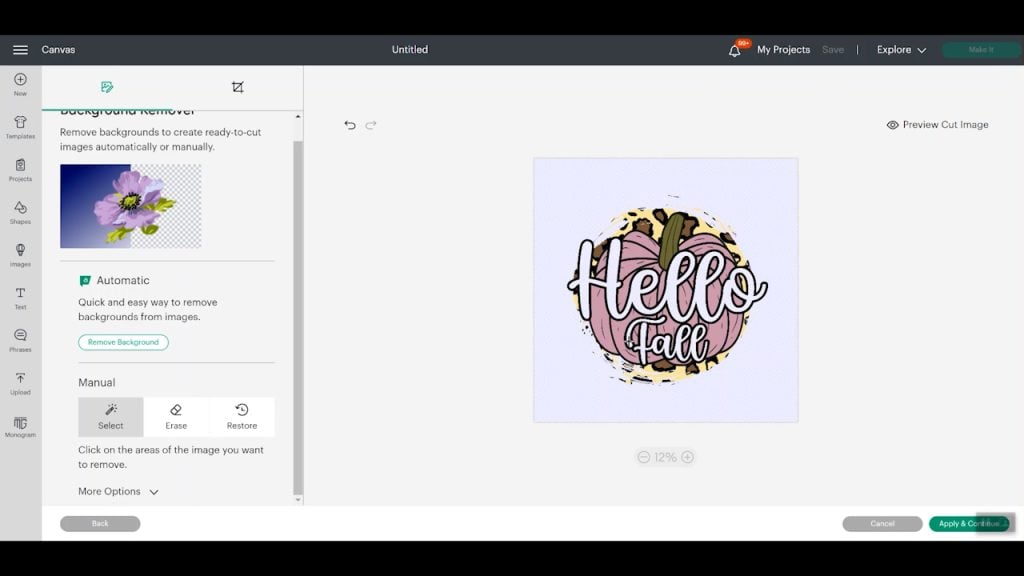
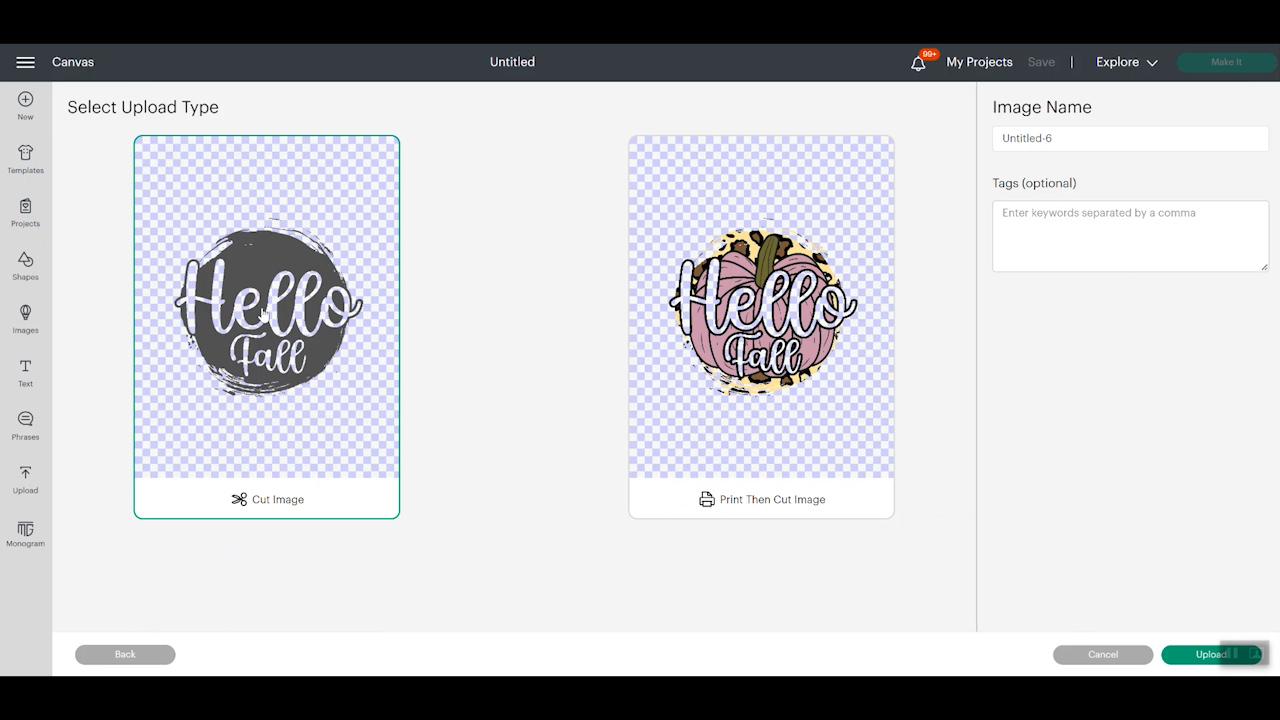
To create the image, we’re going to open Design Space and upload the image. From the Design Space canvas, on the left-hand side select upload. Find your image and click upload. For sublimation prints, I like to choose complex for the upload. Click continue and make sure the background is checked. The checked background means that only the image itself will upload. Select apply and continue. Next, you’ll pick Print Then Cut image and upload.
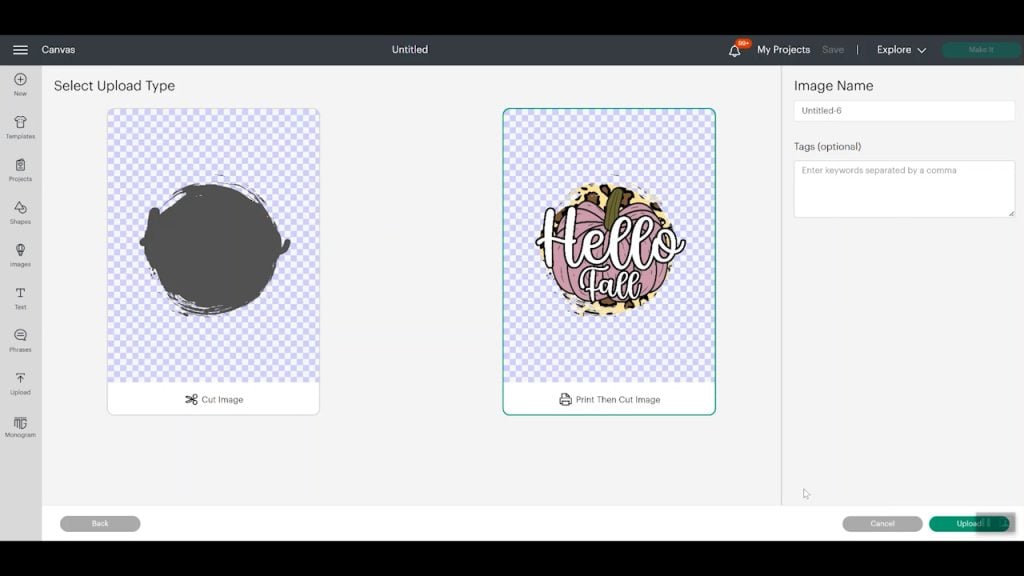
Now that layer is complete so we need the upload the cut layer. The first steps are similar. Click upload, find your image on the computer, and load it. For the cut file, we need to make sure that not only the background is erased (checkerboard) but that anything I want to be white in the final project is checkerboard. Because I want Hello Fall to be cut out of HTV I need to make sure that area also has a checkerboard background.
Select apply, continue, and choose the cut image to upload. Now we’re ready to create our project.
Using Contour to Remove Cuts
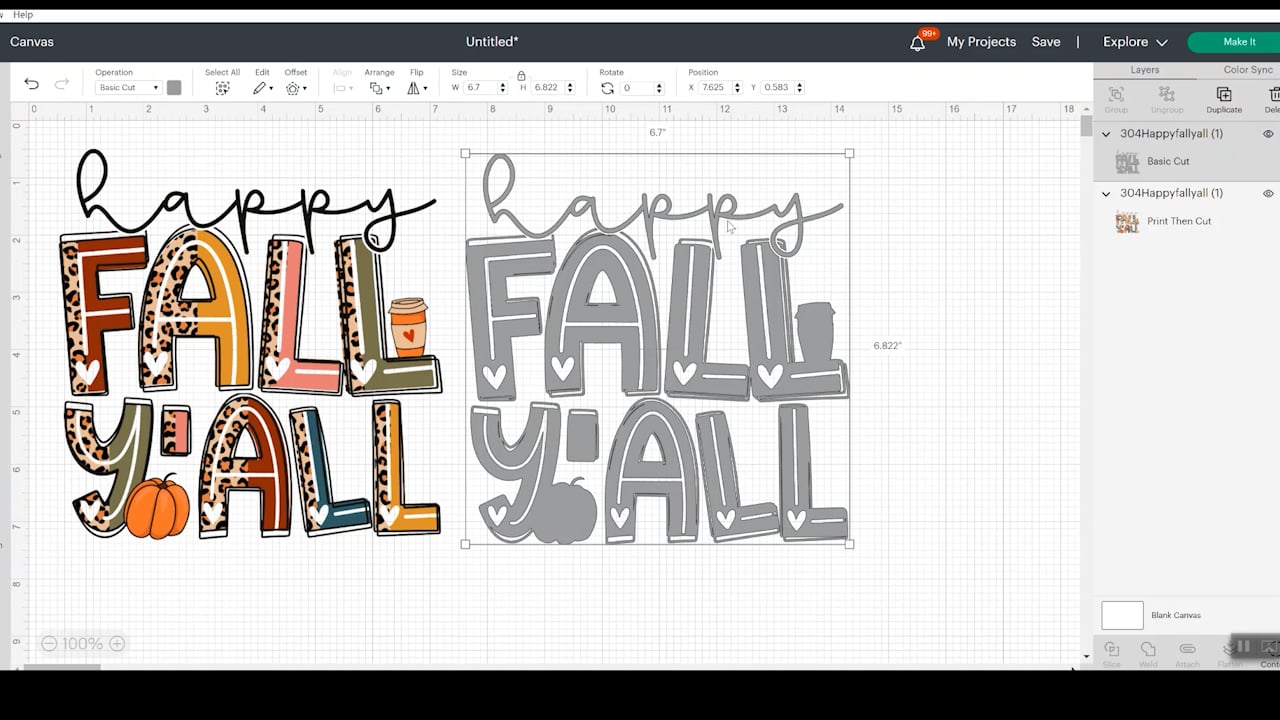
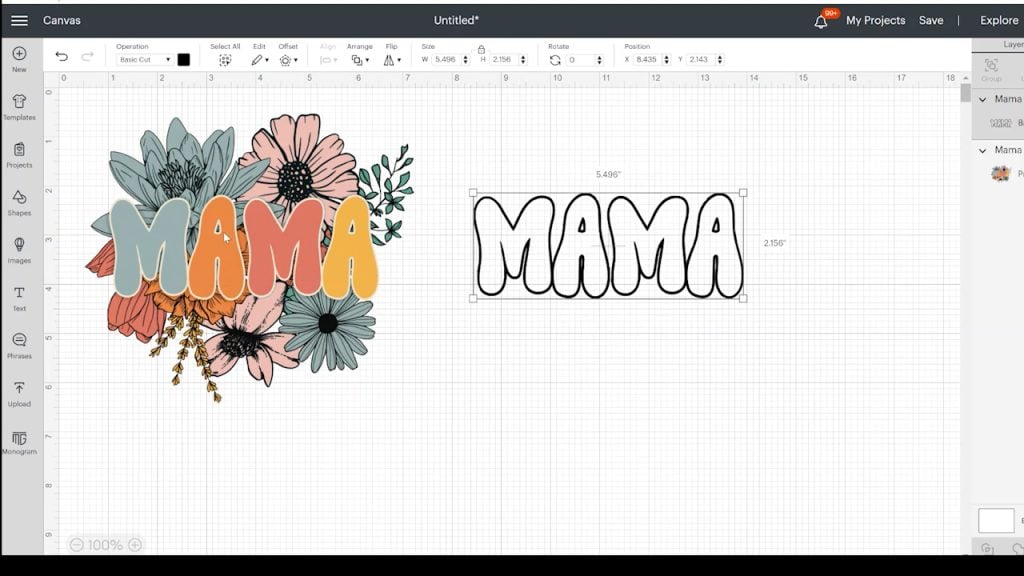
Add both uploaded images to the Design Space canvas and resize them to the same size. I sized both of mine 6.7″ wide. The Print Then Cut image is ready to go. For our cut image, we need to contour it so we have only the words left.
Click on the image and in the bottom right-hand corner select contour. For this file, I’m going to click hide all contours and then select all the letters and the centers of the letters. This will remove all the word outlines and the background of my design.
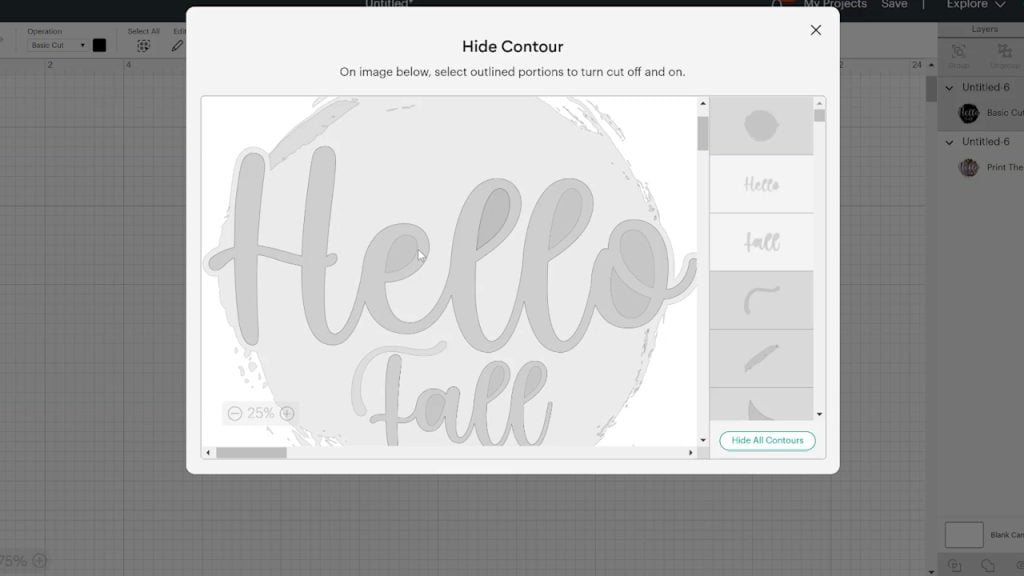
Now that I have my words looking like I want I can double-check to make sure the size is right. Will it fit inside the area on the Print Then Cut? Because I resized both layers before contouring they are the right size. Now I have a cut layer that is my words, a Print Then Cut layer that is the design I want to sublimate, and they are the same size, so I can go ahead and click Make It.
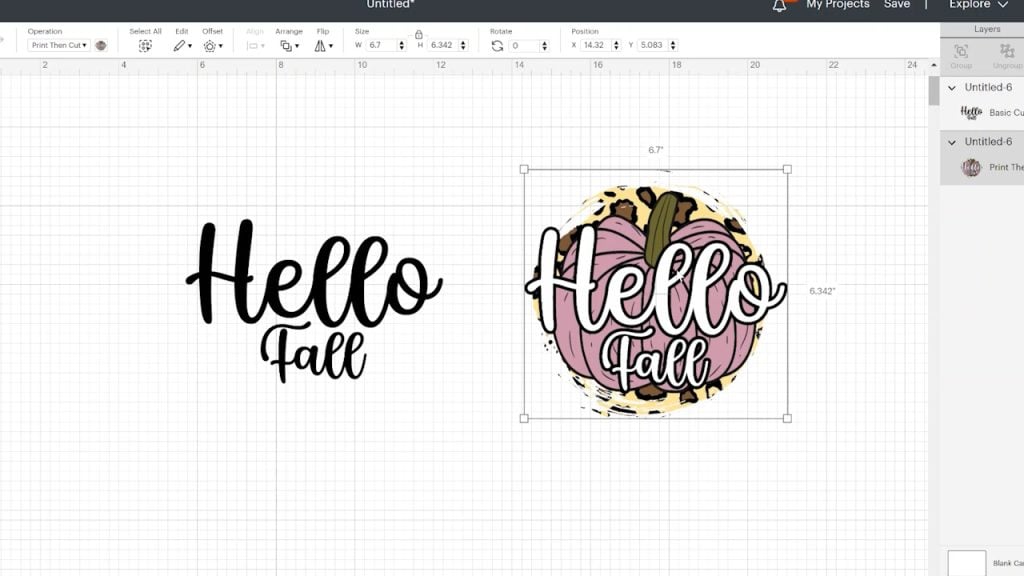
You’ll see the Print Then Cut layer with the box around it. We’re not going to use the Cricut to cut this layer, we’re going to use it to print the image in the correct size. For the cut layer, I want to cut HTV. Make sure to mirror that image and click continue and proceed to cut like you would for a normal HTV project. Select your material, make sure your iron-on is shiny side down on the mat, and cut out your design.
Design with Background Already Removed
For my next two images, I am using different processes to create the white sublimation look. For the Happy Fall Y’all shirt, the upload process is different than the first. With this image, all the sections I want white already have the checkboard background. So I just need to upload one Print Then Cut image. We’ll create the cut layer on the Design Space canvas.
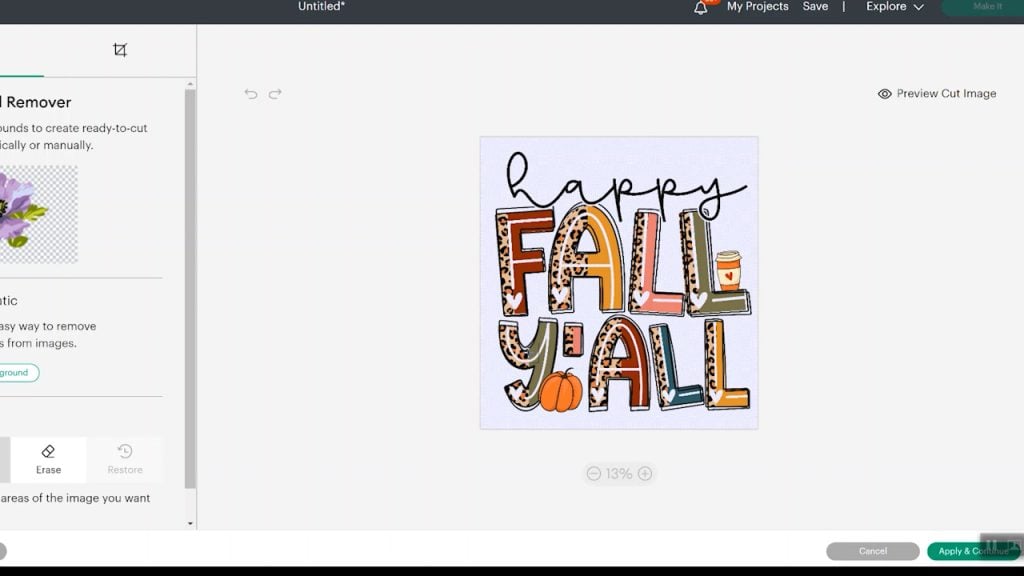
Now that I have the image on the canvas I am going to set it to 6.7″ wide. This is my Print Then Cut layer. Next, I will duplicate the layer so I have two copies on the canvas. Select one copy and in the top toolbar under the operation menu change it to a basic cut layer. From here I can take the cut layer and contour it just like we did earlier.
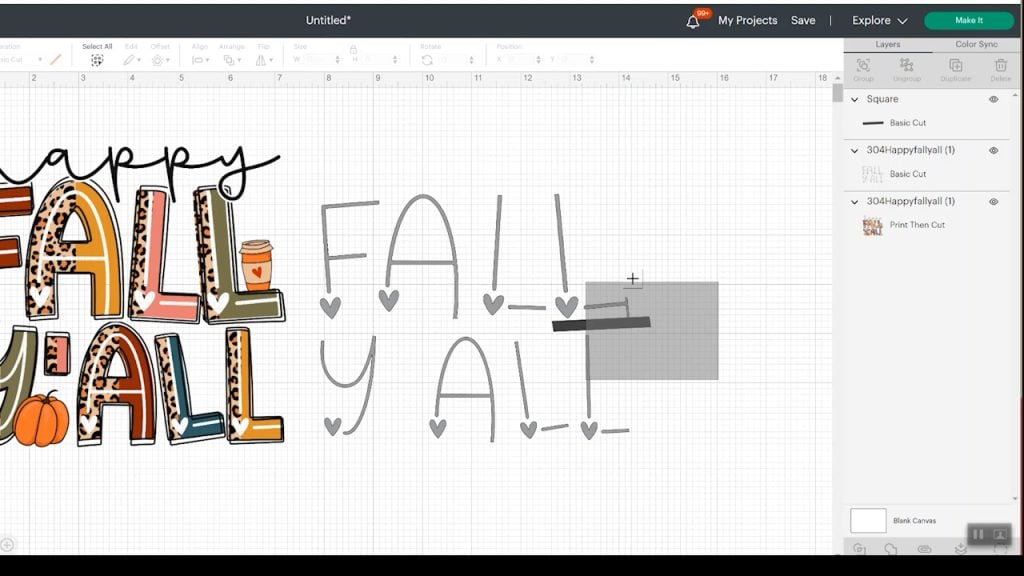
With this file, I did have one weird section that didn’t contour. This was an easy fix by using shapes and slicing the section away from what I wanted to remain. Once the slice sections are done we can delete each piece we don’t want. You can learn more about the slice tool here.
The next steps are the same as our first project. We’ll use Design Space to print to our sublimation printer and then cut out our HTV.
Reminder – with sublimation printing you need to mirror your image. You need to decide if you’re going to mirror the image in Design Space or on your sublimation printer but only mirror it in one place.
Manually Erasing the Background
For my last shirt, I needed to take a couple of extra steps while uploading. Because the white outline around MAMA runs into the clear background if I try to erase the MAMA outline it makes it go away on the first M and second A so I can’t cut it out.
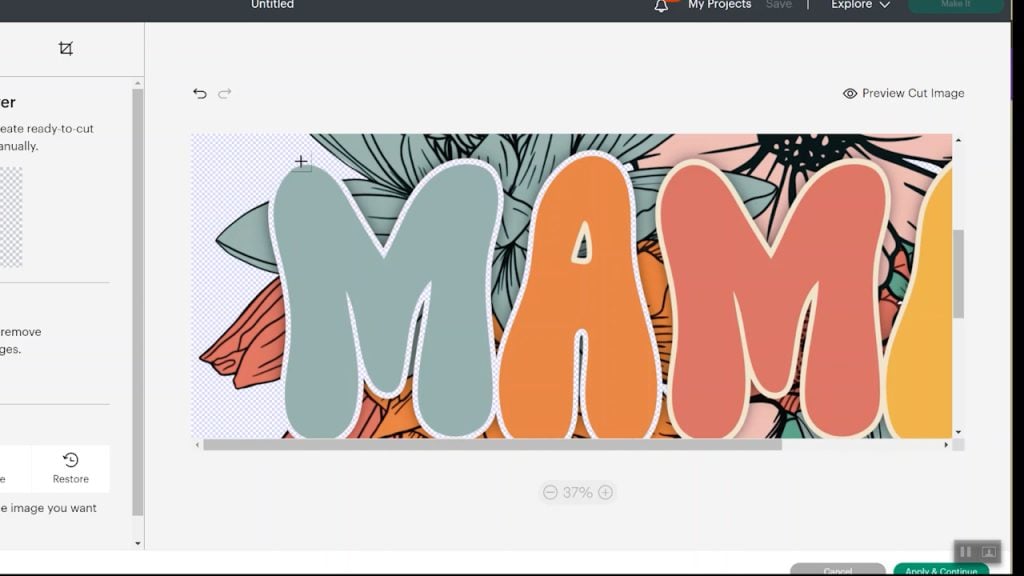
To counteract that, I am going to upload my Print Then Cut image the same way I did the images above. For the MAMA portion of this project, I am going to upload my image as I’ve done before and then, crop the image as close to MAMA as I can.

Then, I am going to use the magic eraser tool to remove the inside of each letter. Once that is done we’ll select the eraser tool and use it to erase everything on the outside of the MAMA letters.
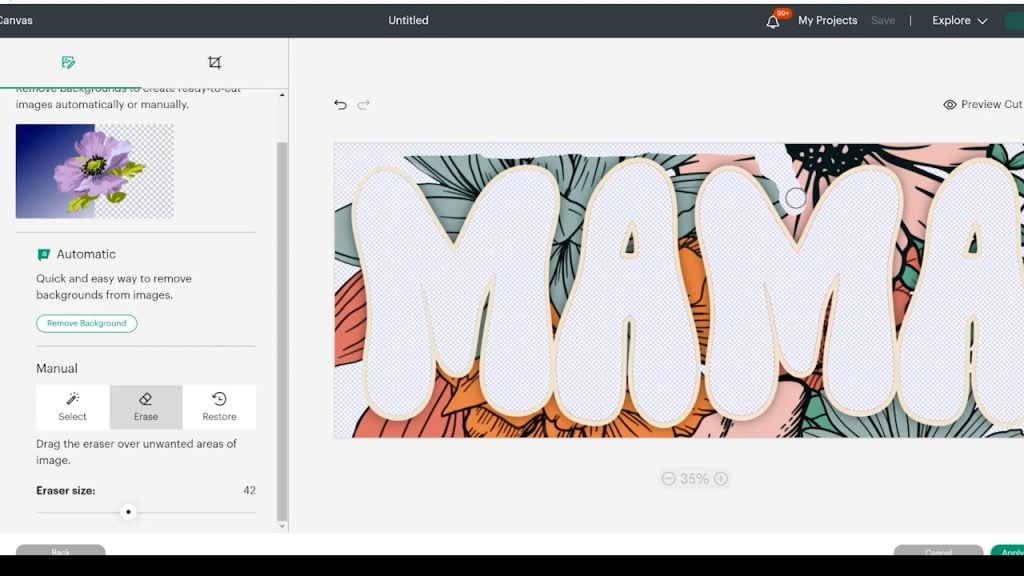
Our goal is to have nothing but the outline of the letters left. You can preview the image as you go so you can see if things are cleaned up the way you want. Once that’s done we can select that as cut and we’re ready to move forward just like we did on the first project.
Making a Shirt with This White Sublimation Hack
Use the design you have uploaded to Cricut Design Space to print your sublimation print and cut your HTV. You will want to weed the HTV layers and then you will be ready to make your sublimation shirts. I am using my Cricut AutoPress to make these shirts. Because sublimation calls for a higher temperature, we will do that layer first. This will also allow us to know exactly where our HTV is going to go.
If you need help cutting or weeding the HTV, try our basics guide here!
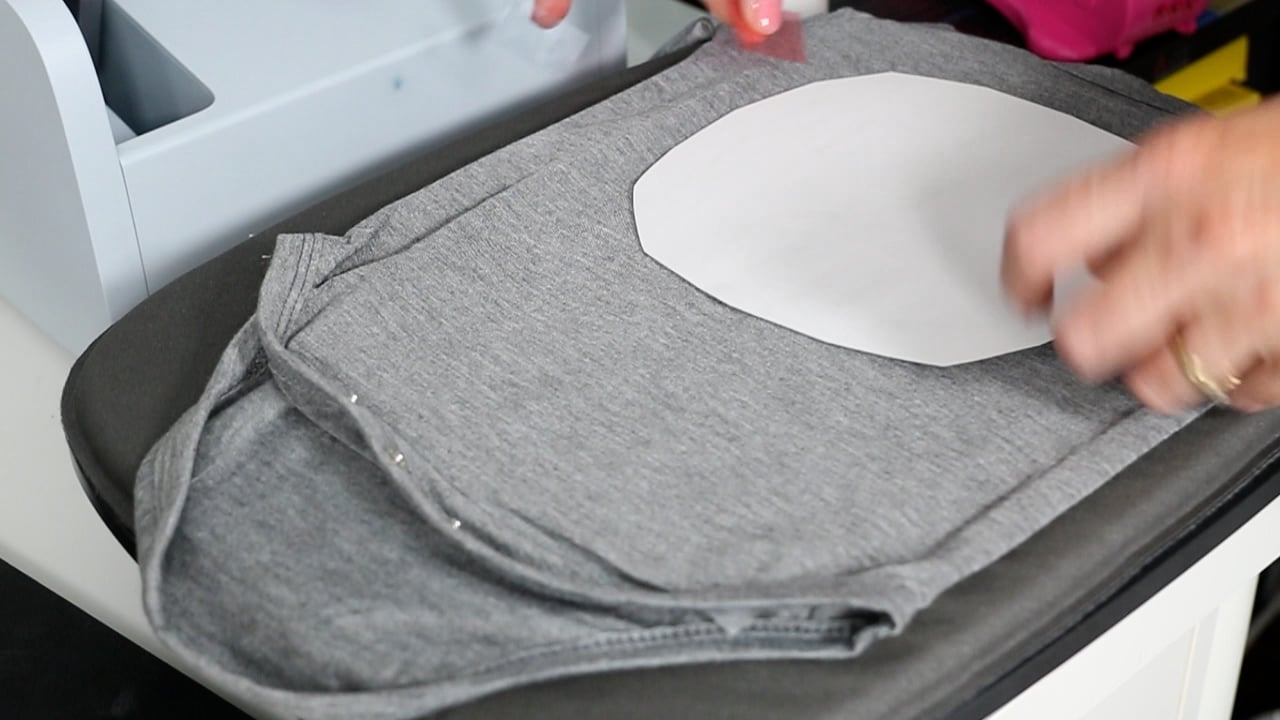
Prepping the Shirt
To prep the shirt, put a protective sheet inside to protect the back from any sublimation. Next, lint roll your surface really well, and then preheat for the specified time. This removes any moisture from your shirt.
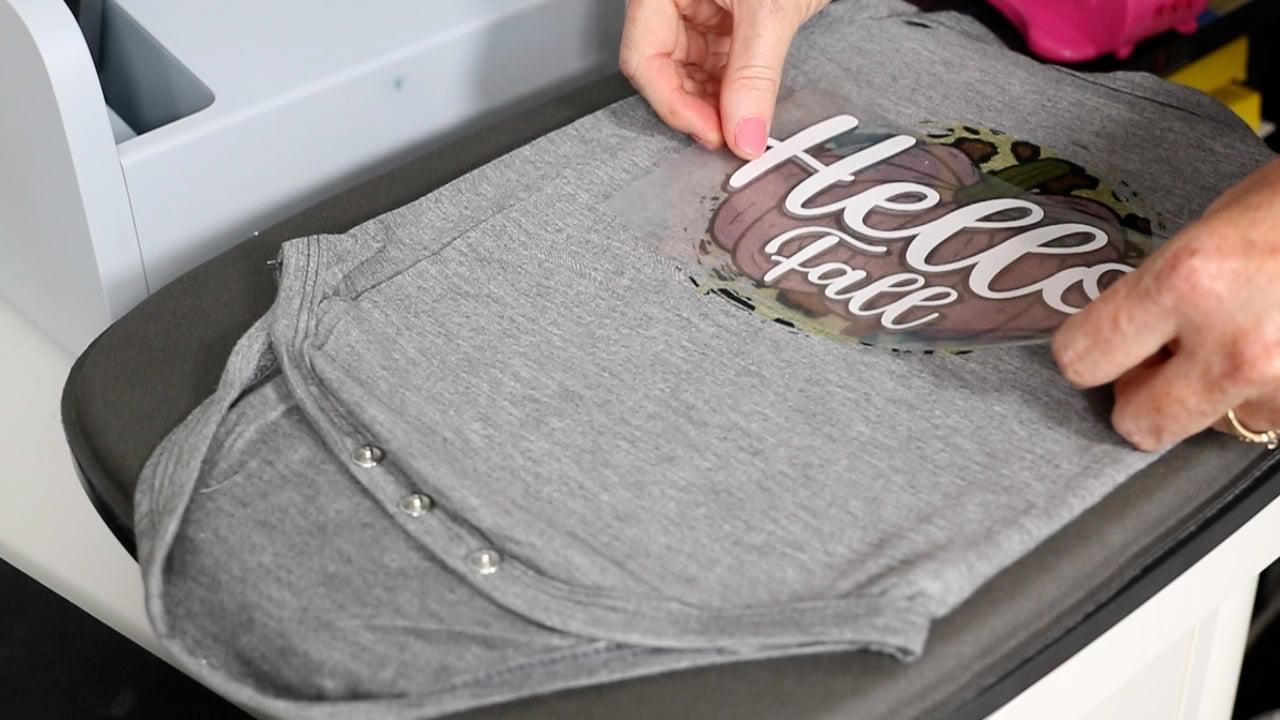
Use scissors cut around the image to remove the black box – if you don’t, the black box will transfer to your shirt and you don’t want that. Add the sublimation print. Remember that the print has been mirrored before printing. Use heat-resistant tape to keep your image exactly where you want it.
Add a piece of protective paper over the top of the print to protect your whole heat surface from any sublimation ink bleed. Now that everything is prepped, press the shirt for the full time recommended for the sublimation print. Once the time is up, remove the sublimation print to reveal the sublimation design on your shirt.
Applying HTV to Sublimation
With the sublimation layer complete, it’s time to add the white HTV. Change the heat and time setting on your press to be the correct setting for your HTV layer. Because we know exactly where the HTV image goes, locating it correctly is pretty simple. If needed, add a couple of pieces of heat tape to your carrier sheet and again cover the whole design with a protective sheet.
Even at lower temps, you run the risk of your sublimation transferring to your heat press or the back of the shirt so don’t forget to use protective paper.
Press for the full time recommended for your brand of iron-on and then remove the carrier sheet. Be sure to check the recommendations and see if your brand of HTV is hot peel, warm peel, or cold peel. Follow the recommendations for your specific HTV for the best results.
Slowly peel up the corners to make sure the image is stuck down well then peel back. If it isn’t, you can go ahead and press for a few more seconds.
Final Thoughts on White Sublimation Shirts
When you add sublimation to something like a grey shirt, you may not be happy with the final project. The design takes on some of that grey color and doesn’t pop off of the shirt as much as it does on white. I really think adding white HTV over some of those areas makes the whole design pop off the grey shirt. It looks bolder and really stands out. I love how each of these shirts turned out, each uses the same basic process but in the end, we have 3 completely different-looking shirts.
Frequently Asked Questions About White Sublimation:
Now that we’ve made a few shirts let’s answer some questions I’ve seen come up about using white HTV with sublimation prints.
Can I use this white sublimation hack on different colored shirts?
I used different shades of grey for each of my white sublimation shirts but you can use any light-colored high polyester count shirt to make this same type of project.
Do I have to use white HTV?
No, you don’t. As I was making these shirts I was thinking how fun it would be to create a Halloween design and then instead of using a white HTV for the eyes use a glow-in-the-dark HTV. I would love to see kids’ reactions to a shirt like that.
You could also use this same process for sports shirts and any elements you wanted to be reflective. You could add reflective HTV over a sublimation design the same way we did the white sublimation designs above.
It would also be fun to add different colors to different designs. Let your imagination run wild with this hack and I am sure you will find that you can create some really unique looks.
How can I get a 3D sublimation look?
You could use Siser Brick in the same color as part of your design and layer it on top to give that section the 3D effect. Siser Brick is pretty thick, so I would use it for small elements, not the whole design as you will make your shirt stiff.
How long will my white sublimation shirt last?
The sublimation portion of your image will last as long as your shirt does. It is a permanent image that won’t fade with time and washing. The HTV areas of your shirt will have less permanence depending on the brand you’re using and how you care for your item. Make sure you’re following the recommendation for your HTV when it comes to washing and drying your shirt.
Will adding HTV to sublimation cause my sublimation to fade?
Typically, because the time and temperature for HTV is lower than what is required for sublimation, the heat doesn’t reactivate the ink. There is a possibility the ink could reactivate a little bit, that’s why we always keep the protective sheet inside the shirt and on top of the sublimation image. This protects your heat press from any ink transfer. That being said, I don’t think you’d be able to notice your actual image fading at all unless you’re adding a lot of pressure or using a higher temp on your HTV for an extended time.
I really had a lot of fun making these white sublimation shirts. I hope you’re excited to try this hack for yourself. If you have any questions don’t hesitate to leave them in the comments below. Have a great day and happy crafting!