This post and photos may contain Amazon or other affiliate links. If you purchase something through any link, I may receive a small commission at no extra charge to you. Any supplies used may be given to me free of charge, however, all projects and opinions are my own.
Did you see that Siser has released a cutting machine? Let me introduce you to Siser Juliet! I’m excited to test out this new machine and see all it can do. Keep reading to see if you want to add this digital cutting machine to your craft room. I will also mention the Siser Romeo and the difference between the two.
Don’t want to get a Siser cutting machine? You can see my Cricut machine comparison here!
What is Siser Juliet?
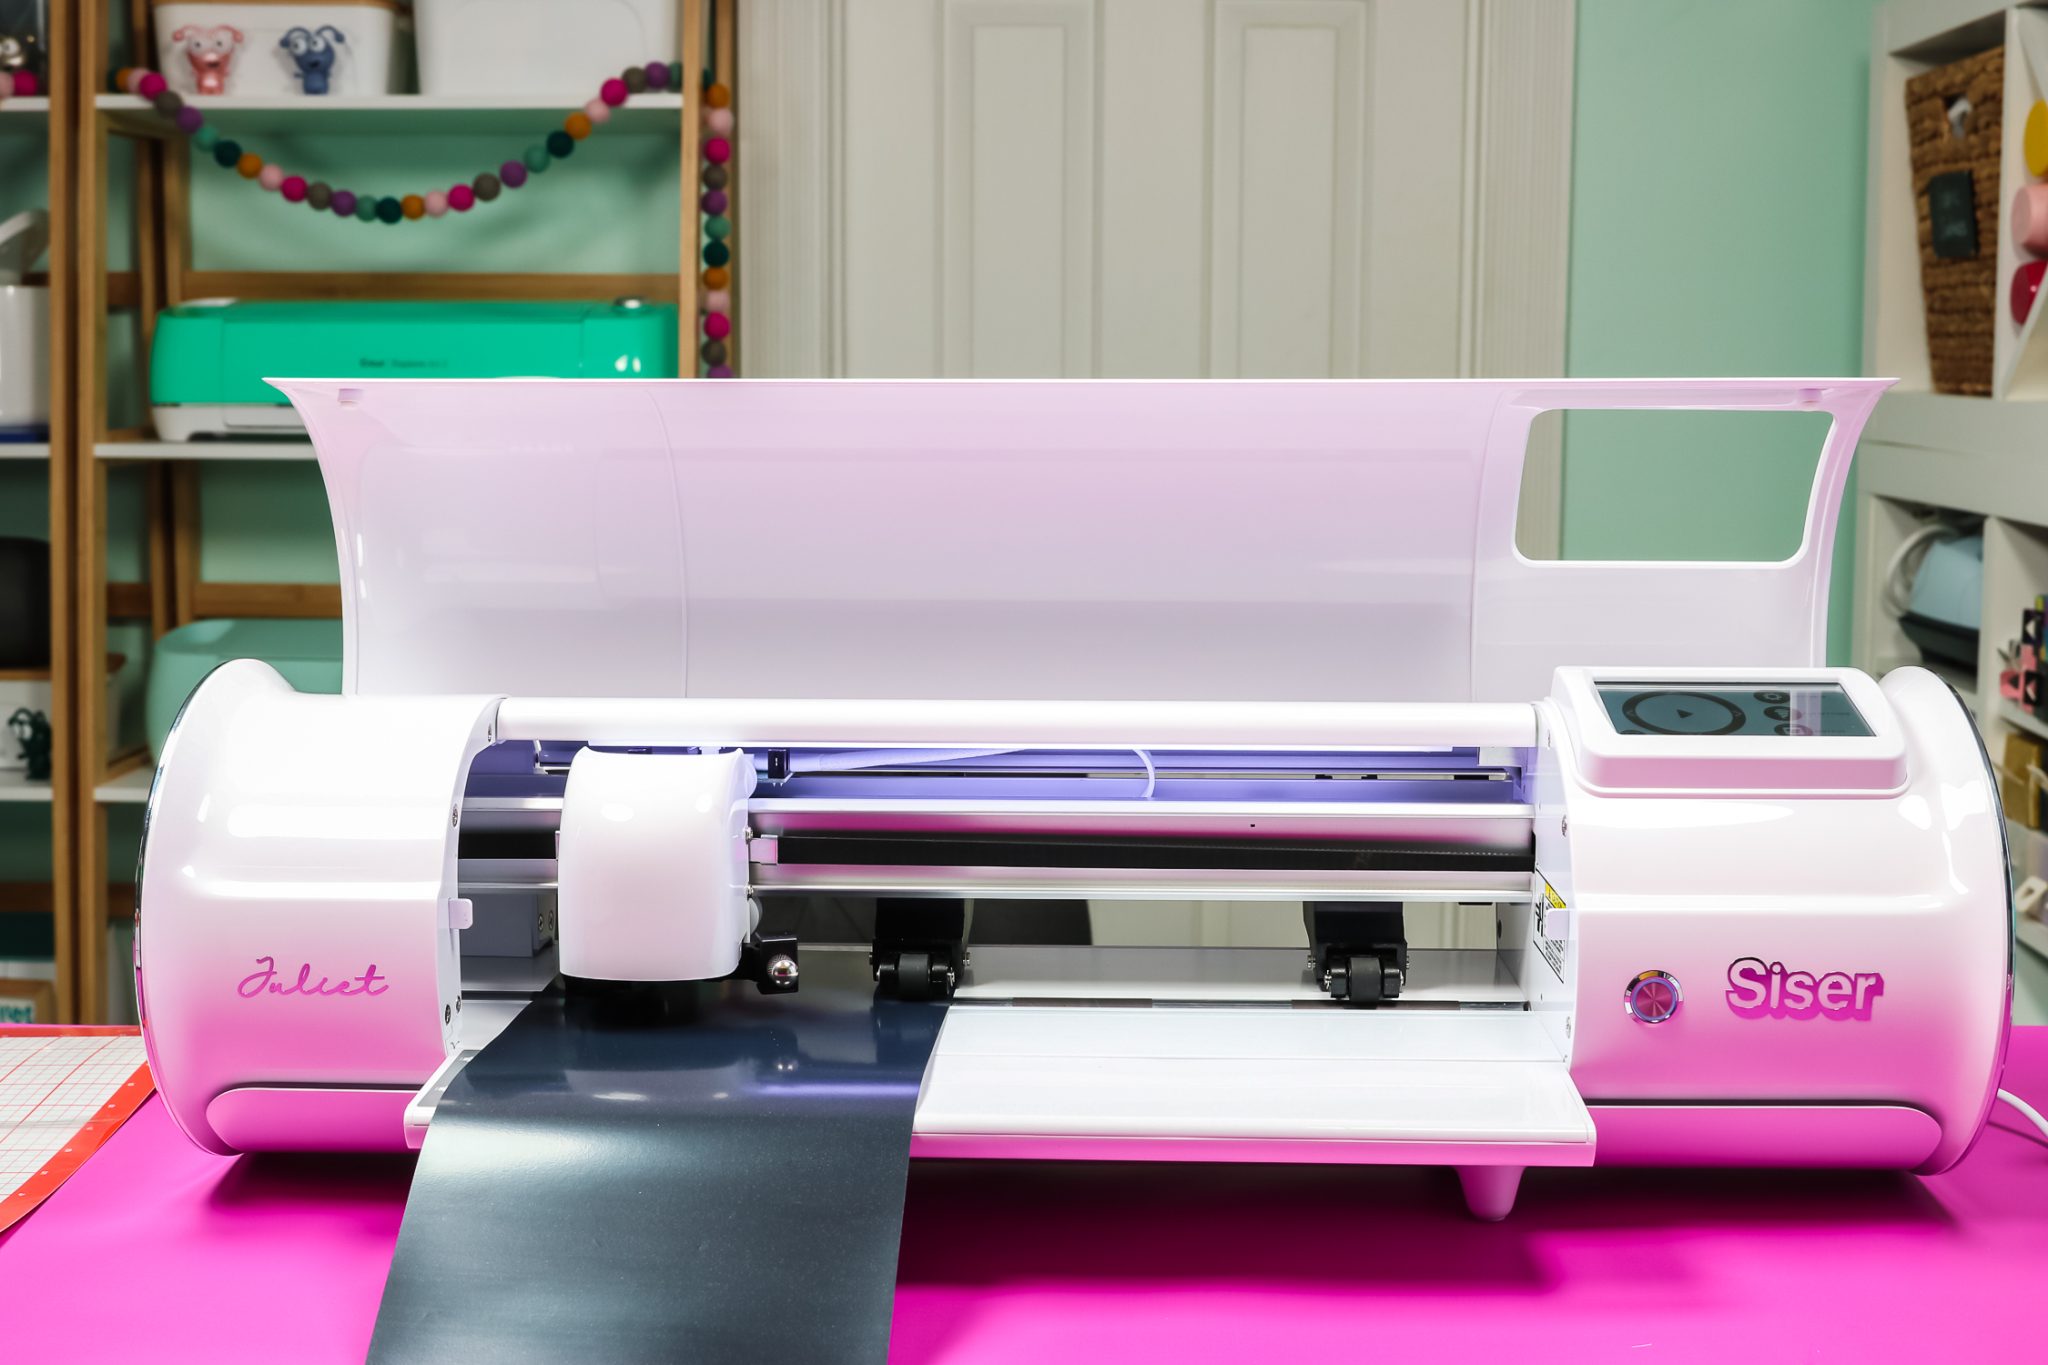
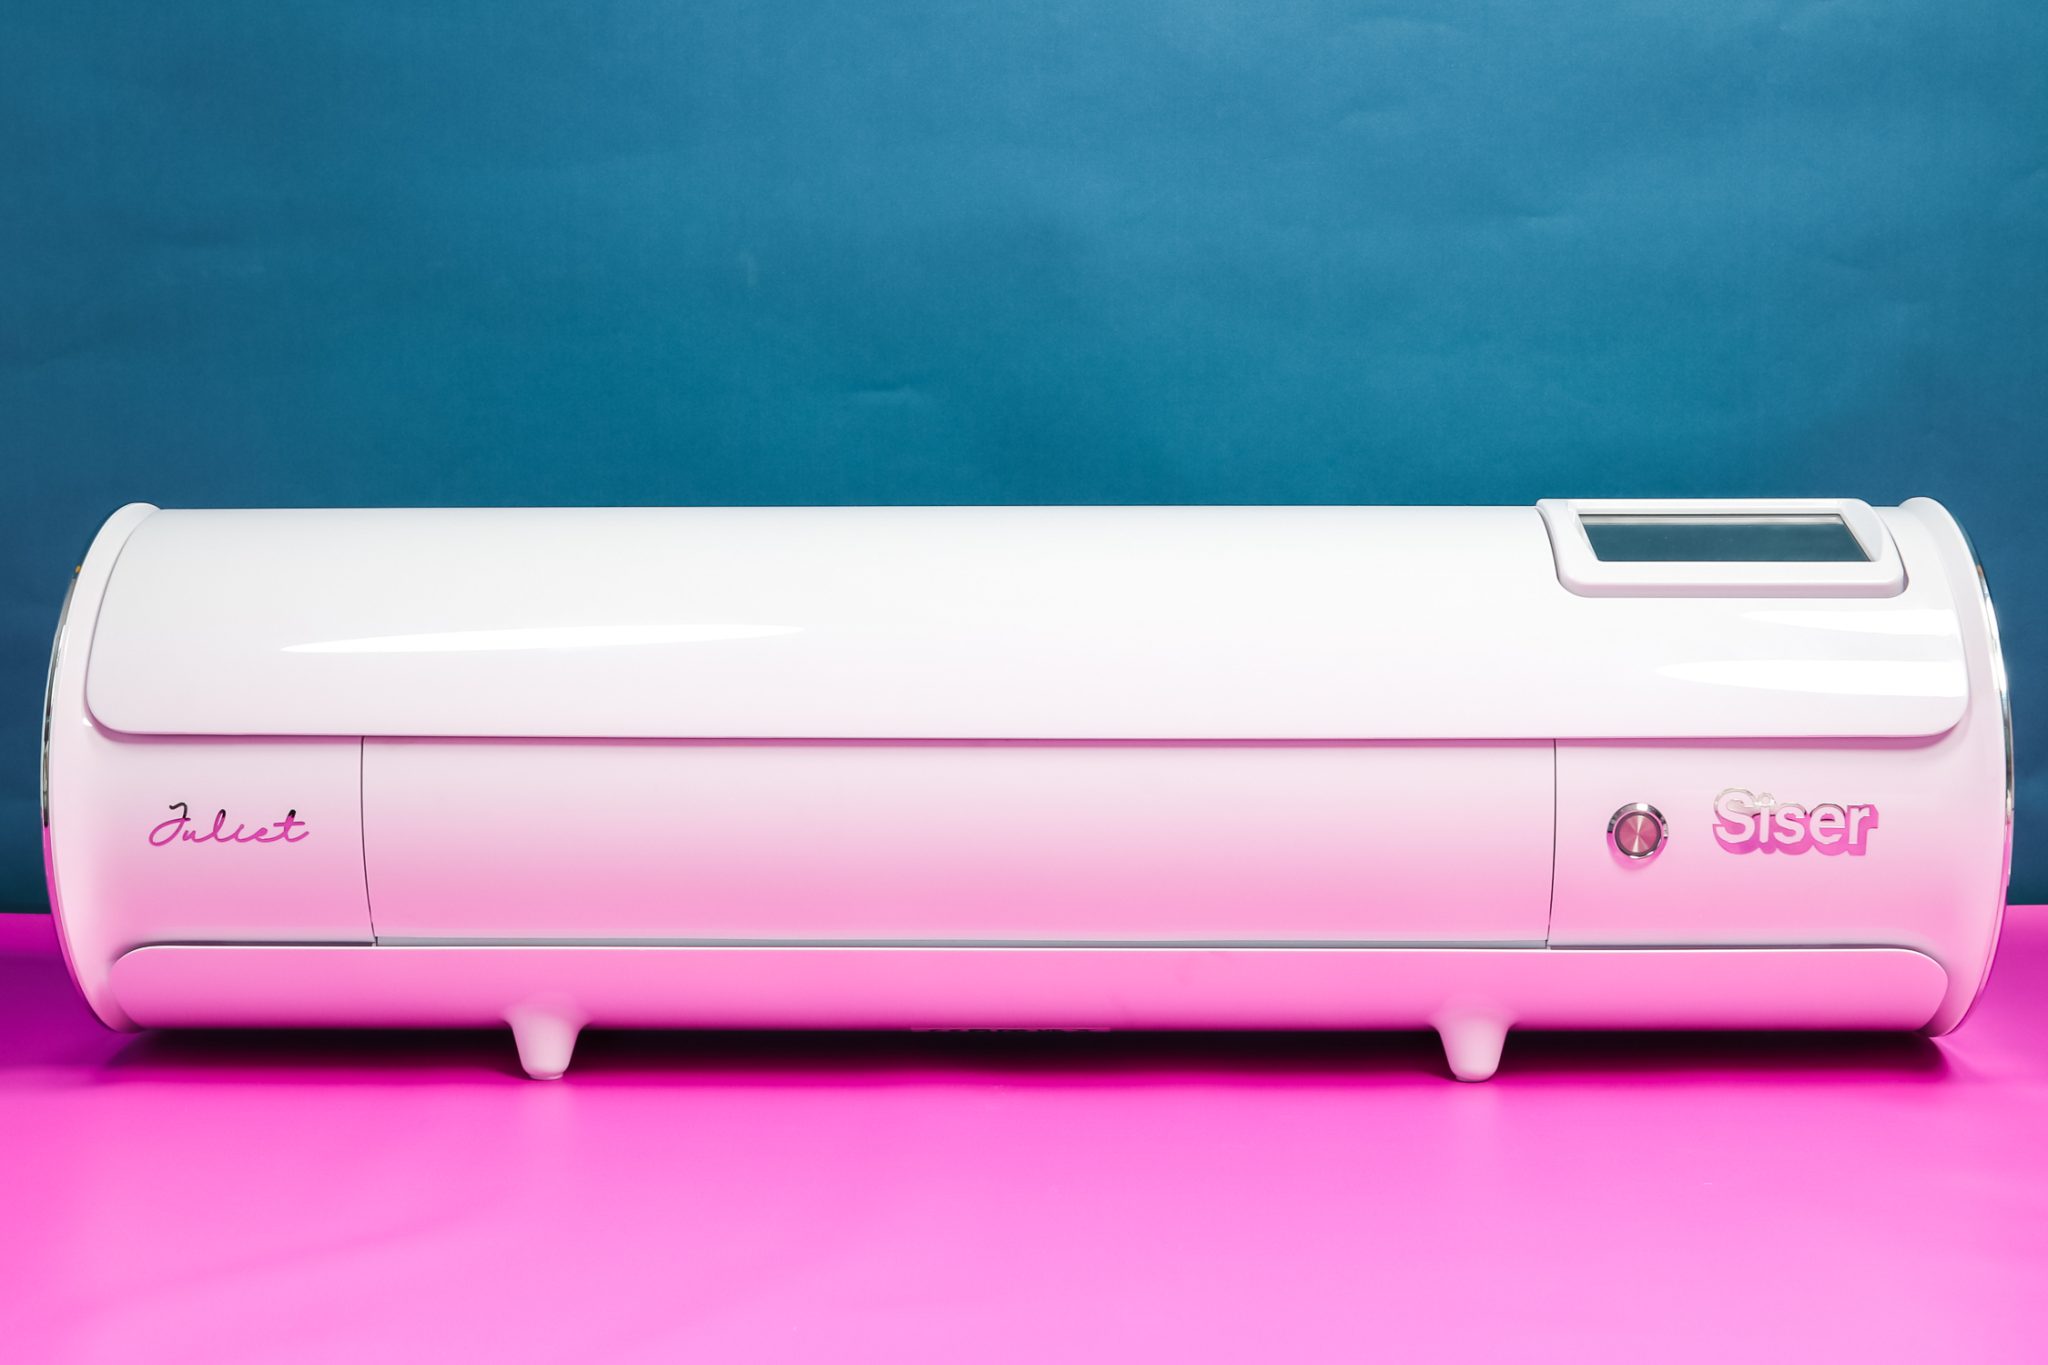
Siser Juliet is a cutting machine similar to a Cricut machine. Siser has just released the Juliet which is their version of a 12″ cutting machine. They also have a 24″ machine coming out named Romeo.
How Wide Does Siser Juliet Cut?
Siser Juliet can cut up to 13.5″ wide. That means you can cut Smart Materials with it. I’ll show you more as we test a few cuts but it cuts very close to the edges of the material. That means you can actually cut close to a full 13 inches wide.
If you really want to see how Juliet works click play on the video below. You’ll get a peek into Leonardo Design Studio, see what’s inside the box, and how to cut with and without a mat.
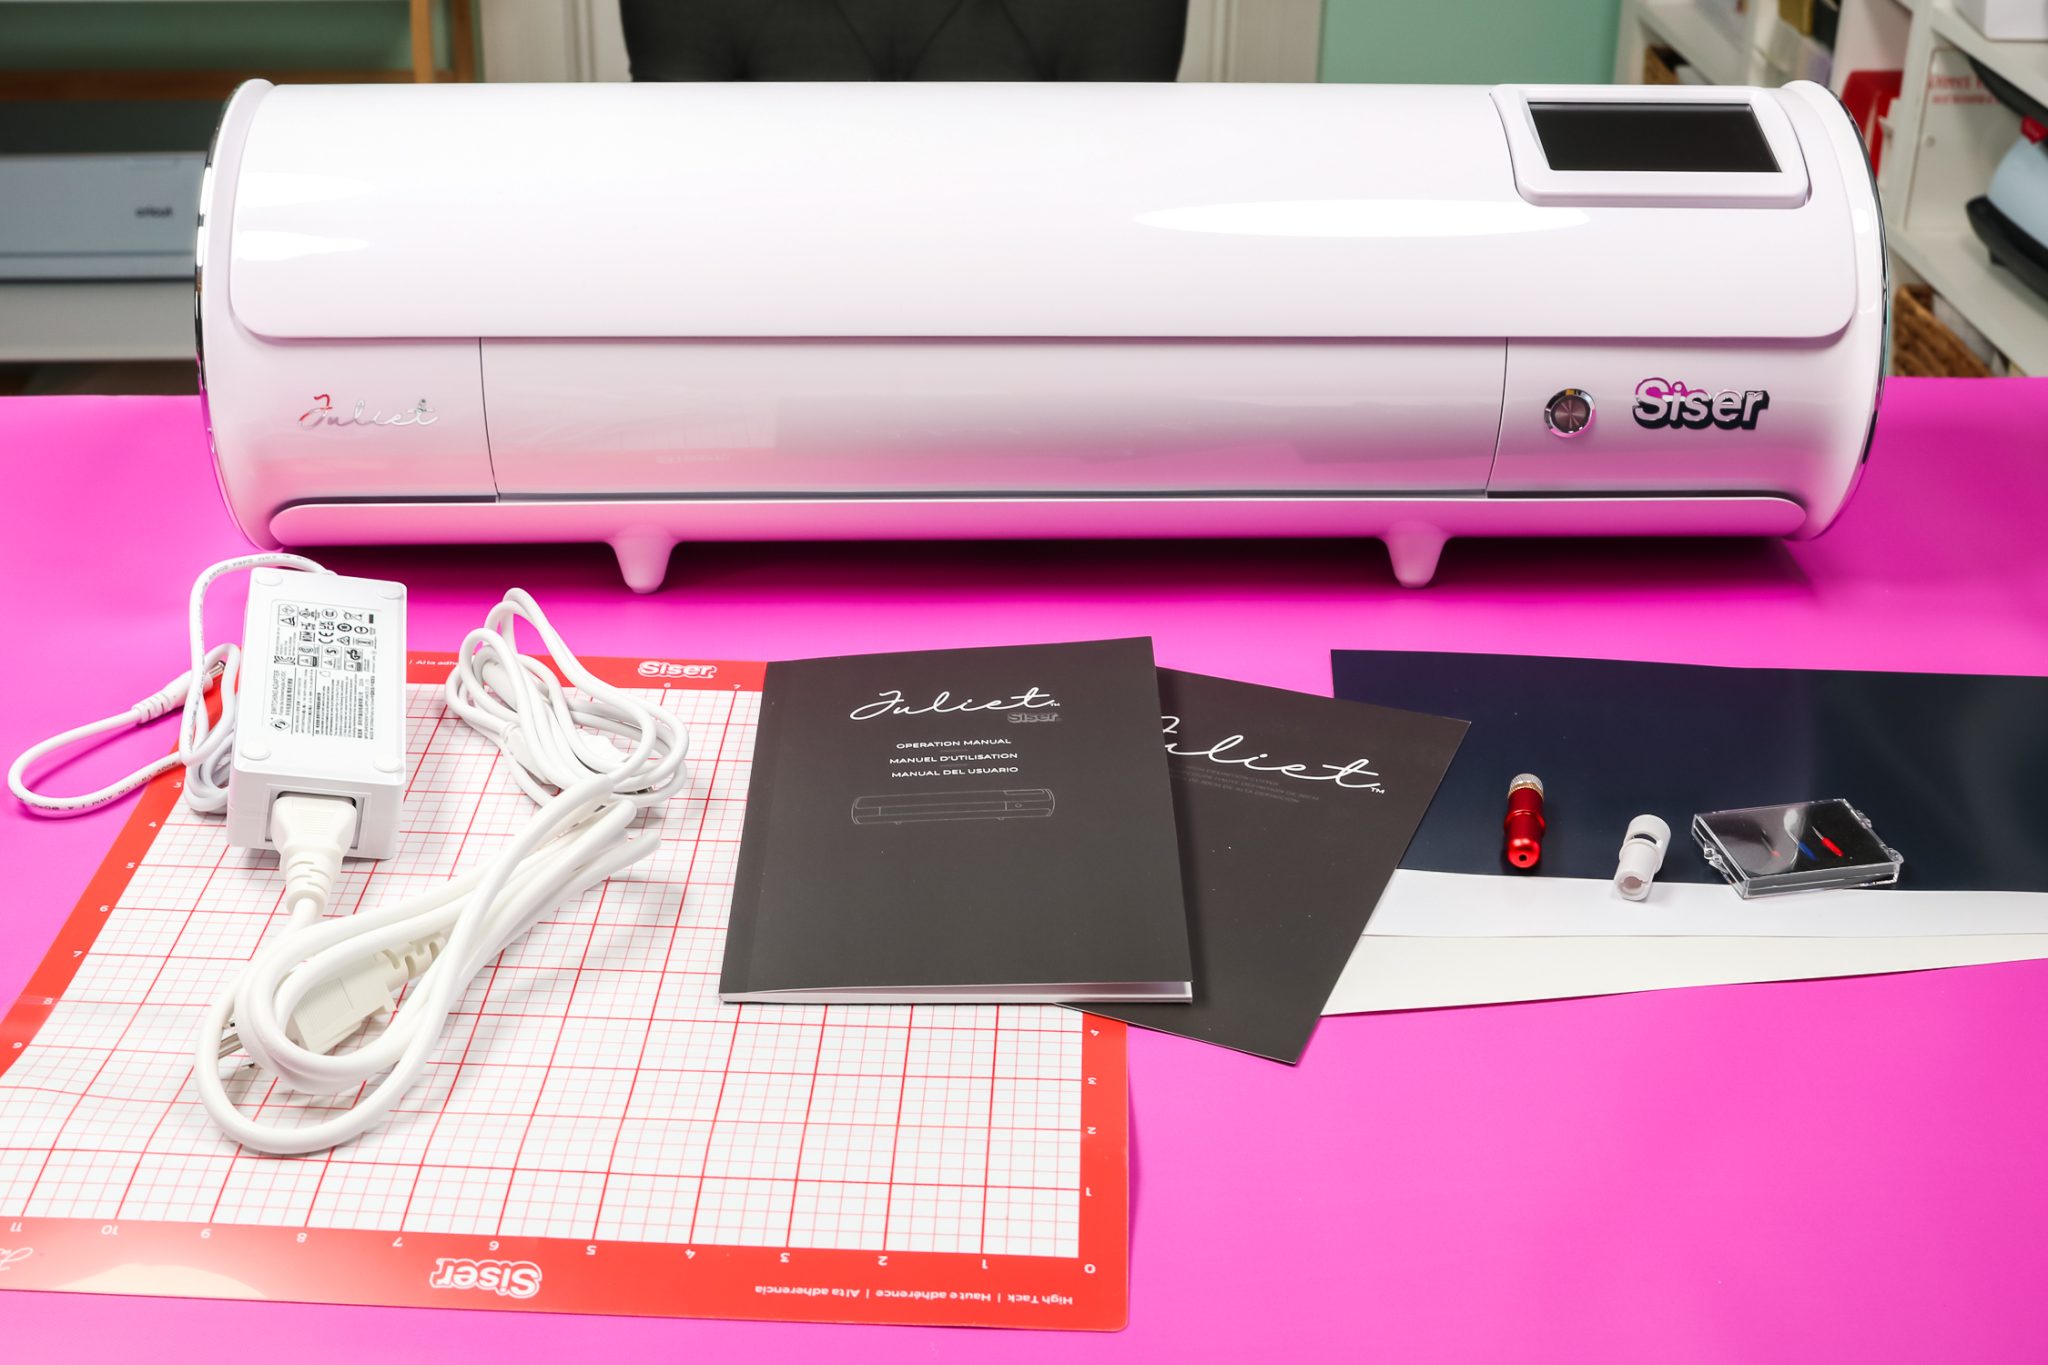
What Comes in the Box?
Inside the box along with the machine itself, you’ll find a get-started guide. Inside the guide is a website you can go to set up your machine and a small operation manual that will explain several features of your Juliet.
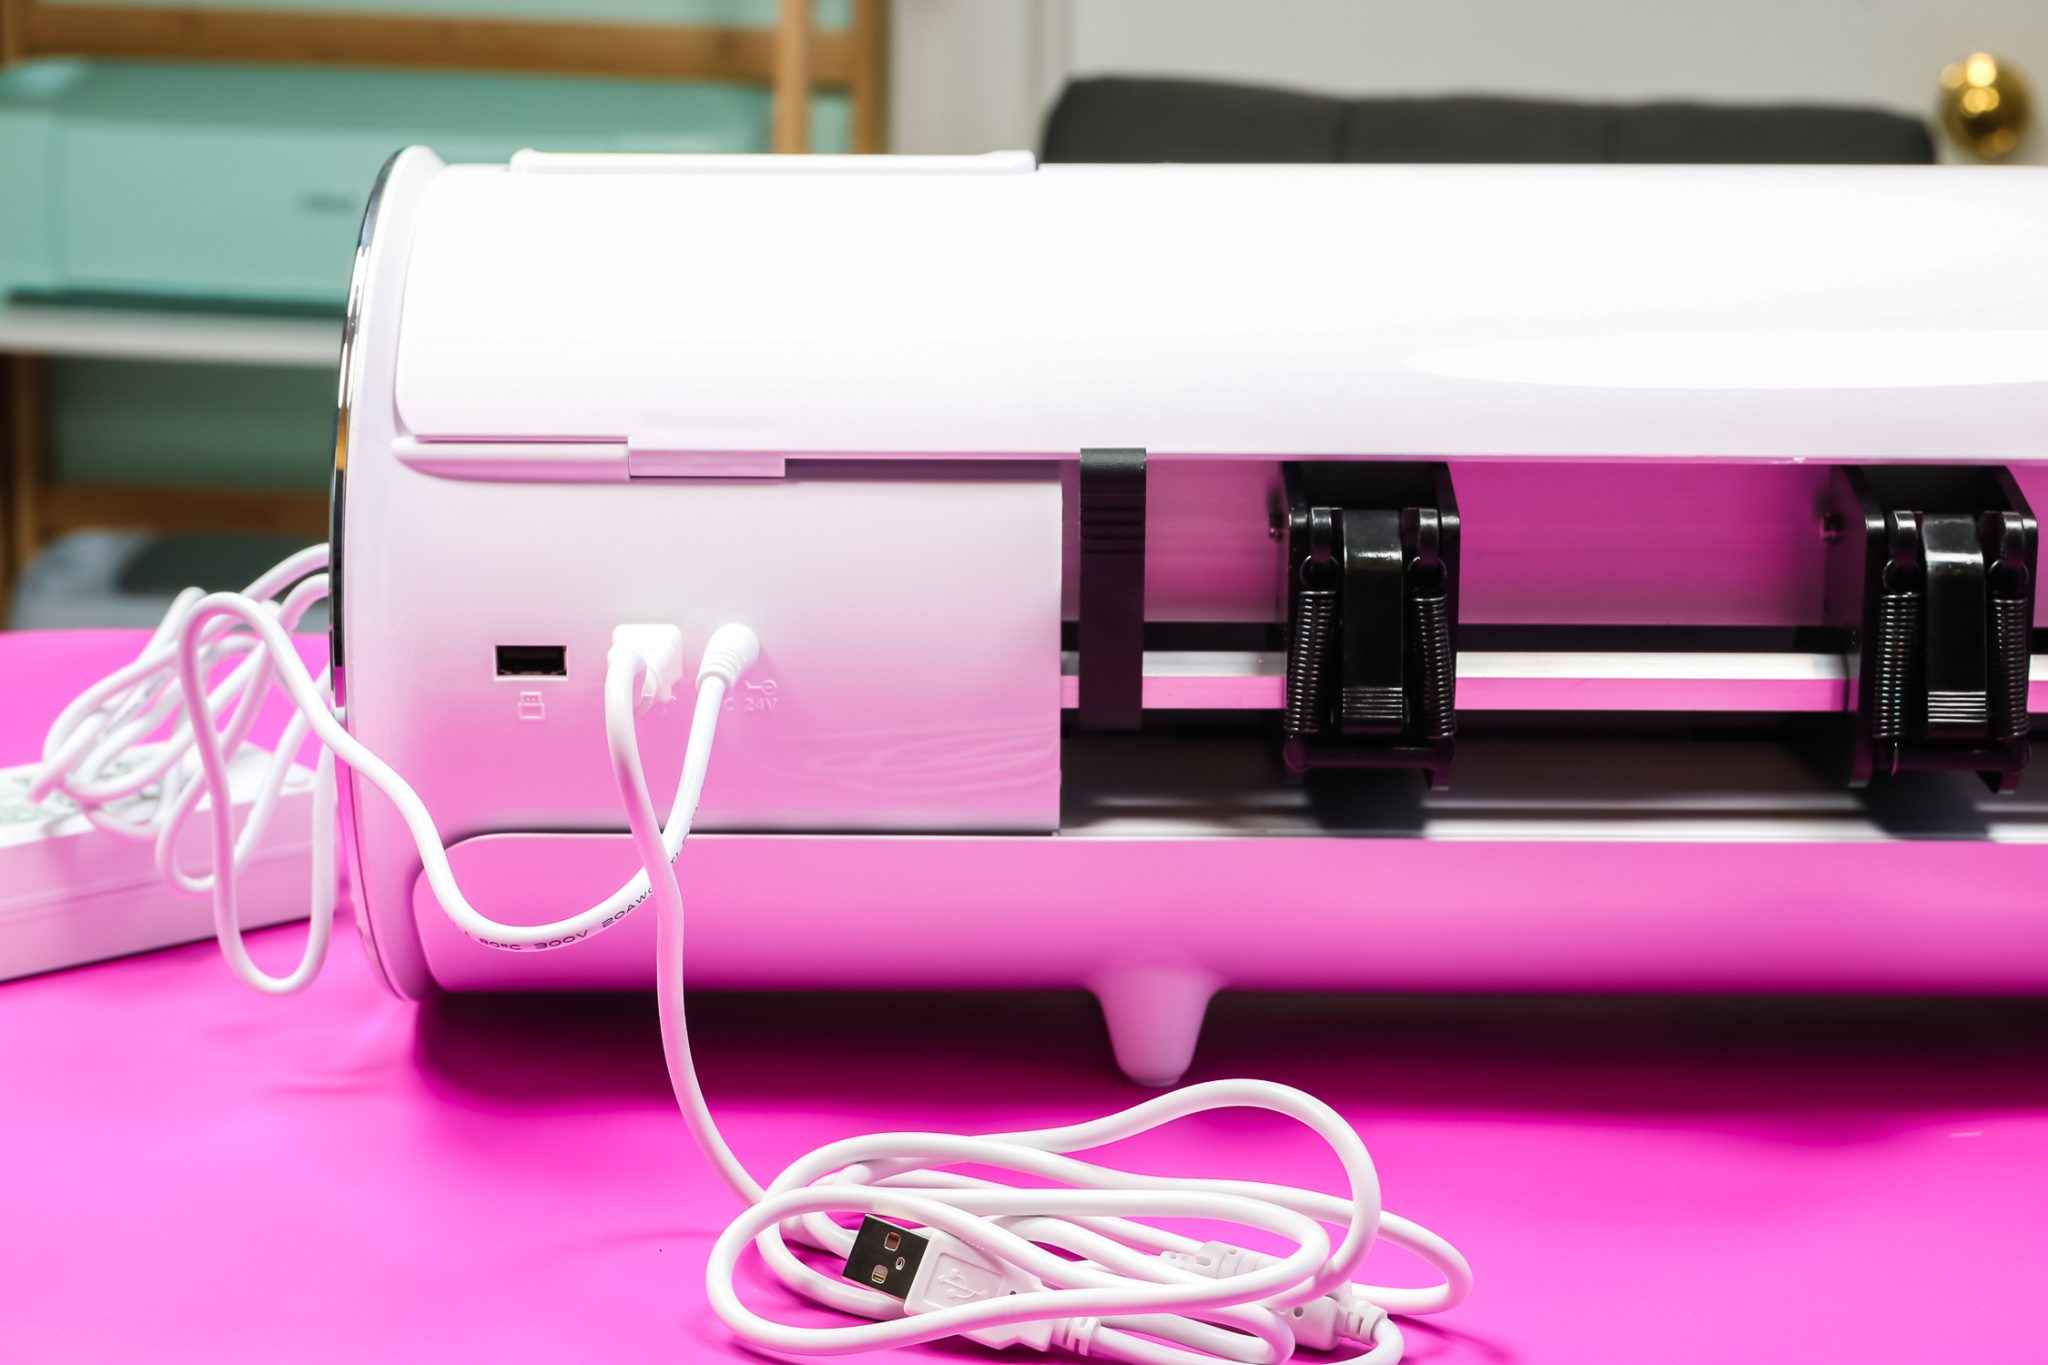
There’s a power cord and a USB cord. Siser Juliet collects wirelessly but you can also connect to your computer directly with the USB cord.
You can cut materials like HTV and Vinyl without a mat but other materials (things without a carrier sheet) need to be cut on a mat. In my box was the high-tack mat. They also make a low-tack mat that you can purchase separately. Also, there were a few different samples of HTV and a cover sheet included.
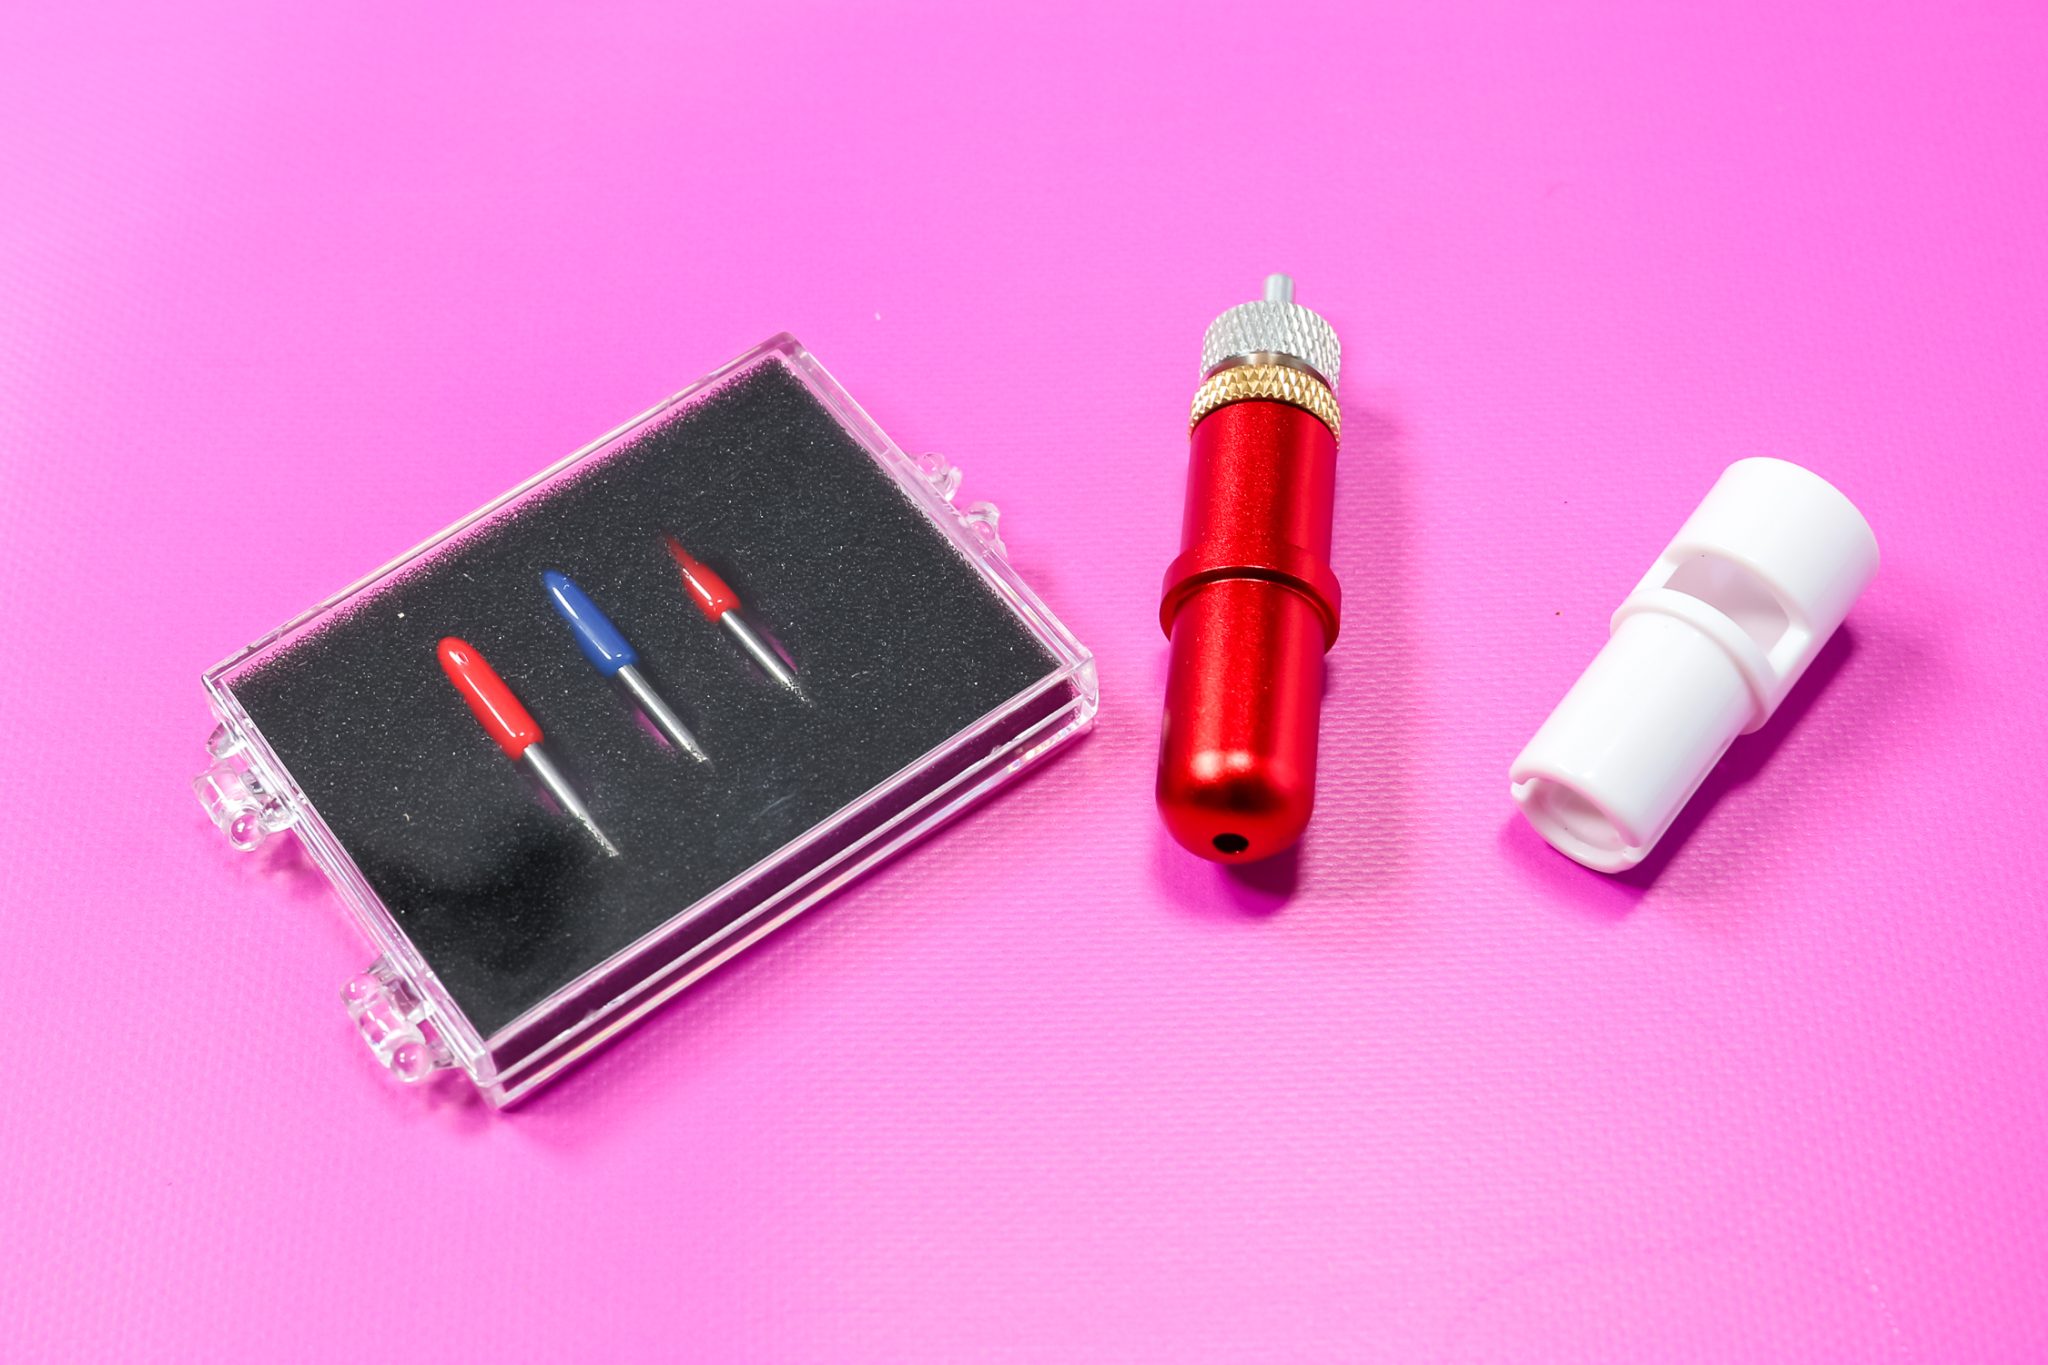
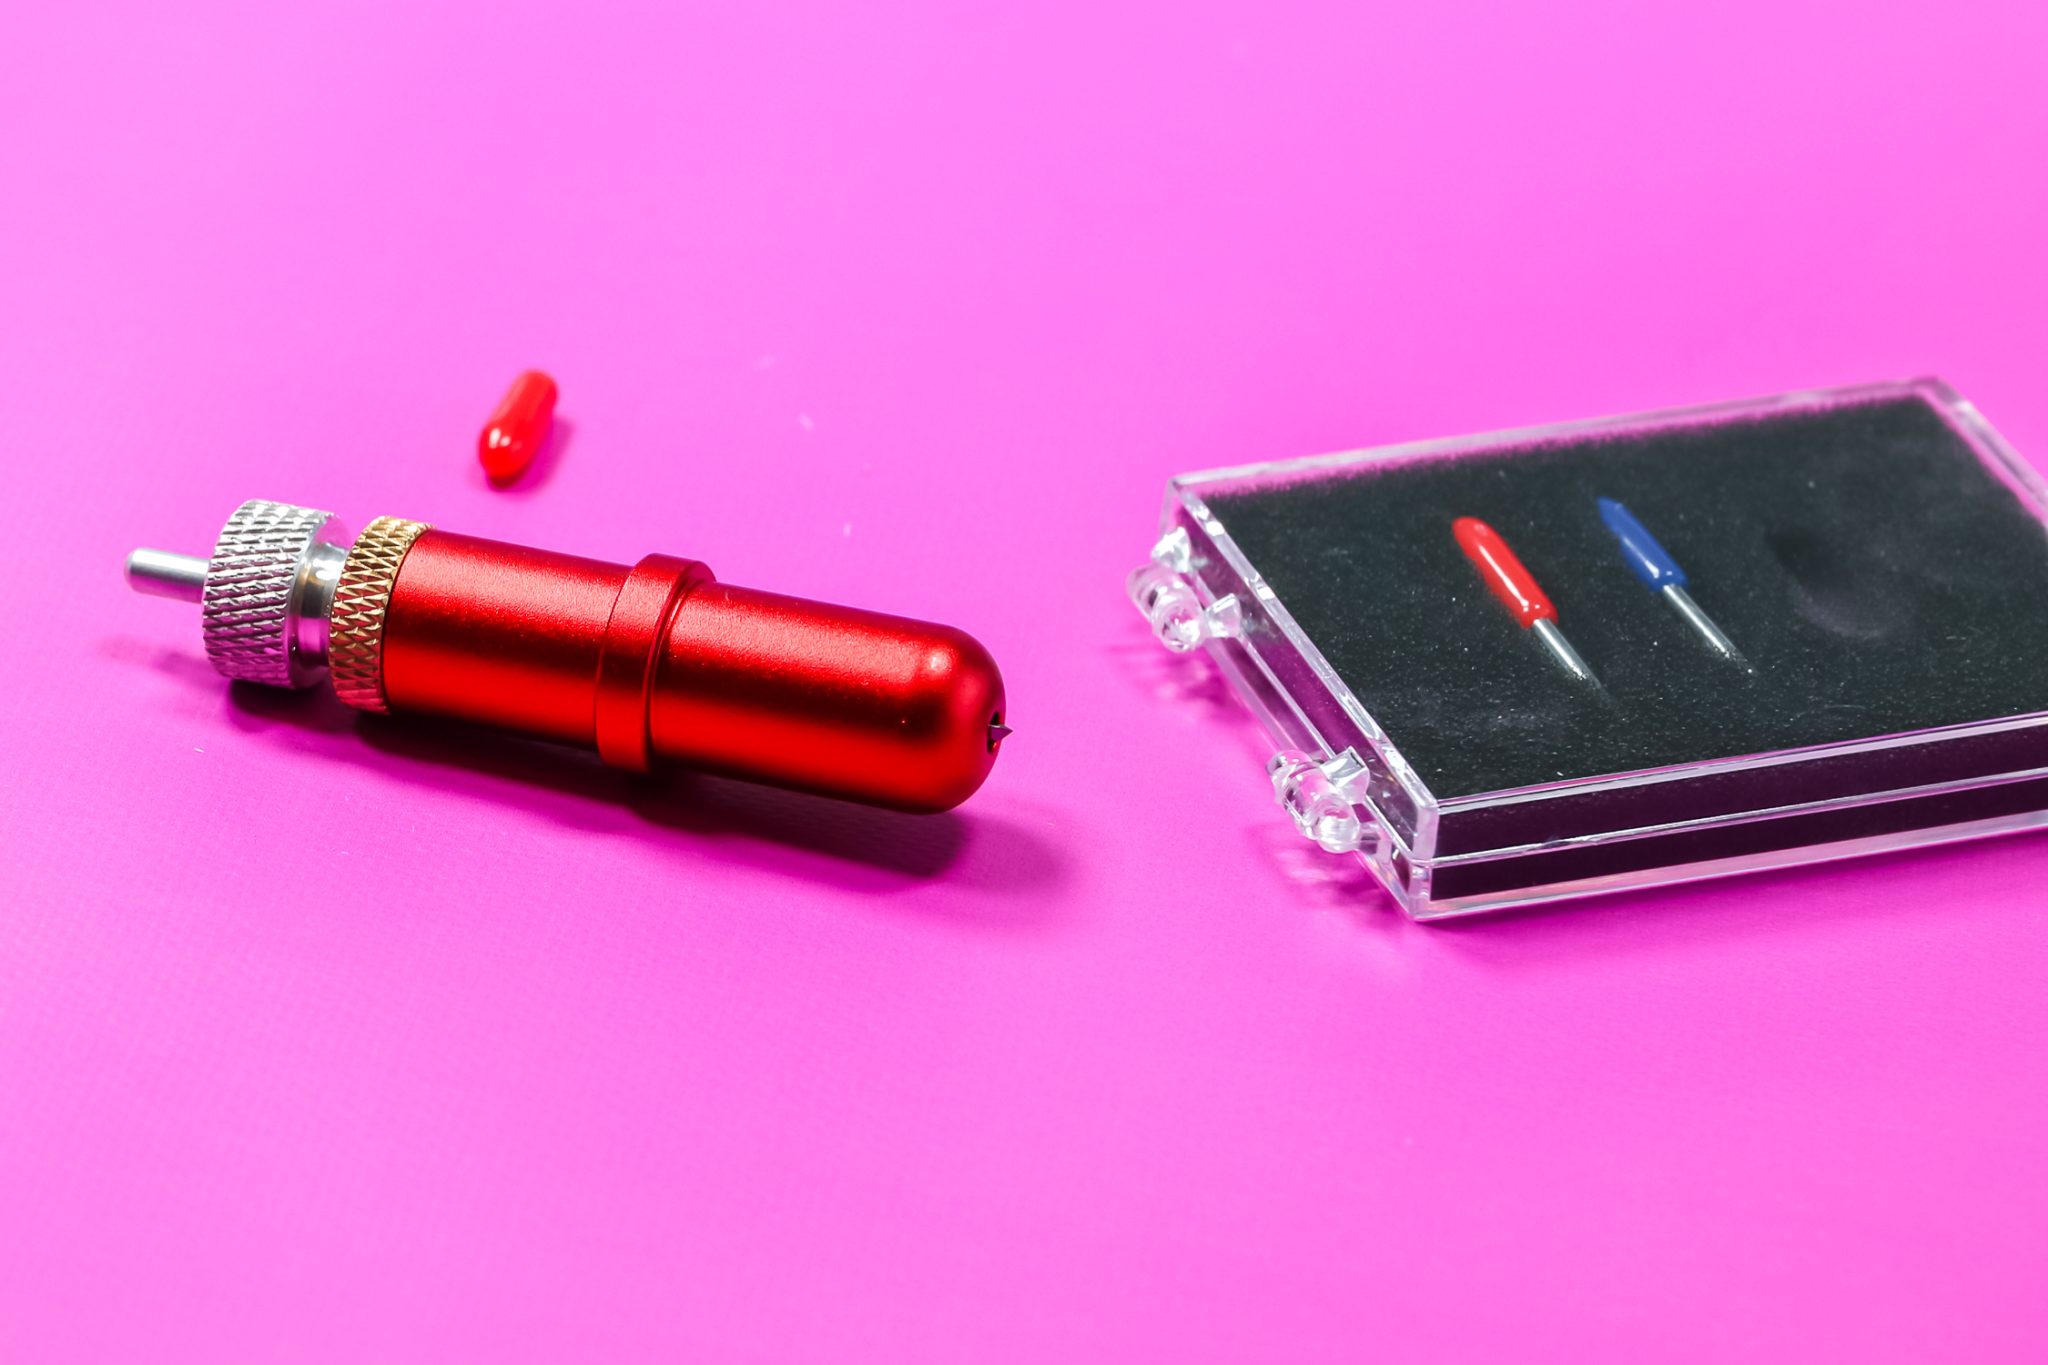
Lastly, there is a blade holder, marker adapter, and three blades in the box. Two are fine-point 45-degree blades and one is a 60-degree blade that cuts deeper.
Removing the Packaging
Now that we’ve seen what comes in the box let’s unpack the machine. Take the machine out of the box and remove the packaging.
There is an important piece of packing material that you don’t want to forget to remove. Lift the lid and open the front and you’ll see the pinch rollers on the front – see those white pieces? They need to be removed.
To remove the pieces, look to the back of the machine and you’ll see a lever. Open that lever and that lifts the rollers. With the rollers lifted those white pieces easily slide out.
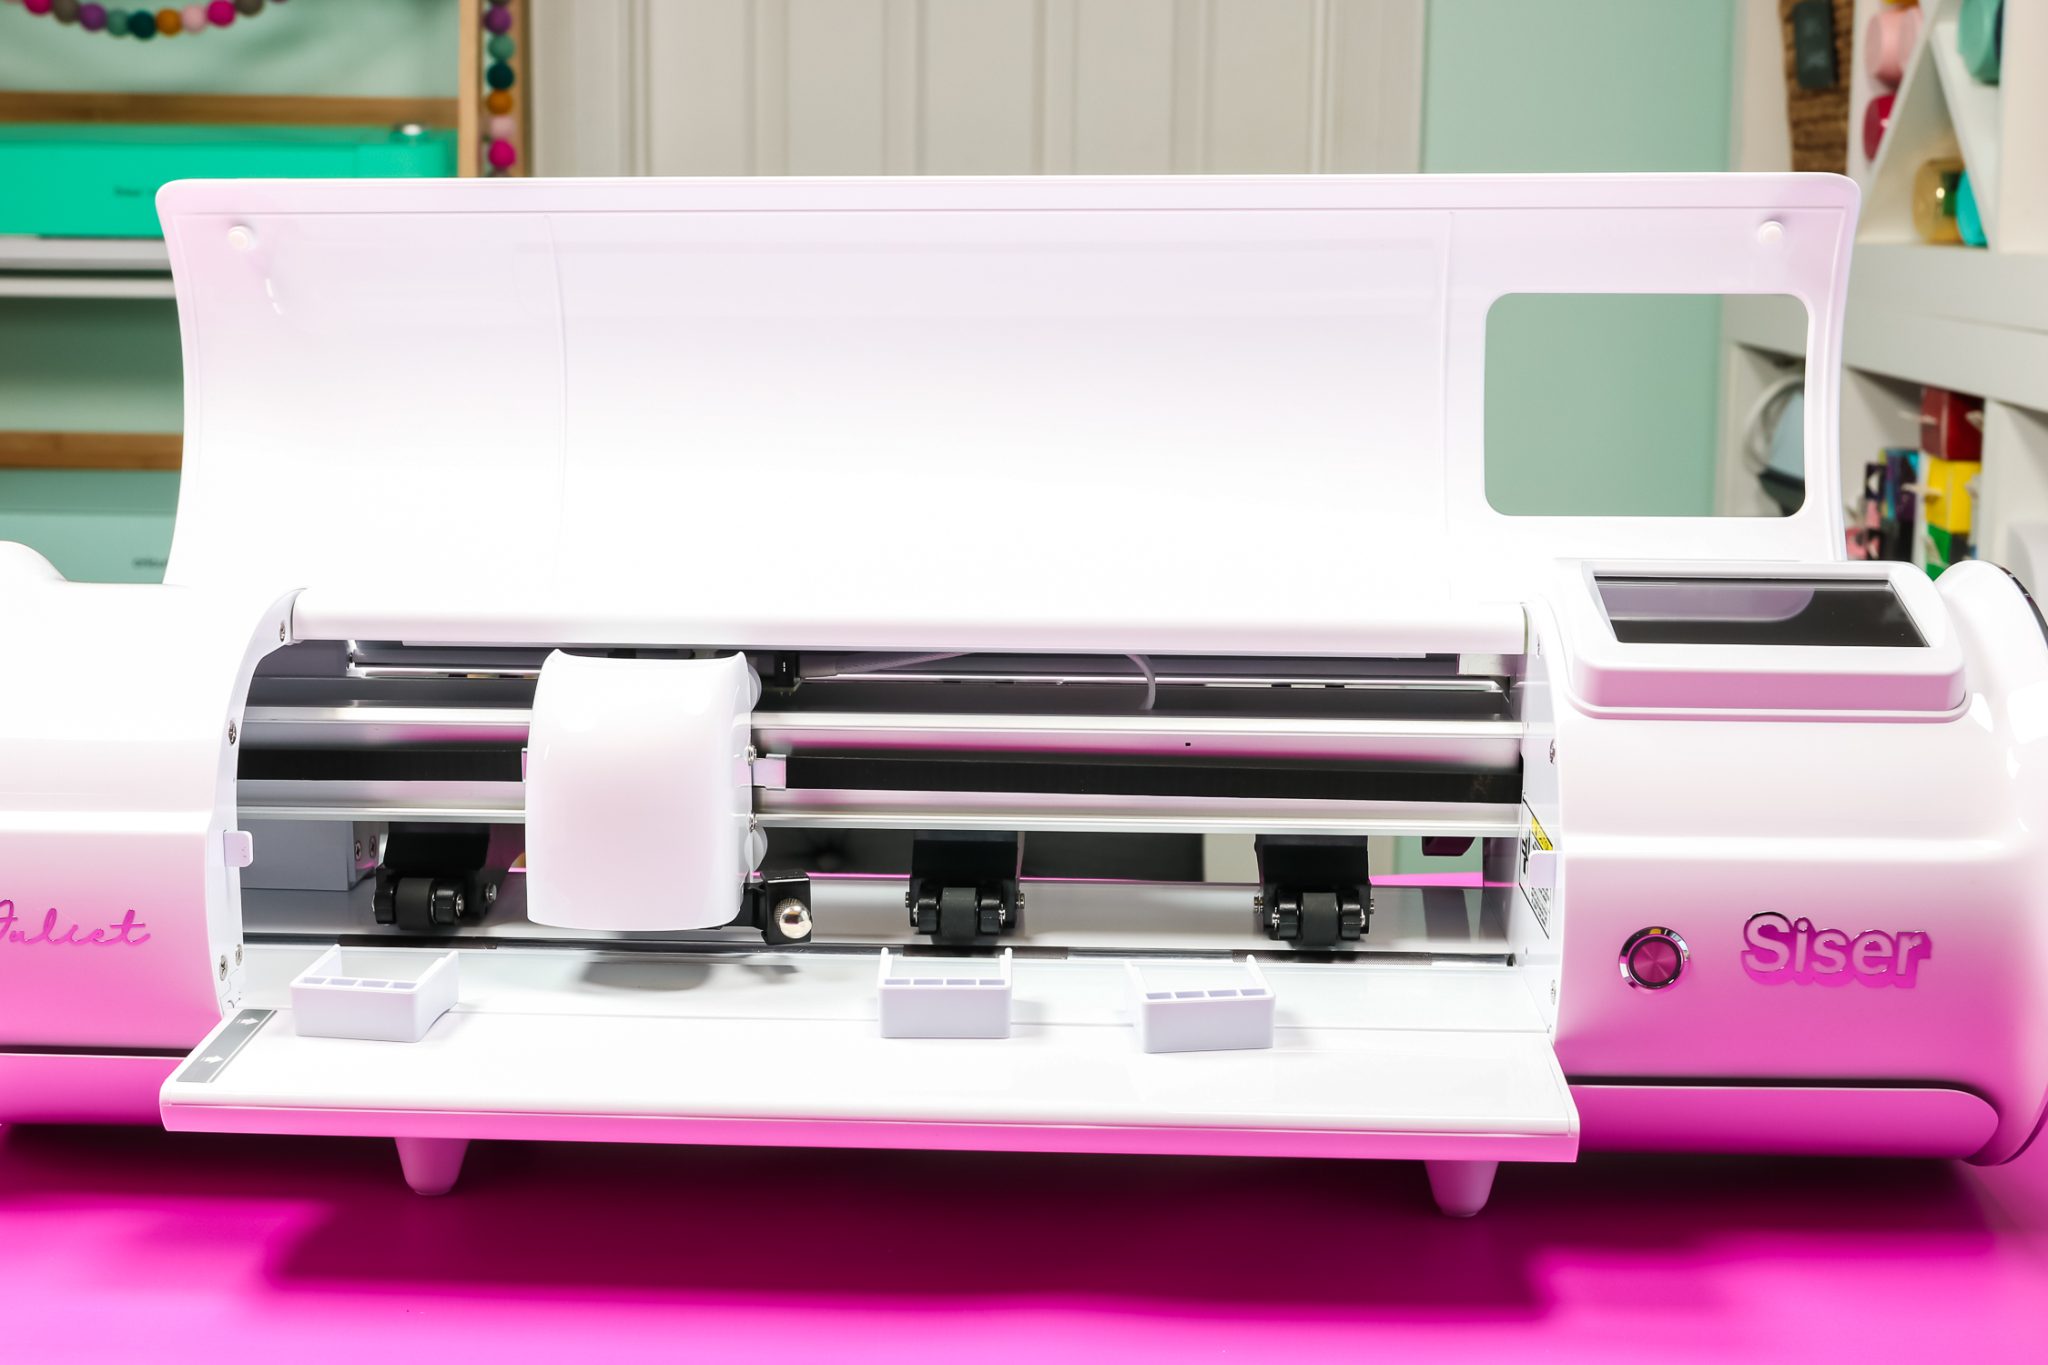
Up Close Look at Siser Juliet
Now that we have all the packing materials removed let’s take a closer look at the machine.
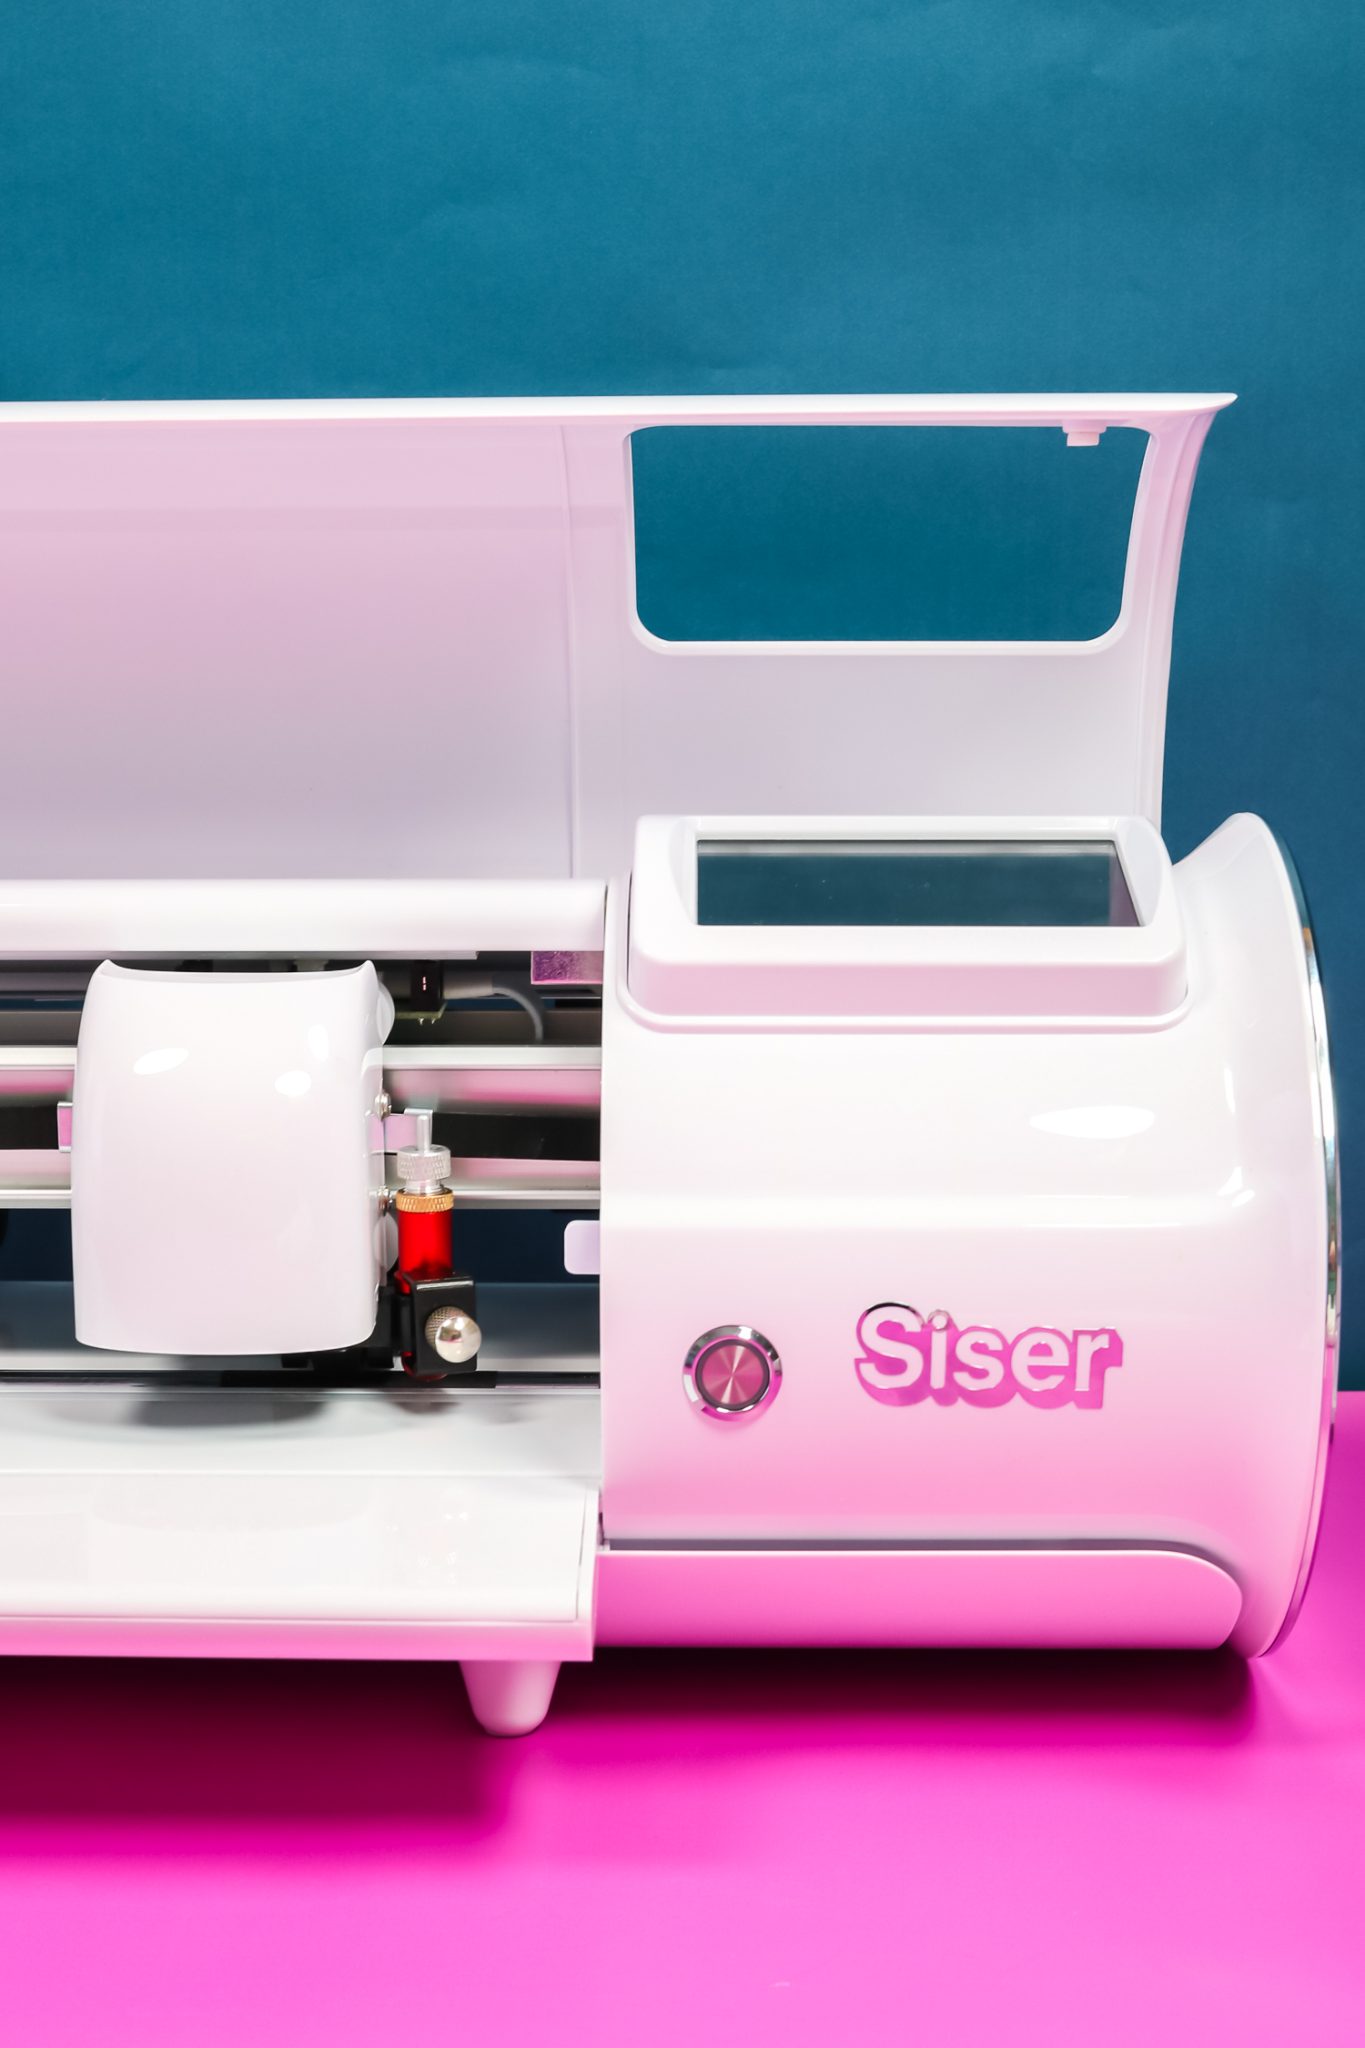
On the back of the machine, you’ll see three ports. The first is for the power cord. Next is for the USB cord if you want to connect to your computer directly.
The last port is a USB slot. With this slot, you can use a jump drive to cut designs on this machine. You can actually cut without a computer at all. You can do it all with the interface on the machine.
How Big is the Juliet Cutter?
Before we start, let’s talk about the size. Everyone wants to know how Juliet compares to Cricut machines. Juliet is actually wider than all of my Cricut machines by about 2.5 inches. Since it cuts a slightly wider design that isn’t surprising. Other than being just a little wider the size is similar.
It is, however, just wide enough that it doesn’t fit on the shelves where I store my Cricut machines. If space is a concern or you just want to know if it will fit where a Cricut does, you should know it is a wider machine.
Using Siser Juliet
Okay, everything is unboxed and set up, now we can plug it in and look at the interface on the machine itself. The power button is right on the front of the machine so press that button to power it on.
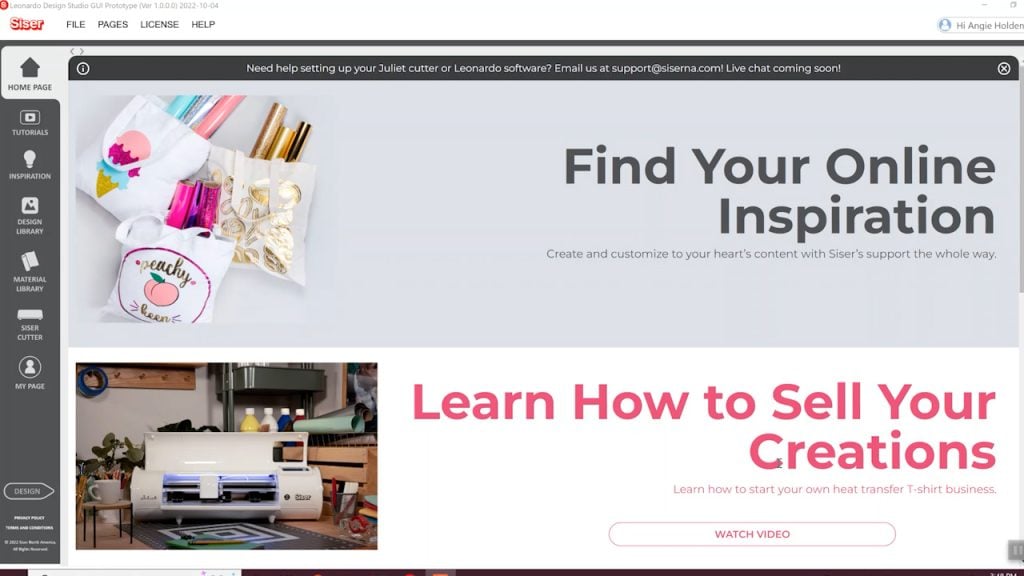
Leonardo Design Studio
Juliet does have its own computer software for both Windows and Mac. Mobile applications for iPhones and tablets are coming soon but as of the writing of this, they are not currently available.
I will be showing you a little of the software behind the Siser machines but will do another video specifically on the software because it’s a pretty robust program with quite a few features.
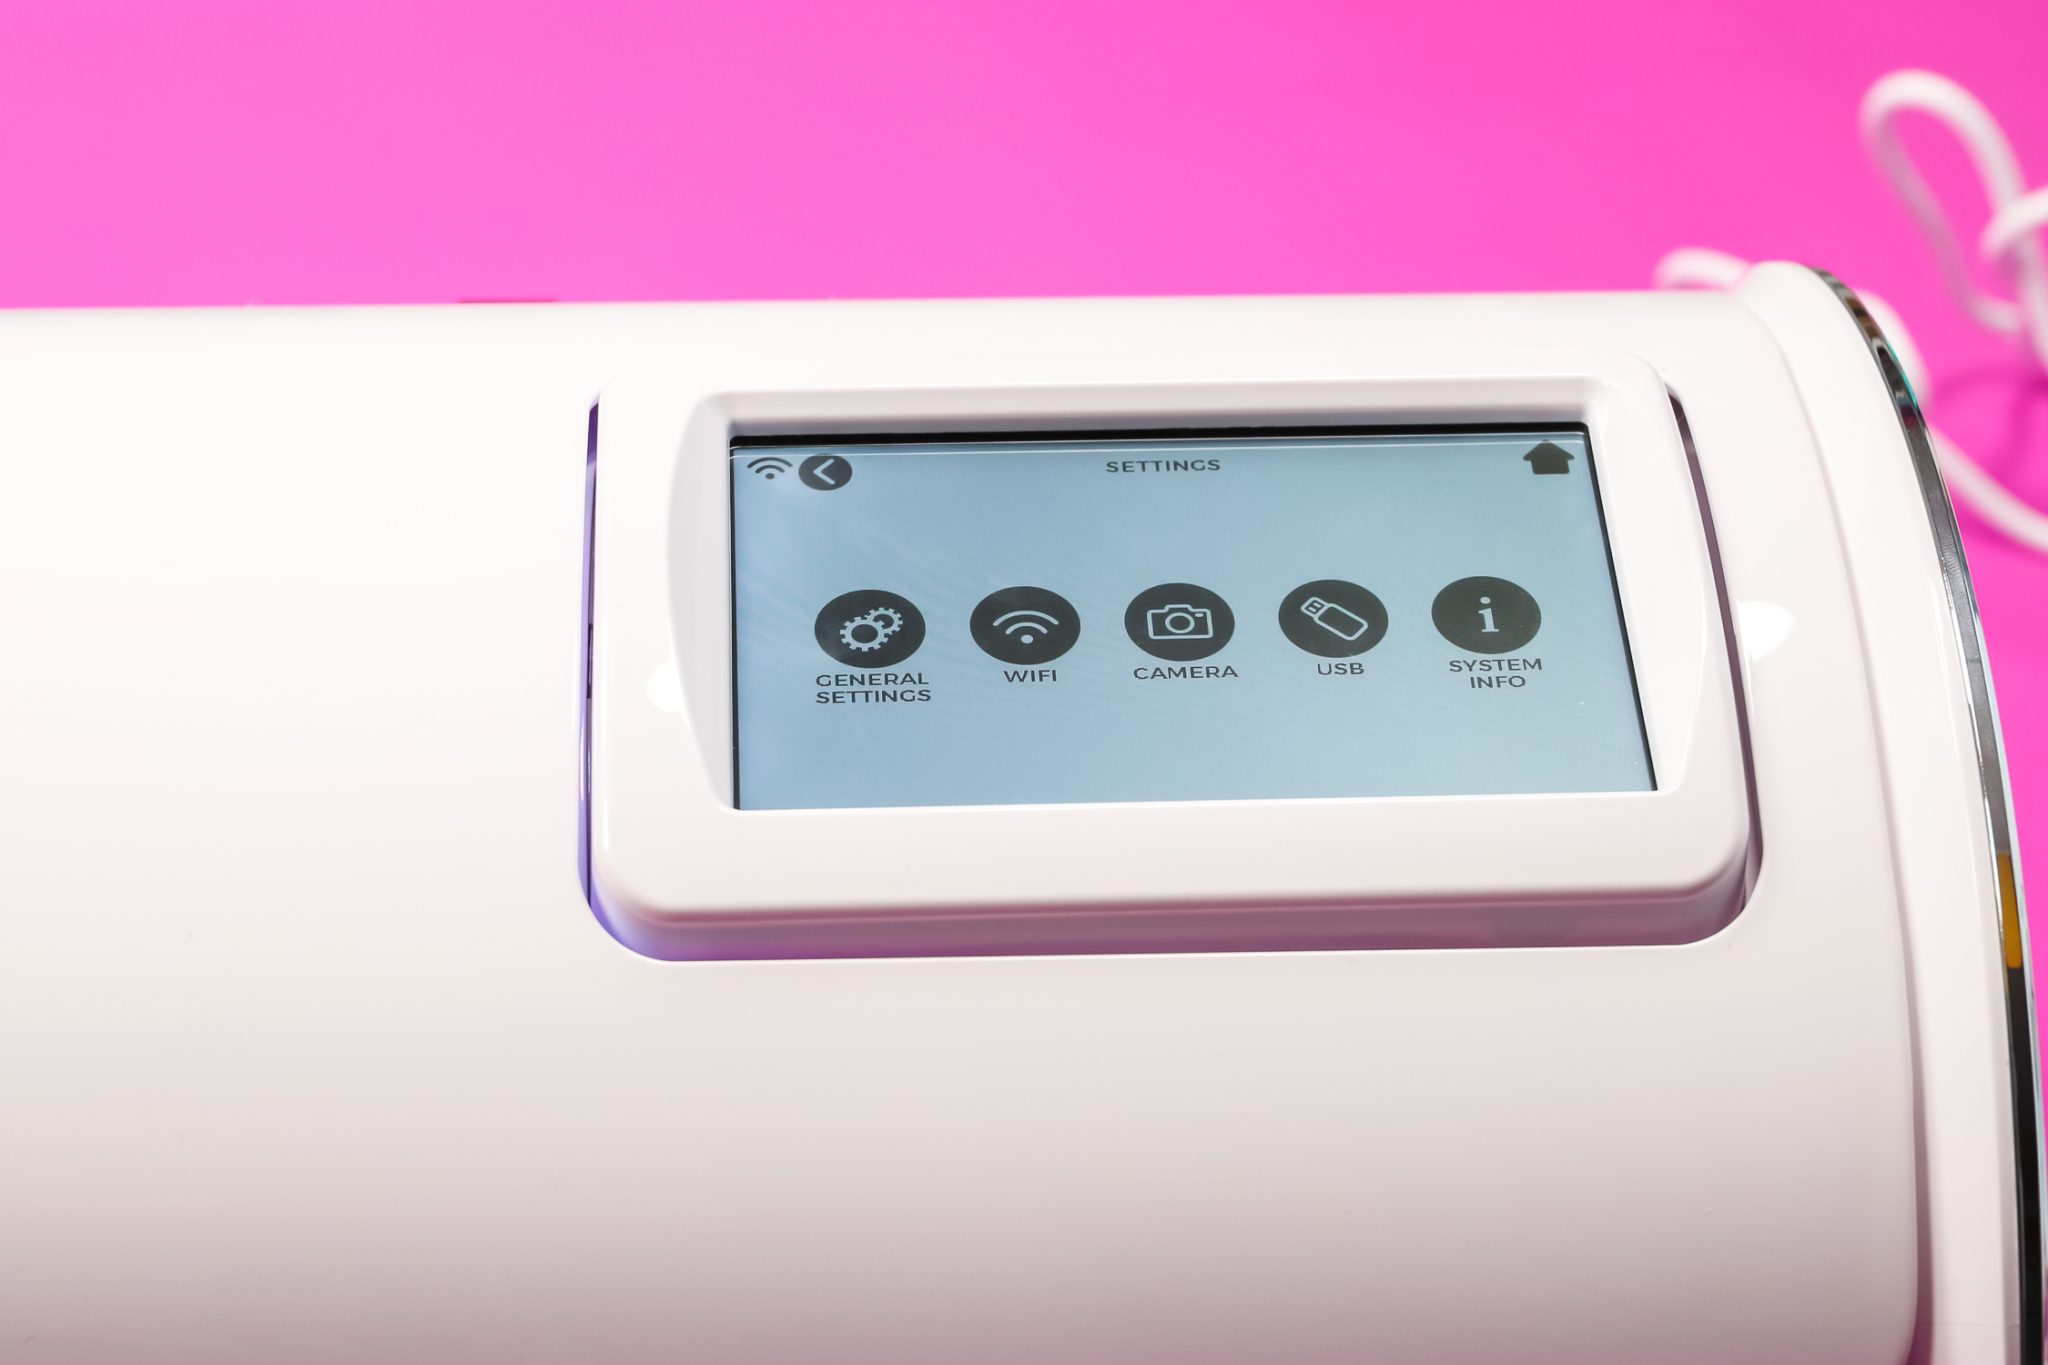
Settings on Siser Juliet Machine
Along with Leonardo Design Studio, there is an interface right on the machine itself.
You can access the settings panel with the top cover open or closed. To really see all of the options I suggest watching the video linked above. You’ll see all the different settings and exactly where I’m clicking for each one.
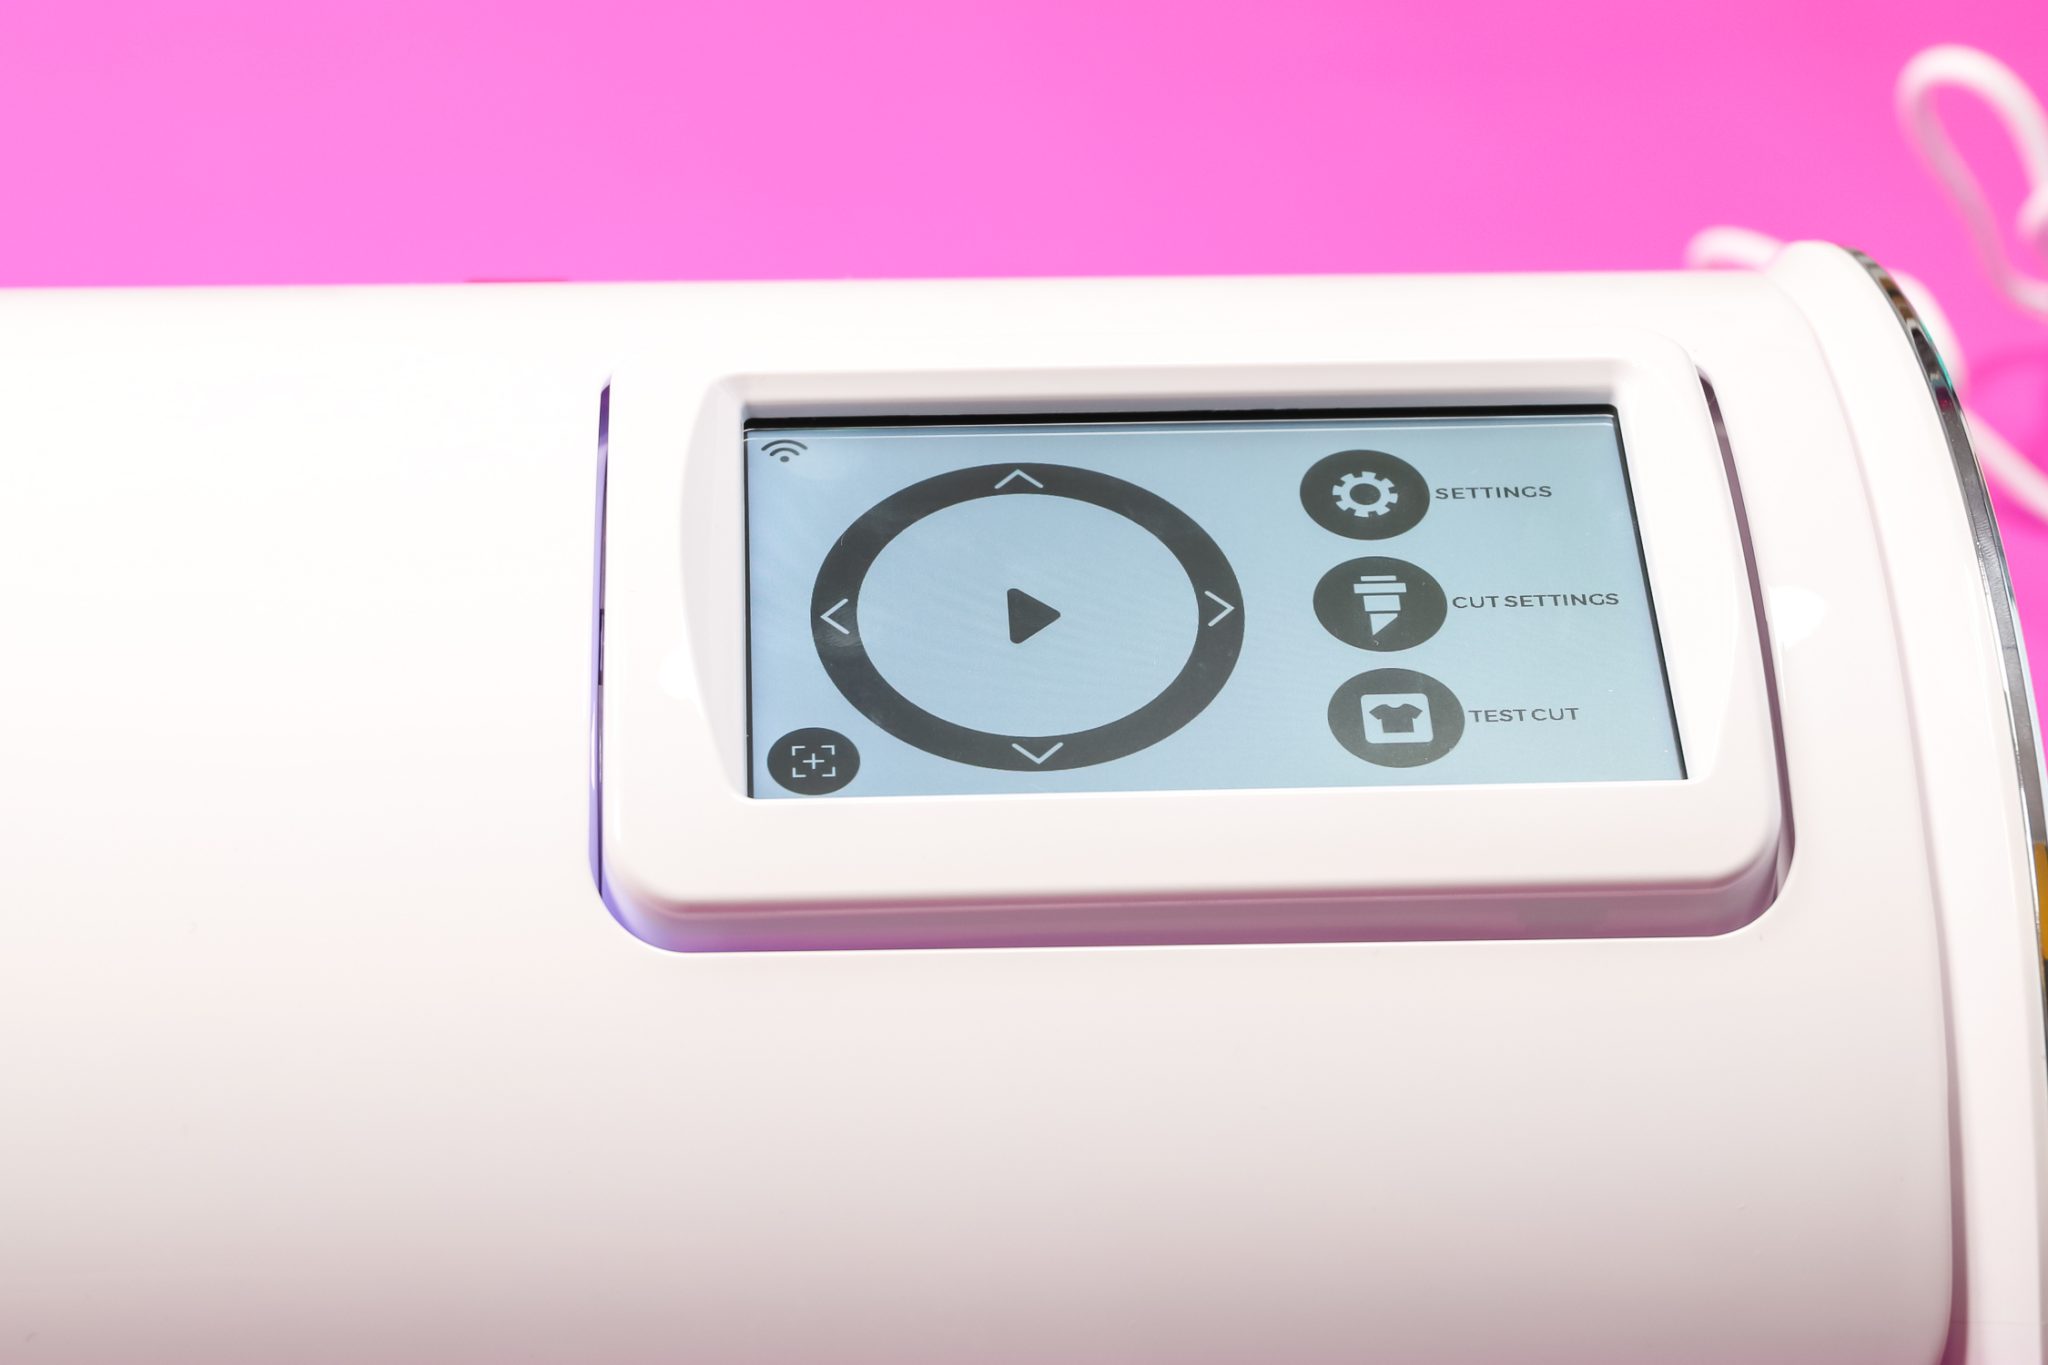
If we start at the top and select settings, that will take us to the general settings.
There are lights inside the machine, you can turn them up and down here. You can also turn on or off an alert for when your machine is done cutting. This means you can set it so that your machine plays a chime or have the lights flash. You could even choose both. There is also a setting for how long your machine should wait before going to sleep and settings for language and your unit of measurement.
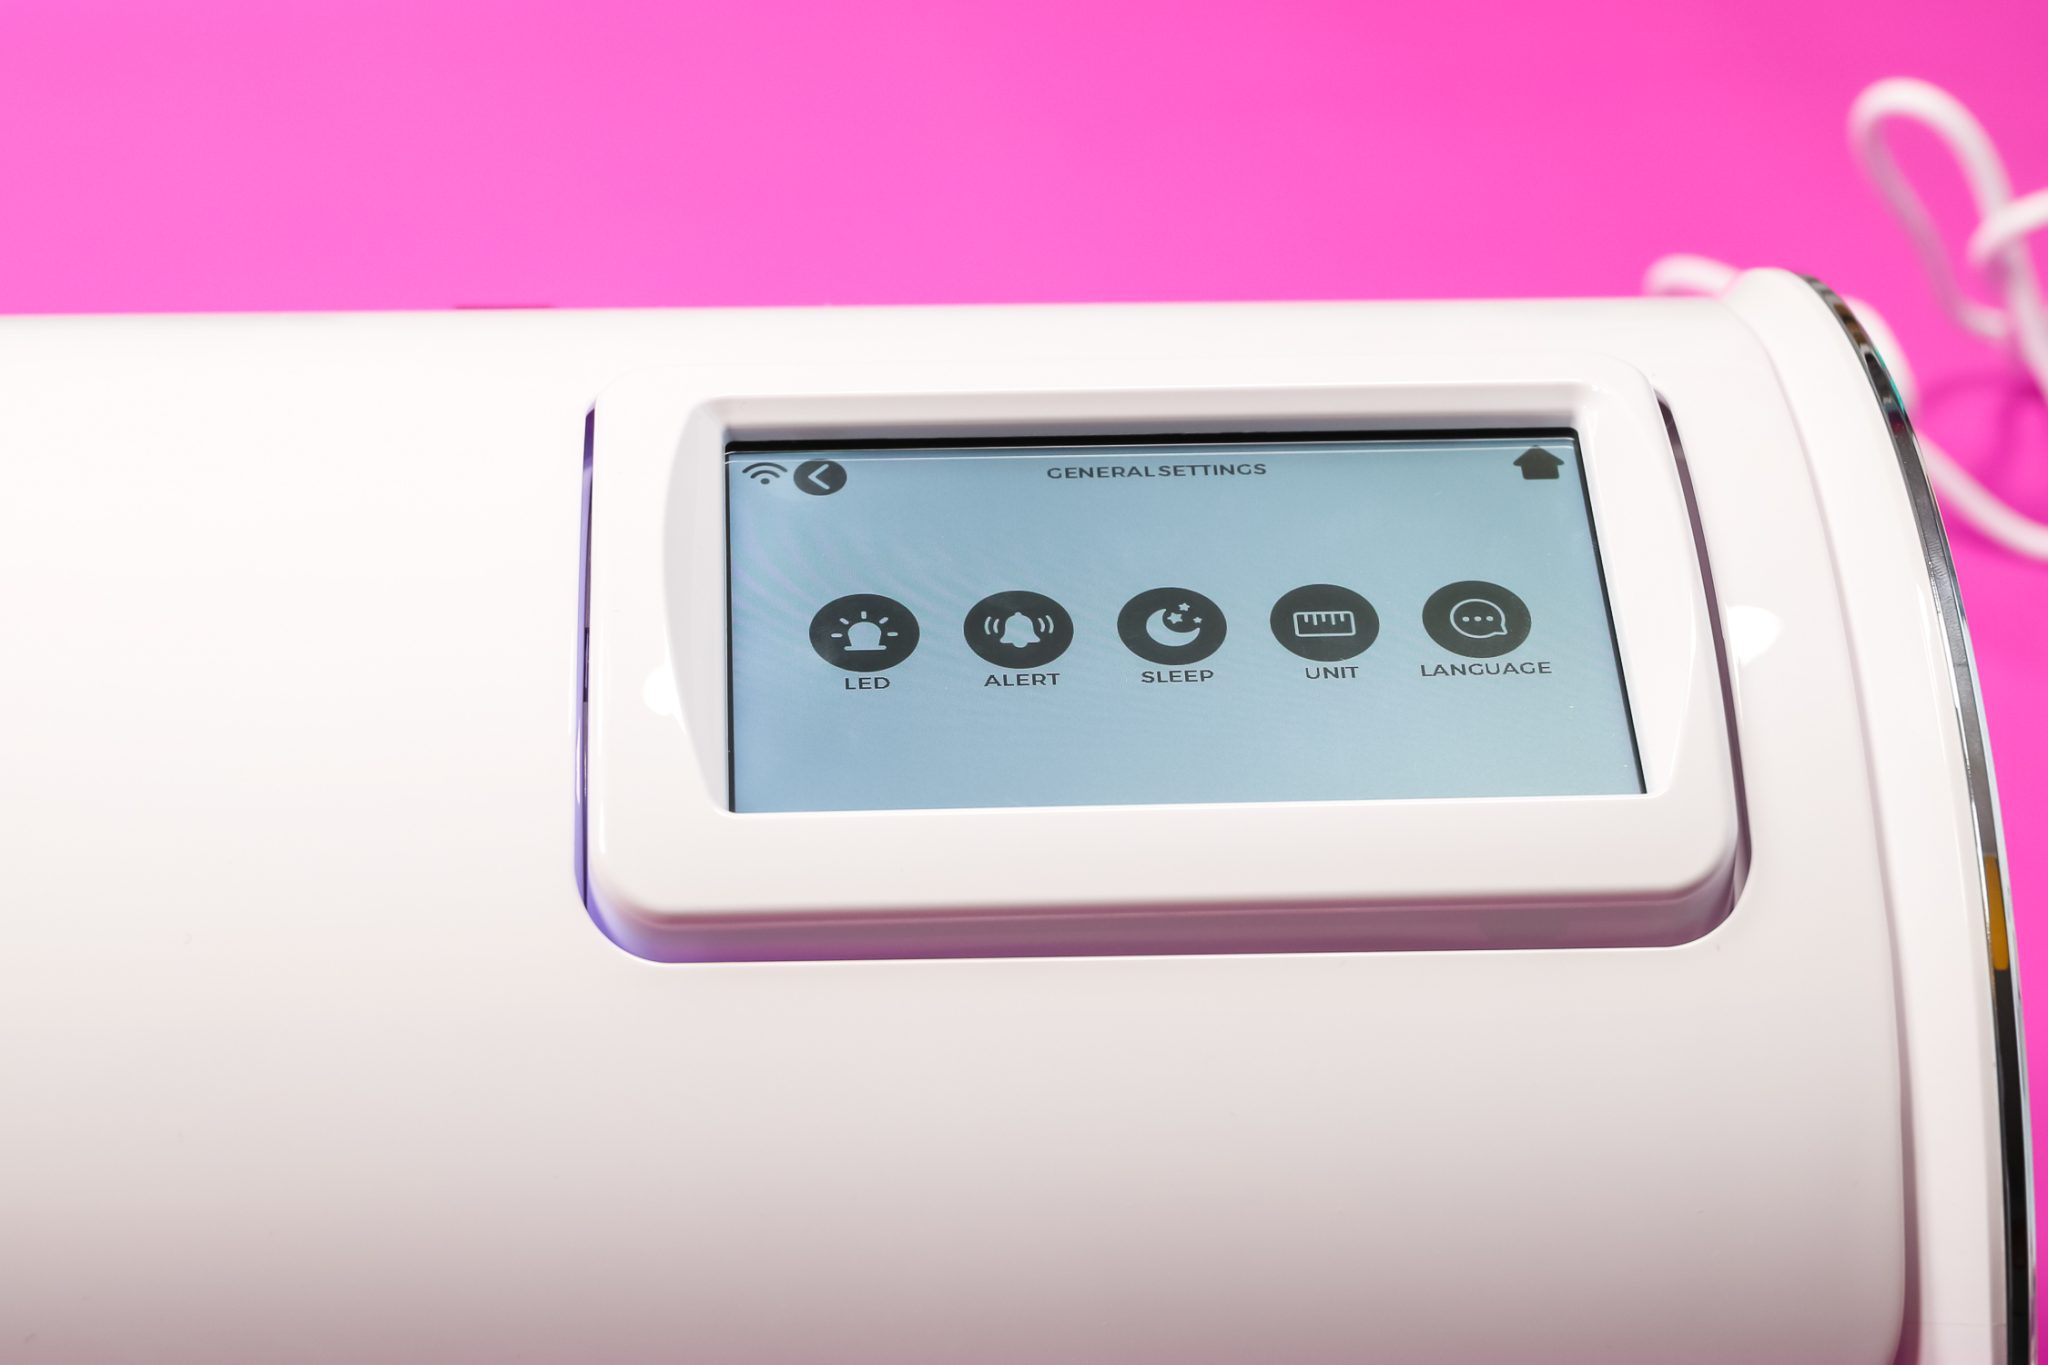
Under settings is also where you will connect your machine to the wifi. There is a camera and we will look at that more closely when we’re working on our print-then-cut project. You can select the USB port and use a jump drive to cut designs. You can also see all of the info about your machine.
Material Cut Settings
Under cut settings, you’ll see that you have some preset cut settings but you also have the ability to adjust the settings and create your own presets. I love that you have the opportunity to change those settings right on the machine easily. If you happen to notice that your machine needs more or less speed/pressure, those can be adjusted here.
The button on the bottom right corner of this main screen does a test cut. At any point, you can click the test cut button and perform a test cut on your material. We’ll talk more about that below.
The main circle on the front panel allows you to move the blade, you can actually start your cut at any point.
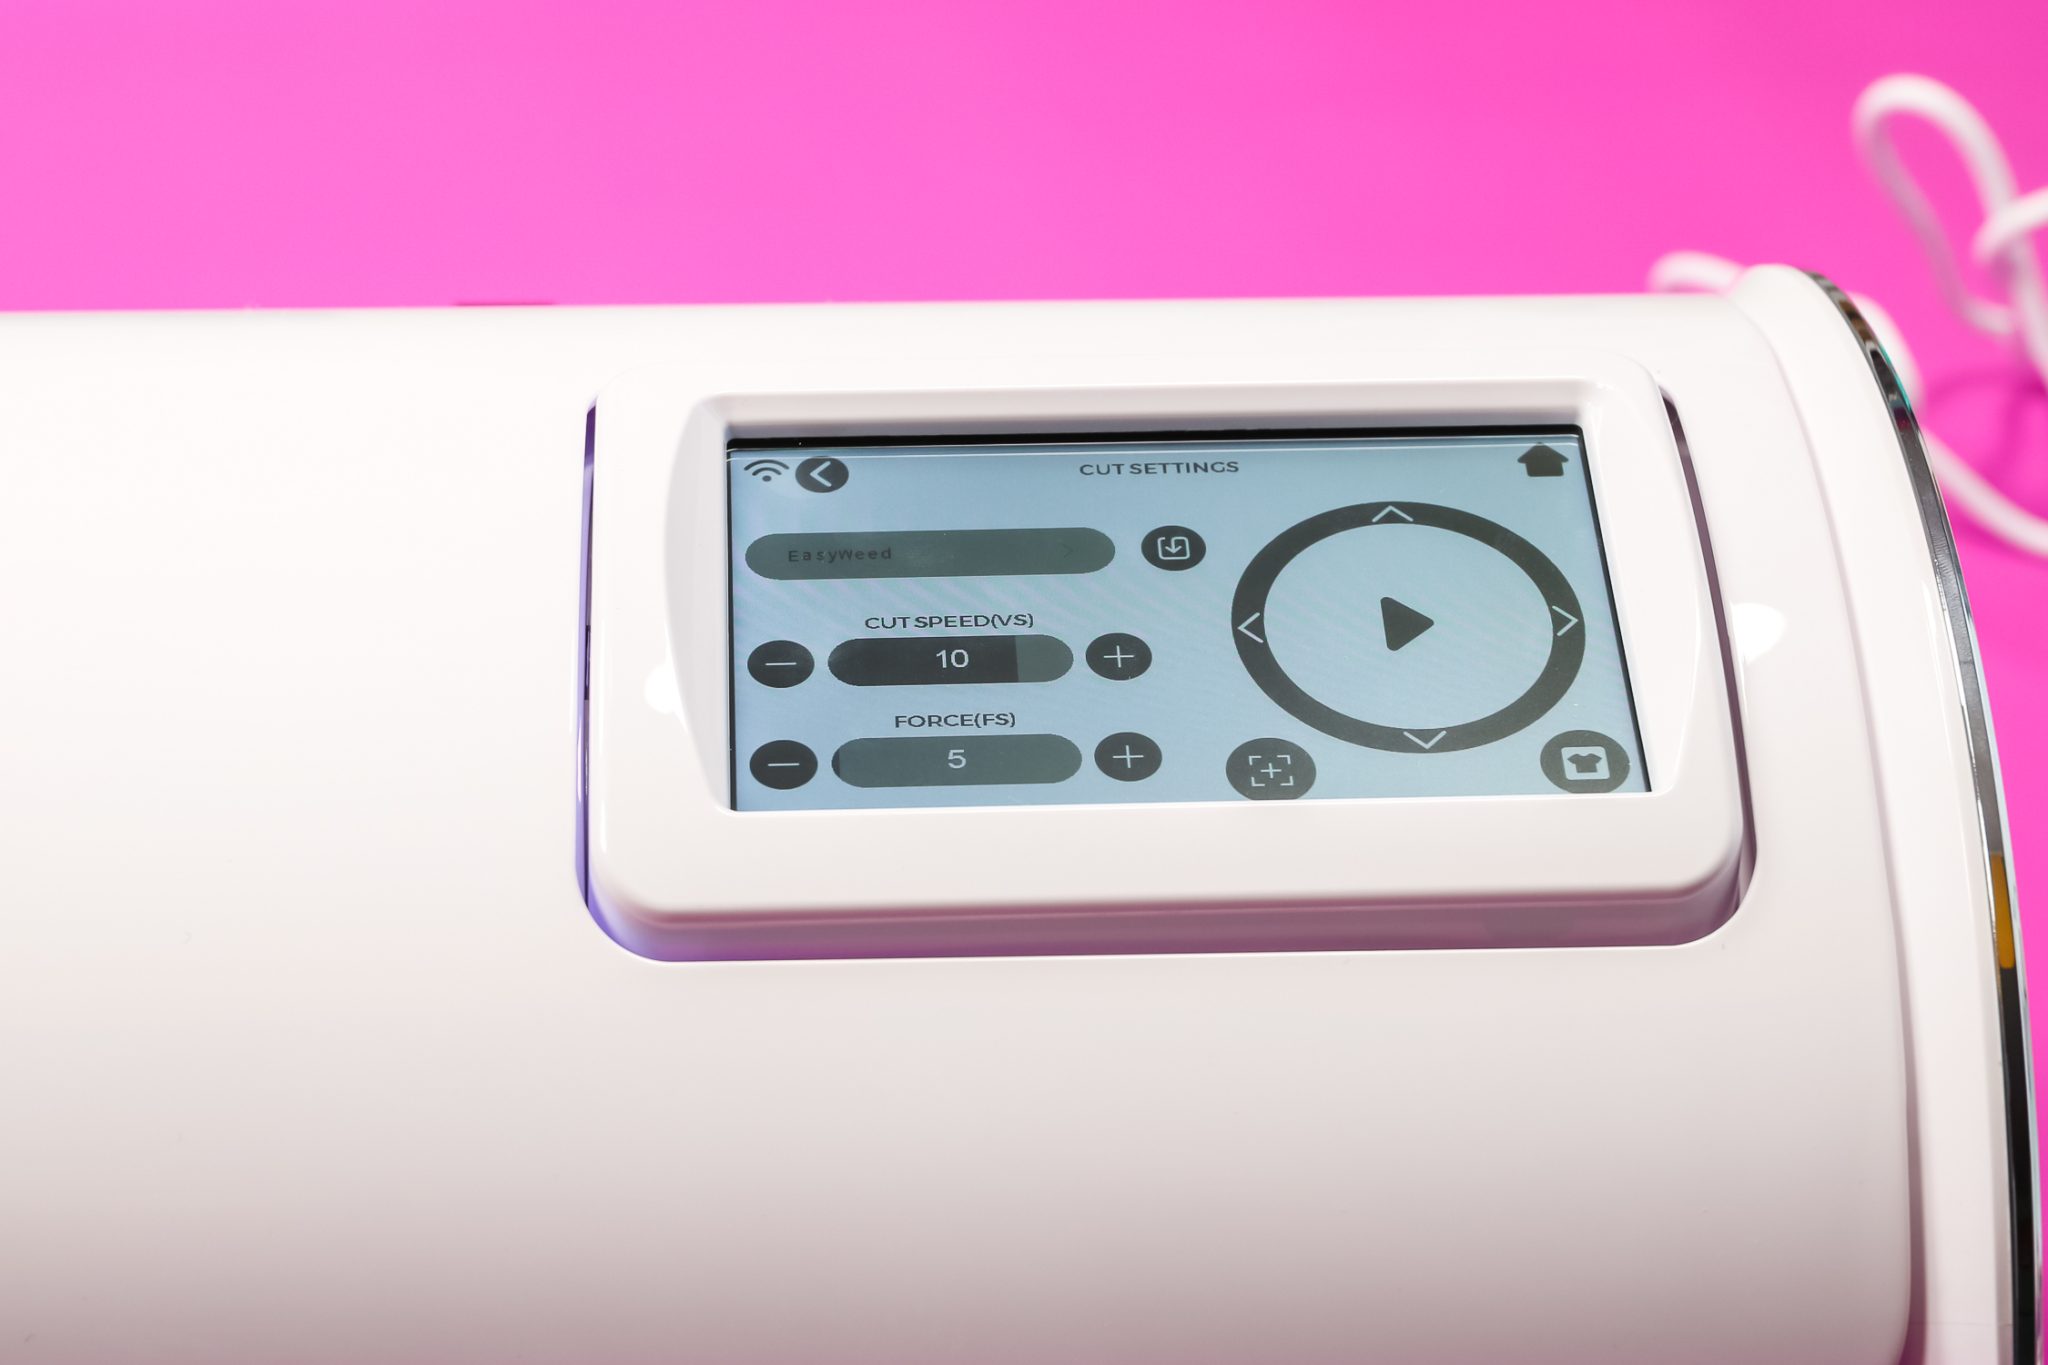
You can also change any of the preset material names and settings. There are spots that are open where you can add a preset but if you never use, for instance, StripFlock, you could remove that preset and add something that you do use more regularly.

Adjusting Pinch Rollers
The pinch rollers are movable which is great if you’re using HTV or Vinyl sheets that are smaller than the size of a mat.
To move the rollers, press the lever down on the back and then the rollers move anywhere you would like. This allows you to slide the rollers where you need so they can help guide the materials into the machine.
Once the rollers are lined up with the materials lift the lever to lock the rollers into place.
Loading Blades into Blade Housing
Siser Juliet comes with 3 blades. Two are regular fine-point blades (red cap) and one is a deeper-cut blade (blue cap).
To load the blades into the housing, you will loosen the gold ring on the red housing and then loosen the silver. Remove the blade from the packaging, and remove the cap from the blade. Place the dull end of the blade into the housing and it should kind of suck up into it.
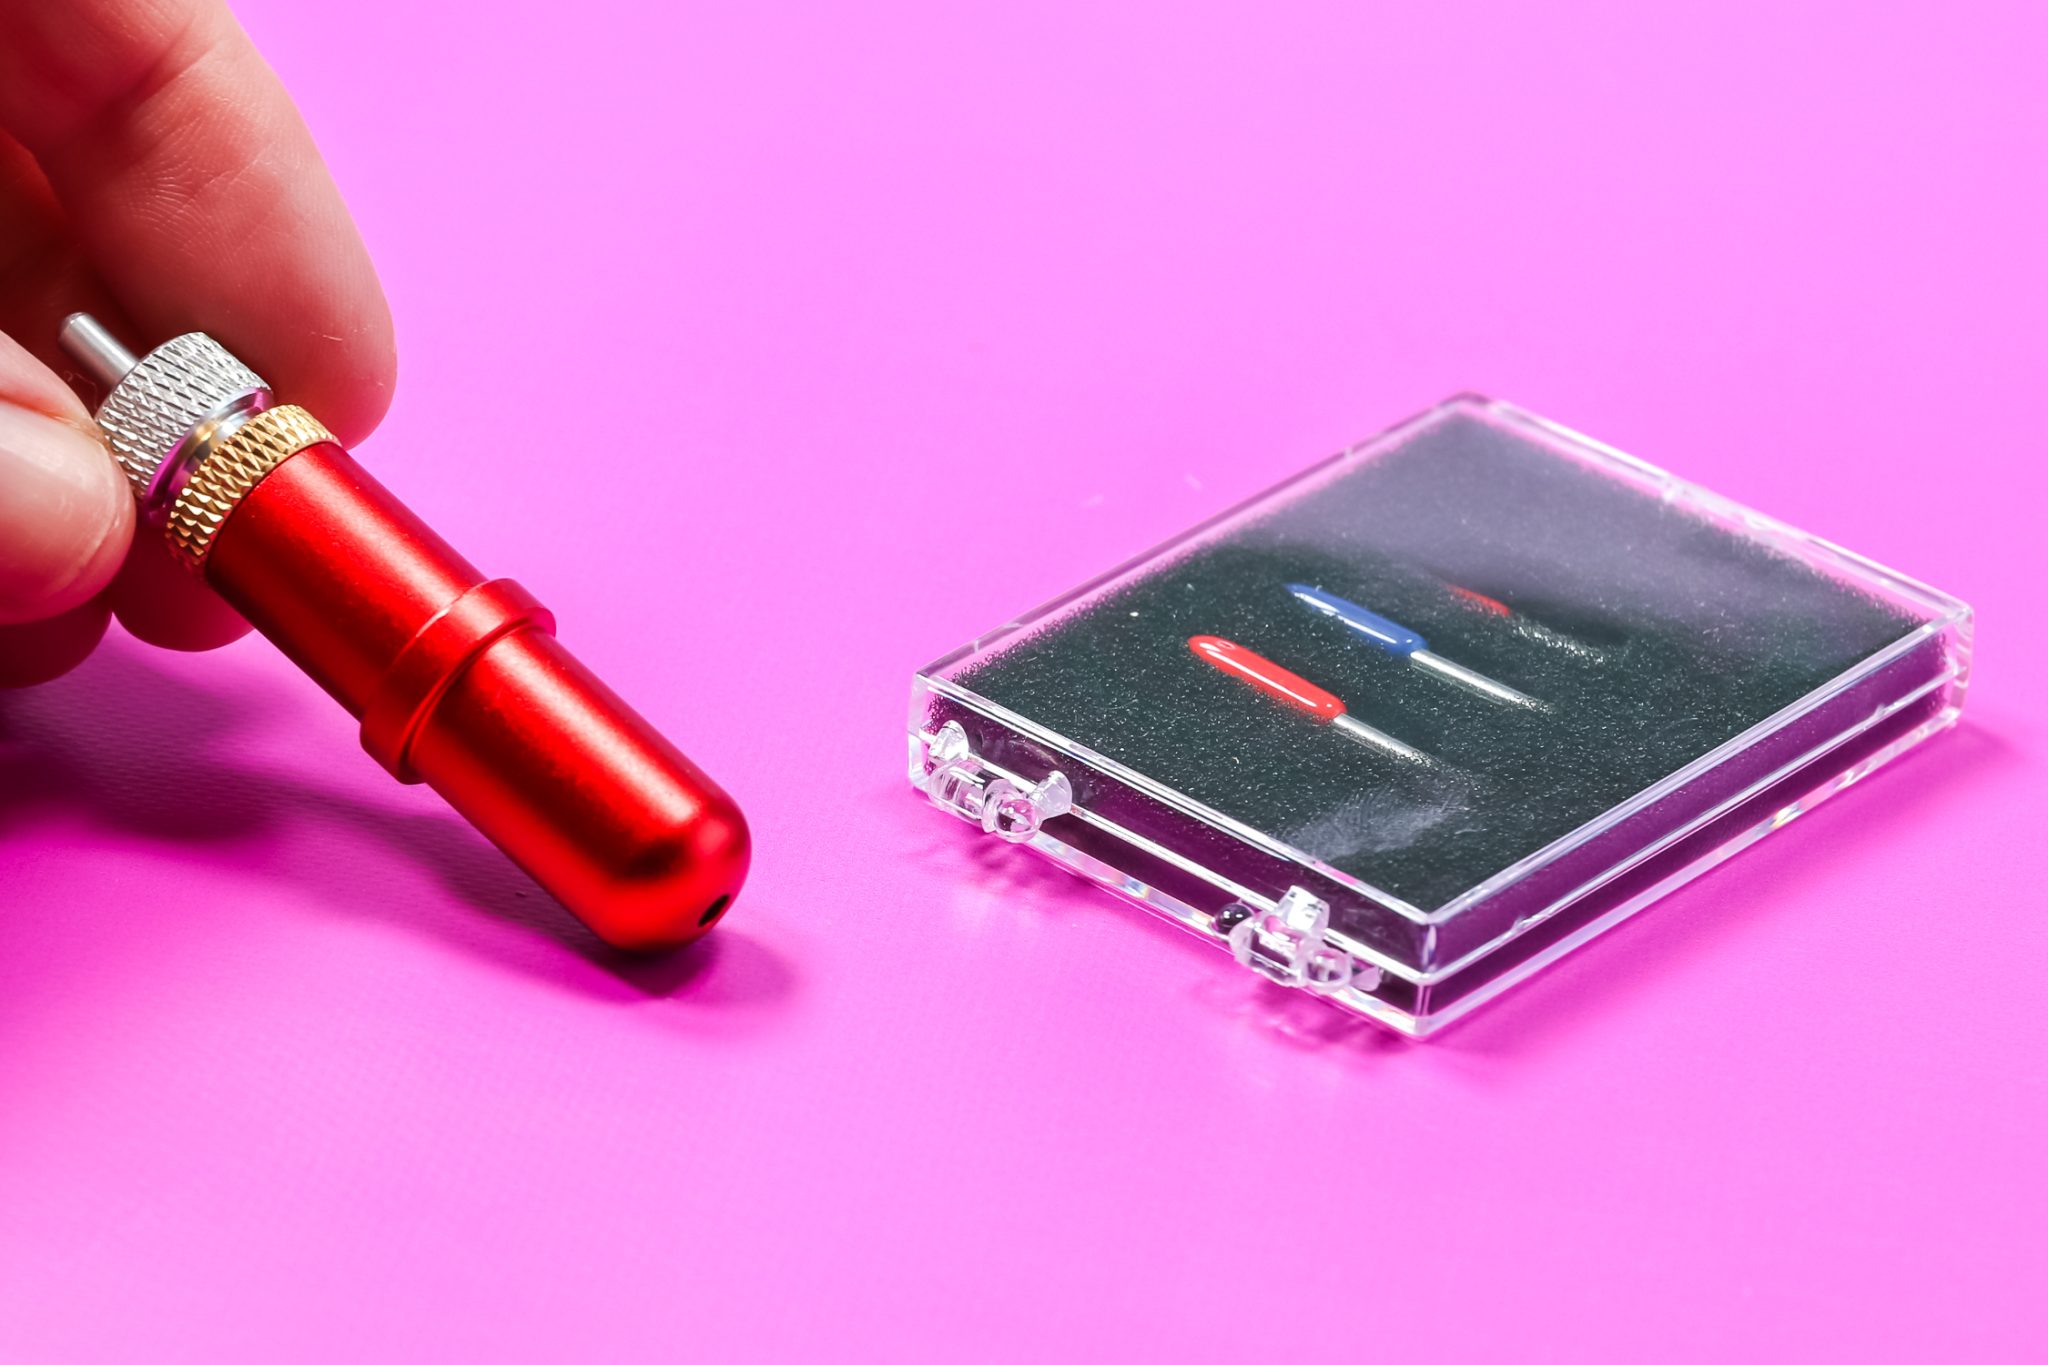
The blade should be sticking out about the width of a credit card. You can adjust it by turning the silver ring. It will shorten or lengthen the amount of the blade that sticks out.
If you’re noticing that your cuts aren’t deep enough or are too deep, you can adjust that by twisting the silver ring. Once you have everything how you want it, tighten the gold ring and your blade is ready to be put into your machine.
Loading Blade Housing into Juliet
Now that we have the blade in the housing we need to load the housing into the machine. The large white piece in the middle is called the head. This is where the magic happens for print then cut. Loosen the screw on the side of the head and drop the blade in.
The blade needs to sit all the way down onto the band. Make sure the housing is sitting down on the band and then tighten the screw back up. You shouldn’t be able to pull the blade housing out of the machine when the blade is installed correctly.

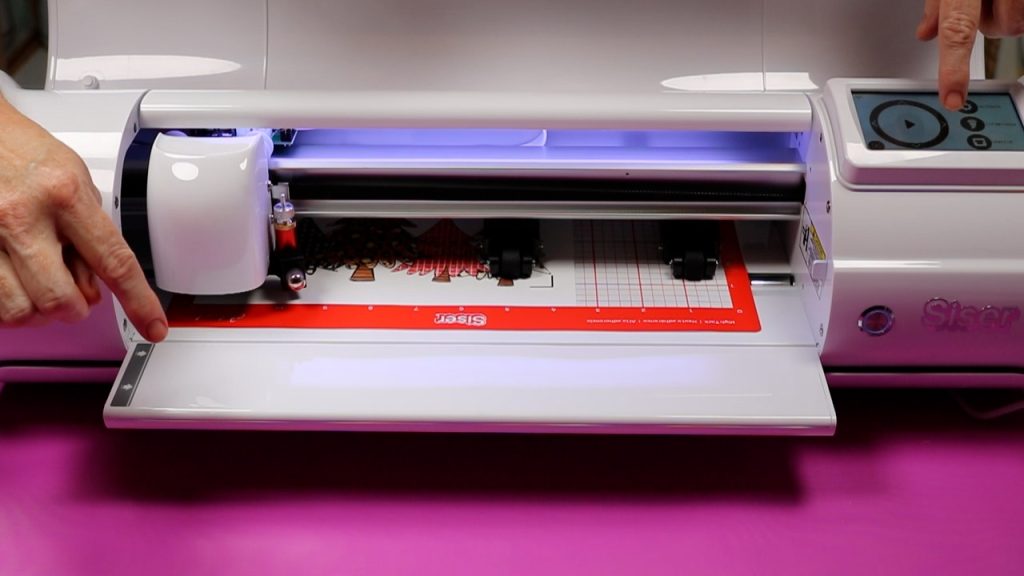
Loading Materials into Juliet
Whether you’re using a mat or not, when you load your materials into the machine you need to make sure they’re under the rollers.
You can actually load your materials from the front of the machine or the back of the machine. Get the material under the rollers and use the arrows on the control panel to load it in. Lock the rollers and we’re ready to do a test cut.
Cutting with Siser Juliet
REMEMBER: wherever you set the blade is where your machine is going to cut. If you set your blade into the middle of your material, it will start the cut in the middle of the material.
Now that the blade and material are loaded into the machine choose the material you’re using and hit the test cut button right on the machine display.
When the cut is complete you can either use the arrows to remove the material out of your machine or use the lever to raise the rollers and pull the material out.
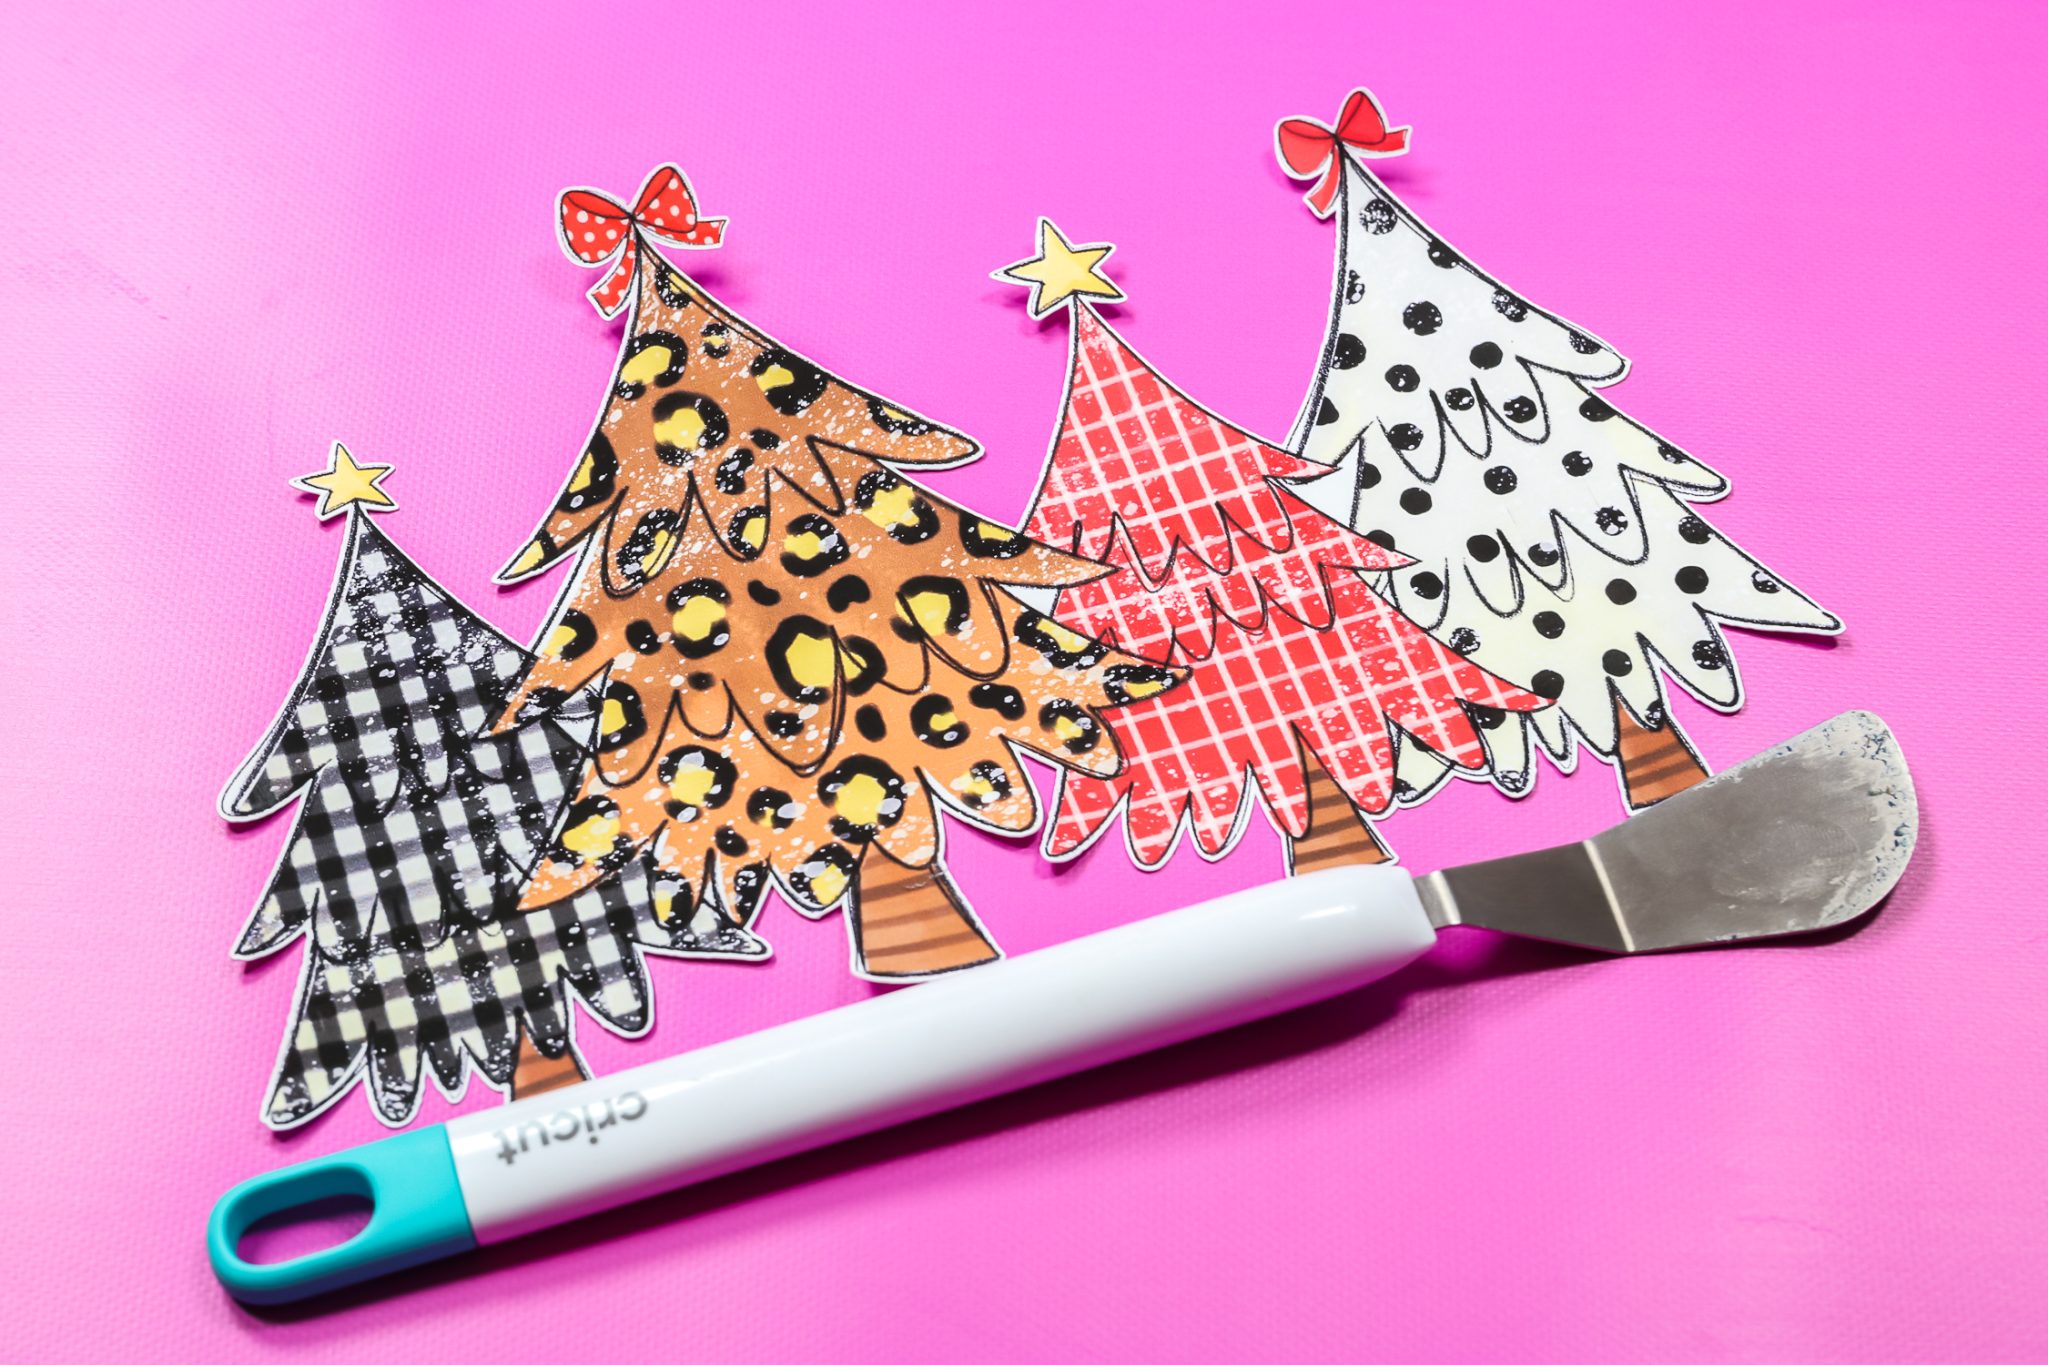
I really like the test cut feature. I tested the EasyWeed setting and it cut the EasyWeed beautifully.
NOTE: With Siser Juliet there are no buffer margins, you can cut right up to the edge of your material.
Leonardo Design Studio
Let’s take a quick look at Leonardo Deisgn Studio. I’ll be doing a full review of this program later but as a quick overview when you open Leonardo Design Studio along the left side you can look at tutorials, look at inspiration, they even have designs that you can pick right within the software.
If you have any designs saved or images uploaded you’ll see those under “My Page”. When you’re ready to make a design click the design button on the lower left-hand corner.
When you first click on design, a few sample designs pull up. One is a cut design and one is a print then cut design. You can use either of those to experiment with or you can just delete them off the canvas.
Creating a Design in Leonardo Design Studio
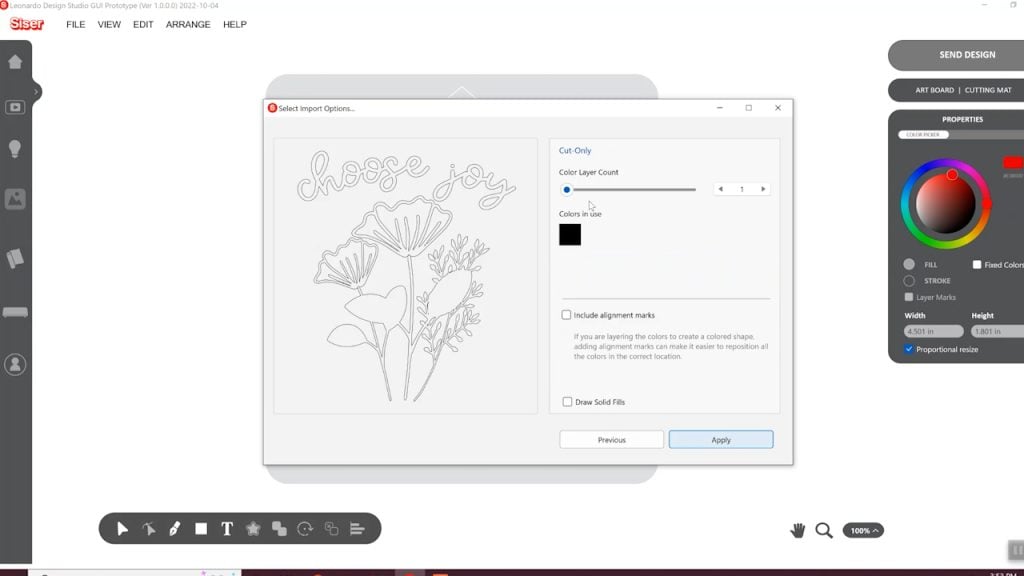
Once you’re in the Design area, you can add designs to the canvas or upload your own. Along the top, you’ll see there are a variety of menus. From here, you can import a design and use the various edit and arrange functions.
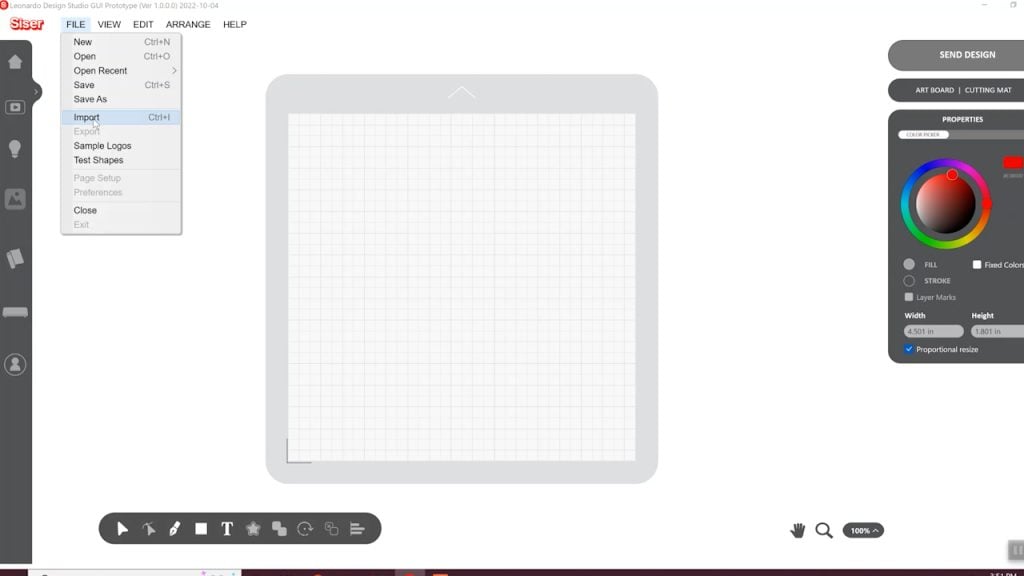
To upload an SVG select file and then import. Select the file you want to upload and then choose how you want it to upload. You can choose cut only, print then cut, or editable artwork. If you want to keep any fill patterns, pen lines, or things like that, you would select editable artwork. I am choosing cut only and then click done.
They also allow you to change the number of layers. If you had a layered file, which I do not, you could increase the number of layers that you wanted to import. Then different colors would be in different layers. You could include alignment marks if you had different colors and those would be boxes around the corner.
If you’ve ever used alignment marks, this is a great way to automatically add those and not have to do that manually.
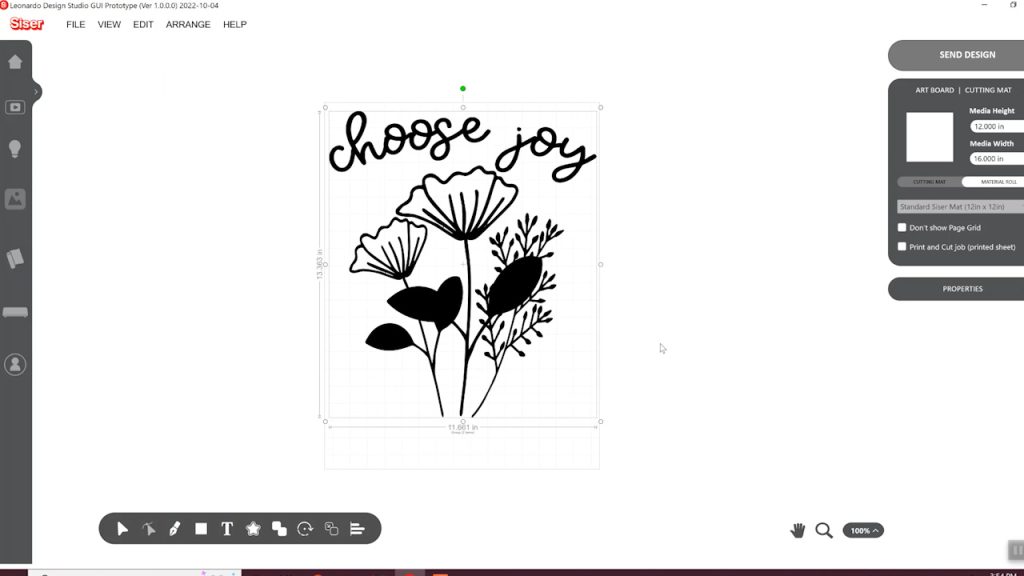
Now we can click apply and we’ll see our design. Select if you want to cut on a mat or on a roll. I will be using a roll of HTV so I am going to select that and then select the material size. With the roll selected, I can now resize my image and see exactly how it will look on the material itself.
How Close to the Edge Can I Cut?
I really like to test the limits so I’m going to make this image as large as I can to see how well it cuts even close to the edge of the material. Once I have the design sized how I want, click on send design, and then move the blade.
The Siser cutter will start on the bottom left. That’s why your print is always going to be kind of moved down. You can move it around on this material if you would like. Because I’m using HTV, I need to mirror my design. I’m going to choose use cutter settings and click send to cutter.
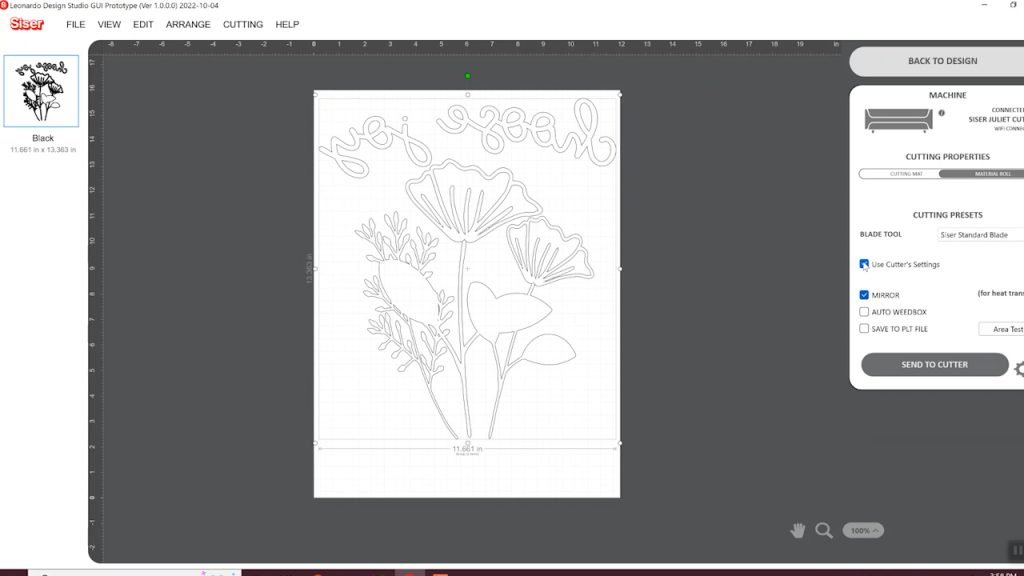
I’m moving my blade so it’s on the bottom left of the material. Go to cut settings, select EasyWeed, and then choose to send to cutter. It does prompt us to make sure that the machine is ready, click yes.
NOTE: You can watch and hear the machine cut in the video above!
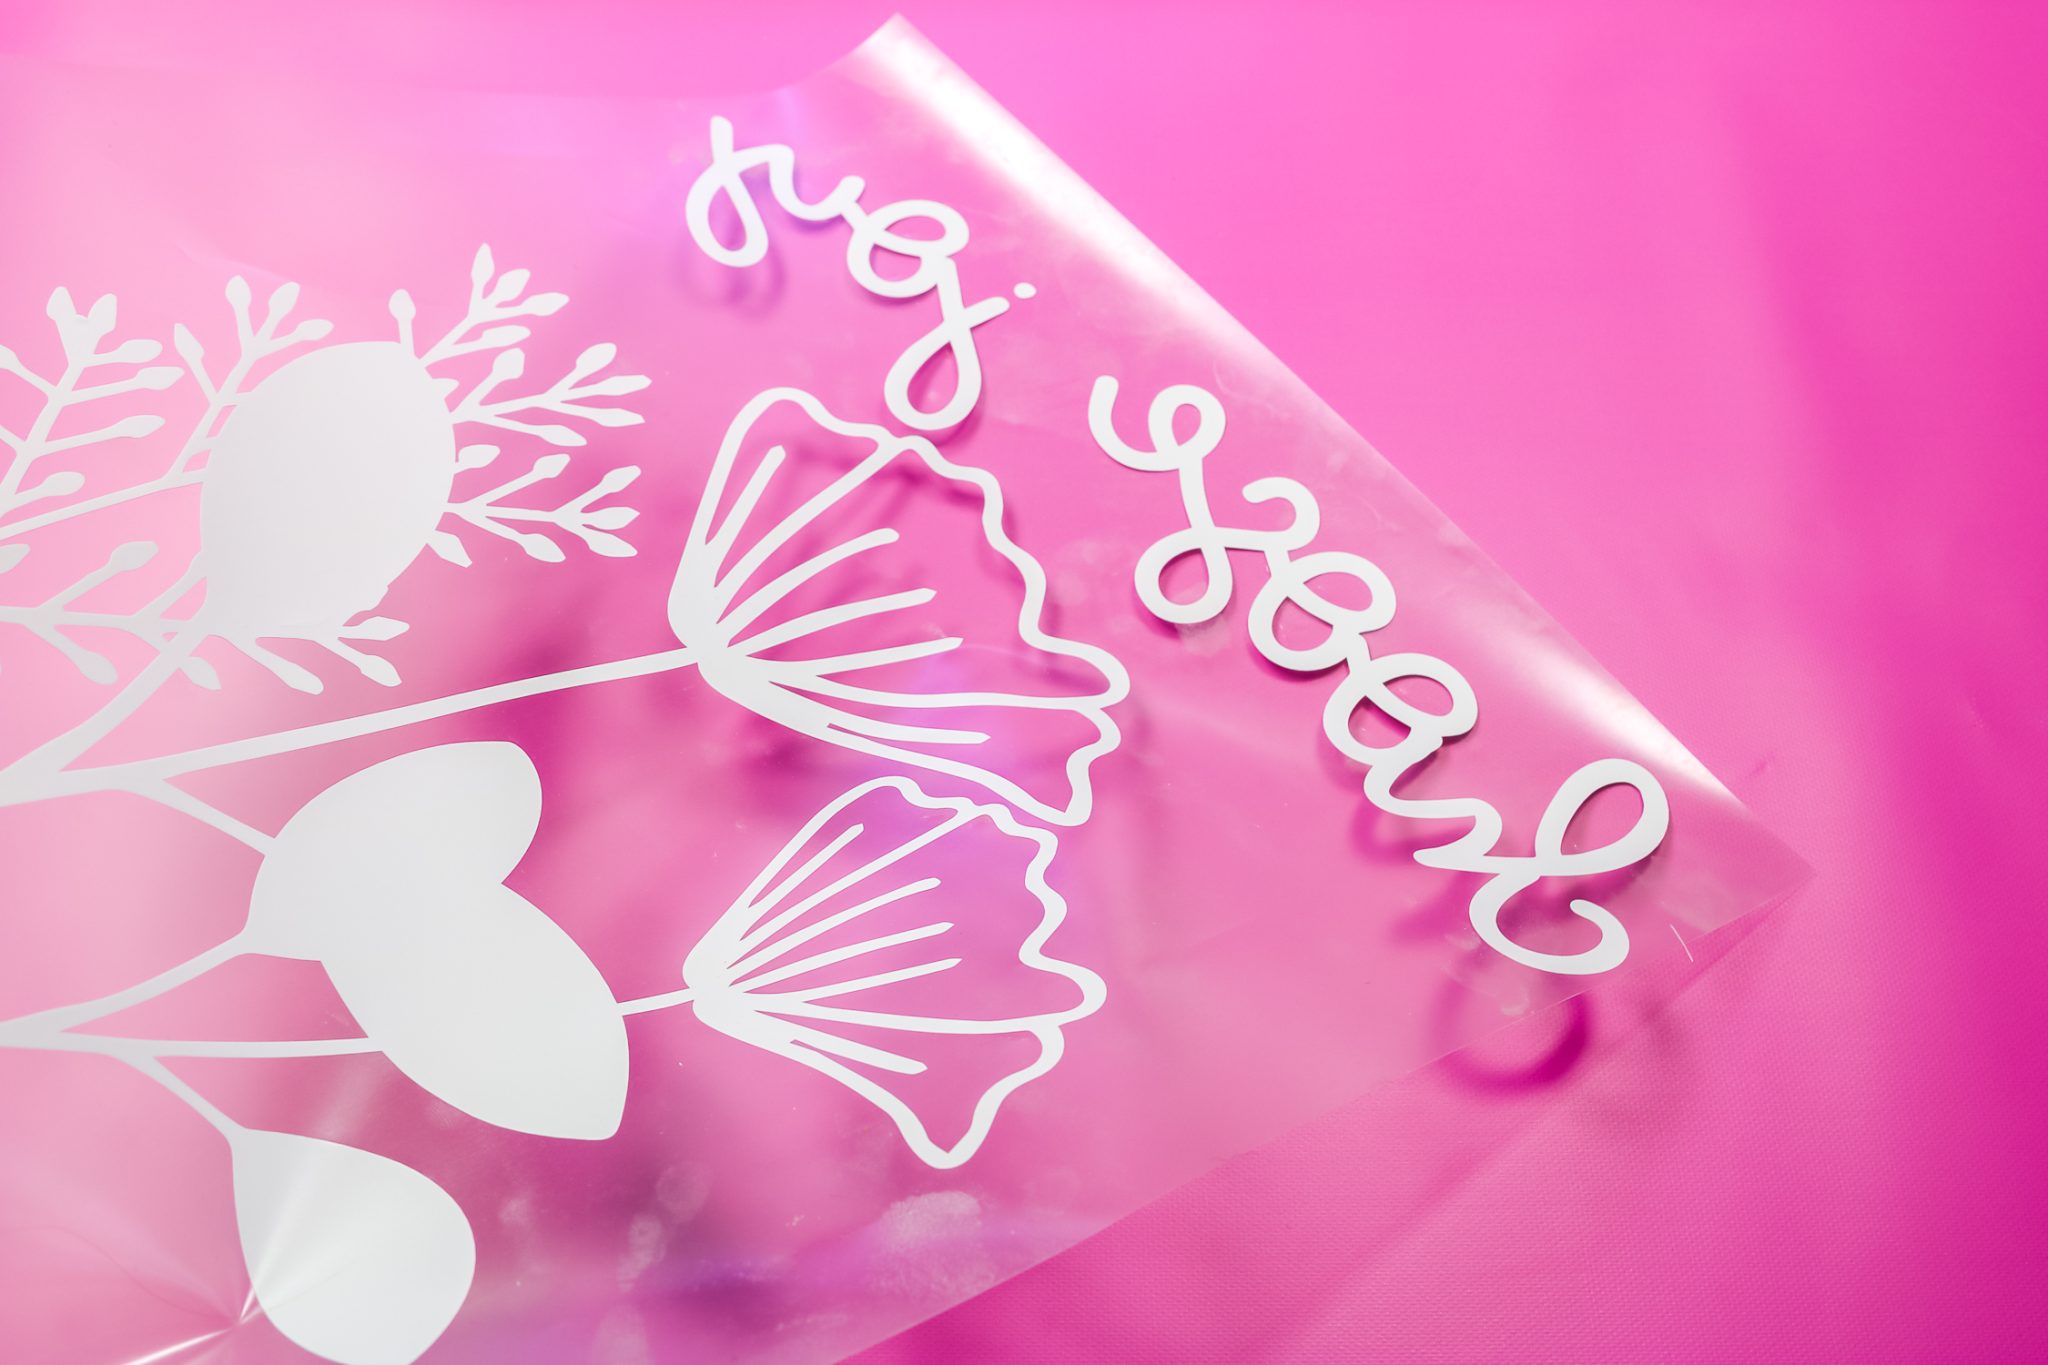
Once the cut is done, the material goes back into the machine so I can drop the lever in the back and pull the material through.
Look at just how close to the edges I was able to get my cut. I was able to get it really close on both sides using as much as I could of that HTV roll and this cut weeded beautifully so I was really impressed. You really can cut all the way to the edge of the material!
Print Then Cut with Siser Juliet
To upload a print then cut design, you’d follow the same steps as you did for a cut-only design. You do have some different options that you can play with like mask tolerance and the ability to add or remove certain colors if you wanted. You can use also drawing tools to add or remove parts of the print.
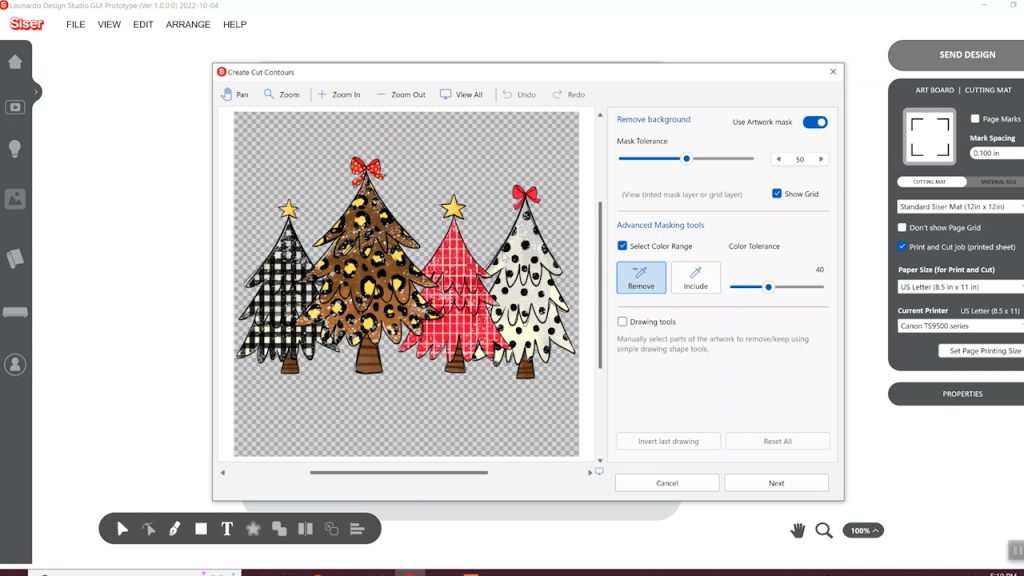
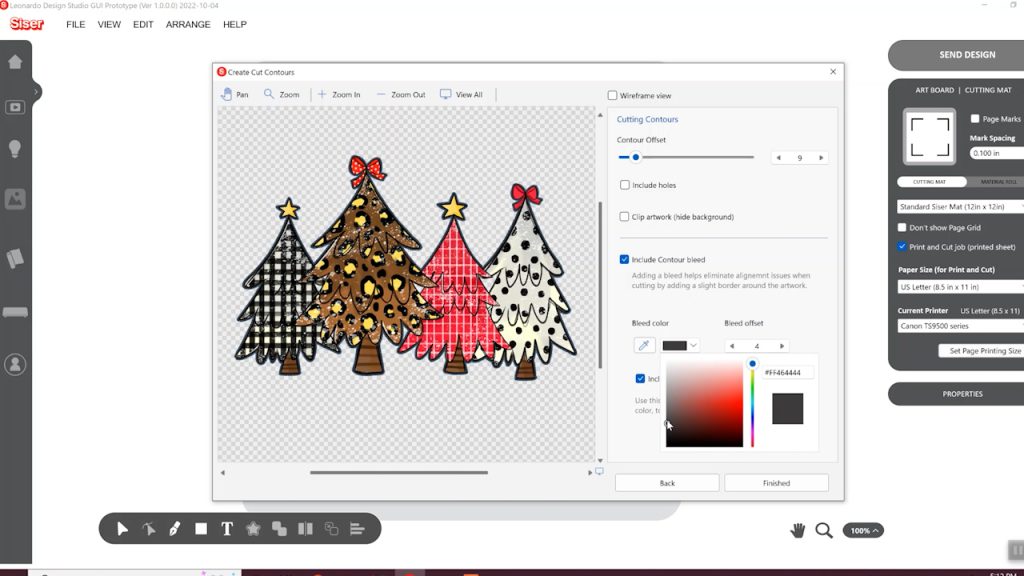
Click next and now the machine will trace the contours. You can change the smoothing level and the minimum contour area to get different results. You can also include or exclude holes. Holes are the open areas between designs. When the trace is done, the blue lines are your cut lines. You can add an offset right here and a contour bleed if you want one.
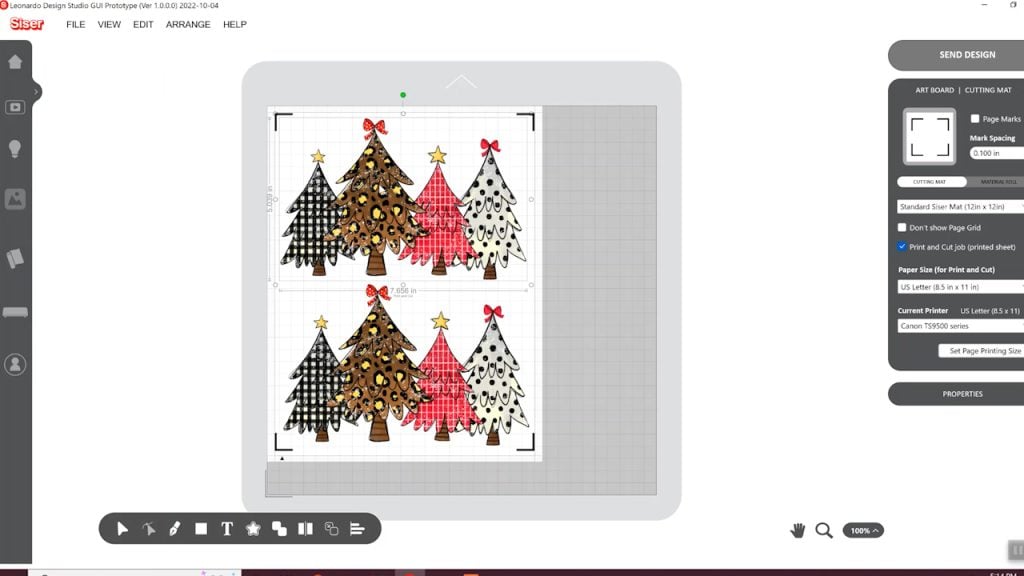
When you have the image the way you want click finish. Choose the paper size you’re using and then you can size the image how you want.
Pay attention to the print area. You need all of the image and the registration marks to be within the print area.
On this screen, you can change your mark spacing so it is just around your image or so it’s using the whole page. You can choose to print one image or more and you can choose that all on this screen.
When everything is how you want it, click send design. You’ll see two sheets, the first will be to print your design and the second will be to cut it.
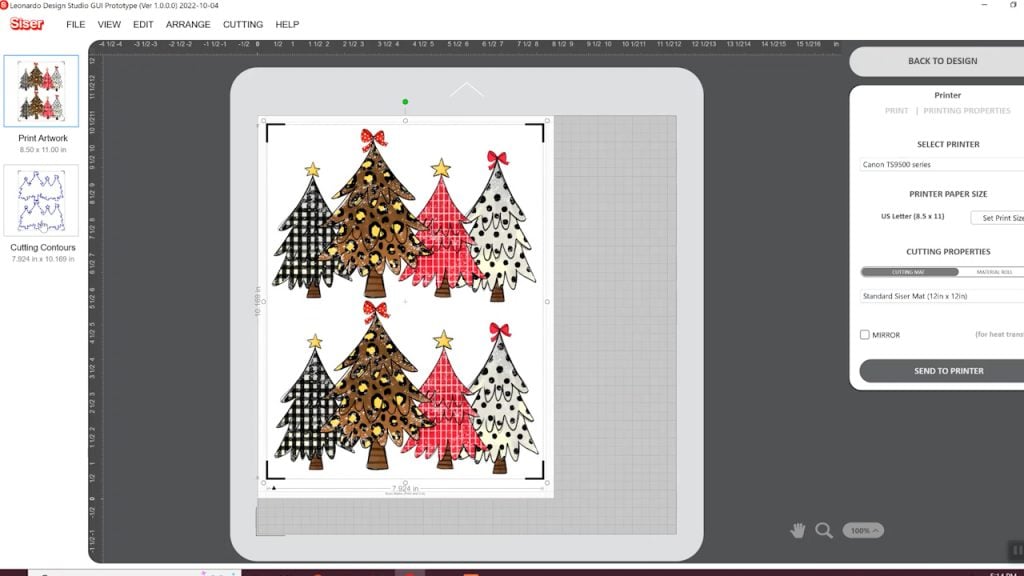
Printing From Leonardo Design Studio
Choose your printer and print size. Click send to printer and make sure your settings are correct. If you need to mirror your design make sure that is selected. When your image is printed, make sure you have it set up on the mat like it is on the screen. It needs to be at the bottom left corner.
Use the arrows on the display to line the blade up on the bottom left registration mark just inside the mark.
Click send to cutter in Leonardo Design Studio. Your machine will first find all four corners and then it will scan the document and cut.
If the machine beeps and gives an error, it probably hasn’t found the very corner of your registration box, just cancel the cut and try again. Remember to place it just inside the bottom mark, almost on that corner just inside of it.
When the machine is done cutting, remove the mat and admire your print then cut! I was able to print and cut right up to the edge and it did a beautiful job.
Frequently Asked Questions
Since this is a brand-new machine there are a lot of questions popping up. I will answer as many of them as I can as this machine is new to me too.
How Does Siser Juliet Compare to Cricut?
This is definitely the most asked question. I can say a few things but I really want to use the machine a lot more before doing a full comparison. I know Cricut like the back of my hand so a comparison right now might not be fair.
- It can cut wider than any current Cricut machines because it can cut closer to the edge of the material.
- The software is very different and the machine itself requires more manual settings before cutting.
- Both of Cricut’s new machines can cut Smart Materials matless but they can only cut one width. Juliet can also cut backed materials like HTV and Vinyl without a mat but in any width or size.
- With both brands of machines, you can cut really long lengths when cutting matless. Juliet doesn’t have a set length you can cut matless, it would depend on how straight you get your material loaded into the machine.
- Both brands cut quickly and relatively quietly.
More comparisons like pros and cons for both machines will come as I have the opportunity to use this one more.
How Much Does Siser Juliet Cost?
The second most asked question is about cost. I don’t normally talk about the cost because it changes all the time but as of the writing of this post Juliet retails for $499. This price is subject to change with time.

What Accessories Can You Get?
Right now you get the items I showed that come in the box and you can get mats in both high-tack and low-tack mats.
Siser is working on other blades that haven’t been released yet. Things like a blade for fabric and a knife blade. I don’t have a date on when they will be released, what exactly they will be, or how many are going to be released but I do know more blades are coming. They are also releasing a roll holder and that will be coming out soon.
What are the Biggest Differences from the Cricut?
- The design starting on the bottom left instead of the top left takes some getting used to.
- Manually placing the blade/pen onto the material is another thing that is different.
- Leonardo Design Studio is very different than Design Space.
- Juliet allows you to actually cut without a computer by using a jump drive.
- The Print then Cut size with Siser Juliet is significantly larger than any Cricut machine. I’ve found that you can Print then Cut up to an 11×17 piece of paper and you can really get your image the full size of the paper, whatever you can print you can cut.
How Loud is Juliet?
If you watched the video, you may think Siser Juliet is a loud machine. The microphone in the camera really amplified the sound. I think it’s really a nice quiet machine.
Where Can I Purchase Siser Juliet?
There are currently several distributors selling the Siser Juliet. You can try a few of my links below!
NOTE: Currently the Siser Romeo is not for sale but it will be coming in early 2023.
Final Thoughts on Siser Juliet
I think if you’ve been using a Cricut machine there will definitely be a learning curve with using Juliet. I think Siser is bringing the commercial cutting world to crafters. Personally, I consider Cricut and Silhouette craft cutting machines. Something like a Graph Tech would be a professional cutting machine. Siser Juliet and Romeo bridge the gap between the two worlds. Siser is bringing aspects of a commercial cutting machine into a package that works for a home crafter.
Who should buy the Siser Juliet? This machine might make more sense for someone who’s running a small business out of their home. The ability to cut really long lengths could be helpful to small business owners. However, crafters who want a more professional machine may also enjoy using it!
I hope this has answered a lot of the questions you may have about Siser Juliet. I’m excited to continue to use this machine to teach you more about it. If you have more questions feel free to leave them in the comments below and I’ll answer everything I can.