
It has been a very long and seemingly endless process, but yesterday I finally put the finishing touches on the IKEA cabinets that I used on the mural wall. They are now completely installed and finished, and as soon as I get the outlet situation finished up, I’ll be ready to start organizing things in my cabinets and drawers. Since the posts about this project have been spread out over a long period of time, and I didn’t actually finish the final step (the filler strips) until yesterday, I wanted to put all of the information about installing IKEA cabinets in my studio in one post to show the entire process from start to finish.
But first, here’s a glimpse of the finished cabinets, complete with the finished toekick and the filler strips between the cabinets and the side walls.


So let me start from the very beginning and give a walkthrough of the entire process that I used, from start to finish, to install these IKEA Sektion cabinets on the long mural wall of my studio.
1. Attach the hanging rail to the wall.
I didn’t actually use IKEA’s hanging rails because I forgot to order them, and the shipping costs on those alone would have been ridiculously expensive. (I don’t live close to an IKEA.) So instead, I just used 1″ x 4″ lumber across the entire width of the wall screwed into studs.

I also put a narrower strip about five inches from the floor to act as a spacer for the bottom of the cabinets to hold them off of the wall at the same distance.
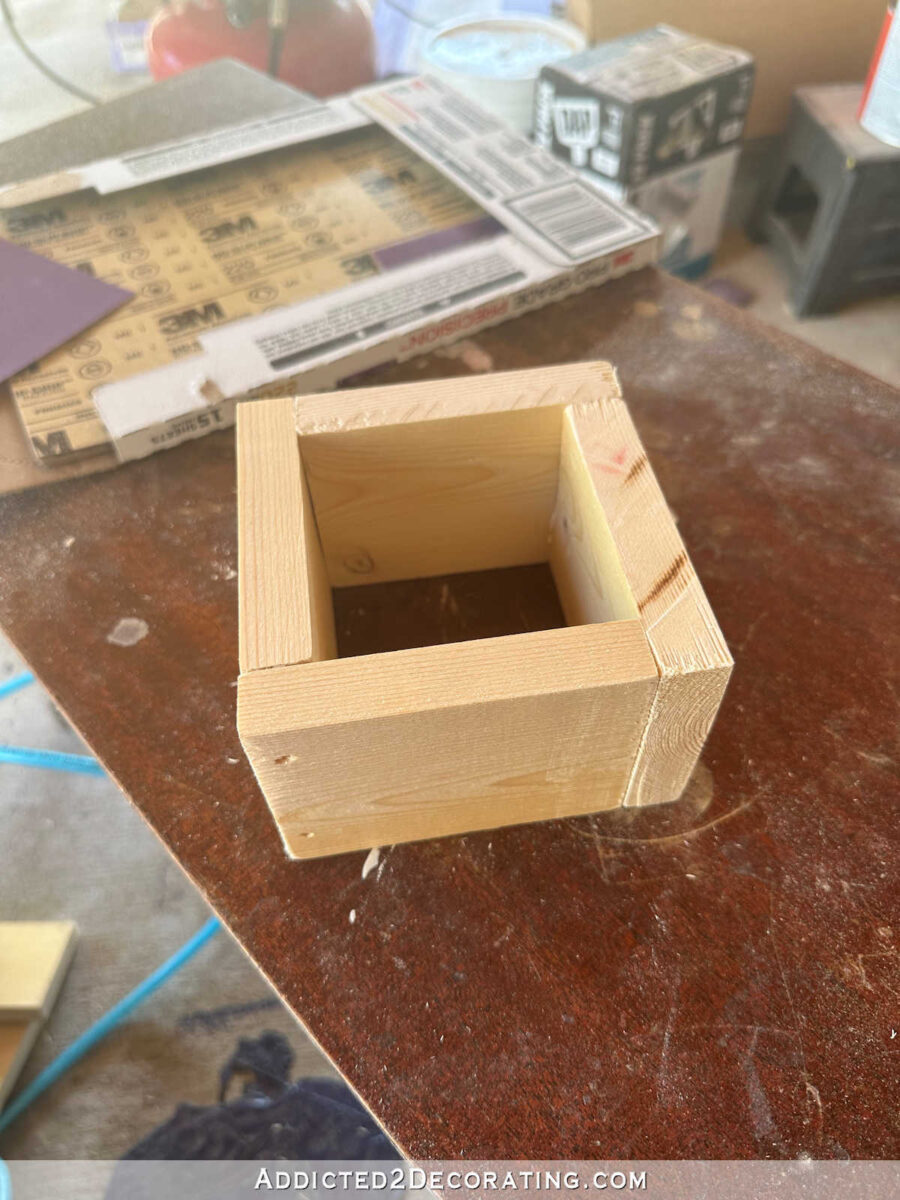
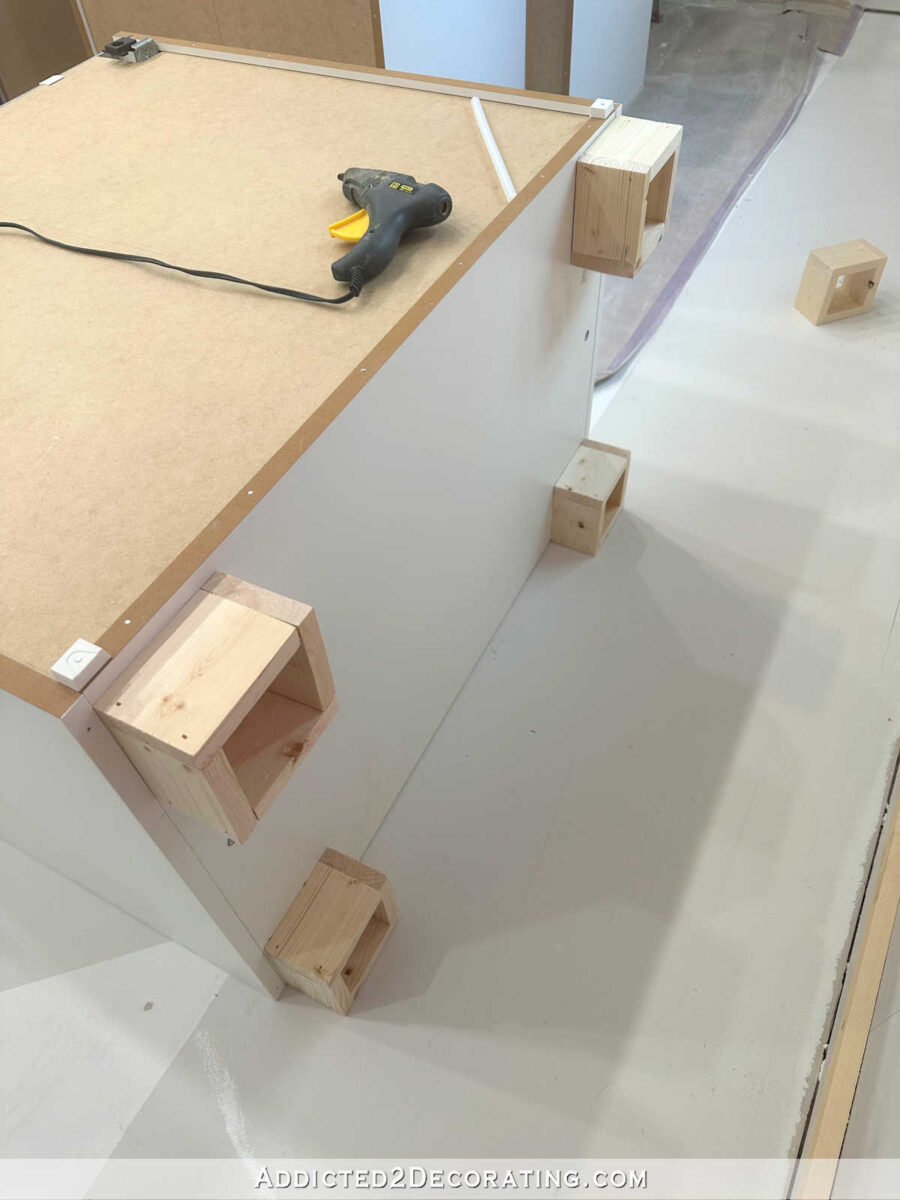
2. Install the feet on the cabinets (IKEA Sektion feet alternative)
I also didn’t purchase IKEA’s feet for the Sektion cabinets because they were too tall for my purposes. I needed my cabinets to be no more than 33″ high, which means that my feet could be no more than 3″ high. The minimum height for IKEA’s adjustable Sektion legs is 3.5″.
So I used some inexpensive lumber, ran it through my table saw to cut it down to 3″ wide, and then cut pieces that were about 4″ long. I glued and nailed four pieces together to make each foot, as shown below.
And then I attached them to the bottom of the cabinets using hot glue. I’ll repeat this again. No woodworker should be using a tiny craft store hot glue gun. Go to Home Depot or another big home improvement store, go to the tool section, and buy yourself a big hot glue gun that can put out a whole lot of glue with each squeeze of the trigger.
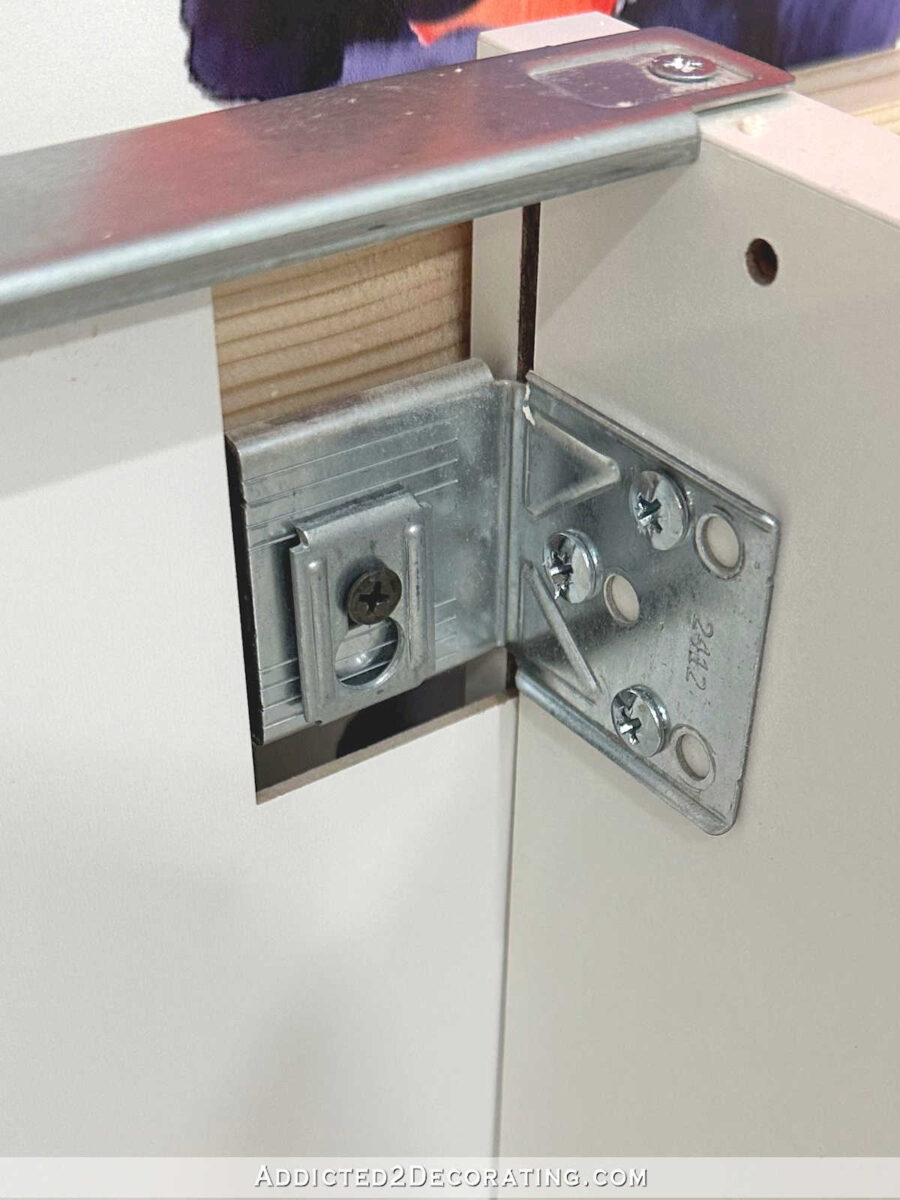
3. Attach the cabinets to the rails.
You’ll need to be sure to carefully read the instructions (correction: carefully look at the drawings in the wordless instruction pamphlets) that come with the IKEA Sektion cabinets because the way in which you install the mounting brackets onto your cabinets is determined by whether or not you are using IKEA’s hanging rails. If you are, the brackets are attached using one set of holes. If you’re not (I didn’t), then the brackets are attached using another set of holes.
Since I wasn’t using IKEA’s hanging rails, I attached my brackets appropriately so that they would screw right into the mounting board I had attached to the wall. I measured carefully and placed each cabinet where I wanted it, and then screwed a mounting screw through the big hole in the bracket and into the board.

And then I hung this little bracket (these come with the IKEA Sektion hardware) over each screw, but I didn’t tighten them completely at this point. I wanted the cabinets to still be able to move a little bit.
Here’s what the cabinet looked like from the side view at this point…

4. Screw the cabinets to each other.
With the cabinets placed in the correct order along the wall, and secured loosely to the board that was screwed into the studs, I was ready to screw the cabinets to each other.
This took some time to get it just right, and required a minimum of three clamps to hold the cabinets together as I was screwing them together. The cabinets don’t come with these screw holes pre-drilled, and the instructions don’t say to pre-drill the holes, but I did pre-drill because it’s easier and there’s less of a chance that you’ll crack the melamine if you pre-drill the holes. The screws that are used to screw the cabinets together come with the cabinets.

5. Tighten the cabinets to the mounting strip
Once all of the cabinets were in place and screwed to each other, I went back and tightened those screws holding the cabinets to the mounting strip on the wall. I used my level with each one to make sure I wasn’t getting the cabinets out of level while tightening the screws.

Here’s what it looked like at this point with all of the cabinets screwed to each other and tightened to the wall.

6. Install the toe kick
I had originally not planned to do a toe kick. I had planned to trim out the bottom of the cabinets without a toe kick like you would with a built-in bookcase. But later, I decided to do a toe kick instead, which meant that I needed to move the feet back a few inches.
I could have avoided this hassle had I planned a toe kick from the beginning and placed the feet the appropriate distance from the front of the cabinet boxes. But it wasn’t that big of a deal, and it wasn’t anything a few whacks with a hammer couldn’t fix.
I used the hammer to loosen the hot glue, then moved the feet back where I wanted them for a toe kick, and re-glued them.

And then the toe kick just attached right to the front of those block feet. IKEA sells toe kick strips to match all of their cabinets, but since I painted my cabinets a custom color, I just used leftover lumber for my toe kicks. I had to rip the boards on my table saw to get the right 3-inch height, but it worked just fine. I painted them to match the cabinets first, and then nailed them into place.
7. Add filler strips between cabinets and wall.
The last step was to fill in the spaces between the cabinets and the side walls. I used 2″ x 2″ lumber (which is really 1.5″ x 1.5″) for this. The cabinet boxes are 30″ high, so I cut a 2″ x 2″ to about 28 inches in length, and then I used my hot glue gun to glue this to the side of the cabinet with the front flush with the front edge of the cabinet box. Once the glue dries, you can follow up with screws in the same way that the cabinets were screwed together. I opted to just use the glue, though.
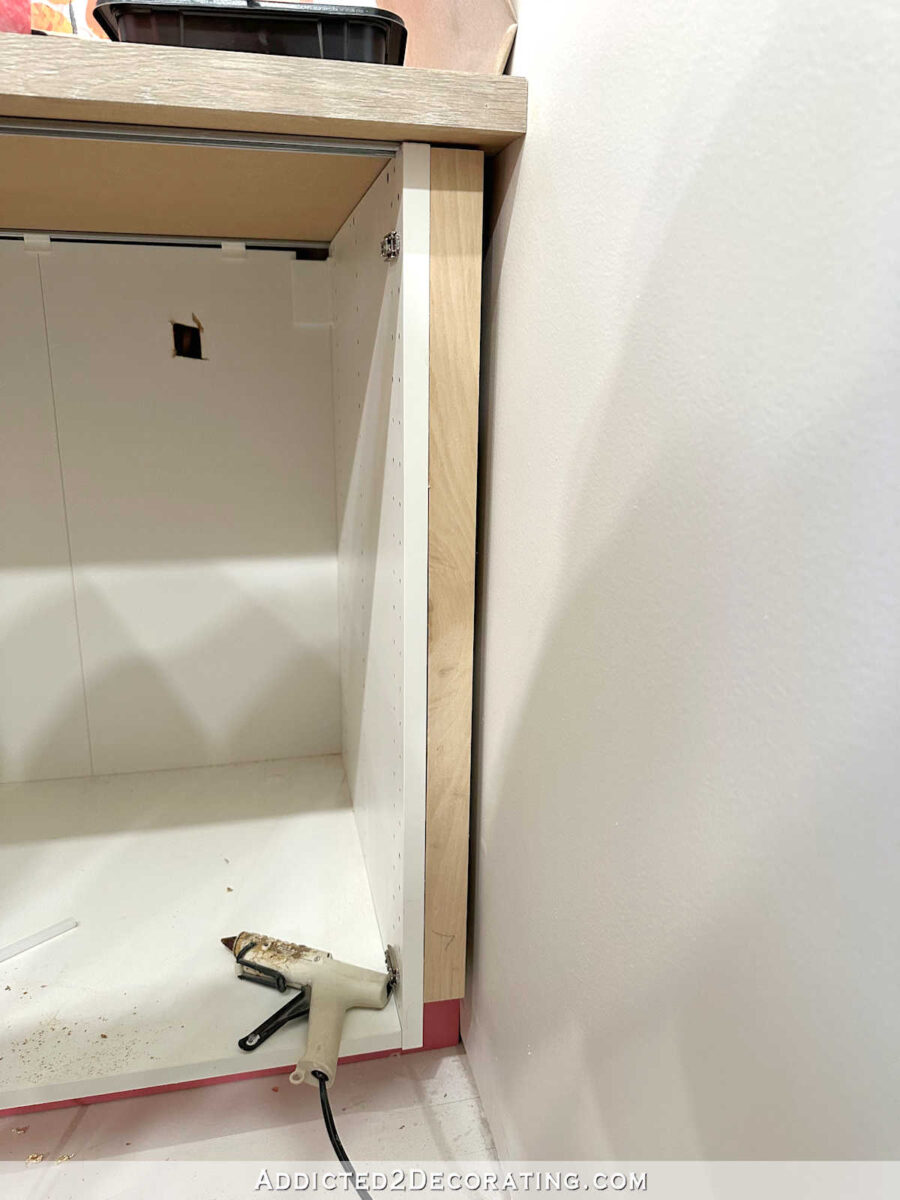
Once the glue was completely dry, I put the door on and measured the space between the edge of the door and the wall. I used my table saw to cut a piece of lumber to fit the width of that space (minus about 3/16″), and then used my miter saw to cut the length to 30″ (the same height as the door). I attached this to the wood spacer piece behind it using 16-gauge 1.5″ nails.

Again, IKEA sells filler strips that match all of their cabinets, but since my cabinets are painted a custom color, I just used scraps of lumber that I had on hand.
Note: I used IKEA’s Veddinge cabinet doors and drawer fronts, which are 5/8″ thick. In order for my spacer strip to be the same, I ran this board (standard 1″ lumber, which of course, is only 3/4″ thick in reality) through my planer to shave off that extra 1/8″ of thickness so that it would match the thickness of the Veddinge doors. If you don’t have access to a planer, and your doors are also 5/8″ thick (depending on the style you choose), you might want to move the first spacer strip back about 1/8″ so that the front finished spacer board won’t look thicker than the doors. Or you can avoid that hassle by using IKEA’s matching filler strips.
And finally, I caulked the little space between that filler strip and the wall, wood filled and sanded the nail holes, and then primed, painted, and clear coated the spacer to match the cabinets.

And then I repeat that whole process on the other end of the cabinets. And with that, the cabinets were completely installed and finished.
This was a pretty easy and straightforward process since this was a bank of cabinets that stretched from one side wall to another.
It’s a much more challenging process when you have an entire side of the cabinets completely exposed, and you have to finish off the entire side to look finished. That’s the situation I’ll be dealing with on the other section of cabinets, so I’ll share that process soon.
Note: This post was just a recap of the installation process. But if you want more information about how I trimmed, painted, and accented my IKEA Sektion cabinets with the Veddinge doors and drawer fronts, or how I built my 20-foot-long countertop, you can read about those projects by clicking the titles below:

Addicted 2 Decorating is where I share my DIY and decorating journey as I remodel and decorate the 1948 fixer upper that my husband, Matt, and I bought in 2013. Matt has M.S. and is unable to do physical work, so I do the majority of the work on the house by myself. You can learn more about me here.