This post and photos may contain Amazon or other affiliate links. If you purchase something through any link, I may receive a small commission at no extra charge to you. Any supplies used may be given to me free of charge, however, all projects and opinions are my own.
Have you seen the new Cricut Warp Tool in Design Space? This is a really exciting update for those who have been wanting to create projects with trendy wave text.
This tool is brand new which means you may not see it in your Design Space yet. If you don’t see it, keep reading to learn how to switch your Design Space to the beta version to get it today.
If you’re new to Cricut, make sure you read my beginner’s guide to Design Space to get started.
There are a couple of things to know about the new warp tool.
- You may not see it in Design Space right away if you’re running the Live version of Design Space. Switching your Design Space to the Beta version should show you the warp tool.
- It is only available for Cricut Access subscribers. If you are not a Cricut Access subscriber, I will show you 3 other free programs you can use to create warped text below.
- The warp tool only works on text in Design Space. You will need to have text selected for the warp tool to be usable.
You’ll see the warp tool in the top toolbar in Design Space up by the Offset feature.
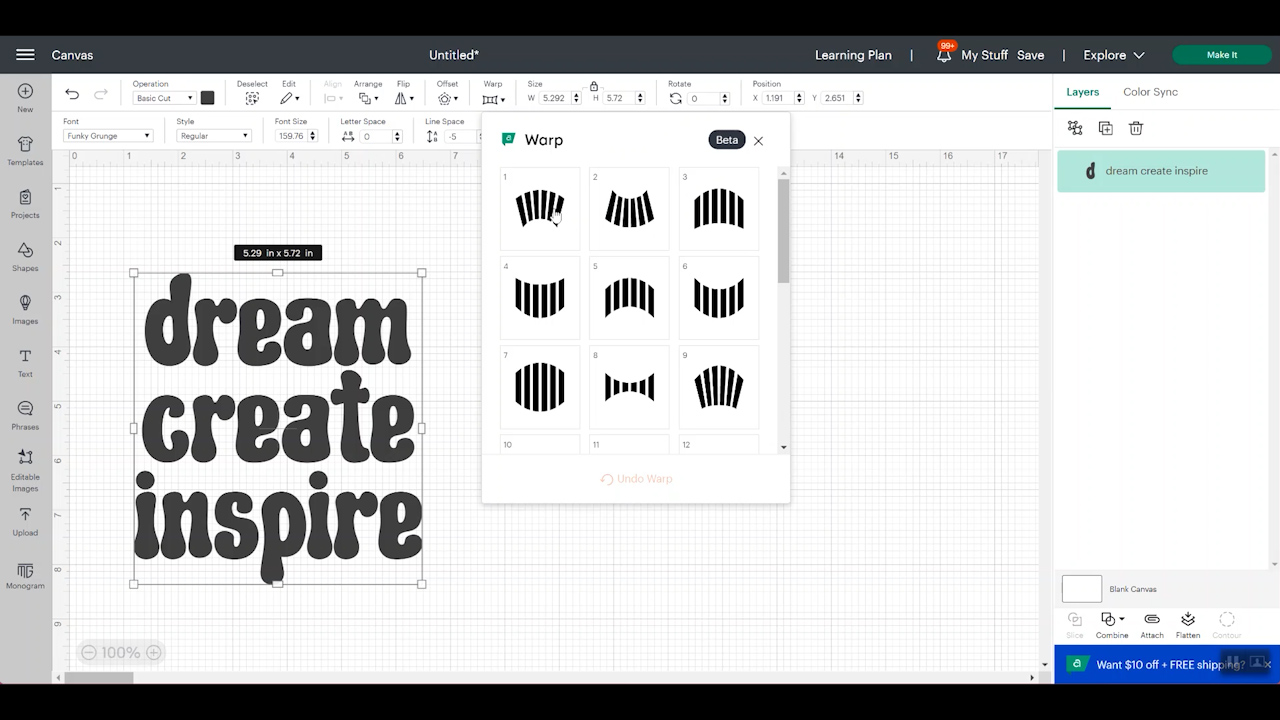
What Does the Warp Tool Do?
The Cricut Warp Tool can do a lot of things. Essentially, it distorts your text. There are currently 24 different ways you can distort your text with the Cricut warp tool.
From creating a wave to curves and so many other options, you’re sure to find what you’re looking for. If you’re interested in seeing all the Cricut Warp Tool can do, you can watch me use it and other programs by pressing play on the video below.
I do want to note that since filming that video Cricut has already updated the Warp Tool. There is now a slider that allows you to adjust how much your text is distorted with each different warp tool option.
Cricut Warp Tool
Before we get into the other programs we’re going to look at the Warp Tool in Cricut Design Space.
How to Change Design Space to Beta
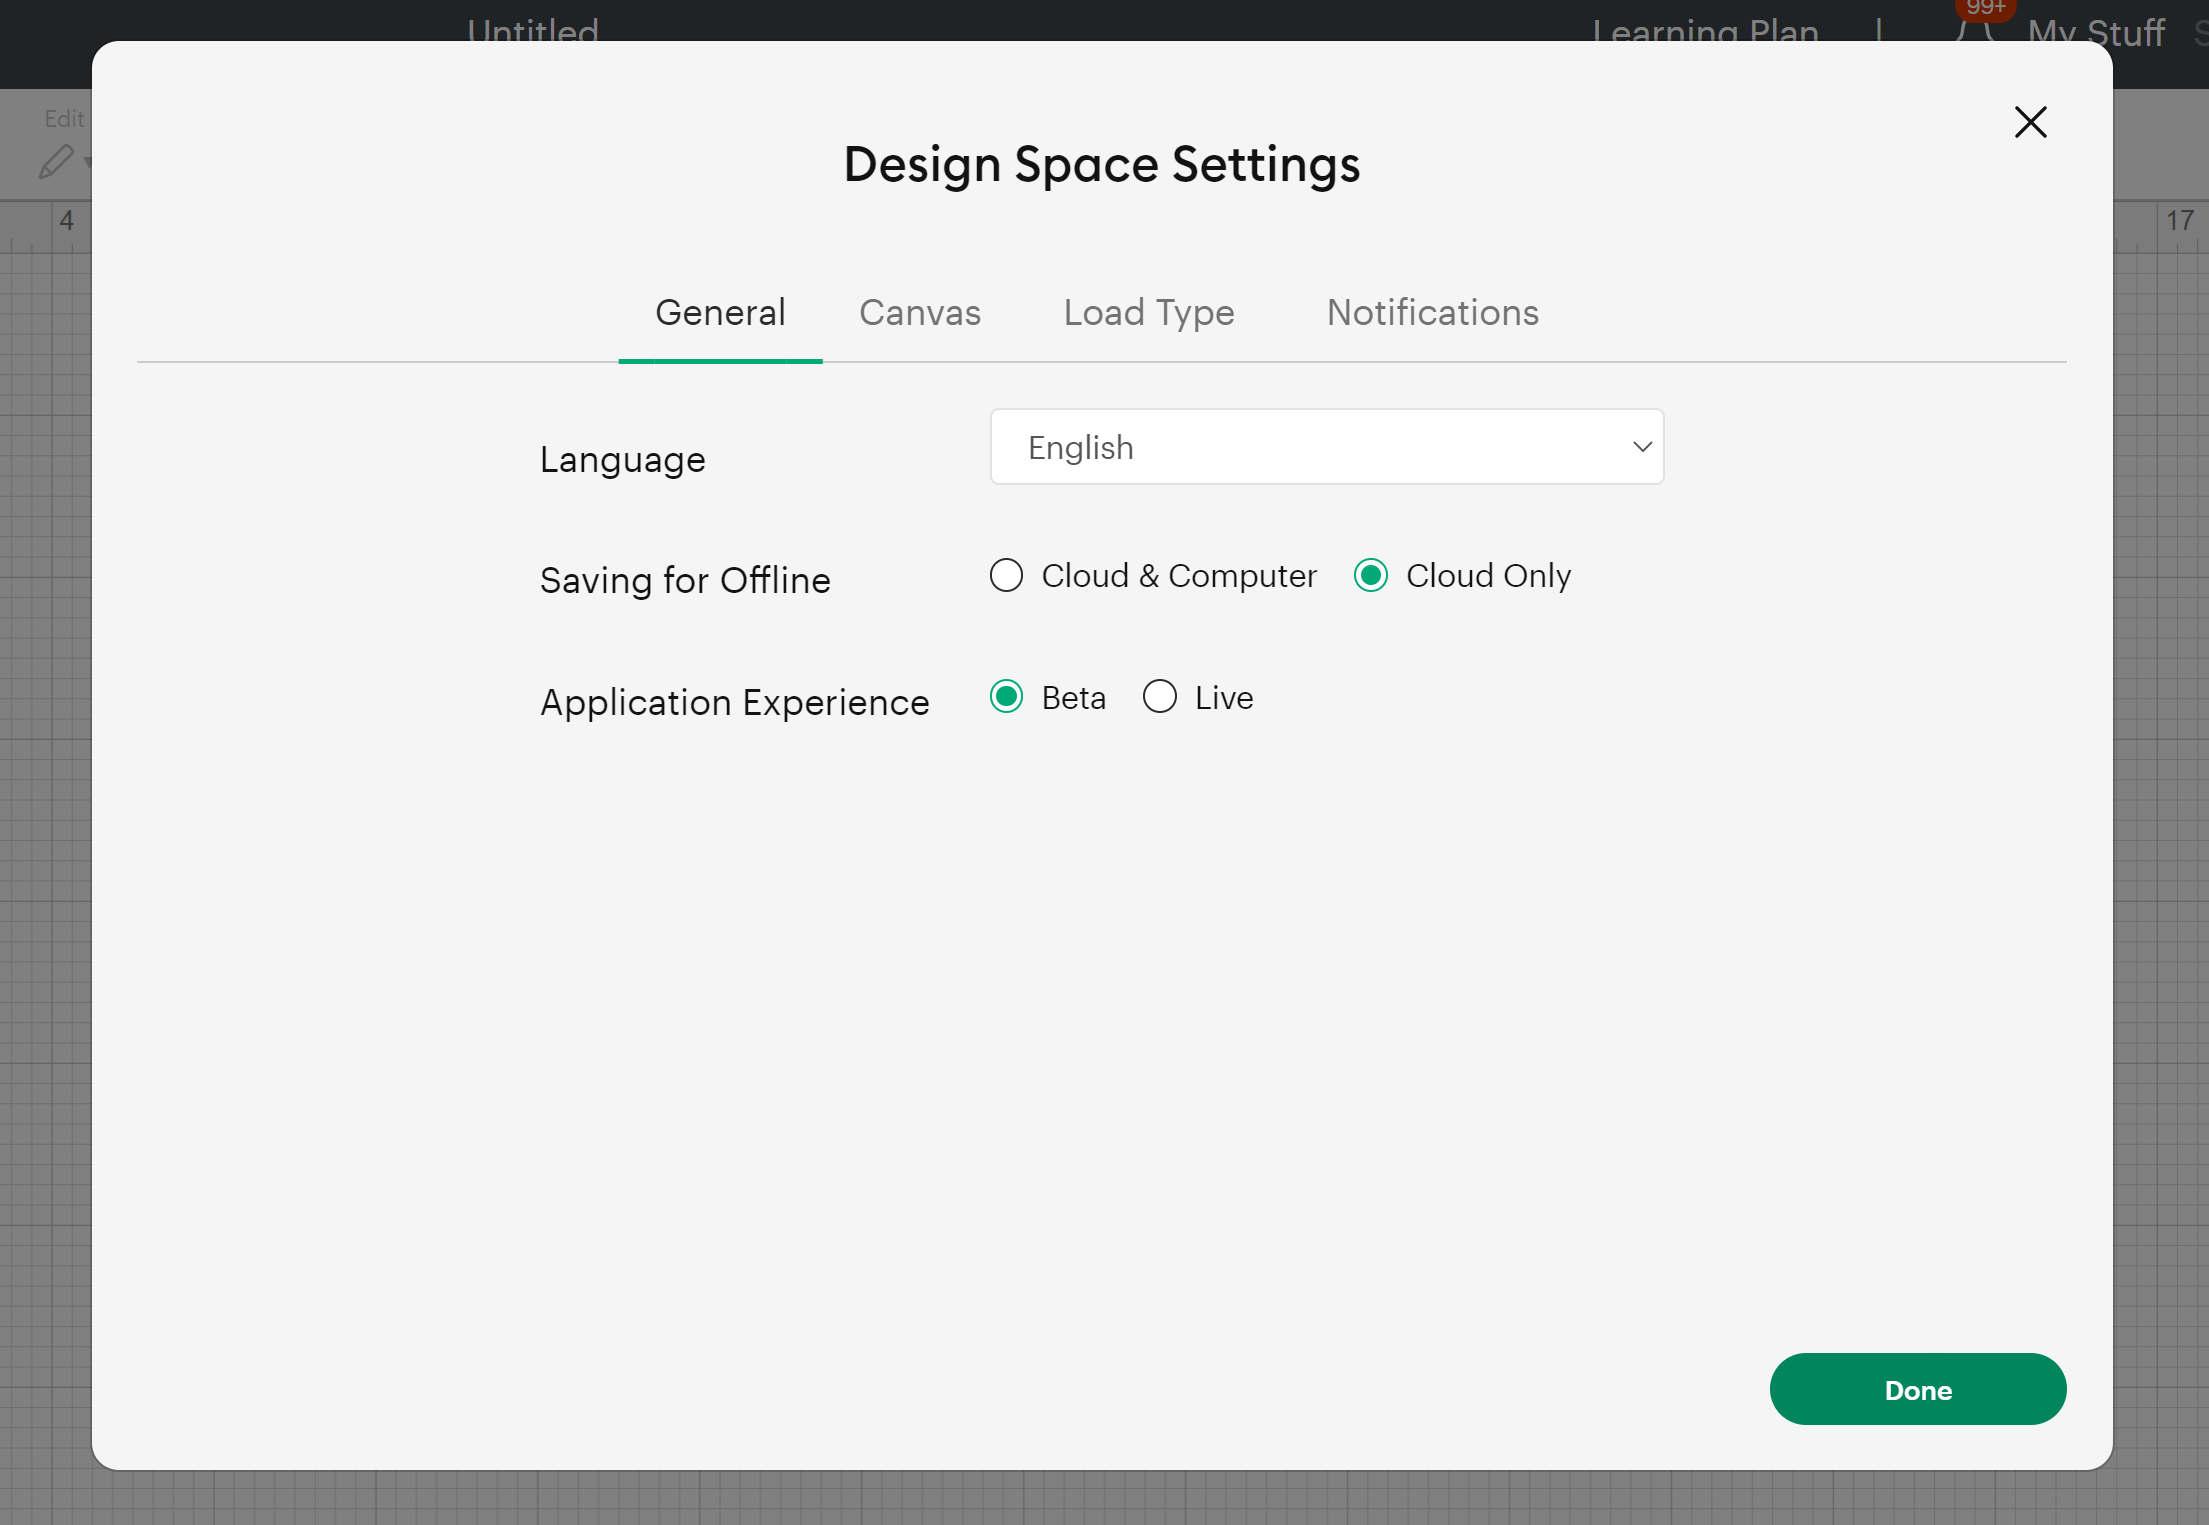
If you don’t see the warp tool in your top toolbar, you may need to change your Design Space Application Experience to Beta. To do this, click on the three lines in the upper left-hand corner and then click on settings.
Under General, you’ll see User Experience. Change that from Live to Beta.
When you change the user experience to beta, it may download a new version of Design Space and you should then see the warp tool in the toolbar.
How to Use the Cricut Warp Tool
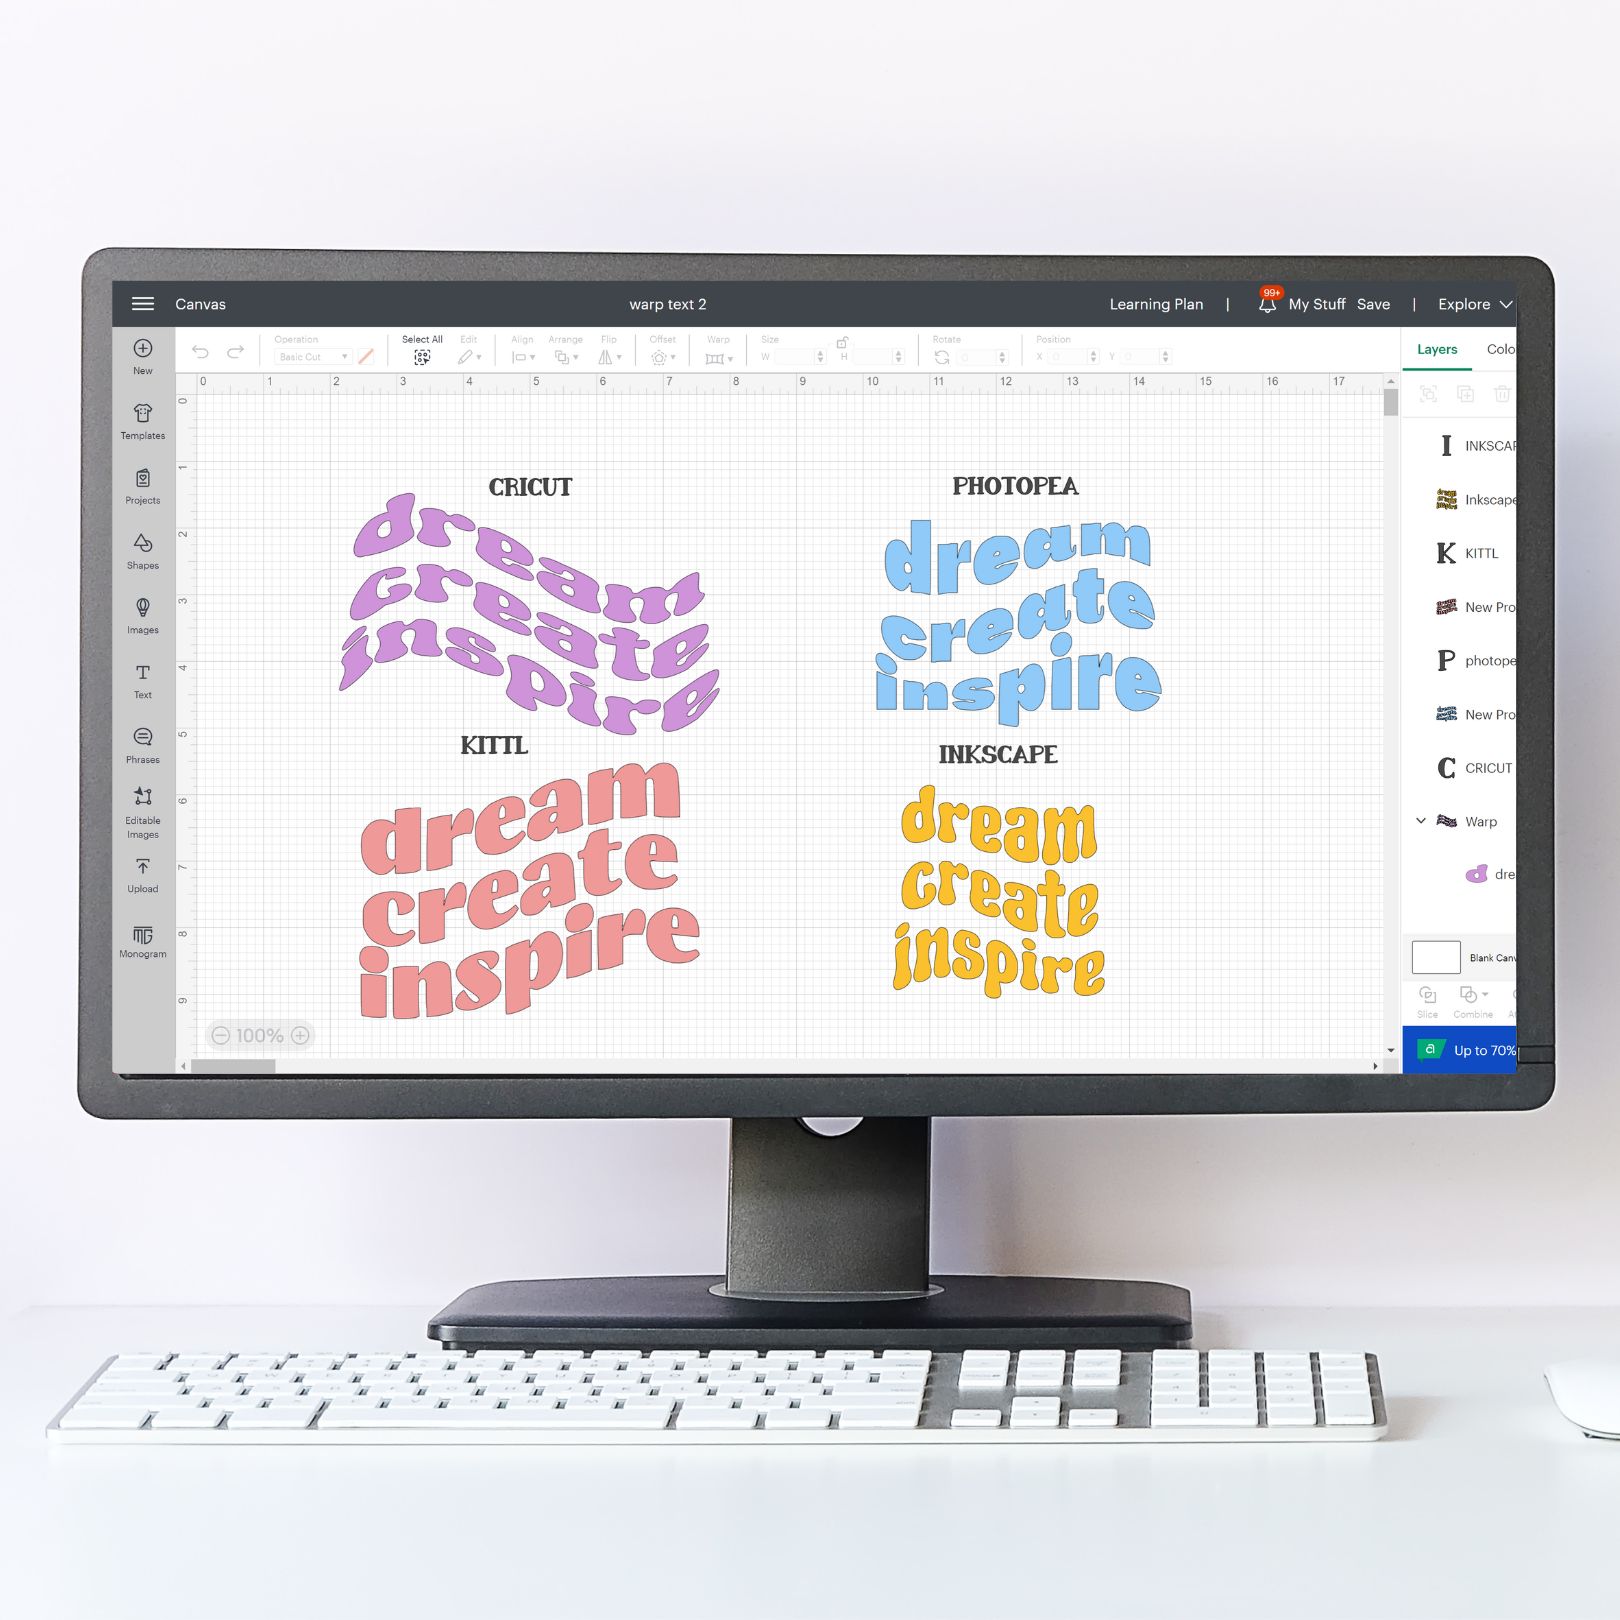
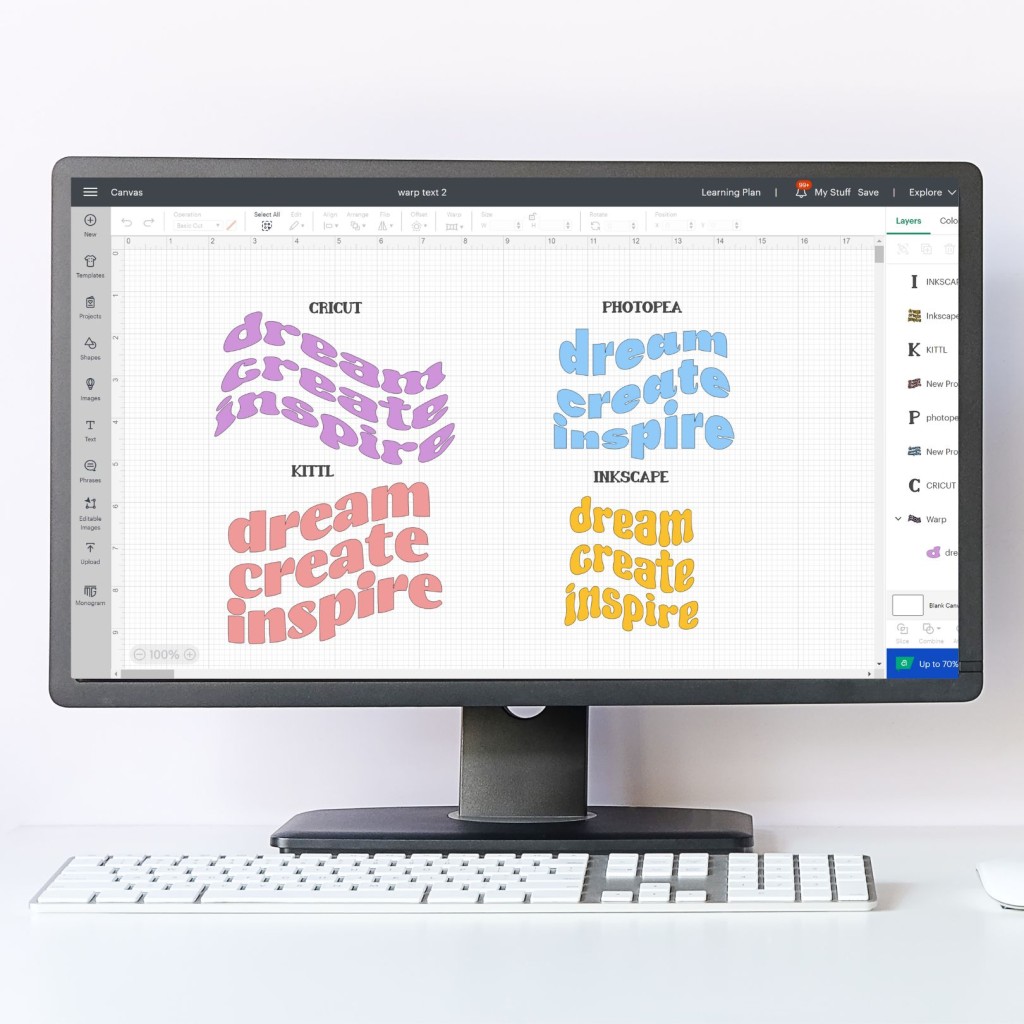
I mentioned before that to use the warp tool you have to have text on your canvas and have that layer selected. I am going to use the same 3 words in each different program I am using below. Dream, Create, Inspire stacked one on top of the other.
Now that I have that text on the canvas the warp tool is no longer greyed out and can be used. The Warp Tool does have some limitations but it can be used with both Cricut and System fonts. I am going to use a system font called Funky Grunge.
Just choose your text, choose the warp type, and then you can also adjust the amount of curve with the lastest edition of Design Space. Play around with different options until you get something you love and want to use in your project.
What Can the Warp Tool Do?
Here are a few of the features that do work with the Cricut Warp Tool:
- With the Cricut Warp Tool, you can change the font before warping and after you have warped it.
- As far as adjustments go, you can change both the line and letter spacing after warping. You can also continue to make adjustments with the slider in the actual warp tool. This will allow you to get your design just how you want it.
- You can also choose to set the warp and then change the sizes of the text to distort it further.
- Weld, Attach, and Flatten are all options with warped text.
- You’re able to add an offset to one layer or multiple layers of warped text.
- You can change the font size and also the alignment of your font.
What Can’t You Do with the Cricut Warp Tool?
There are some things you can’t do with the Cricut Warp Tool.
- With your text warped, you cannot do any of the advanced text options. You can’t separate into lines or individual letters.
- You cannot use a multi-layer font in Design Space, you can choose a multi-layer font but when you select that the warp will go away.
- Even if you choose just one layer of the font you cannot use the warp tool.
- You cannot use the Slice tool.
What Projects Is the Warp Tool Good For?
Now that Cricut has added the adjustment slider on the warp tool there are a lot of different projects I think this tool would be fun for.
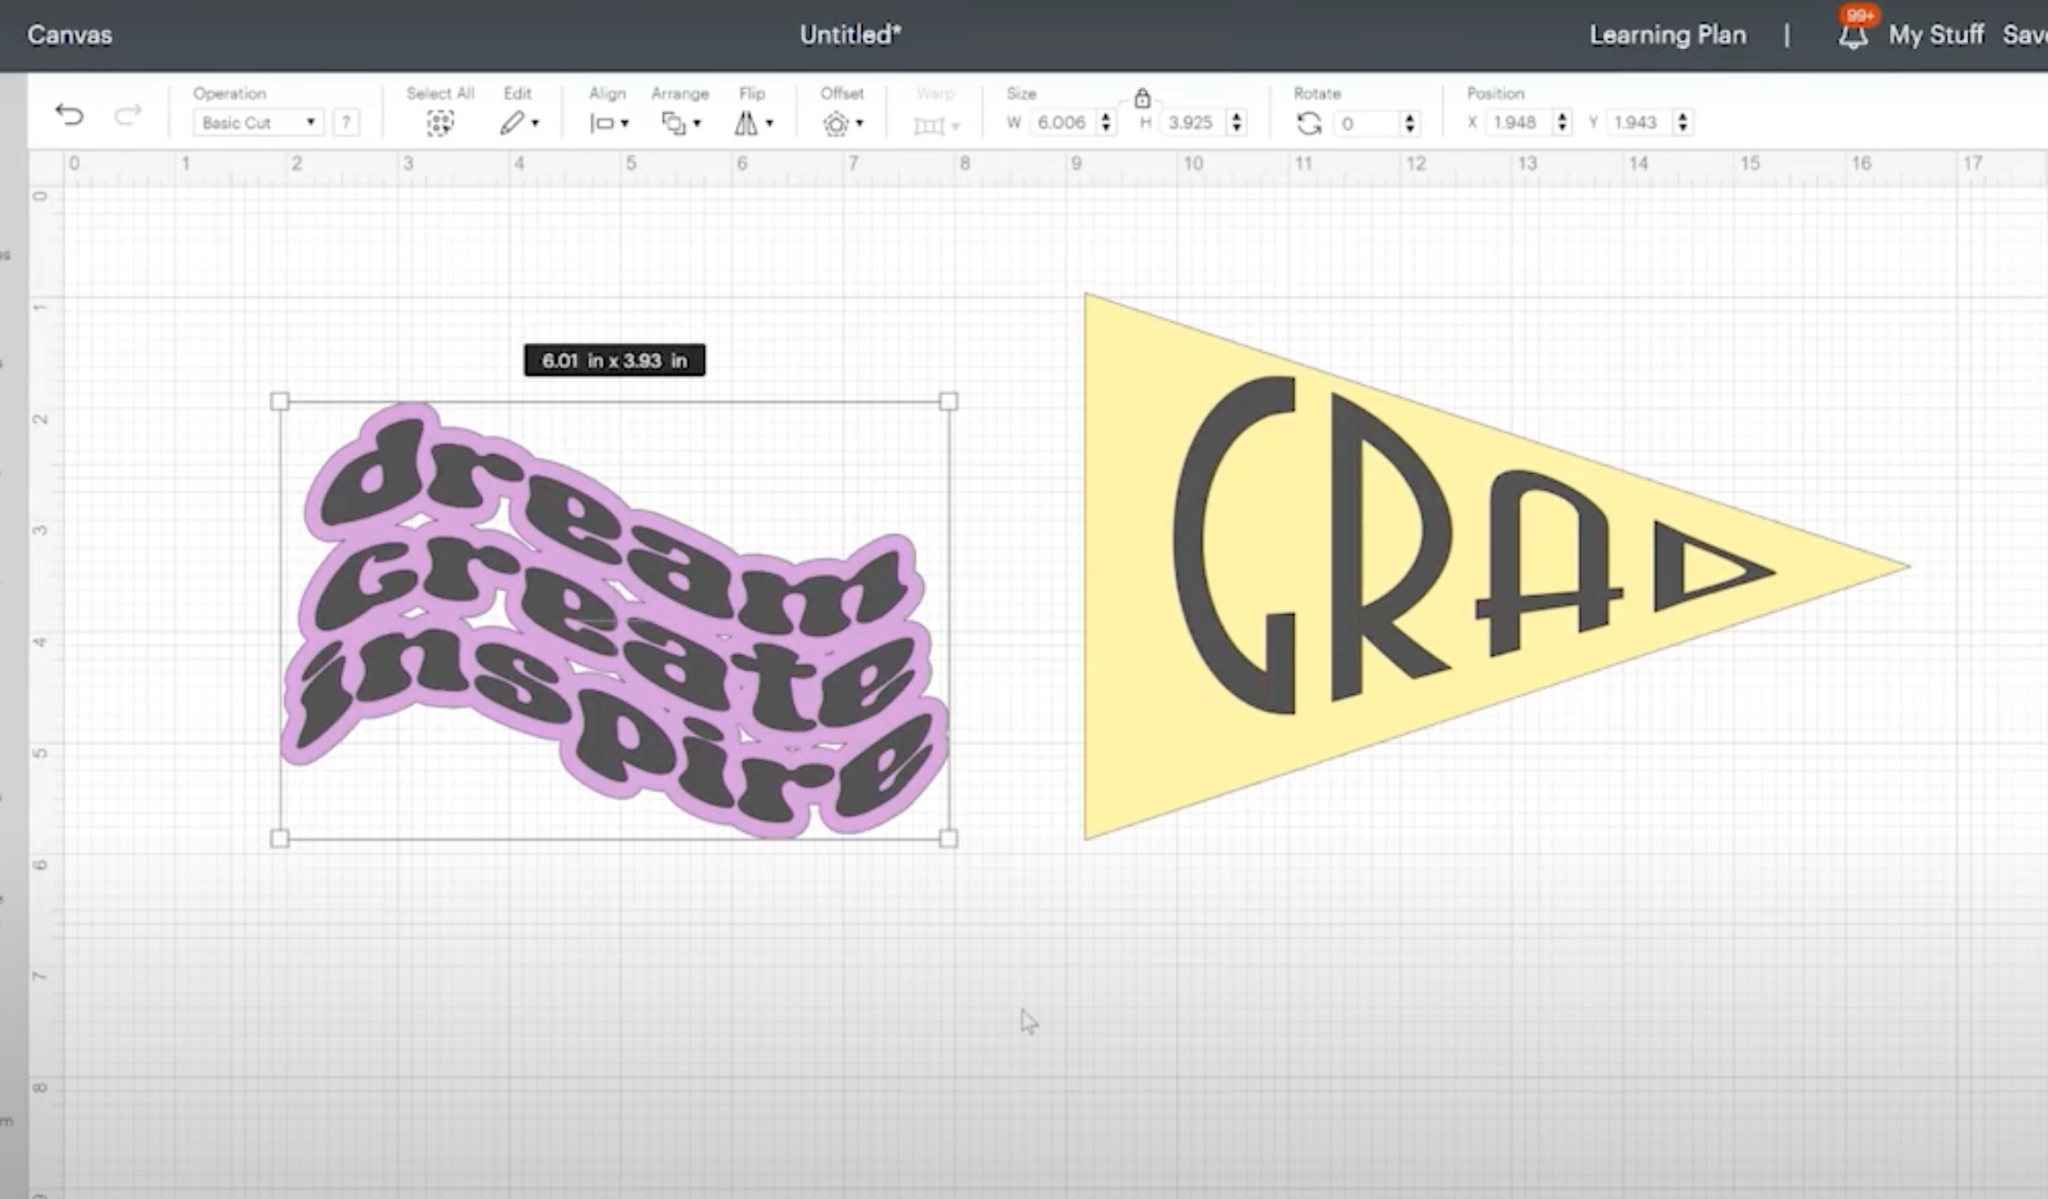
You could use this to create those trendy t-shirts with the fun wave font that are popping up everywhere. Offset is also fun to use with the warp tool. This would be a great way to create fun stickers.
I like the way the Warp Tool works with creating flags. The Grad flag turned out fun using the Cricut font Avenida Com. With the warp tool, I was able to get the font to fit right with the triangular flag.
What Other Programs Can You Use to Create Warped Text?
If you are not a Cricut Access subscriber and don’t want to pay for Cricut Access to warp your text, I have some other options for you.
Using the same Dream, Create, Inspire design I will show you three different free programs you can use to create a warped text.
With the initial limitations of the Cricut Warp Tool, I actually preferred these other options over the Cricut option. With the ability to adjust the warp now in Design Space, that tool is a lot easier to use and can be adjusted in a lot more ways.
How to Use Photopea to Warp Text
Photopea is a free online program. Because it is free, you will see several ads on one side. To make a project we will click “New Project” and then we can set the size of the canvas and click “Create”.
Next, we’ll click Text and type out dream, create, inspire, and then center them so they’re lined up on top of each other. You can change your font size and the font itself. Because this is online software your system fonts will not automatically appear in the program. You can load them into it if there is a specific one you want to use by clicking load font in the upper right above the font list.
You can change things like the line spacing under the paragraph tab on the right side of the canvas area. I would recommend playing with the line spacing before warping in this program.
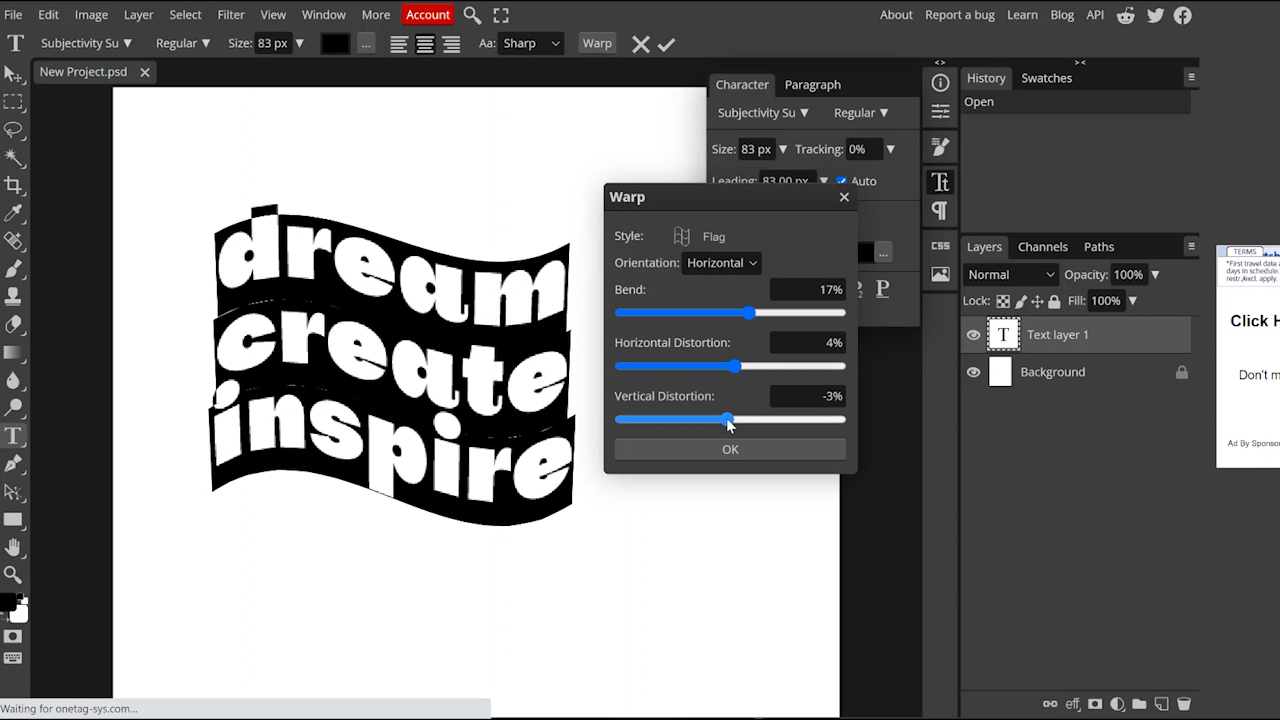
Once you click on the text, you’ll see warp pop up in the top toolbar. There are several different warp options you can choose between.
The flag option is the same as the wave-looking option I chose in Design Space. I like the wave option here in Photopea. The wave option keeps the text in a square shape and waves the text within the square.
Within Photopea you can make a lot of different adjustments to the warped text including distorting it horizontally or vertically.
I decided to do the wave option, horizontally and adjusted the bend. Click the checkmark in the upper toolbar to save the settings.
How to Save Projects from Photopea to Use in Design Space
Now that we have our design set we can save it to use in Design Space. To save an image from Photopea, click on File, click Export As, choose PNG, then Save.
The process for uploading into Design Space will be the same for each different program so I will show you how to do that after we look at the other programs.
How to Warp Text in Kittl
I’ve shown you Kittl before and how to use it. You can learn how to use it and what it does here. I am using a free version of Kittl so you do not need a paid version to warp text in Kittl.
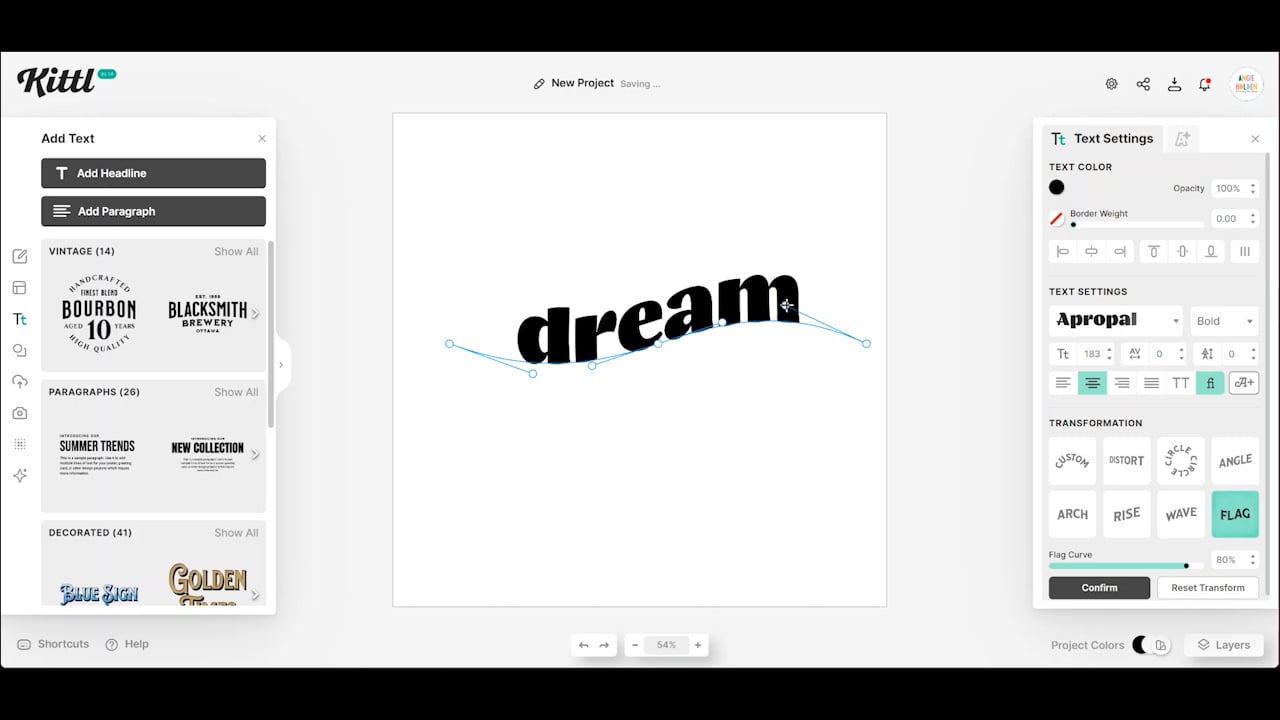
To begin in Kittl, click New Project and then choose a size. I chose standard. Now I will click Text, and then click Add Headline. Type in the text you want to warp. I am using dream, create, and inspire again.
With the free program, I can choose a font from within Kittl. If you want to use your own font, you would need to pay for a Kittl subscription.
Kittl is different than the other programs because you cannot warp all of the text at the same time. With Kittl I have to warp each line separately. If you click on one line of text, the other lines will go away while you edit that line.
I am using the Flag transformation in Kittl which is similar to the shape I used in Design Space. Kittl allows you the ability to alter the warp in a lot of ways. You have unlimited adjustments with the tools in Kittl. You can adjust how much of a warp it has and the angle by moving the adjustment tools in different ways.
With that first word set, it’s easiest to duplicate that word so the wave is already set to match. Copy and paste the text and then change it to the new word. When you click off the word, the wave will reappear.
Note – when you paste the text it will be added right on top of the word you copied. As you edit the text it will be in a straight line. Don’t worry, when you click off the word the warp will reappear.
How to Save Projects from Kittl to Use in Design Space
To save the project to use in Design Space click Download and then choose to save as a PNG file. Keep reading below to see how to import that into Design Space.
How to Warp Text in Inkscape
Inkscape may be a program you’re already familiar with. If you’re not, I have a whole post on how to make SVG files with Inkscape you can check out to learn more. Inkscape is not an online program, it is a free program that you load onto your computer.
Because it is a program you load onto your computer it will find all of the fonts you have on your computer.
In Inkscape, we’re going to open a new project and then click on the text tool. Type out the text, I’m using dream, create, and inspire again. With the text on the canvas, you can adjust the size, change the font, align the text so it’s centered, increase or decrease line spacing, etc.
Once you have the text looking like you want, we can begin to warp it. To do this, you’ll make sure your text is selected and then click:
- Path
- Stroke to Path
- Path (again)
- Path Effects
Then a window will open on the right. If there is another window open in that area, click the x to close it and you should see the Path Effects window.
Click on the + and it will open the different effect options. There are many different effect options to choose between.
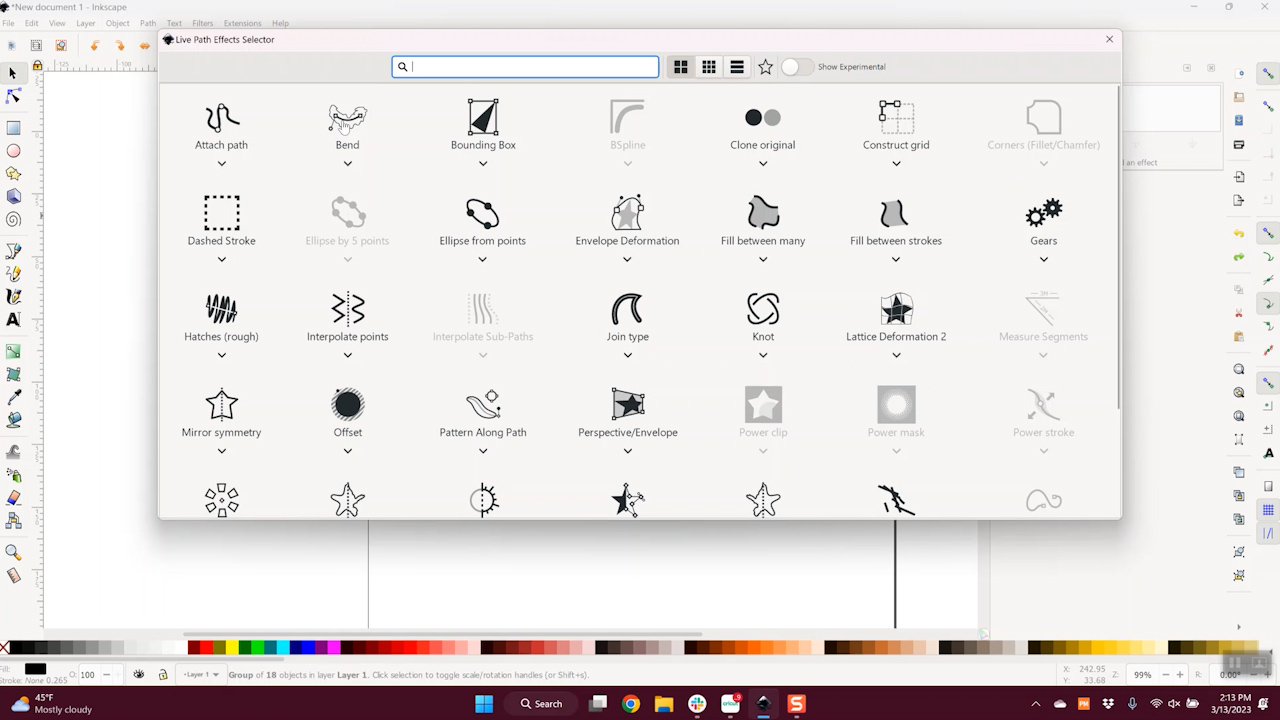
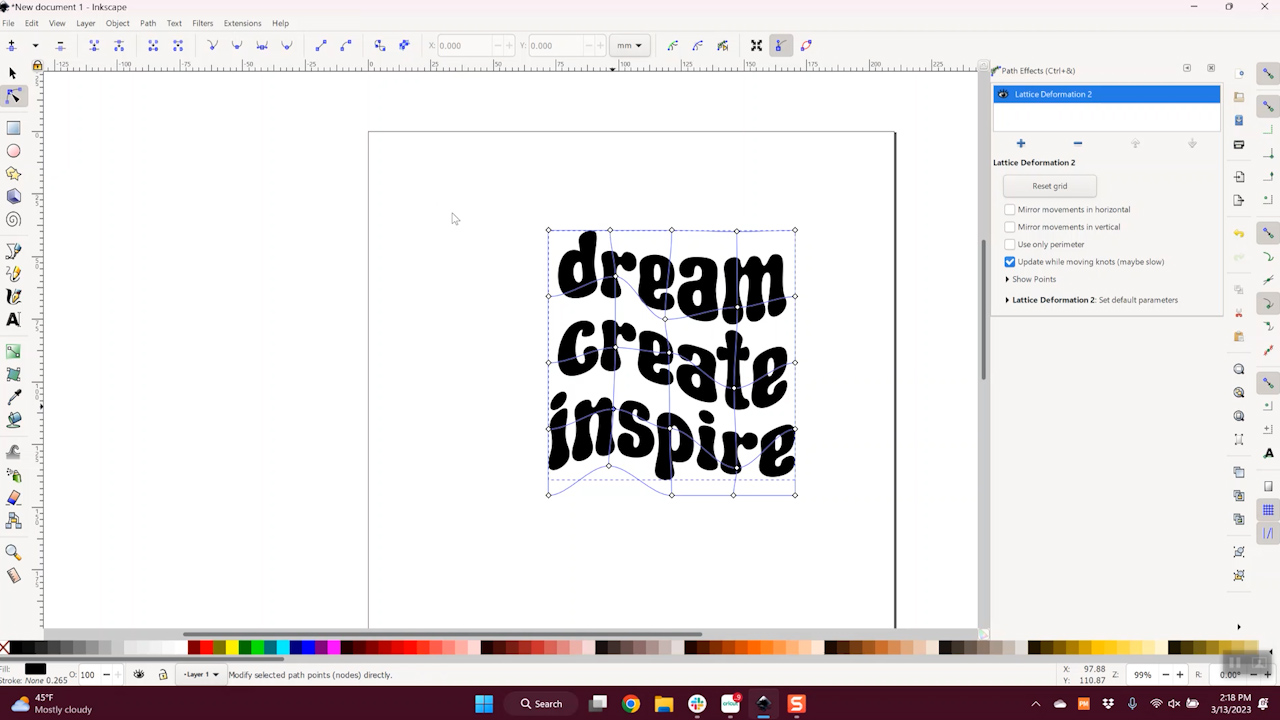
I like the lattice deformation effect but many people also use the bend tool. I am going to use the lattice deformation tool today. With that selected, you’ll see some different options pop up in the right tool window area.
How to Use the Edit Path by Nodes Tool
At the top of the left toolbar, there is a tool called Edit Path by Nodes. Click on that tool and you’ll see all these nodes are now on the text.
You can click on any of those nodes and drag them around to get the warp that you’re looking for. I really like the freedom of the adjustments you can make in Inkscape and it’s nice to be able to warp all three lines of text at the same time.
How to Save Projects from Inkscape to Use in Design Space
Once your design is set exactly how you want it, you can save it to your computer. Click File and then Export PNG Image. Check everything on the right-hand side of the screen and if it looks right click Export.
How to Import an Image into Design Space
The process to upload an image into Design Space will be the same for each of these different files. Although they were all downloaded from different programs, the upload process is the same.
Click upload in Design Space and then find the image on your computer. I always choose complex and then click Continue.
For some of these images, you will need to remove the background. Make sure you zoom in and remove the background from inside letters too. Click Apply and then Continue.
From here make sure everything looks okay and then choose either a cut image or Print Then Cut image. You can change it later on the canvas if needed. Click Upload and then choose the design and add to Canvas.
The Inkscape version does come with the background already removed which is nice. With Kittl, that is a paid feature and I’m really not sure with Photopea. I did not see it but it may be there and I missed it.
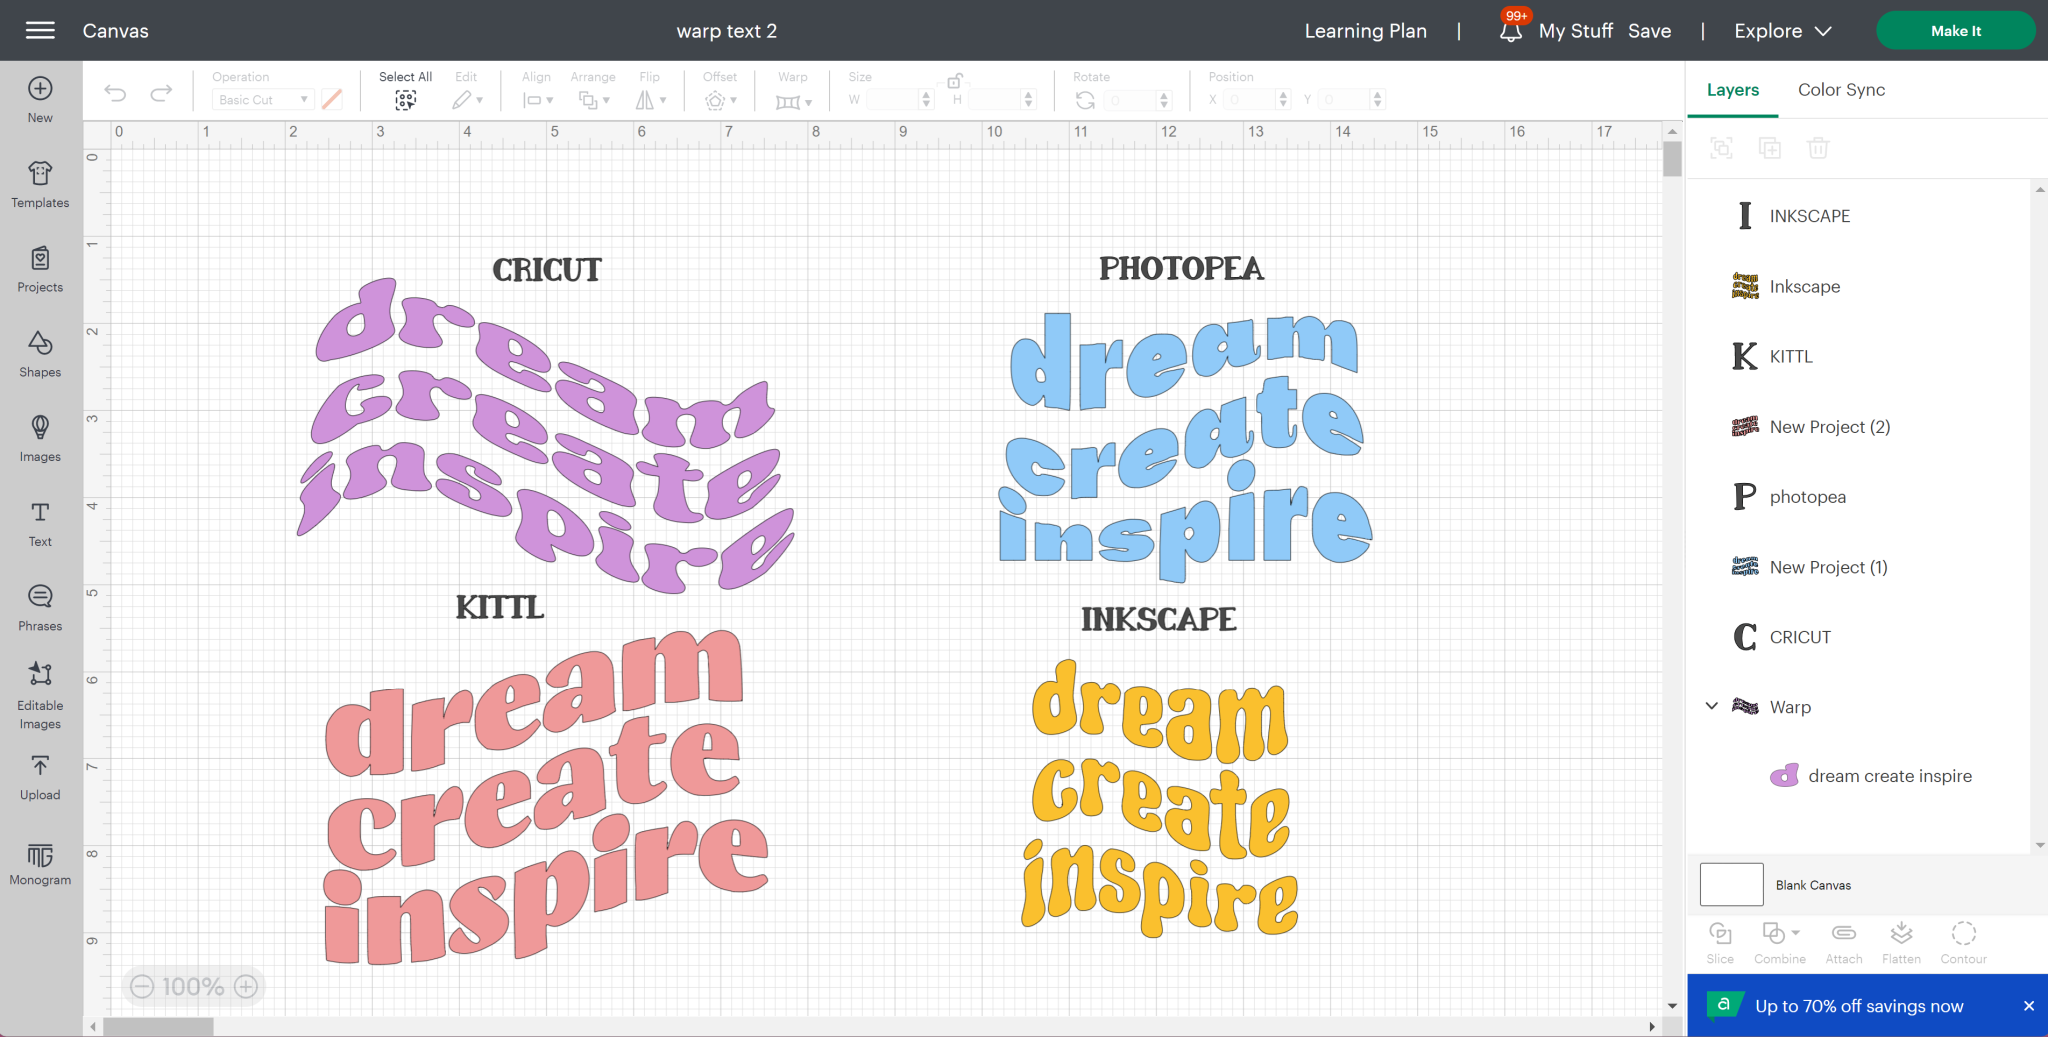
You can see a comparison of the results I got from each method in the image below.
Final Thoughts on the New Cricut Warp Tool
I do want to remind you that since I filmed this video Cricut has already updated the Warp Tool in Design Space. It does now include an adjustment slider that allows you to make a lot more adjustments than were available when I first tried it.
I do think it comes down to what look you like the most or what program you prefer to use.
There are a lot of different warp options in each different program. Once the designs are loaded into Design Space, you do have the option to use Offset on all of them. You can also resize them to fit different shapes like we did the flag.
You would be unable to adjust the distortion of text warped in other programs because once you download it becomes an image, not text.
Remember, the Cricut Warp Tool is only available to Cricut Access subscribers. If you’re an Access subscriber, definitely check it out. If you have any questions about the new Cricut Warp Tool or the other programs we used today drop them down in the comments section and I’ll get those answered for you!