
This post and photos may contain Amazon or other affiliate links. If you purchase something through any link, I may receive a small commission at no extra charge to you. Any supplies used may be given to me free of charge, however, all projects and opinions are my own.
Have you started preparing your Halloween attire yet? If you are, you need to add a peek-a-boo sublimation shirt to your list. These shirts are fun to make and easier than you probably think. Plus you can use ANY shirt for this including cotton and dark colors. You just need a white polyester panel for the inside for sublimation. Keep reading to learn how to make your own today!
New to sublimation? Learn how to use sublimation here.
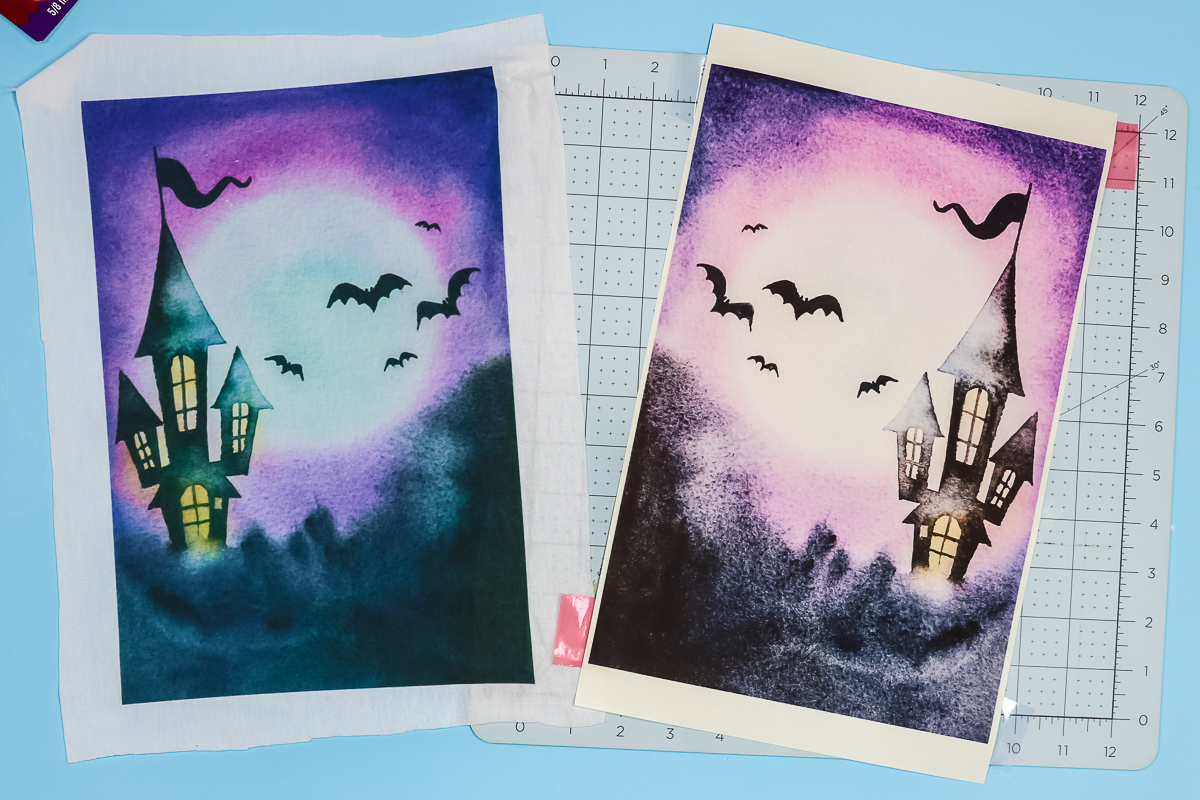
I first saw this project in a video by my friend Jamela Payne. Her’s are fun but scarier than mine. I’m keeping mine mild. I really love this look, you can stay mild with your Halloween design like I did or go scary as she did here.
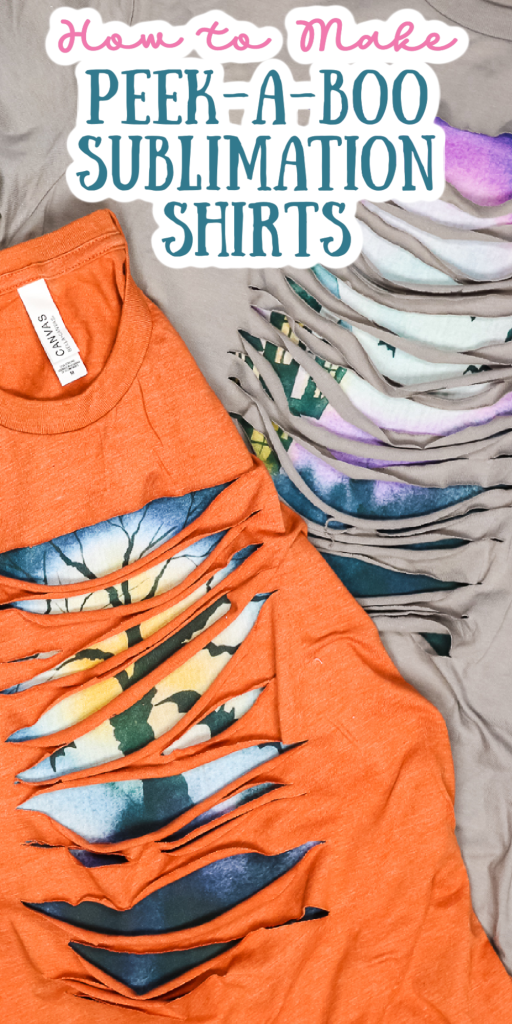
Peek-a-Boo Sublimation Shirts
Are you ready to make a peek-a-boo sublimation shirt? You can watch me create these fun shirts, just click play on the video below:
One of the reasons I really love making peek-a-boo sublimation shirts is that you can use any type of shirt for this project. If you love the feel of cotton shirts, you can use a cotton shirt. Because the sublimation is not on the shirt itself you can use a shirt with any combination of materials.
You will need a polyester panel to sublimate your design. I suggest using something that is 100% polyester for the most vibrant and bold finished design.
If you have a shirt that is old or damaged, this project is perfect for repurposing as you’re just going to tear it up anyway. As long as you have a polyester panel for the inside to do your sublimation, you can use any shirt you want.
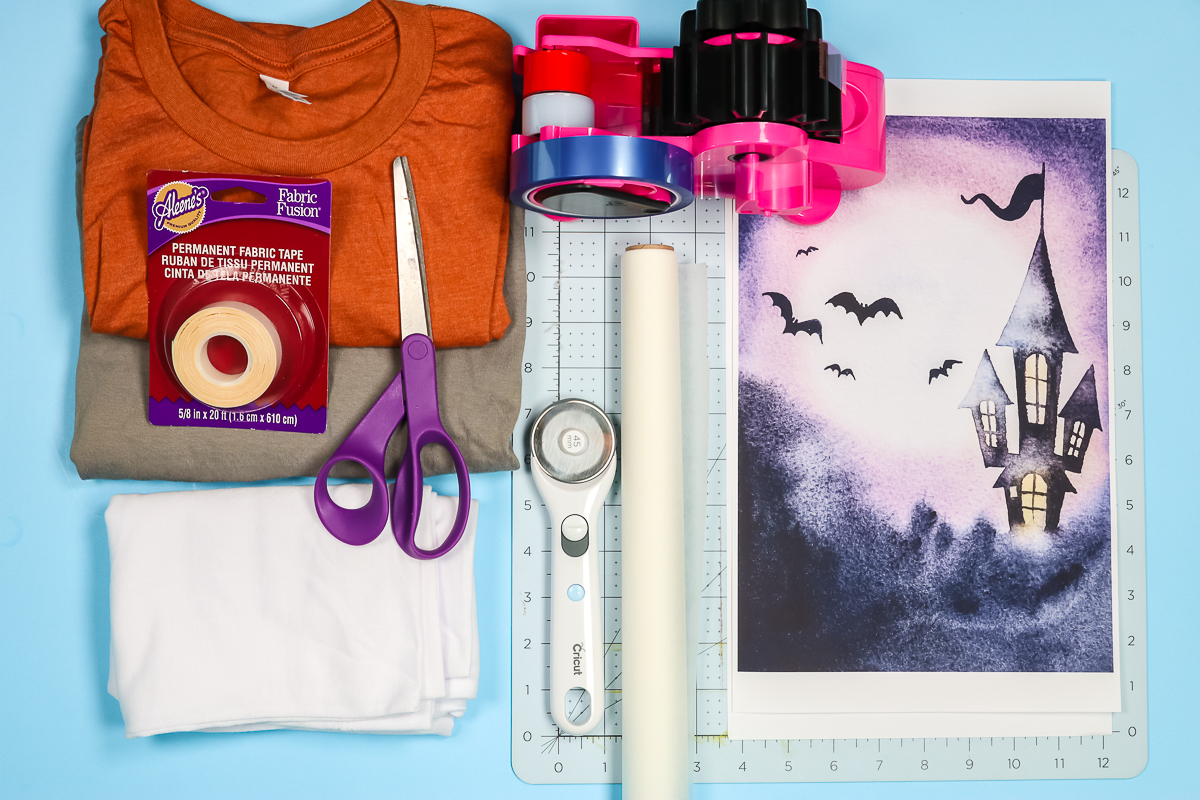
Supplies Used:
Blanks used:
Designs used:
Making a Peek-a-Boo Sublimation Halloween Shirt
To make a peek-a-boo sublimation Halloween shirt, you need to have a Halloween sublimation print. A sublimation print is sublimation ink printed onto sublimation paper from a sublimation printer. You can’t just print an image with a regular printer.
If you haven’t made a sublimation print before, learn all about using a Cricut AutoPress for sublimation here.
Making a Sublimation Panel
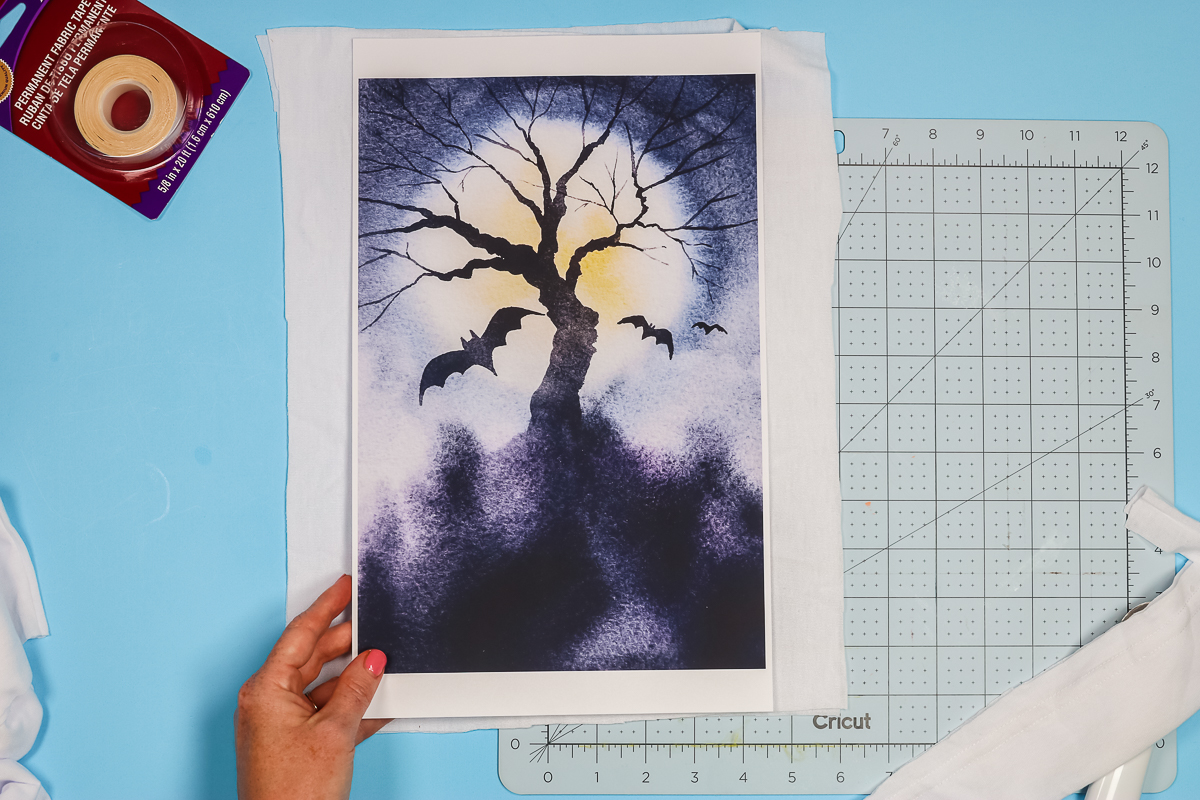
To create my peek-a-boo shirt, I need the image that will peek through the finished shirt. The polyester fabric piece needs to be large enough to fit the entire sublimation design and have enough room around the outside edge for how you’re going to attach the panel.
I’m using fabric tape for attaching my panel. You could use fabric glue or even sew your panel into place. Just make sure your panel is large enough for how you’re attaching it.
I am using a polyester pillowcase for my panel. It’s large enough for my whole print including space for my tape and I can create four panels from one pillowcase for four shirts if desired.
Preparing the Polyester Panel
Because I’m using a pillowcase for my panel I need to prepare it. Using scissors trim off the pillowcase cuff and right along the seams on 3 sides. Again, leave room for the tape on all 4 sides.
Working with a pillowcase allows me to create two panels at once for two different shirts. The edges don’t need to be perfect because they’re inside the shirt. It’s up to you if you want to use your rotary cutter to create clean edges all the way around.
Applying Sublimation to the Polyester Panel
You’ll create your sublimation panel just like you do other sublimation projects. Begin by setting your heat press to the correct time and temperature for your materials. I am using my Cricut AutoPress because it’s my largest heat source. I recommend making sure your heat source is larger than your print. If your press is smaller, you could consider a smaller design or you can try pressing twice.
Because the images I am using have a watercolor effect you would likely not notice any fading if you needed to use a smaller press multiple times.
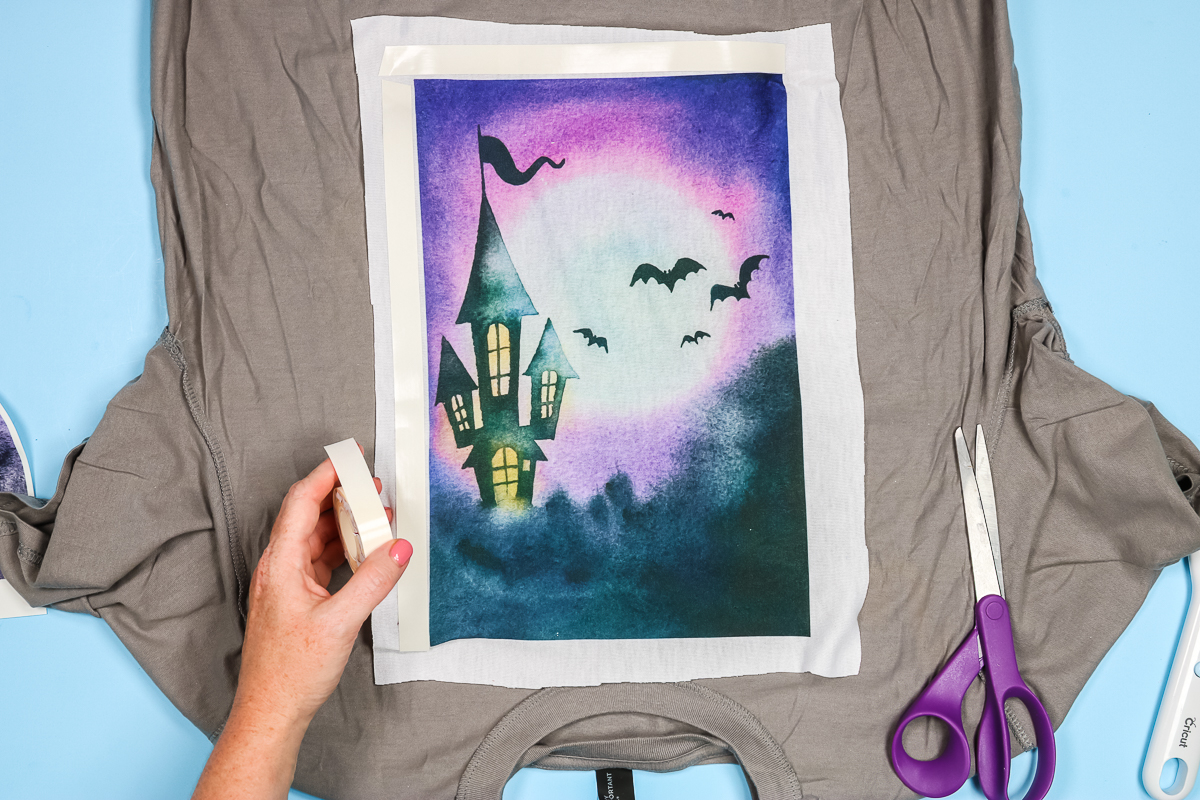
Preheat your fabric to remove any moisture. Lint roll and then apply your sublimation image. Place the design side down on the fabric and using heat-resistant tape secure it in place. Make sure you have protective paper under your fabric and on top of the design to protect your surface and heat source from any ink transfer.
Press the design for the full-time. I have my AutoPress heated to 385 degrees and the timer set for 55 seconds. As soon as the AutoPress is done, I can remove my sublimation print and my panel is done.
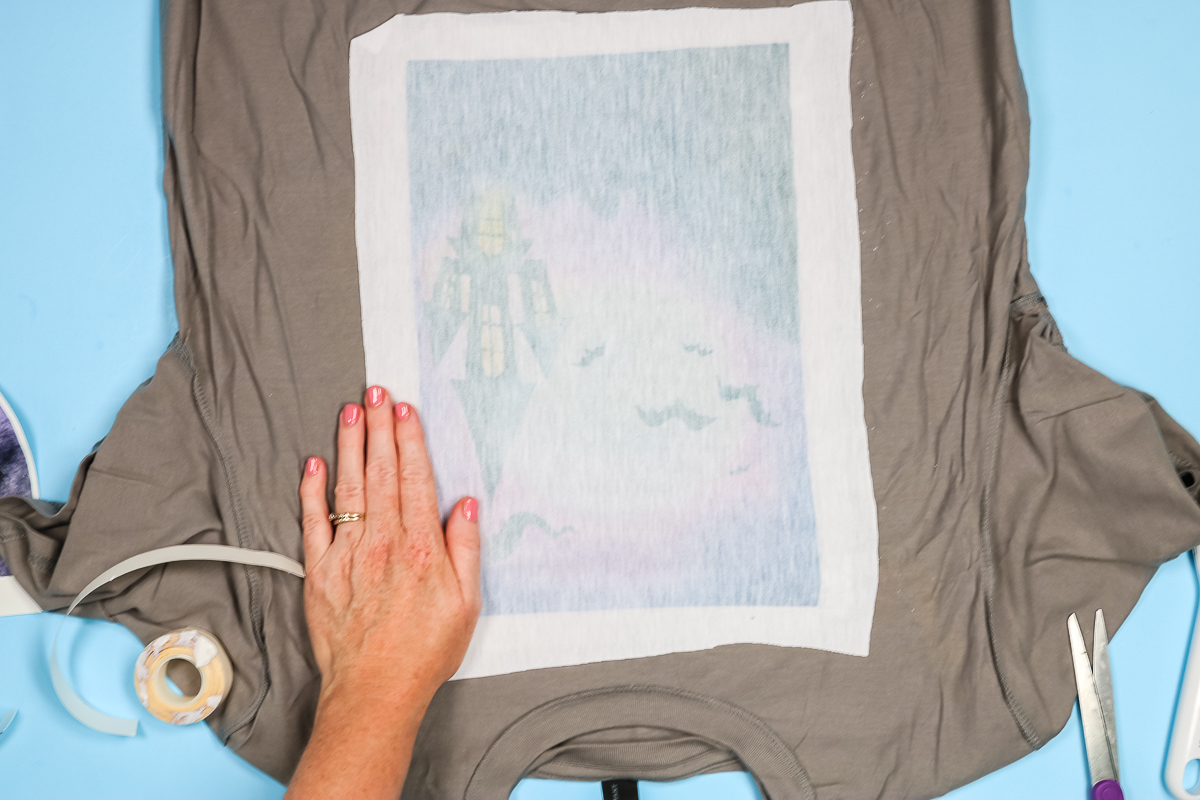
After you remove the sublimation print, save that sheet and tape to use later in this project.
Creating the Peek-a-Boo Effect
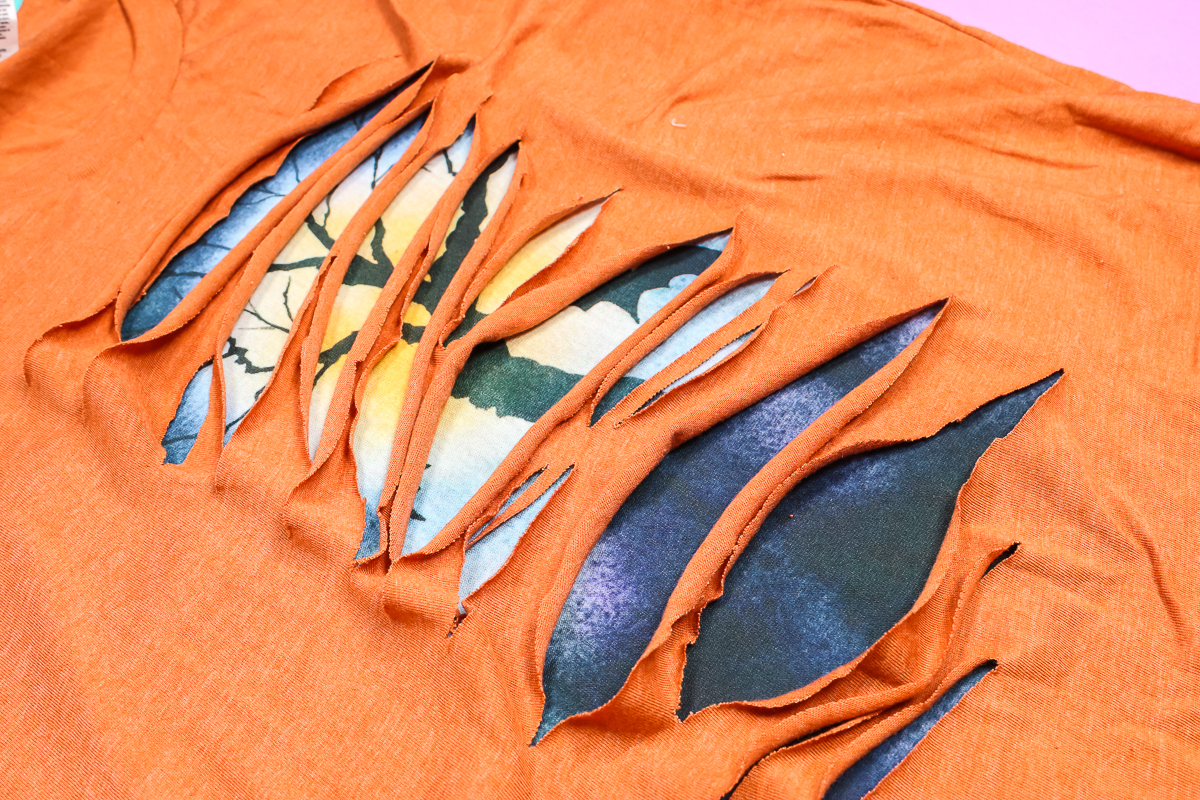
Now we’re going to create the peek-a-boo effect. Grab the shirt you want to use and put your cutting mat inside the shirt. If you don’t have a mat, you can use something like a piece of cardboard. You just want to make sure that when you cut the front you don’t cut through to the back.
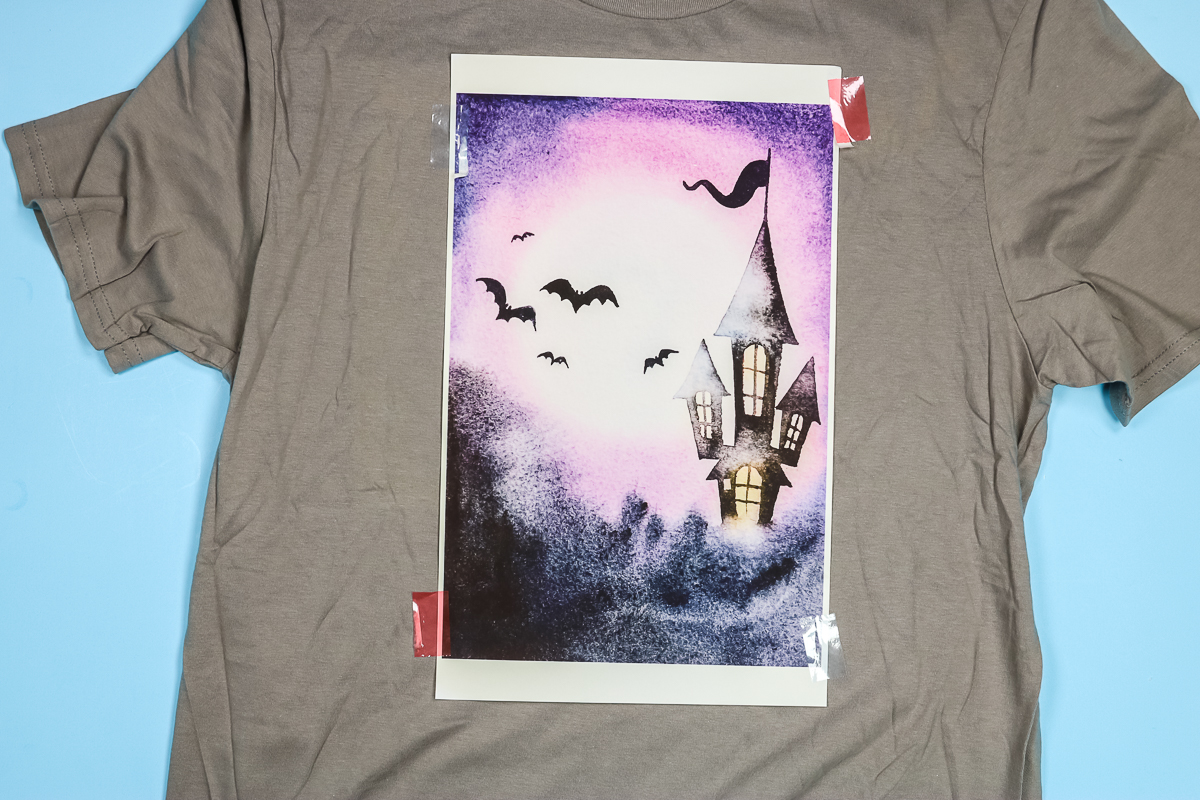
Get your shirt smoothed out and grab your used sublimation paper. We’re going to use it as a template for our cut lines. Lay the print on top of the shirt where you want it and tape it into place. With the print in place, we know where we want our cuts to be.
Remember, we just want the sublimation print portion to peek through so don’t extend your cuts wider than the image itself.
Use your rotary cutter to cut straight lines horizontally across the print. The lines don’t have to be the same distance apart. You can measure them if you want to but I didn’t, I just cut them how I thought they looked good. Cut through the paper and the front of the shirt. You can cut as many lines as you want.
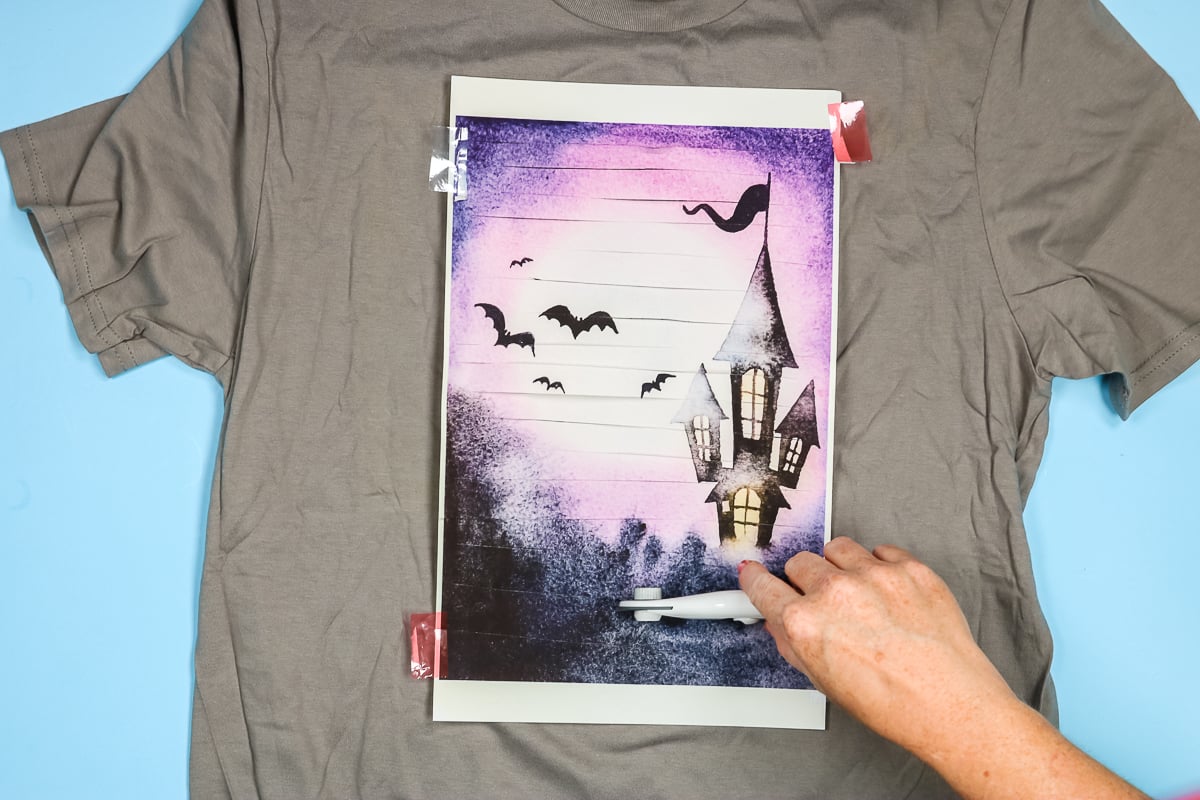
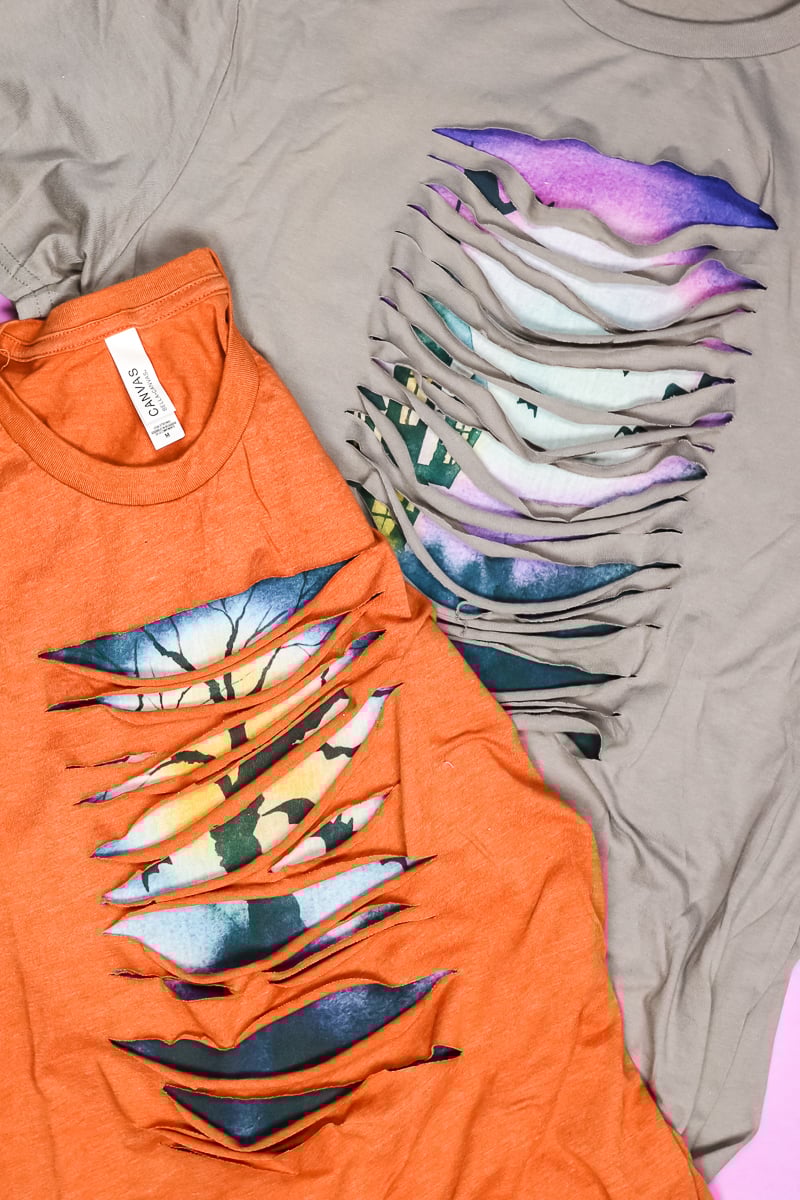
As you can see in the photo above I stopped my cuts before I got to the bottom and top of the image and didn’t cut all the way through the sides. How straight and wide your sections are is totally up to you.
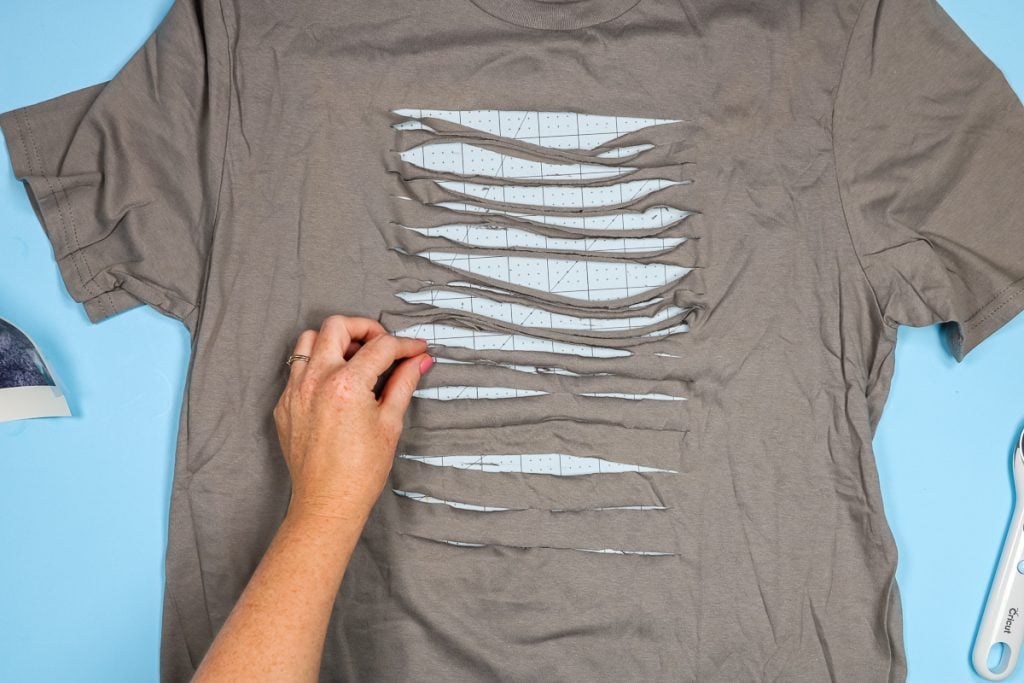
Once you have all the cuts done, remove the print and then check your shirt. Make sure your cuts are all the way through, or you could leave a few connected as I did. Just check and make sure it looks how you want it to look.
Stretching Cut Section
Now it’s time to create the peek-a-boo look. Just cutting the shirt doesn’t leave an open area where you can see your sublimation design. To get the look we want, stretch each of the cut sections. By stretching each line, the fabric curls a little and then hangs, which creates the open areas where our sublimation design is going to peek through.
Applying the Sublimation Panel
To finish the shirt we need to apply the sublimation panel. Start by turning your t-shirt inside out with the peek-a-boo section facing up.
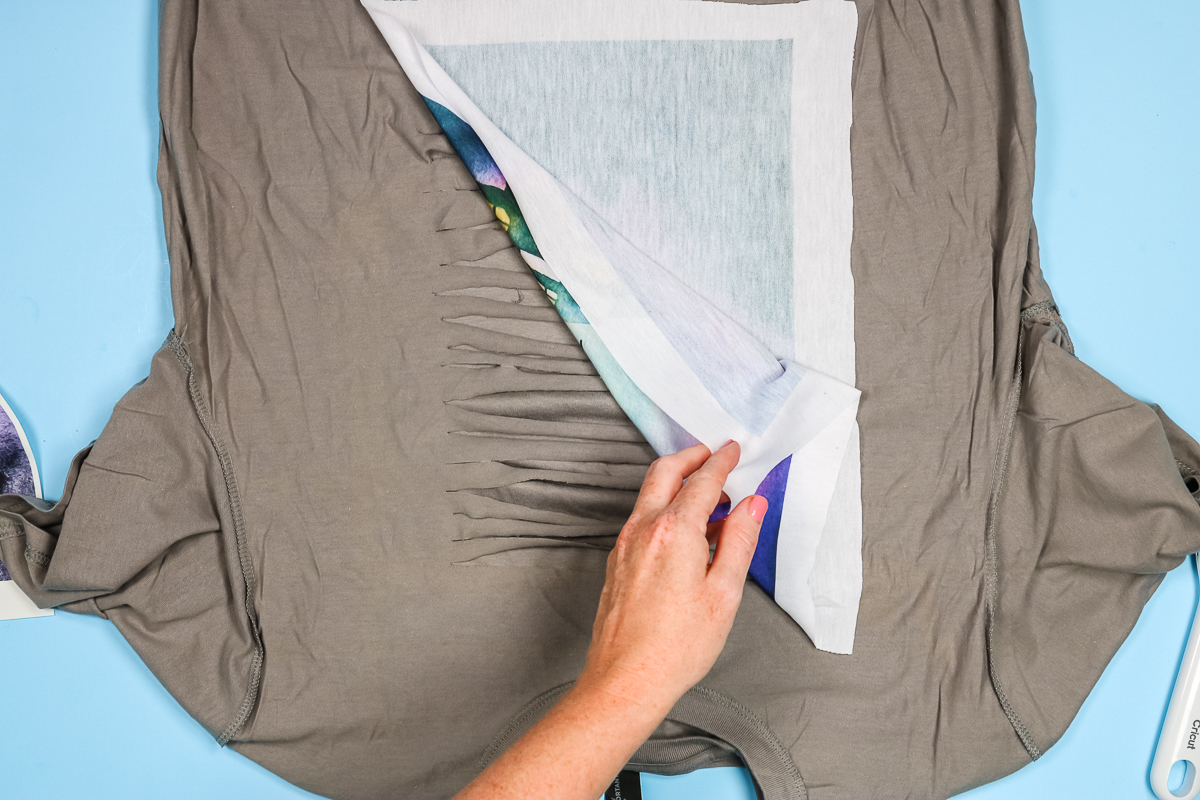
Because I’m using fabric tape, I’m going to apply it to all 4 sides of my sublimation panel. Follow the directions for your fabric tape, press it down really well and then remove the liner to expose the adhesive on the other side.
Make sure the sublimation print is flipped in the same direction as the shirt and then lay it on top of the shirt. Before pressing it down really well check and make sure it’s placed correctly. When you have it exactly where you want it, press down the adhesive making sure it’s stuck down really well on all 4 sides. Flip the shirt right side out and your project is done!
Final Thoughts on Peek-a-Boo Sublimation Shirts
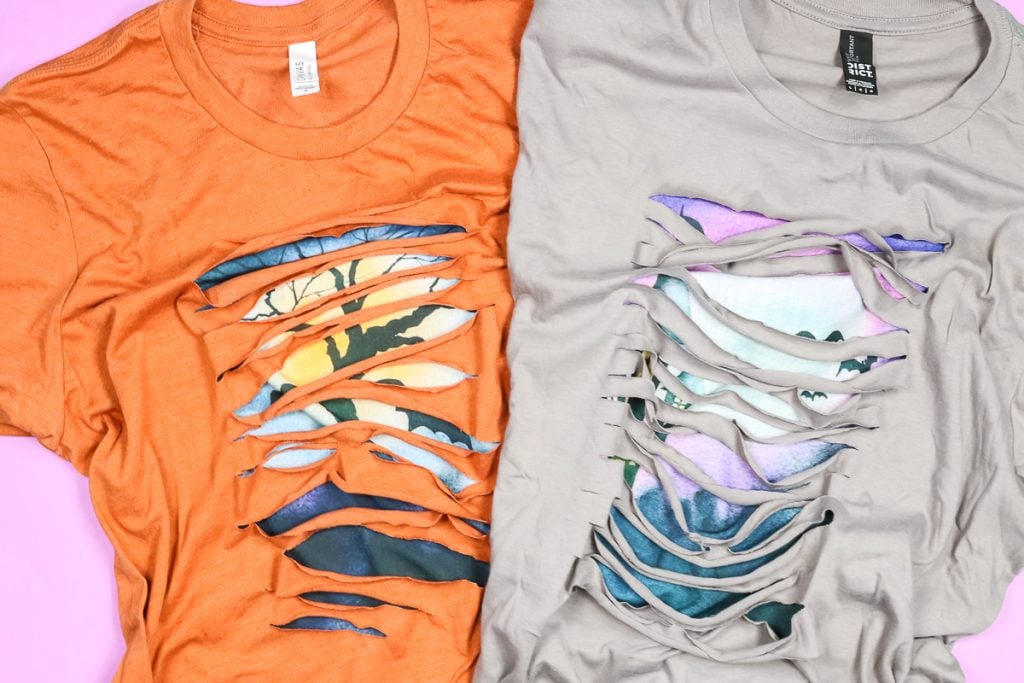
I love these shirts. They turned out so fun and are perfect for Halloween. As you wash your shirt the stretch and rolling on the cut sections will keep getting better.
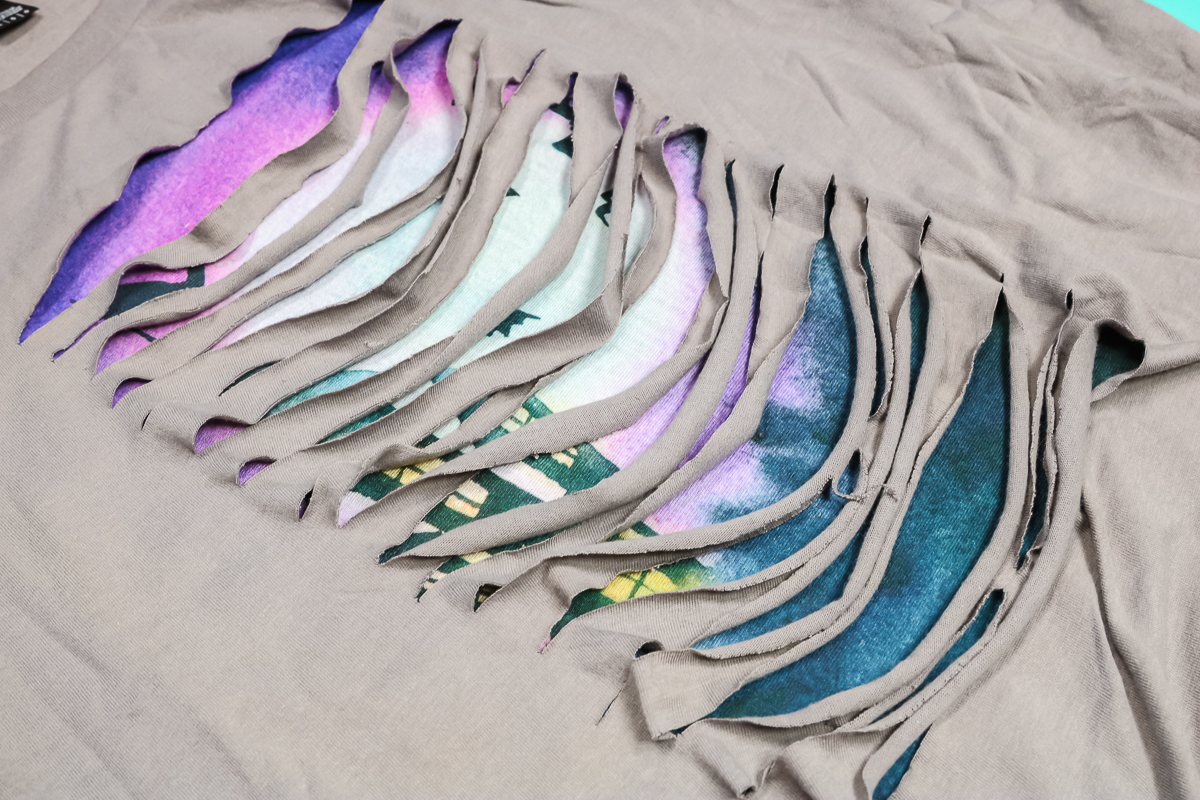
You can see the Halloween design perfectly through the peek-a-boo cuts and I love that you decide how you want your peek-a-boo section to look. It can be perfectly uniform with straight lines all the same distance apart or you can cut your lines at a diagonal and with different widths. It’s up to you how you want your shirt to look.
You can use any color shirt, any shirt material, any style of shirt you want. You can make your sublimation image fun or you can find something scary. While I think this project is great for Halloween shirts, you’re not limited to Halloween. You could create peek-a-boo sublimation shirts for anything you want.
I hope you found this tutorial helpful. If you have any questions about anything we covered leave them in the comments.