This post and photos may contain Amazon or other affiliate links. If you purchase something through any link, I may receive a small commission at no extra charge to you. Any supplies used may be given to me free of charge, however, all projects and opinions are my own.
Ever wonder how to find Dollar Tree sublimation items? Well, today I am sublimating things I found at Dollar Tree. You can find some amazing deals and learn a bit more about sublimation as well. I will show you what to look for in the store as well as what I did to sublimate on the items that I picked up!
Dollar Tree Sublimation Items
Just click play on the video below to watch me find and sublimate several items from Dollar Tree. Then just head out and find your own items to experiment on!
Can’t watch the video or miss some of the information? You can also follow along below!
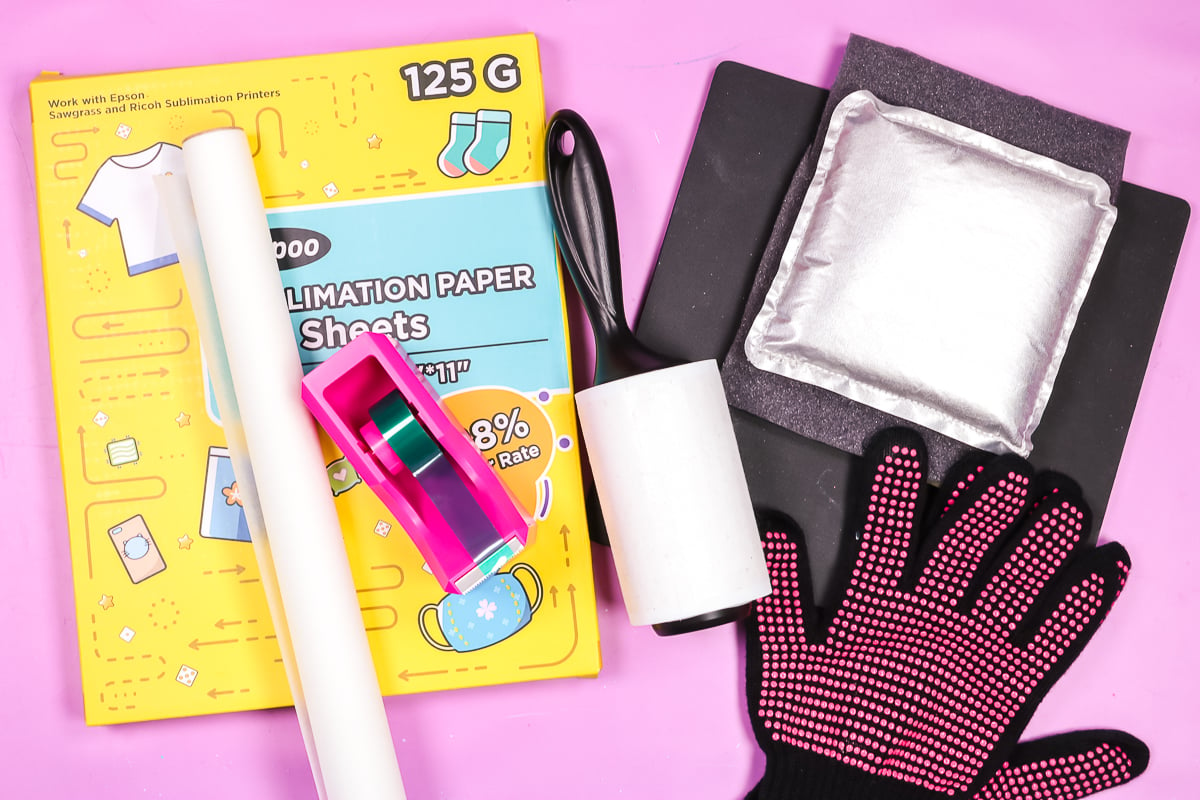
Supplies Used
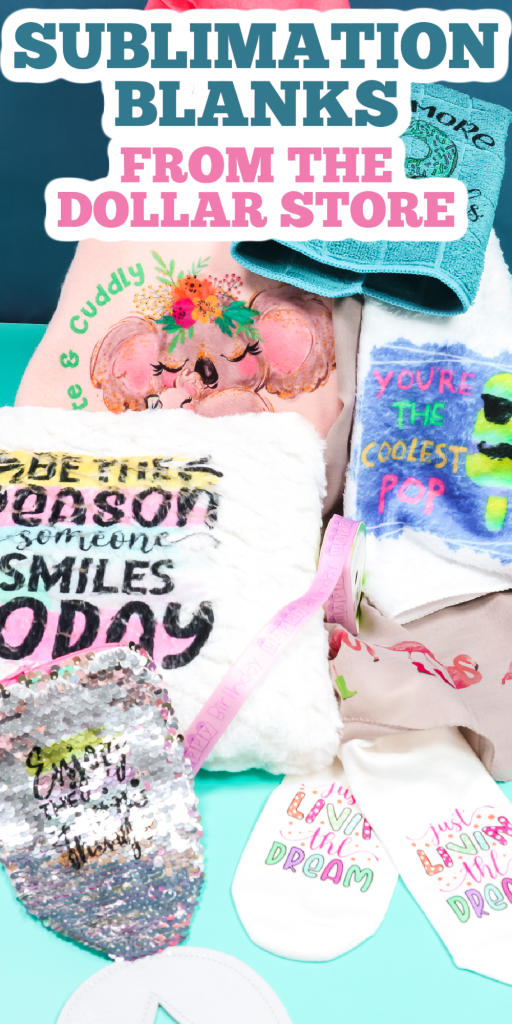
Designs Used
Note that you could also use Infusible Ink or sublimation sheets in place of the sublimation prints that I am using.
What to Look for at the Dollar Store
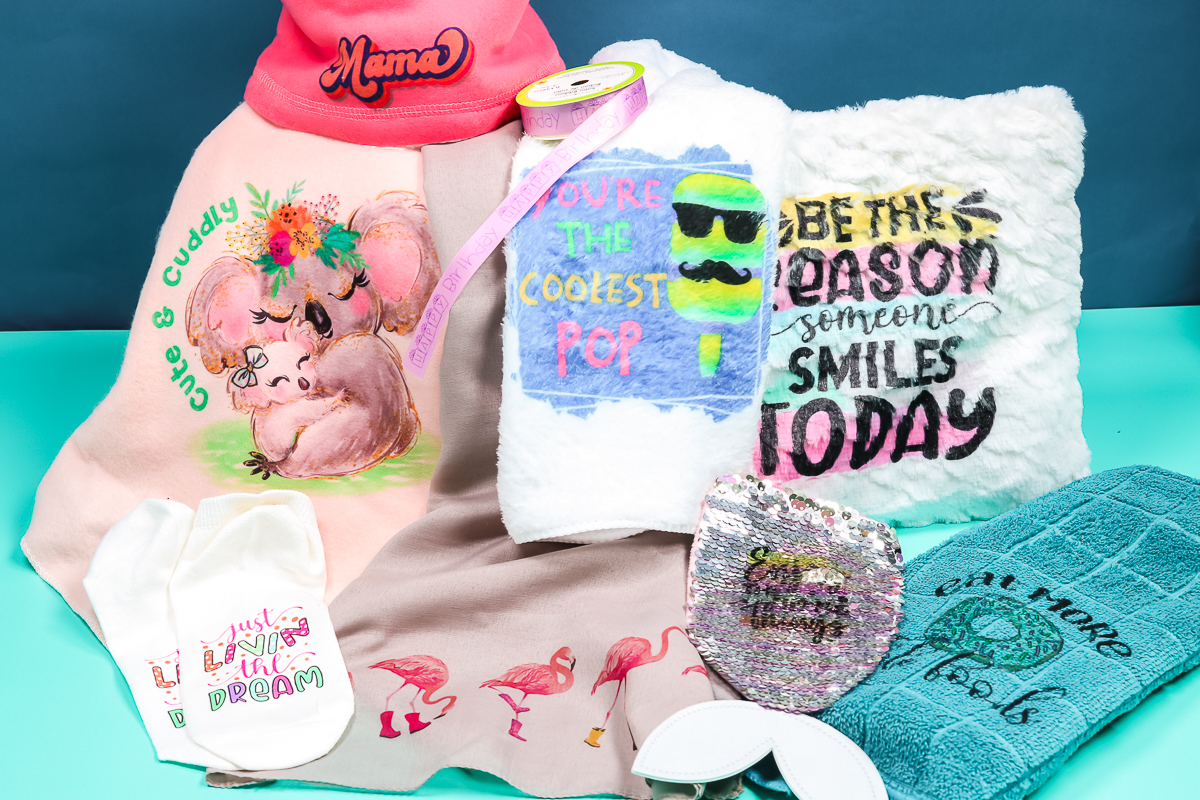
I headed to my local Dollar Tree and I looked at the tags on each of the items. Anything that says 100% polyester was fair game. I threw a bunch of stuff into my cart and experimented with it just for you. What did I find? Fleece baby blanks, microfiber cloths for washing cars, tea towels, scarves, hats, socks, pillows, ribbon, and more!
I did find a pencil pouch with sequins on one side and what felt like polyester on the other side but there were no tags. For certain items, I would be willing to take the risk, especially if I think that it feels like polyester. Plus with this one, you can often sublimate on the sequins themselves. Why not just give it a try and see what happens? I think it’s worth the trial and error. If you were going to sell the item, I would definitely launder it a few times and make sure that the sublimation is permanent.
Time, Temperature, and Pressure
For each blank you find, you will need to find a time, temperature, and pressure. Here are a few guidelines you can use to determine the right settings:
- The first thing is to look at the back of your sublimation paper. It might have rough suggestions for time, temperature, and pressure for certain materials.
- If you found a tea towel at Dollar Tree and you’ve done tea towels from a sublimation supplier before, just start with the general recommendations on the sublimation tea towel.
- For my projects, I am starting with 385 degrees F for 50 seconds for most of these blanks. I’m going to reduce the time, but leave the temperature the same if the material looks extremely delicate. That’s what I’ve come up with as a good experiment when I’m using Hiipoo sublimation ink and Hiipoo sublimation paper.
- As a rule of thumb, 400 degrees F for 60 seconds is a good recommendation if you have no idea. If there’s nothing on the back of your sublimation paper, you’ve never really done any experiments before, and you’re dealing with completely new blanks, 400 degrees for 60 seconds is usually a good place to start and you can increase or decrease from there.
Remember that your first blank with experiments like this may not turn out. That’s okay. It came from Dollar Tree. Get another one and try again. Sooner or later, you’ll have the right time and temperature and be sublimating away.
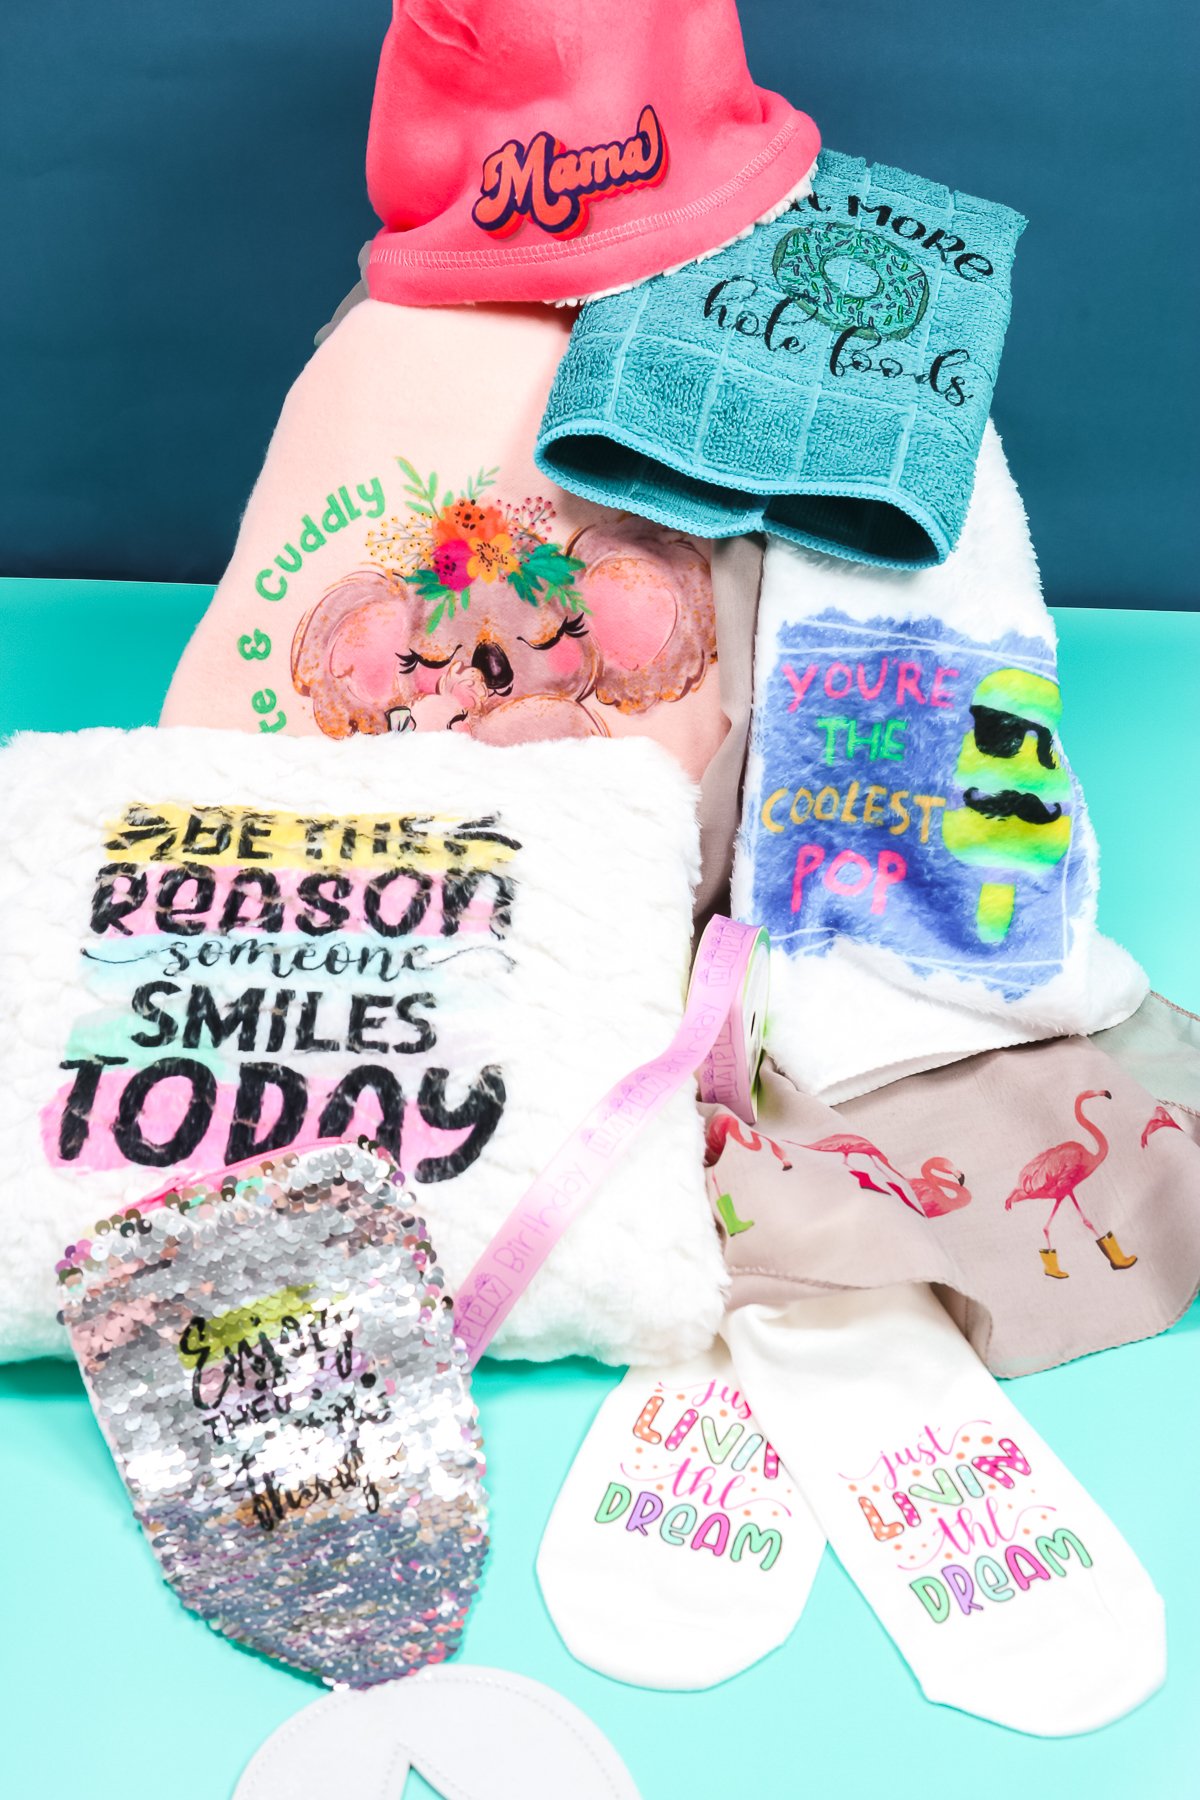
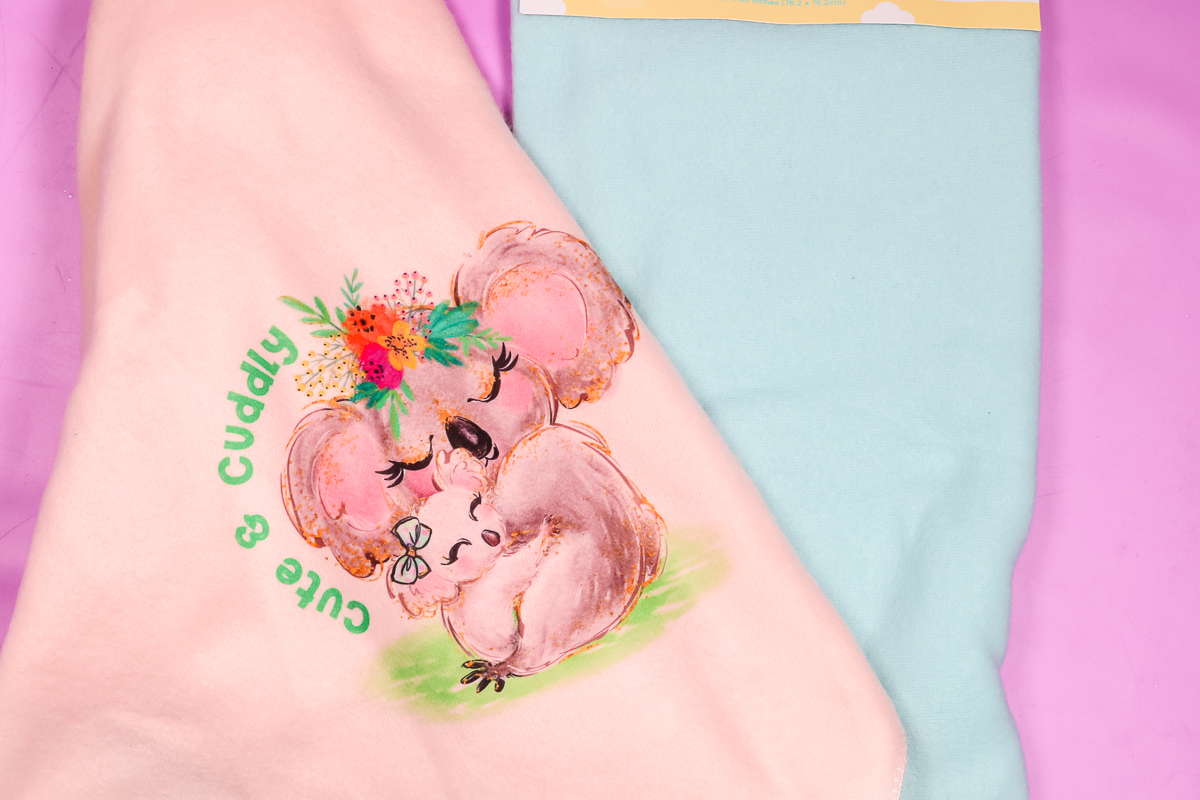
Sublimation on a Baby Blanket
These baby blankets are actually one of my favorite dollar store sublimation blanks and I have made them before. Use the following steps for sublimation.
- Pre-press to remove any moisture.
- Lint roll to remove any debris.
- These baby blankets cause tons of trouble with press lines. I went ahead and ripped my design all the way around so that if the lines were there, they would at least be broken up a little bit. Locate the design and tape it down well.
- I added a pressing pillow underneath with protective paper on top again to help with the pressing lines.
- Put in the heat press with protective paper over the top.
- Set the pressure to be as light as possible.
- Press at 385 degrees F for 50 seconds.
- Remove from the heat press and peel back to reveal your gorgeous design.
If you can still see some press lines. use an Easy Press Mini and turn it all the way up to the third setting. Run it in circular motions around those press lines. That usually gets rid of most of them. And my baby blanket looks gorgeous!
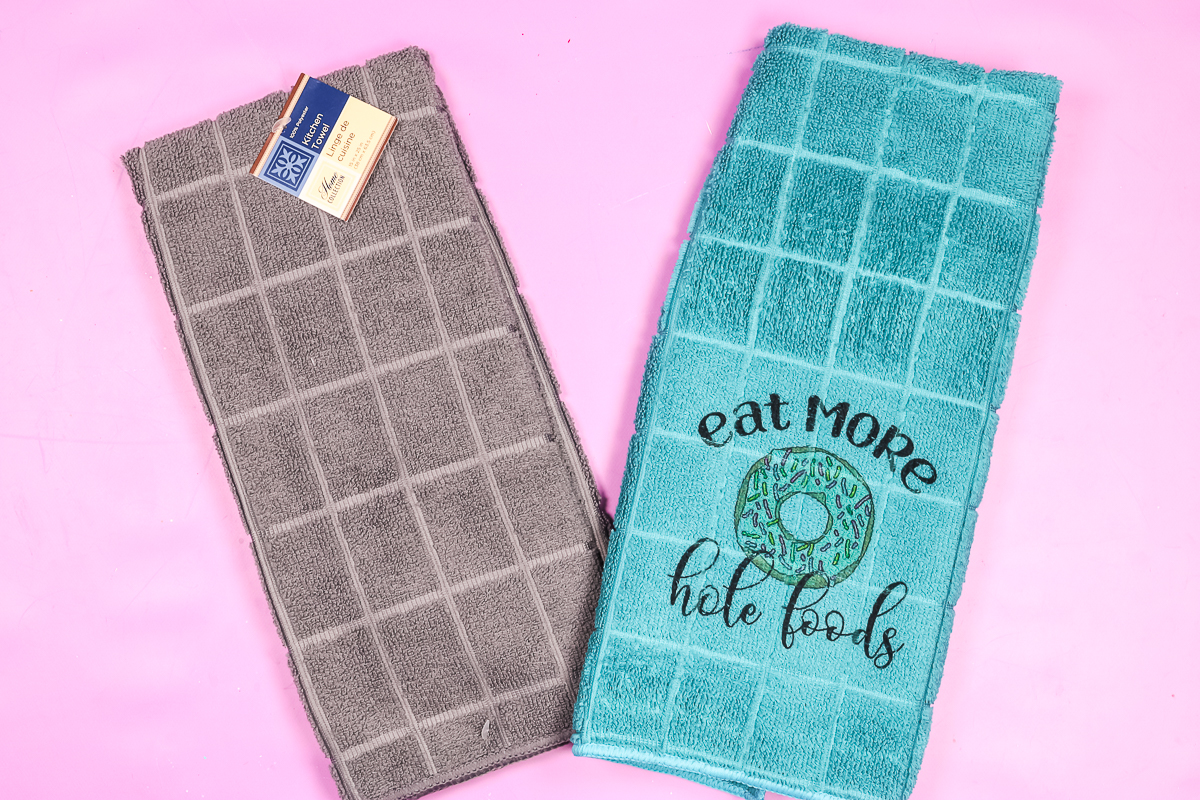
Sublimation on a Kitchen Towel
I followed basically the same procedure as the blanket above. You can follow along with my steps below.
- Pre-press to remove any moisture.
- Lint roll to remove any debris.
- Add your sublimation print ink side down and tape down well.
- Put the protective paper on the top as well as underneath the towel.
- Put in the heat press.
- Set the pressure to be as light as possible.
- Press at 385 degrees F for 50 seconds.
- Remove from the heat press and peel back to reveal your gorgeous design.
The towel that I used has a texture to it and that texture is going to get flattened when you press it. There is not a whole lot you can do to avoid that. After pressing, I like to fluff it up with my hand at first just to get that texture back again. You can use the Easy Press Mini on this one as well, and just run it in circular motions to lift that texture back up into place and make it look a little bit better. I was able to make it look pretty good, and this one’s ready for my kitchen or to give as a gift.
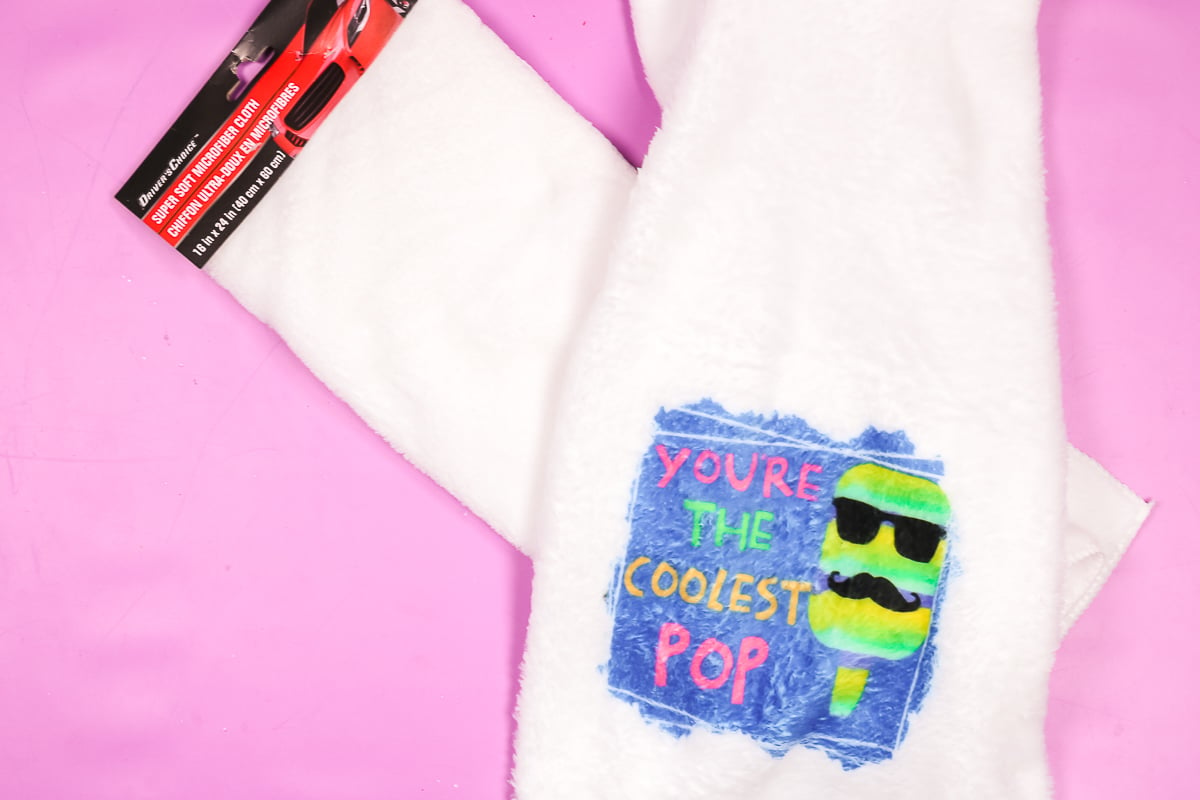
Sublimation on a Microfiber Towel
These microfiber towels can be found in the car wash section and they make excellent gifts. I’m sublimating it in the exact same way as the kitchen towel above. I did go ahead and tear the edges of my design before adding it to the towel. I used 385 degrees F for 50 seconds for my settings. After pressing, you just peel it back to reveal a gorgeous design that is perfect for gifts for Father’s Day. Again, the pile was pressed down and I fluffed it back up in the same way as I did with the kitchen towel. There were zero press marks and I was super impressed with this blank. This is actually one of my favorite Dollar Tree sublimation items, so be sure to pick one up.
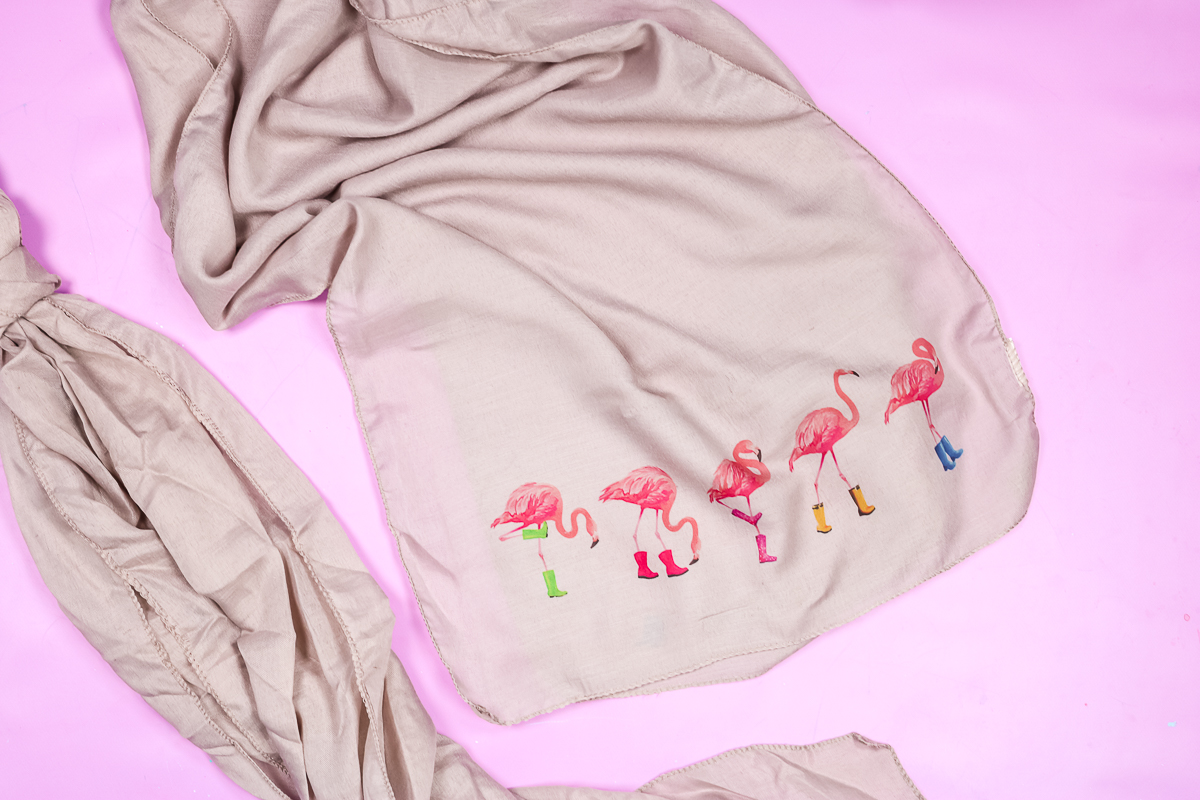
Sublimation on a Scarf
The scarf I am using is a very delicate material so I was extra cautious when pressing. If find materials like these, try the steps below when pressing.
- Pre-press the entire thing for a few seconds.
- Lint roll your material to remove any debris.
- I tore my sublimation print, and then taped it to the ends of my scarf. I made sure that I had a piece of protective paper on the top that would cover my entire heat press. This will prevent the heat press from touching the scarf and give the material some protection. I also made sure to put some protective paper under the scarf because it is a very thin material.
- I pressed at 385 degrees F for just 35 seconds because the material is super delicate and thin.
- Once it is done pressing, remove from the heat press and peel back the sublimation print.
It actually worked perfectly. I was super surprised and I actually love the way the scarf turned out with the flamingos. This is one of my favorite designs and I’ve used it on mugs as well as this scarf. I must say that this turned out gorgeous. I’m going to have to think of a reason to keep this one for myself.
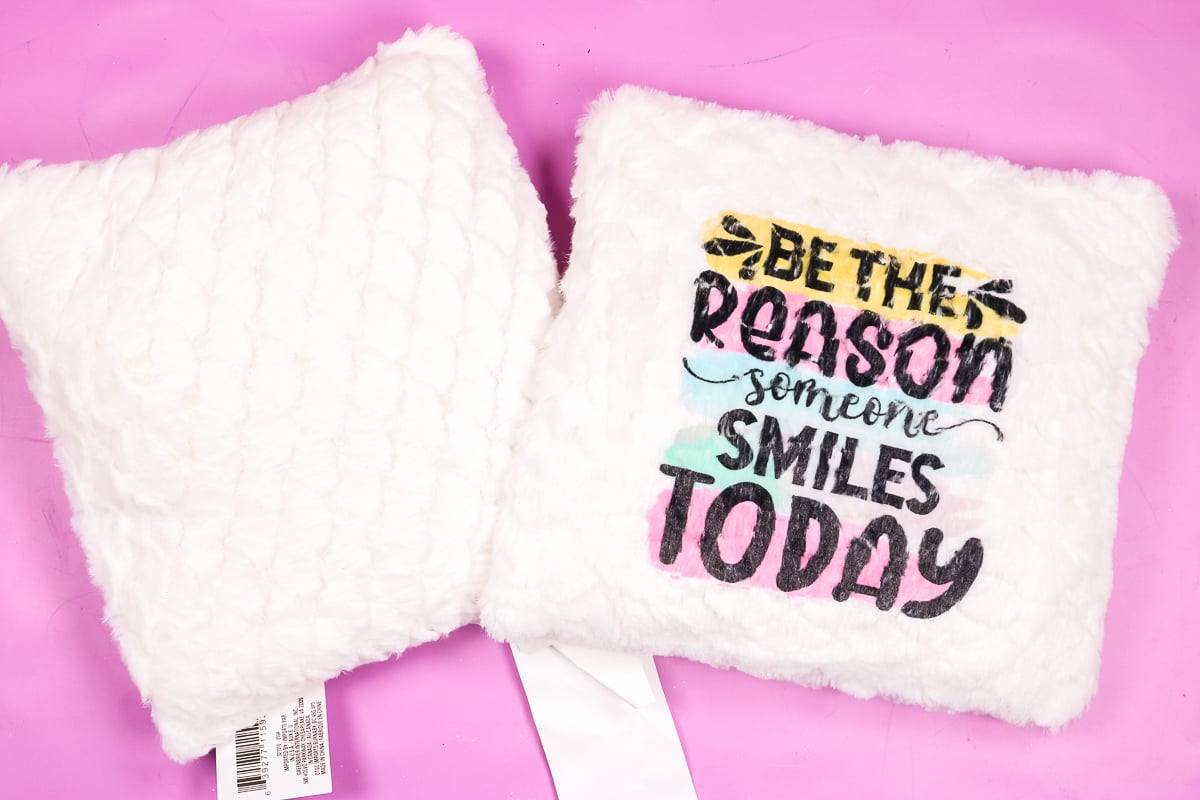
Sublimation on a Pillow
Pillows are notoriously hard to press. For this small little pillow, I had to open my heat press up all the way. It is a clamshell press, so breaking out your Easy Press on this one might be the way to go. Here are the instructions that I used.
- Pre-press it for just a few seconds. I find that pre-pressing something like this allows me to set my heat press in the right location.
- Lint roll to remove any debris.
- Tear the edges of the design and locate it with some heat-resistant tape.
- Just add protective paper to the top then put it in the heat press. Press it at 385 degrees F for 40 seconds. I cut the time just a little bit because I was flattening the pillow so much and I wanted it to be able to rebound.
- Once the pressing is complete, remove the pillow from the press and peel back your sublimation print.
As you can see, the sublimation on this pillow turned out great. With a pillow that has a super thick texture, the sublimation print will be distorted when you flip that texture up. You may or may not like that, but it is a super cute pillow.
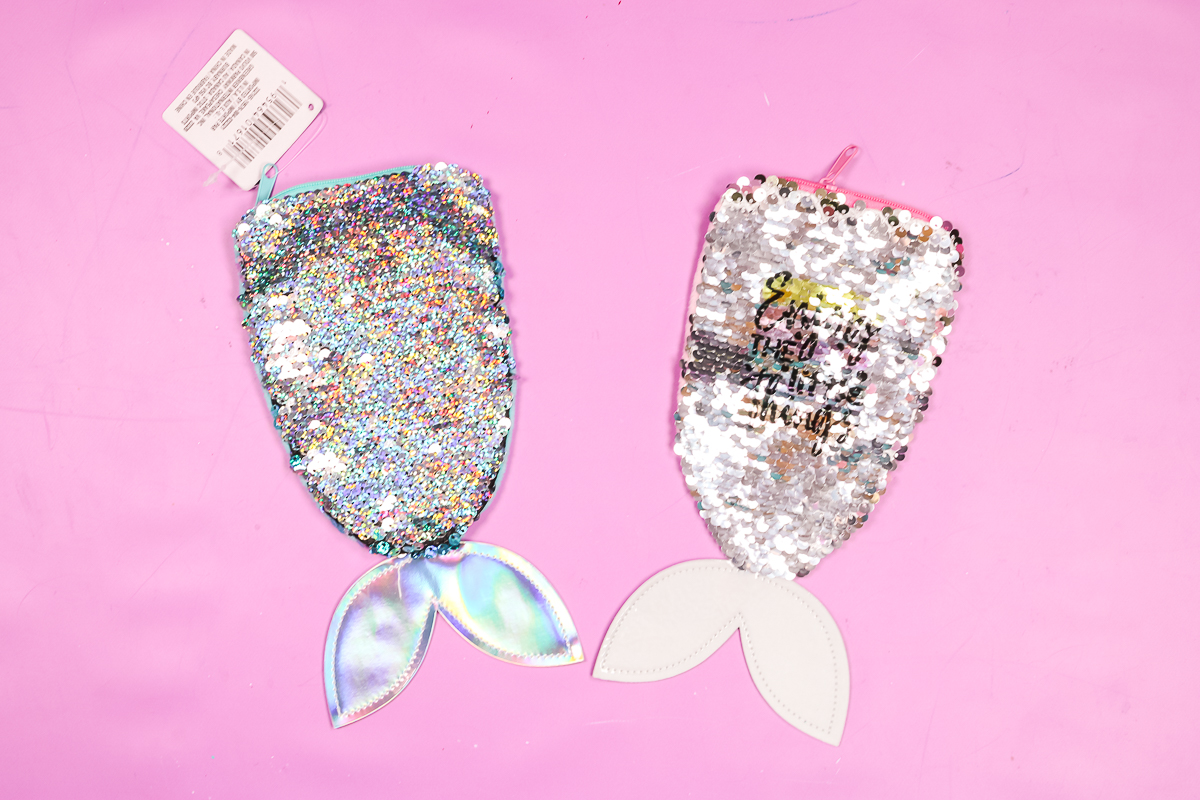
Sublimation on a Sequin Pencil Pouch
Many times you can sublimate on sequins, but I wasn’t even sure if this was possible. Here are my steps for sublimation on sequins.
- Add protective paper to the inside, just in case. NOTE: I did not preheat this one because I didn’t want the sequins to be damaged.
- Make sure that your sequins are flipped in the same direction. Add your sublimation print with some heat-resistant tape, and then add protective paper to the top.
- Press at 385 degrees F for about 40 seconds. This does have a zipper at the top. If I can, I like to hang the zipper off the side of my heat press which is what I did in this case.
- Once it is done pressing, remove it from the heat press and carefully remove the print from the surface.
You can see that everything looks great. If you look really closely at the tail, it did mess up the material a little bit. You might add some more protective paper or press it for less time. When you sublimate sequins and turn them in the opposite direction, you won’t be able to see the design, which is part of the fun. This is a really fun sublimation project from Dollar Tree.
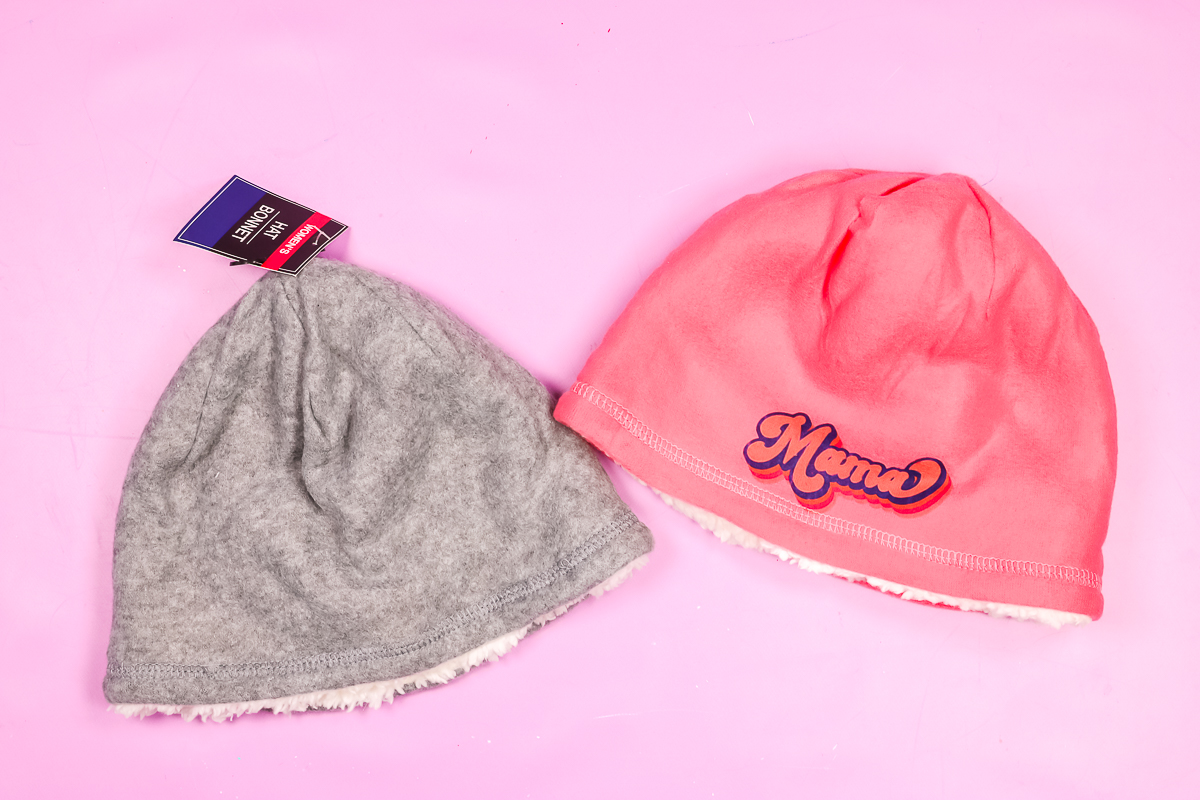
Sublimation on a Polyester Hat
You can find tons of hats at Dollar Tree that are 100% polyester, so let’s sublimate on one. The steps are basically the same as the other blanks but here is an overview.
- Add a pressing pillow to the inside and pre-press with the pillow in place.
- Lint roll to clean the blank.
- Be sure to add protective paper over the pressing pillow then add your sublimation design to the front. I did tear the edges and used some heat tape to secure it into place.
- Once everything is in place, cover the sublimation print with more protective paper.
- Put it in the heat press with as much of the hat as possible hanging off of the press then press at 385 degrees F for 50 seconds.
- Remove from the heat press and peel back the sublimation print.
As you can see, my sublimation print transferred and it looks amazing. This is a great way to make sublimation hats for less!
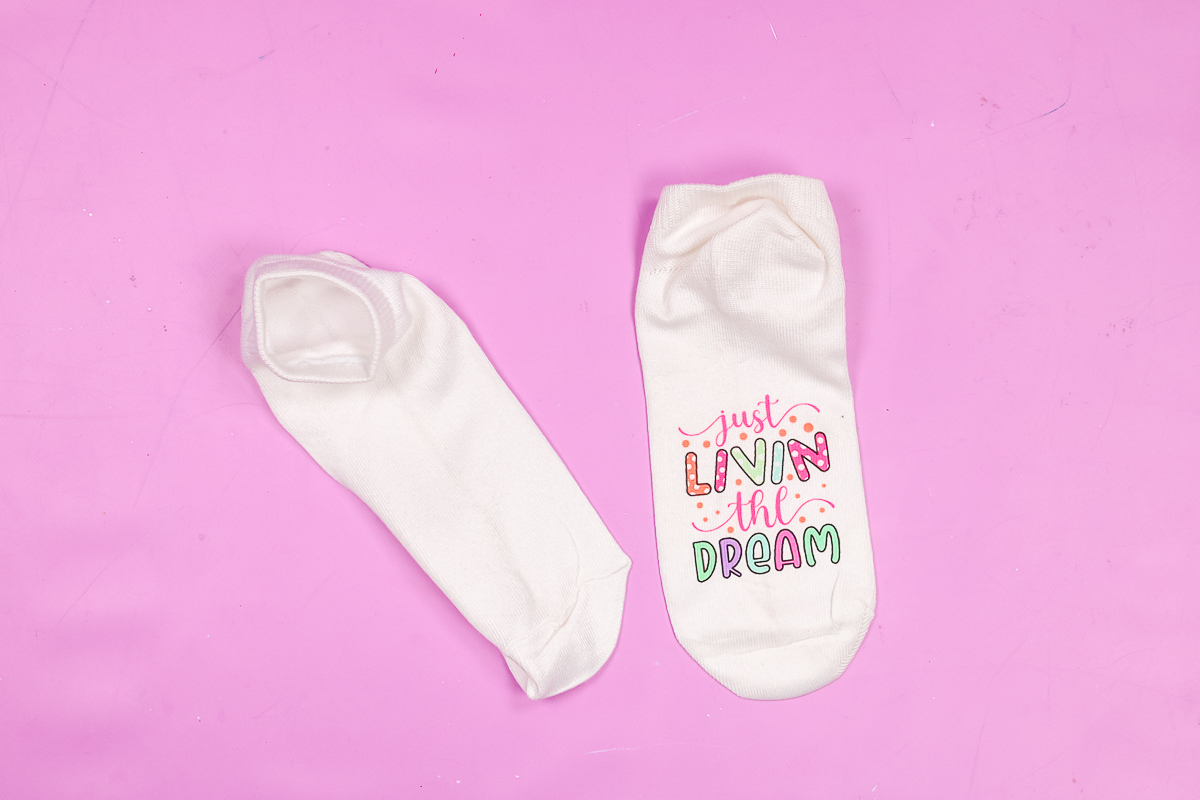
Sublimation on Polyester Socks
You can find a wide variety of socks that are 100% polyester. How do you sublimate on them? Well, I am going to show you! For this pair, I want to add a design to the bottom. But you can use these same steps for designs anywhere on your pair of socks.
- Pre-press for a few seconds. I made sure that the bottom was flat as that is where I want to add my design.
- Lint roll the area to remove any debris.
- Add your sublimation print and tape into place.
- Cover with protective paper and press your socks. I left the heel of my socks hanging off of the press. I did 385 degrees F for 50 seconds with light pressure.
- Then remove from your press and peel back the sublimation print.
You can see it’s bright and vibrant and perfect for gift giving. I might have done this upside down as I probably should have put the sublimation print the other way. That is okay! These Dollar Tree sublimation items are for learning new skills!
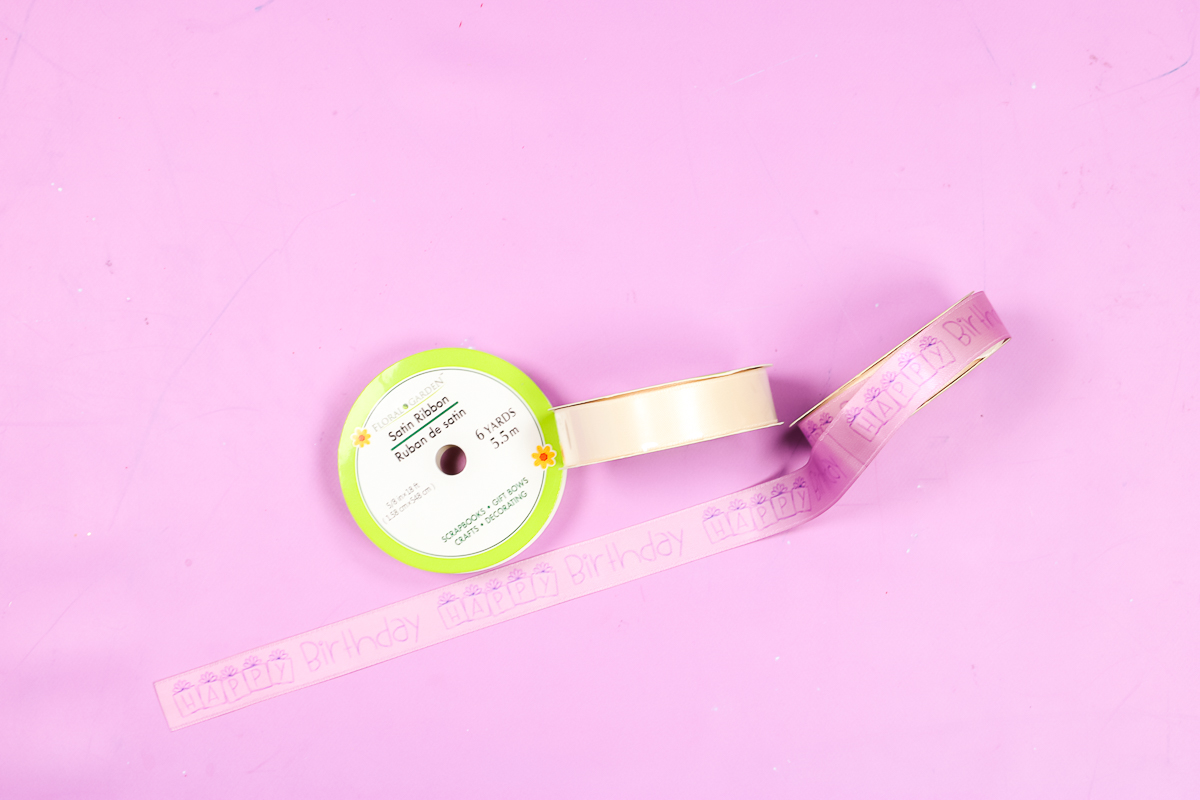
Sublimation on Ribbon
Let’s talk about sublimating on a ribbon. I did some experiments here. Basically, I printed out a full-size sheet of sublimation. I designed it with a repeating print that says “happy birthday”. I spaced the print out enough where the print will fit on the width of the ribbon that I have. Then just cut the sublimation print into strips that are wide enough to cover the entire ribbon. That way I’m changing this ribbon from off-white to pink with sublimation ink. Let’s take a look at the process and how it turned out!
- Lint roll the ribbon.
- Add a strip of the sublimation image and tape it down well.
- Add protective paper to the top and bottom.
- Put in your heat press and press at 385 degrees F for 50 seconds.
- Remove from the press and peel back the print to see your design. You can stop with a small length of ribbon or continue to add more.
- I did the next strip in the same way, adding the sublimation print to the next area. I did overlap the end of one strip with the beginning of the next.
- You can continue this for as long of a piece of ribbon as you need for your project.
I will note that you can see a little bit of a line between where I sublimated the two strips. Be aware of this, but sublimating on a ribbon is 100% possible. If you do change the entire color as I’ve done here, you may have to have that little line in between the areas of your print. I still thought it looked pretty good, but if you want to avoid that I would just not do the background color. Then the area between the two prints would not have been an issue.
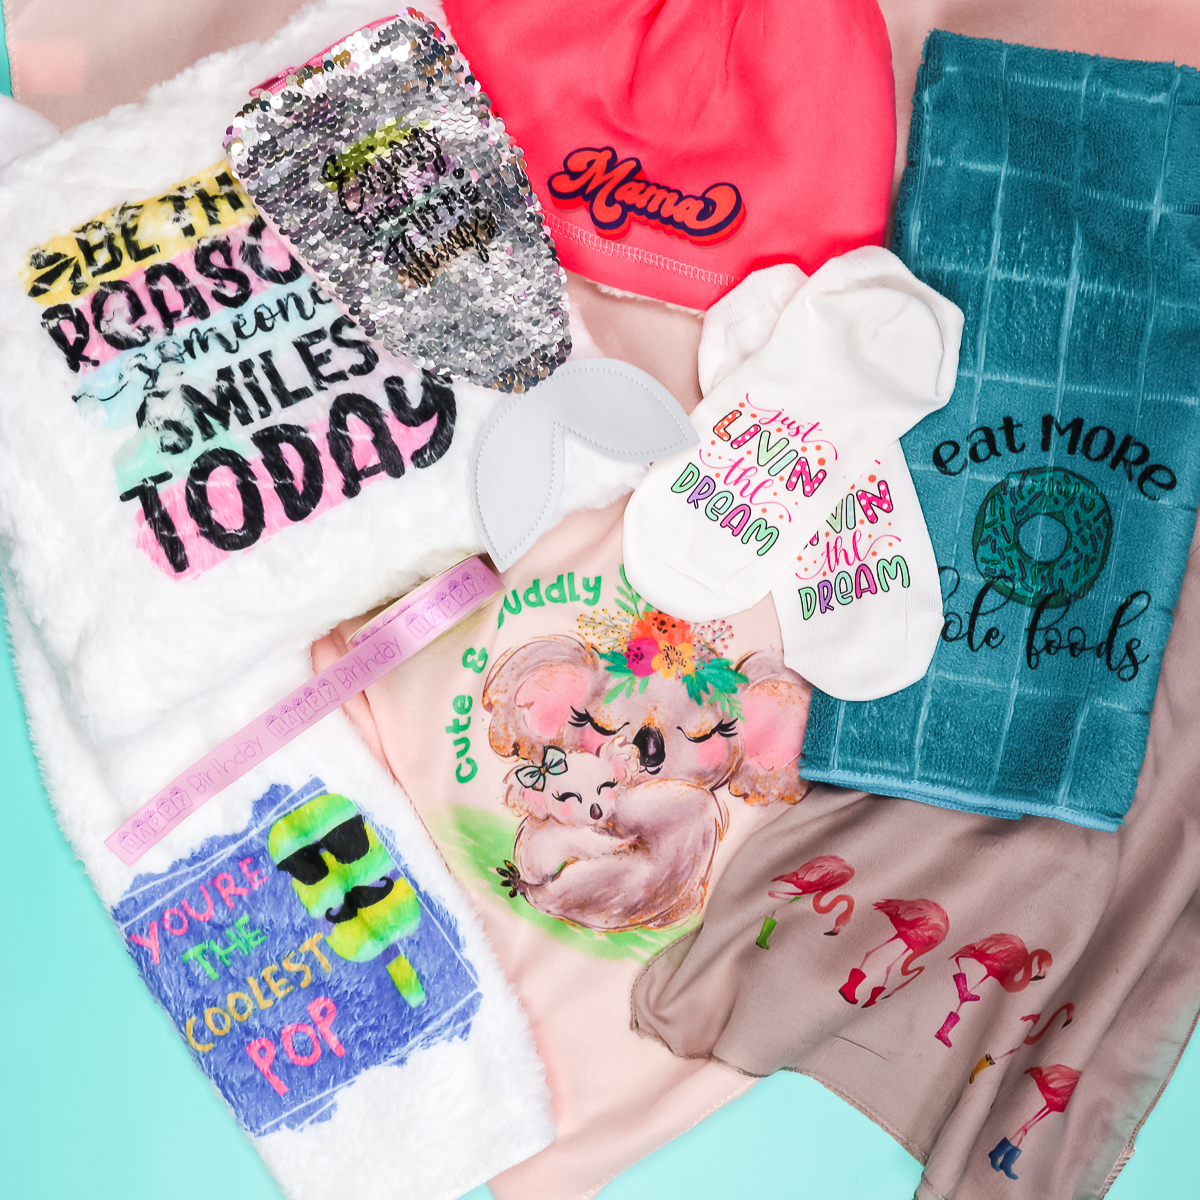
My Favorite Dollar Tree Sublimation Items
Now I have a ton of really cool and amazing sublimation projects all with items from Dollar Tree. I encourage you to head to your Dollar Tree and pick up some things that say 100% polyester. Then just experiment with your sublimation printer and sublimation ink. I think you just might find a new favorite sublimation blank.
Now, which one of these is my favorite? Personally, I would say the way the scarf turned out is my favorite. The flamingos on it are amazing. However, I would say I’ve used the baby blanket several times for things like baby shower gifts. They turn out so great and are such an inexpensive gift idea.
I would love to know from you, which of the projects I did today is your favorite? Which are you going to try? Will you be picking up some Dollar Tree sublimation items to try?