Plans coming soon! Sign up for my email newsletter to be notified when they’re available : https://pages.convertkit.com/daa72a067b/e8b584b1ba
⛵Check out the TotalBoat High Performance Epoxy I used! http://bit.ly/TotalBoatHP
👕 Get your Build It Yourself merch! http://bit.ly/BuildItYourselfMerch
📦 Materials Used On The Lift Top Coffee Table (affiliate):
Lift Top Mechanism : https://amzn.to/2SPhYJ5
Soldering Kit : https://amzn.to/2GnsVMf
Wood Glue : https://amzn.to/2MxXXRR
Water-Based Polyurethane : https://amzn.to/2IcJ34Z
Clear Enamel : https://amzn.to/2tlk7xV
TotalBoat High Performance Epoxy : http://bit.ly/TotalBoatHP
🛠 Tools Used On The Lift Top Coffee Table (affiliate):
TS8000 torch : http://bit.ly/2tjhw7v
MAP-Pro Cylinder : http://bit.ly/2SO1EYR
Countersink Bit : https://amzn.to/2SUHrRz
Powermatic 15HH Planer : http://bit.ly/Powermatic15HH
Powermatic PJ-882HH Jointer : http://bit.ly/PJ882HH
Table Saw : https://amzn.to/2WrrNMm
Miter Saw : https://amzn.to/2TeGdgO
Woodpeckers Square : https://amzn.to/2N3fzVM
Cordless Drill : https://amzn.to/2wOFM2S
Domino Joiner : https://amzn.to/2E92bwu
Router : https://amzn.to/2UUjCXd
½” Rabbeting Bit : http://bit.ly/2E9ZpXT
Jigsaw : https://amzn.to/2Id61sF
Pocket Hole Jig : https://amzn.to/2UWT0oi
Track Saw : https://amzn.to/2E8fqh3
Sander : https://amzn.to/2oHOmg7
Block Plane : https://amzn.to/2V2D7h1
Card Scraper : https://amzn.to/2TNezI2
Parallel Clamps : https://amzn.to/2OjcdRs
HVLP Sprayer : https://amzn.to/2SM45vc
Scotch Brite Pad : https://amzn.to/2UU4oRX
Ultimaker 3 Extended : http://bit.ly/Ultimaker3
Thingiverse project for the dividers : https://www.thingiverse.com/thing:27070
📹 SUBSCRIBE : https://goo.gl/V5gcNJ
💰 SUPPORT ME : https://www.youtube.com/channel/UC-hTi9atsD6wAl2s46LpAVw/join
📲 FOLLOW CRAFTED WORKSHOP!
INSTAGRAM: http://instagram.com/craftedworkshop
FACEBOOK: http://facebook.com/craftedworkshop
TWITTER: http://twitter.com/craftedworkshop
PINTEREST: http://pinterest.com/craftedworkshop
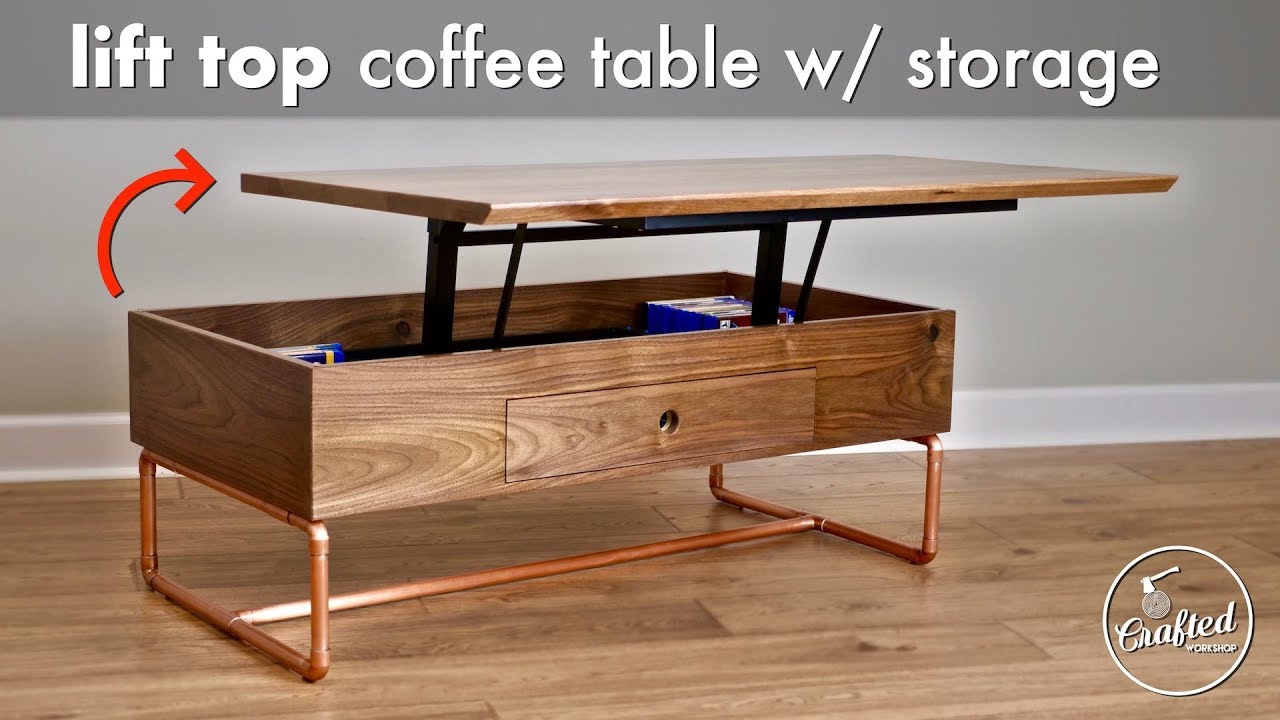
Build Process :
I decided to use solid Walnut on this build, mostly because I had a few Walnut boards hanging around that would work well for this project, so my first step was breaking down the boards into rough lengths.
After the boards were cut to rough length at the miter saw, I could square up one face and one edge at the jointer.
Once the boards had two square surfaces, I could run them through the planer to bring the other face parallel to that flattened face.
Next, I ripped the boards to final width at the table saw.
With the boards ripped to width, I could lay them out and mark locations for Dominos, which I used for alignment.
After a few hours in the clamps, I removed the clamps and scraped off any glue squeeze out, then I taped off a few knot holes on the underside of the top to prep for filling them with epoxy.
I poured the epoxy into the knot holes in a thin stream to try and allow as much air to escape as possible. Off camera, I came back with a propane torch and popped any bubbles in the surface of the epoxy.
Before cutting the top to final size, I went ahead and worked on the cabinet section of the coffee table. The first thing I needed to do was work on the side of the cabinet which would house the drawer front. I wanted to try something new here and cut the drawer front from the middle of the board, which would create a drawer front with a perfect continuous grain pattern.
To do this, I first laid out where the drawer front would be, making sure to label all of the parts, and then cut away the top and bottom sections at the table saw.
With the top and bottom strips removed, I could then crosscut the drawer front from the center section at the miter saw.
…