This post and photos may contain Amazon or other affiliate links. If you purchase something through any link, I may receive a small commission at no extra charge to you. Any supplies used may be given to me free of charge, however, all projects and opinions are my own.
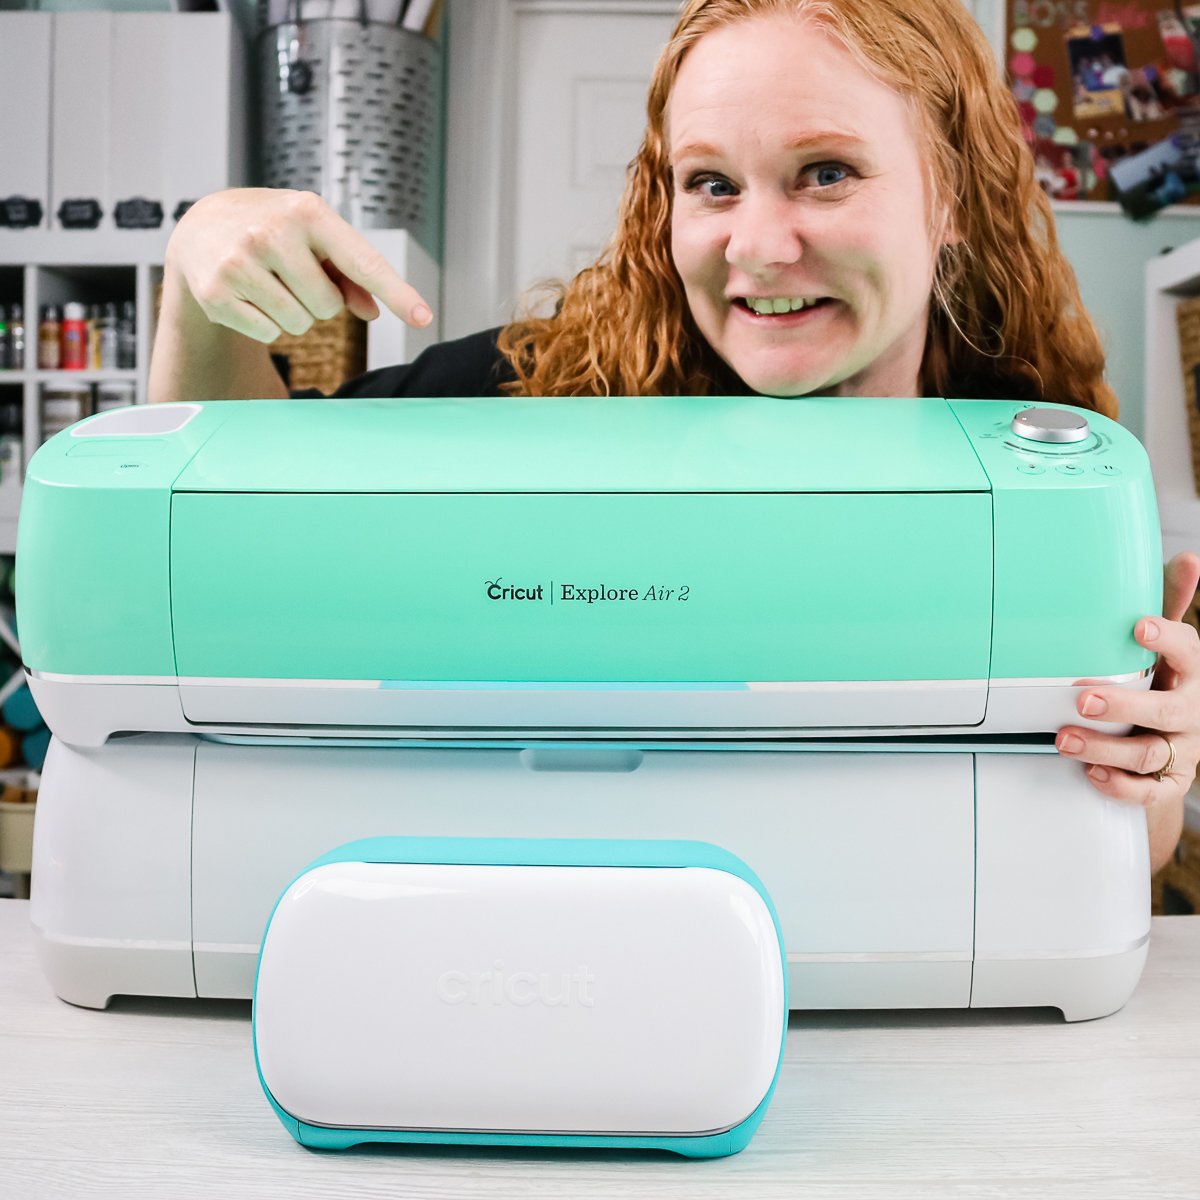
Today we are going to do a Cricut glossary of terms or a Cricut for Dummies crash course. My hope is that you can spend one hour and really learn your Cricut machine. This will help you start creating faster and understand the terms as you go watch more YouTube videos and really dive in. So grab a cup of coffee, sit back, learn all the terms and then you’ll know the Cricut lingo.
Want to dive deeper into your Cricut machine right now? Try our free 7 day course instead by clicking here!
Cricut for Dummies
If you want to dive into the one hour video, just click play below. I walk you through everything you need to know about your Cricut from the machine to tools to materials and so much more!
Can’t watch the video or missed something important? You can also follow along below as I explain everything briefly.
Table of Contents
Different Cricut Machines
I am going to start with machines. What are the different Cricut machines? There are three different machines on the market right now. The Cricut Joy, which is the smallest Cricut machine. Then it steps up from there. The next machine up is the Cricut Explore Air 2. That’s the one that they’re currently selling right now. There are also older machines, like the Cricut Explore Air and one that’s just called the Cricut Explore. Finally, there’s the Cricut Maker which is one step up from the Cricut Explore. If you would like to see a big comparison between the three machines, you can click here.

These are the three machines that Cricut makes right now and these are the ones that are supported by the current software. If you see other machines for sale, you might see a Cricut Expression or something for sale on Facebook Marketplace. That is an older technology and not currently supported by Cricut. So when you see those, be aware that when you purchase them, you may not be able to do all the things that you see online.
Machine Terms
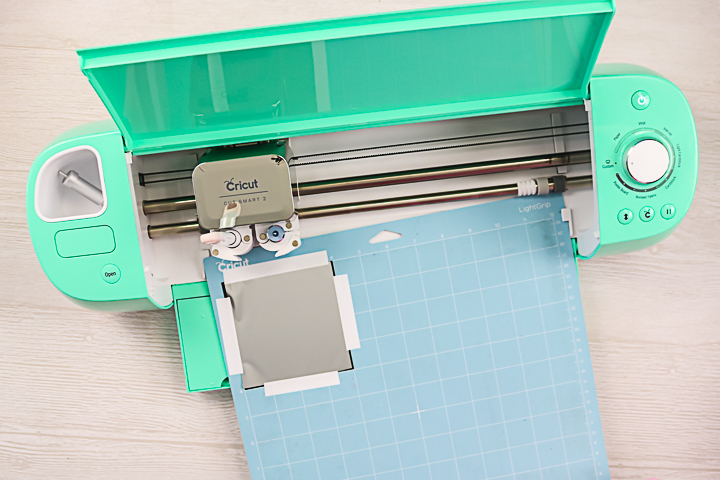
Now that we’ve talked about these machines, let’s take a closer look inside of the machines at the parts, so you will know what all those parts are called when you’re using your machine. The Explore has a button on the left to open the machine while the Maker and Joy you just pull the flap to open. The Explore also has a slot to add a cartridge on the left-hand side. The cartridge is an older technology and you can link your cartridges to your Maker or Joy by calling Cricut.
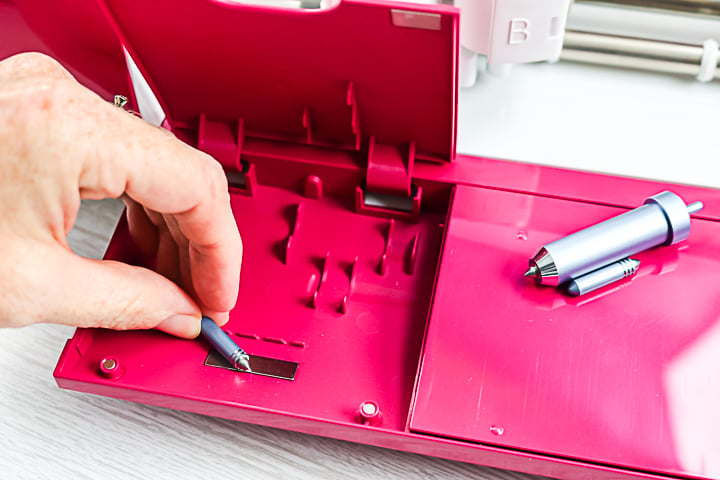
The Maker and Explore also have some storage built into the left-hand side as well as a tray that opens for storage. So you can just put various things like pens or blades inside there.
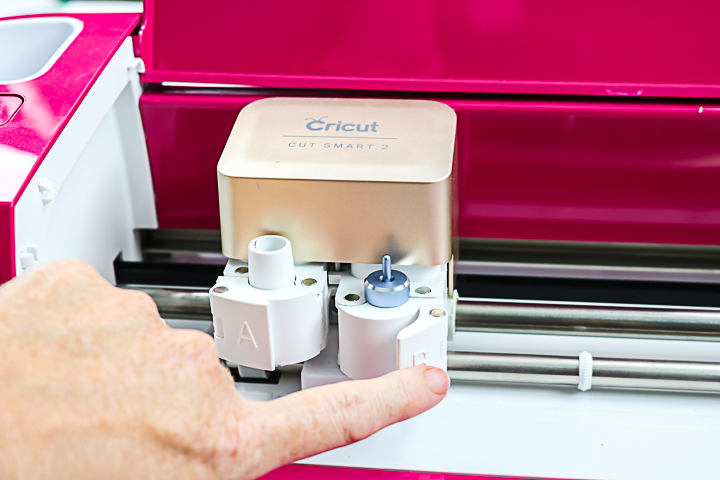
The carriage is the part that has your clamps. For the Explore and the Maker, you have two clamps. The Joy only has one clamp. The Explore and the Maker have an A-side and a B-side. The A-side is for pens and the scoring stylus. The B side is for blades. NOTE: The Joy can use pens, however, they go in the same clamp as the blade.
For the Explore and Maker to work for print-then-cut, it also has a sensor located on the bottom of the carriage. Inside you will also see roller bars with some rollers along them. There are gray rollers on both ends of all machines and these cannot be moved. However, there are white star wheels along the bar on the Explore and Maker and those can move. For certain materials, you’ll need to push all of those over to the right so you don’t mar your material.
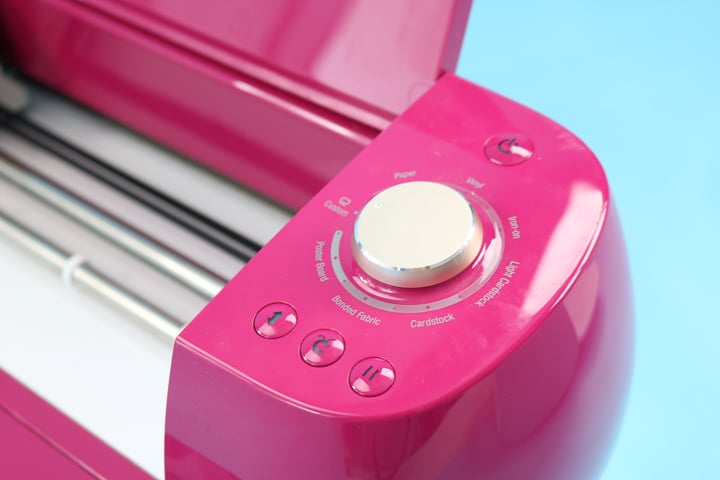
The power button is on the right side of the Explore and Maker. NOTE: The Joy doesn’t have any buttons. You just plug it in to turn it on. The Explore also has a dial, which you will not find on the Maker. The dial allows you to choose your paper, vinyl, iron-on light card stock, regular card stock, bonded fabric, or poster board. Or you can change it to custom. When you change it to custom, Cricut Design Space will ask you for your material. The Cricut Maker is basically always on custom. So it always asks for your material and the Cricut Joy does that as well. The other buttons on this side include unload and load, the Cricut C that tells the machine to start cutting, and a pause button.
The Explore and the Maker machines will come with two cables. One is for plugging into the wall and the other is for connecting to your computer. All Cricut machines operate on Bluetooth which is the technology that sends your design from your computer, tablet, phone, directly to your Cricut without a cable required. A Joy works on Bluetooth only. So you won’t have the computer cable with the Joy.
Cricut Blades
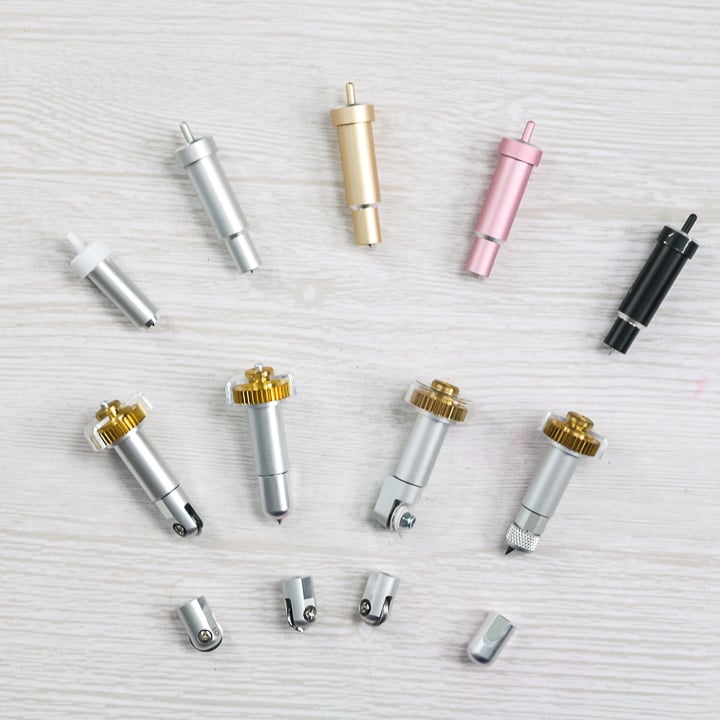
Blades and mats are the other two components that are required to use your Cricut machine. So let’s take a look at those and an explanation of each one. Remember the outer part of the blade is called the housing then the blade itself inserts into the housing. You can also see our Cricut blades guide here for more information.
Explore and Maker Blades
First up, we have blades that can be used on both the Explore and the Maker.
- Fine point blade – there is a version of this for the Joy as well but the housing and blade are slightly different for that machine. This blade cuts cardstock, vinyl, HTV, and more.
- Deep point blade – goes slightly deeper for things like craft foam and cork.
- Bonded fabric blade – the fine point blade in a pink housing so you only use it for fabric. Bonded fabric refers to fabric with interfacing on the back.
- Foil transfer tool – adds a metallic shine to your projects by transferring foil. This one has three different interchangeable tips for fine, medium, and bold lines. See how to use this one here.
- Scoring stylus – while not technically a blade, this goes in the pen side of the Explore or Maker to add scoring lines. What is scoring? Scoring is making a slight indention line on the material so that you know where to fold it.
Maker Only Blades
Here are the blades you add when you have a Maker.
The Maker has a sensor to detect the blade. In some cases, it may be fooled. For example, it can’t tell the difference between the single and the double scoring wheel. But it can tell the difference between the rotary blade and knife blade. So it does check to make sure that you have the right blade installed. The other machines do not do that. So you need to make sure you have the right blade in your machine before you start cutting.
Cricut Mats
The other thing you’ll need when operating your Cricut machine is a mat. There are different sizes and grips. When you get your mat, there will be a clear protective cover on the front. You will want to remove that to reveal the sticky part. Be sure to keep and replace the cover after use to keep your mat as clean as possible.
Mats will have measurement markings across the top, bottom, and sides as well as a grid on the sticky portion. These are for your convenience when crafting to locate cuts if needed. Note that the location will not be exact in Design Space so you will want to give yourself plenty of room.
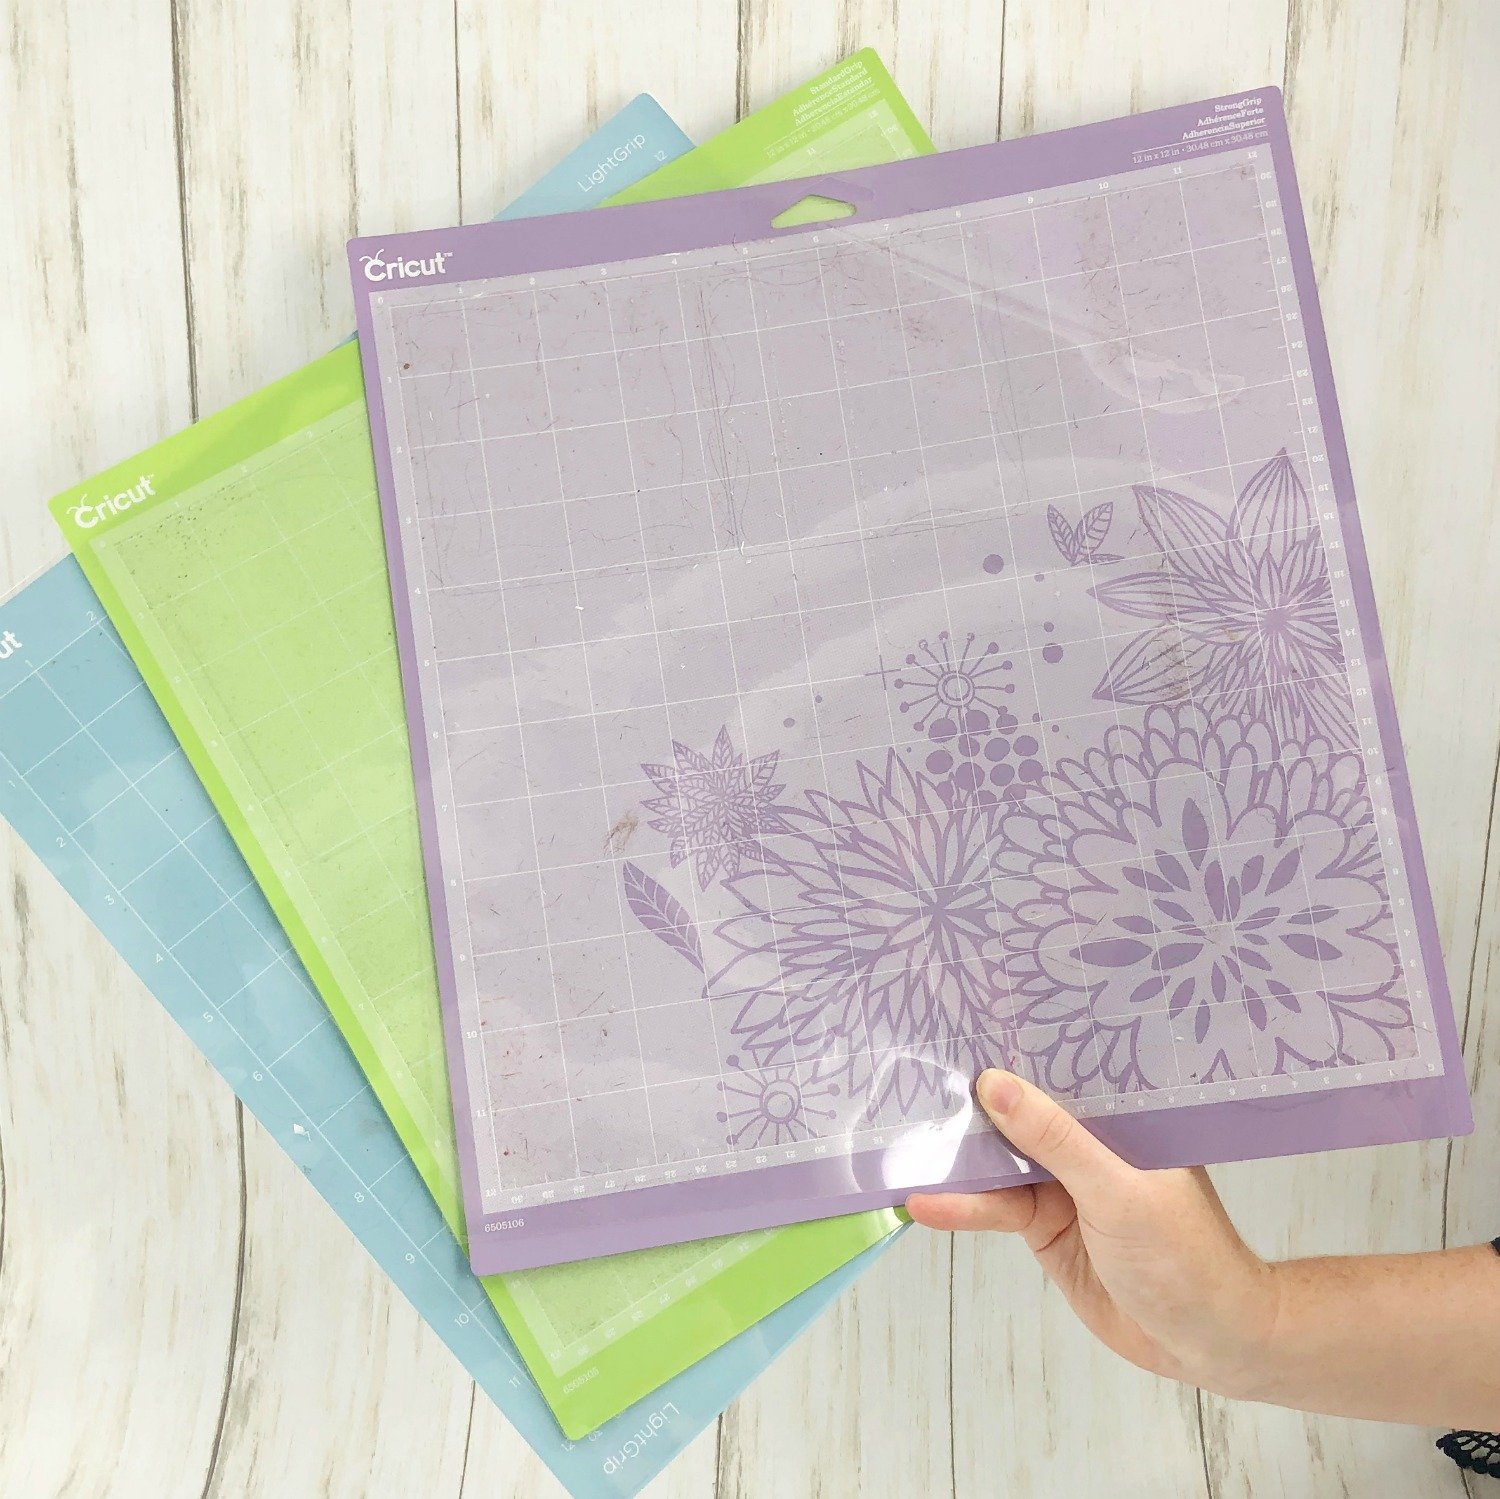
Cricut Mat Strengths
Let’s start with grip strength. Here are the four different colors and what they are intended to be used for.
- Pink – Fabric grip mat – Any fabrics (both bonded and non-bonded) as well as delicate materials.
- Blue – Light grip mat – Printer paper, thin cardstock, vinyl, or any material that is thin.
- Green – Standard grip mat – Heavier cardstock, kraft paper, HTV, glitter vinyl, or any medium weight material.
- Purple – Strong grip mat – Wood, chipboard, leather, or any material that does not stick well to the other mats.
Cricut Mat Sizes
For Cricut Joy, there is both 4.5 x 6.5 inches and 4.5 x 12 inches as well as a special mat for cut and folded cards. You can see more about the card mat here. Note that there are only blue and green mats for the Joy.
For the Explore and Maker, you can get 12 x 12 inch and 12 x 24 inch mats in all four grip strengths.
Want to clean your mats and extend the life? See our post here!
Cricut Tools
So now, maybe you’re ready to tackle some projects and cut some things, what are the tools you need? Let’s take a look at the tools and what they’re called, so you’ll know the proper terminology.
Weeding Tools
Weeding tools or weeding hooks come in a variety of shapes and styles. There’s a kit that you can buy from Cricut. It really just depends on your preference, which one you might prefer.
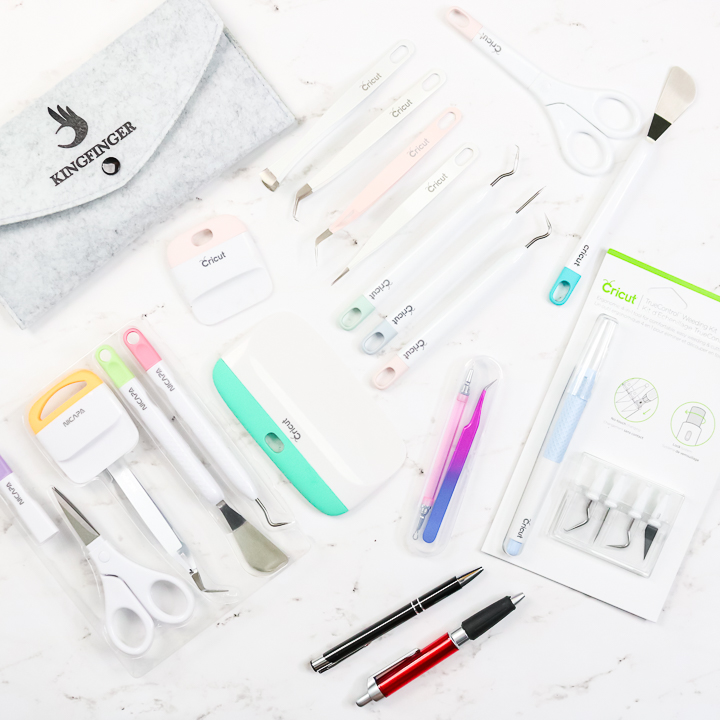
Tweezers
Tweezers are used for weeding or picking up small pieces off of your mat. Something like a set of wide tweezers is perfect for picking up fabric off your mat. Touching the pink mats with your fingers can actually weaken the adhesive and this is one way to get around that. Again these are just based on your preference, so use whatever works for you!
Craft Knife
A craft knife is great for crafting in general but especially with your Cricut. I love the Cricut True-control craft knife. It can be great for cutting materials before putting them on your mat or finishing any cuts that maybe didn’t get finished. In the case of wood, that happens quite a bit.
Spatula
A spatula is amazing for getting small pieces of paper or scraps off of your mat. Just use it to scrape along and pick things up. Definitely a must-have tool and, a lot of times, it comes in a kit with some of these other tools.
Scraper
A scraper is a must-have as well. It comes in two sizes (large and small) and they are perfect for pressing your material down onto the mat or burnishing your vinyl down to the transfer tape. If you are going to do vinyl projects, pick up a scraper.
Scissors and Rotary Cutter
Scissors are a must for any crafter. A rotary cutter steps that up a notch. Retract the safety cover and expose a round blade that will cut fabric in gorgeous straight lines. This is especially important if you’re going to put that fabric on your Cricut mat.
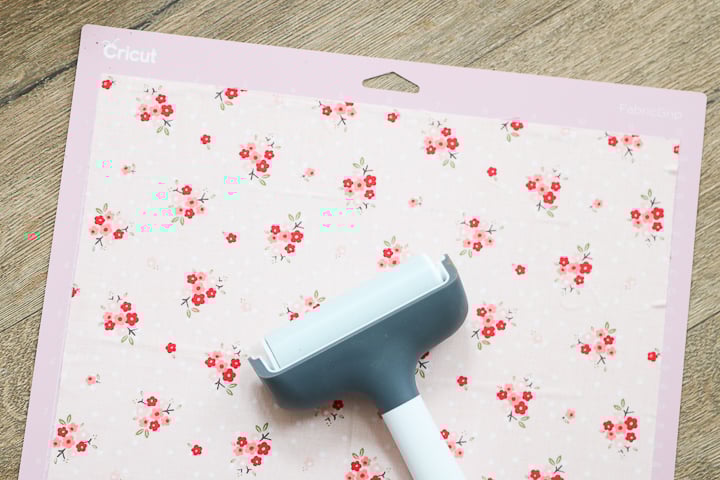
Brayer
Next up is a tool that not many people know about, especially when they get started. It is a rolling tool called a brayer. This is amazing for extending the life of your mat. Roll this over your material on the mat to push it down into the adhesive. It really helps extend the life and helps you use those mats longer. I highly recommend a brayer to all new Cricut owners.
Paper Trimmer
A paper trimmer is not required but is super handy. Add your paper to the inside and swipe to cut a straight line. It also works on vinyl, HTV, and more.
Ruler
Another must-have for any crafter, like scissors, a ruler is just a must-have for crafting.
Cricut Design Space Terms
All right, so now that you’re more familiar with your machine, we’re going to jump into Cricut Design Space and talk about the terms there. Let’s take a look in Cricut Design Space at all the buttons and I’ll explain briefly what each of those mean.
What is Cricut Design Space?
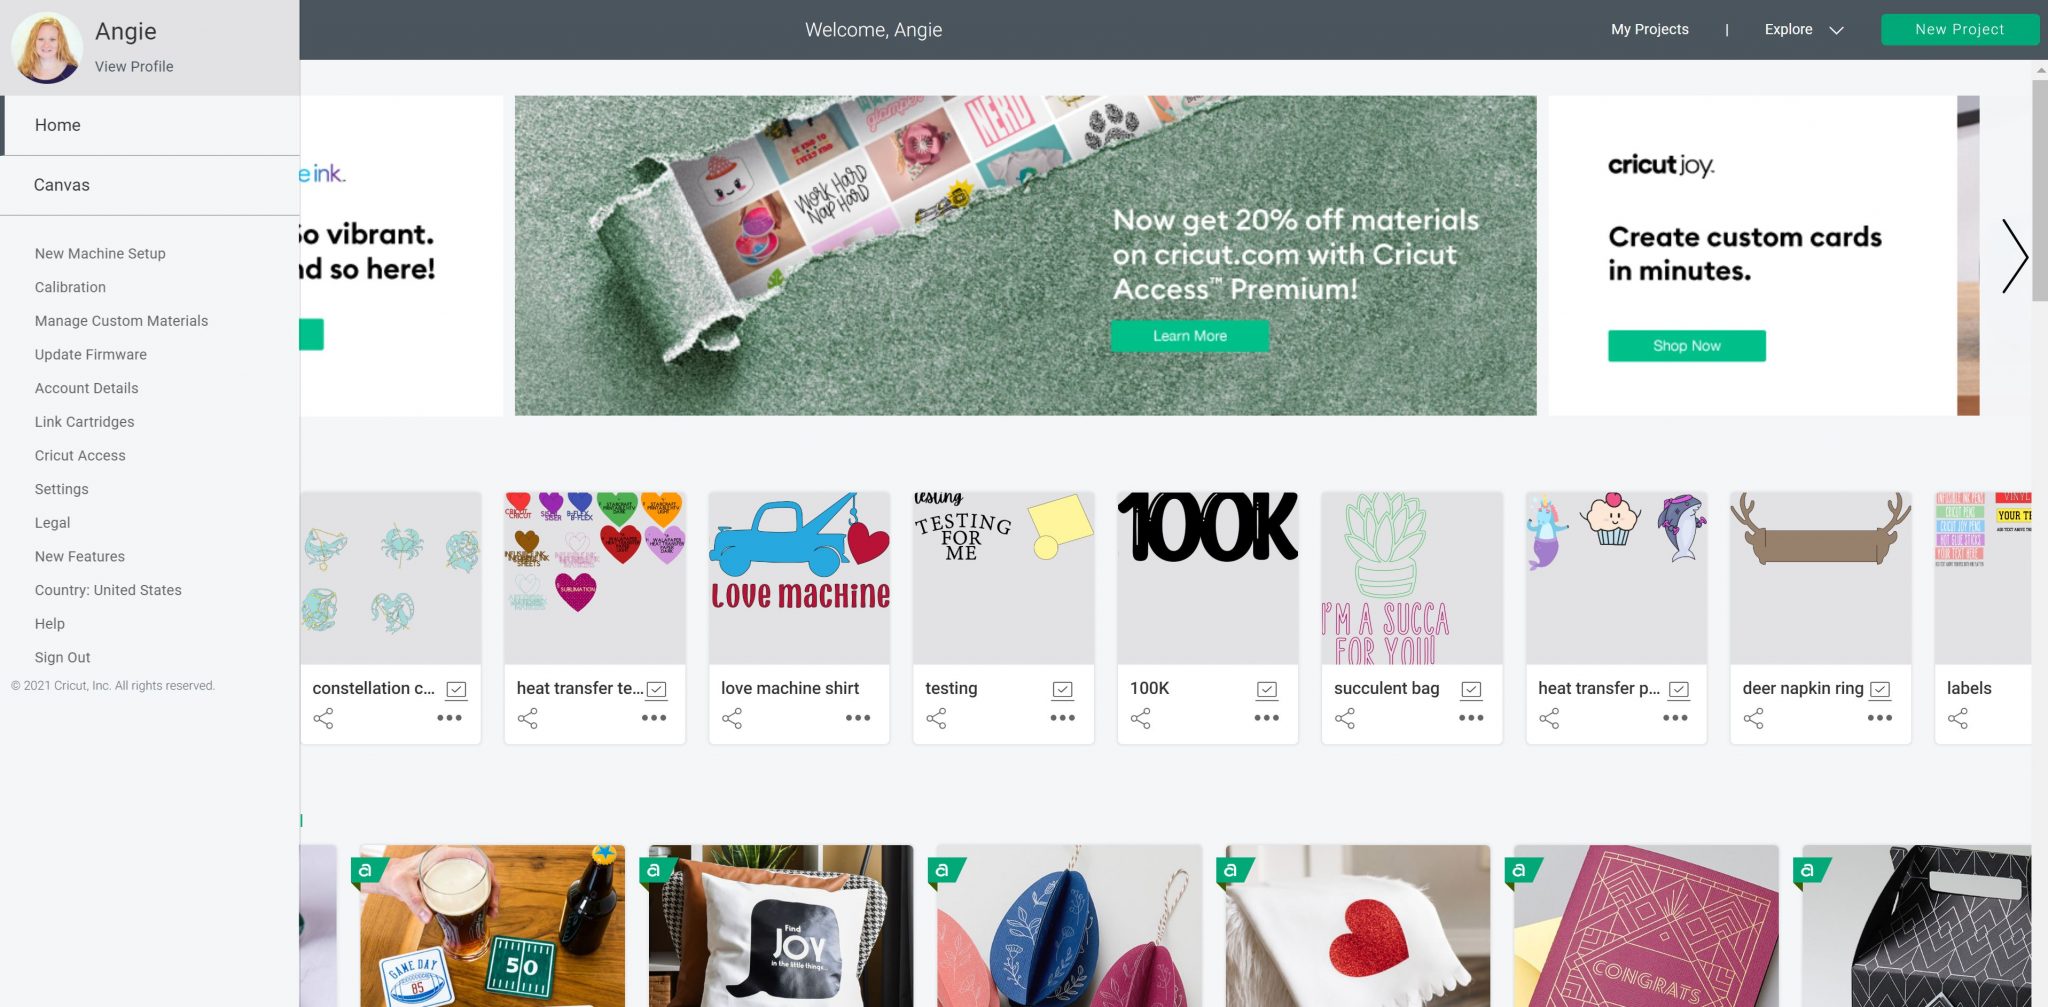
First of all, Cricut Design Space is a free program and you can download here onto your computer, or look on the app store on your Android or iOS device. The image below is what it looks like when you open it on your computer for the first time. Mobile will be similar.
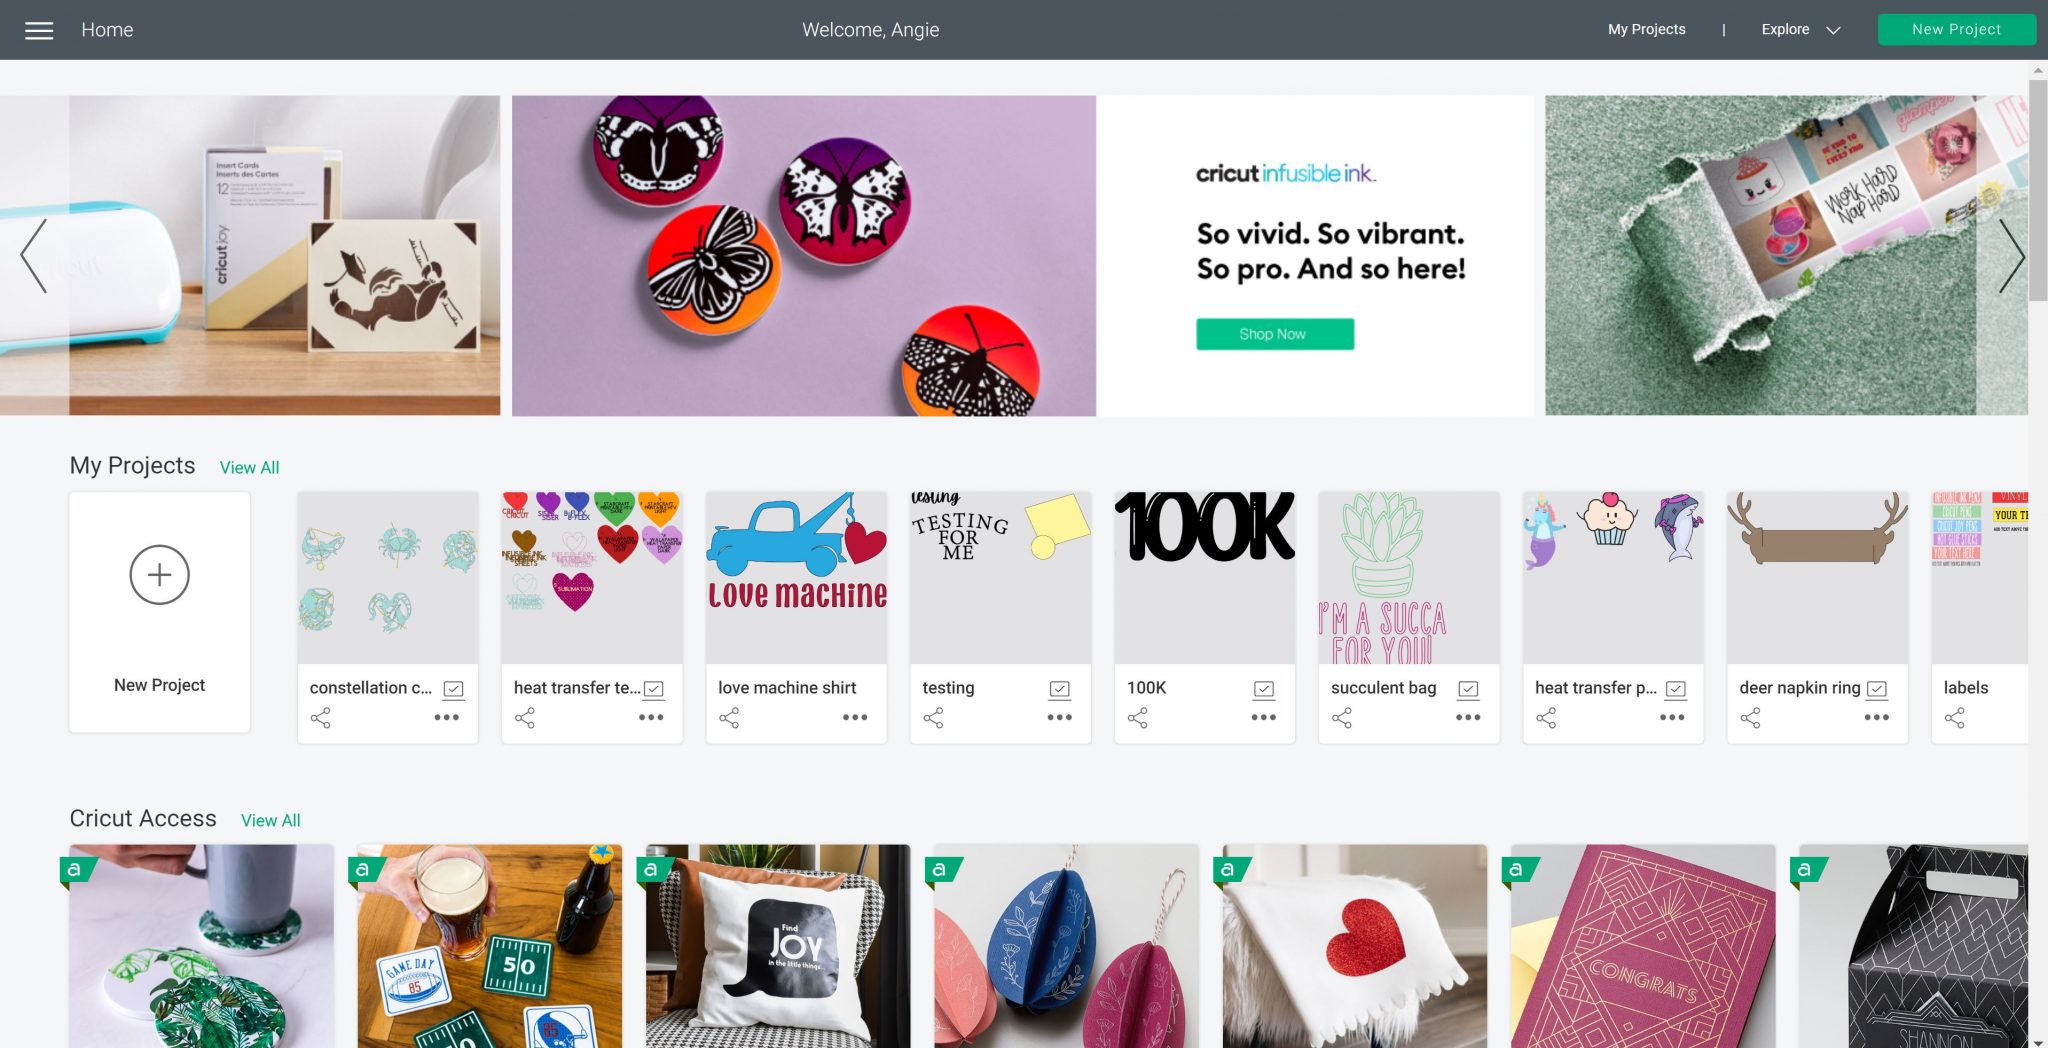
Projects you have made and saved will be across the middle. This area will be blank if you are opening it for the first time. Projects below that are ready-to-make projects which means you can just click a few buttons and get started creating.
What is Cricut Access?
The green “A” indicates that the project is part of your Access subscription. You usually get a free trial of Cricut Access when you buy a new machine, so you might as well use that. After any trial, there is a monthly fee and that gives you access to free projects, free images, and free fonts. I suggest that you use it for your trial month, see if it’s worth it for you, and then continue from there if you would like to pay that monthly fee. If you cancel your subscription and do not pay the monthly fee, you can still use Cricut Design Space for free. You don’t have to have Cricut Access to use it.
Main Menu Buttons and Terms
Pull down the menu by clicking the lines in the upper left. Here are the menu items:
- Home – which brings you back to this screen.
- Canvas – where you will design your projects in Cricut Design Space.
- New machine set up – when you get your machine.
- Calibration – for print then cut, rotary blade, and knife blade. This will change depending on what machine you have picked in the upper right-hand corner. Always make sure you have the machine you are working with chosen. You can use the calibration option when you are having issues.
- Manage custom materials – you can see more about adding them here.
- Update firmware – you shouldn’t have to use this often but can be useful if there are issues with your machine.
- You will also find your account details, information on linking cartridges, Cricut Access, and some settings.
Your Design Space Canvas
You can hit new project either under projects or in the upper right-hand corner. This will take you to your canvas where you can start designing. Let’s start with those buttons down the left hand side.
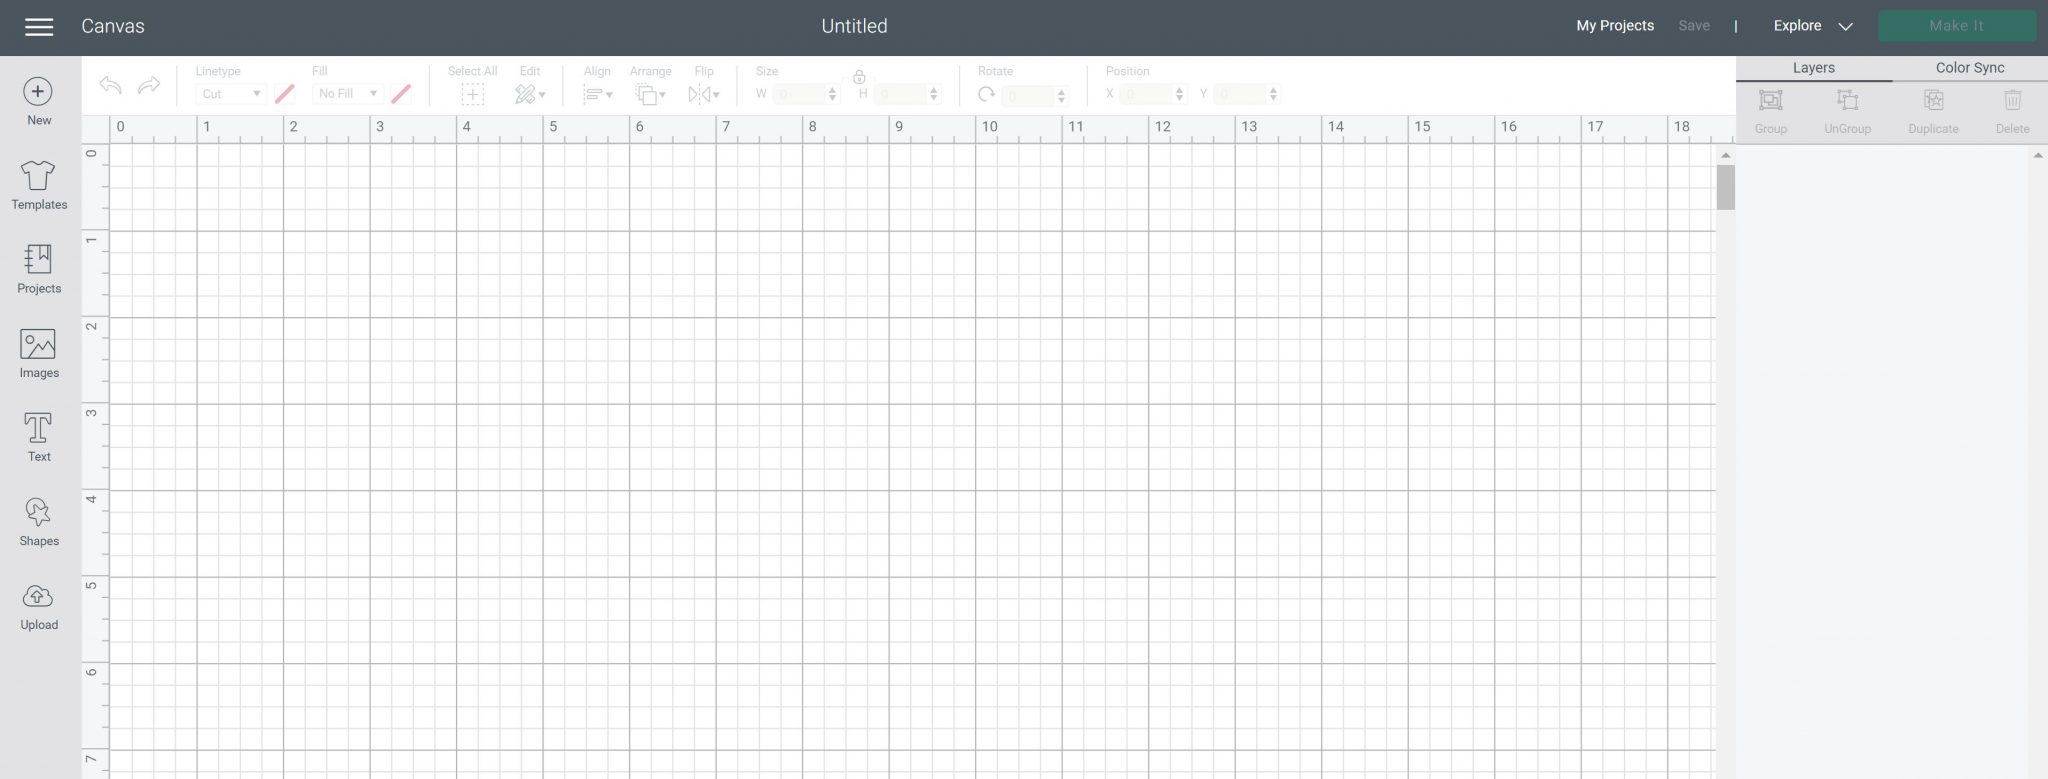
Templates
While I always recommend that you measure whatever blank you’re using, templates can help you visualize and size your project. Please note these do not save with your project and they are for reference only.
Projects and Images
If you click projects here, you get the same screen as on that first screen above. Next is images where you can use images already in design space. It is important to note that you can filter these. You can search by category or by word. You can even click free and see those projects or images that are free for you.
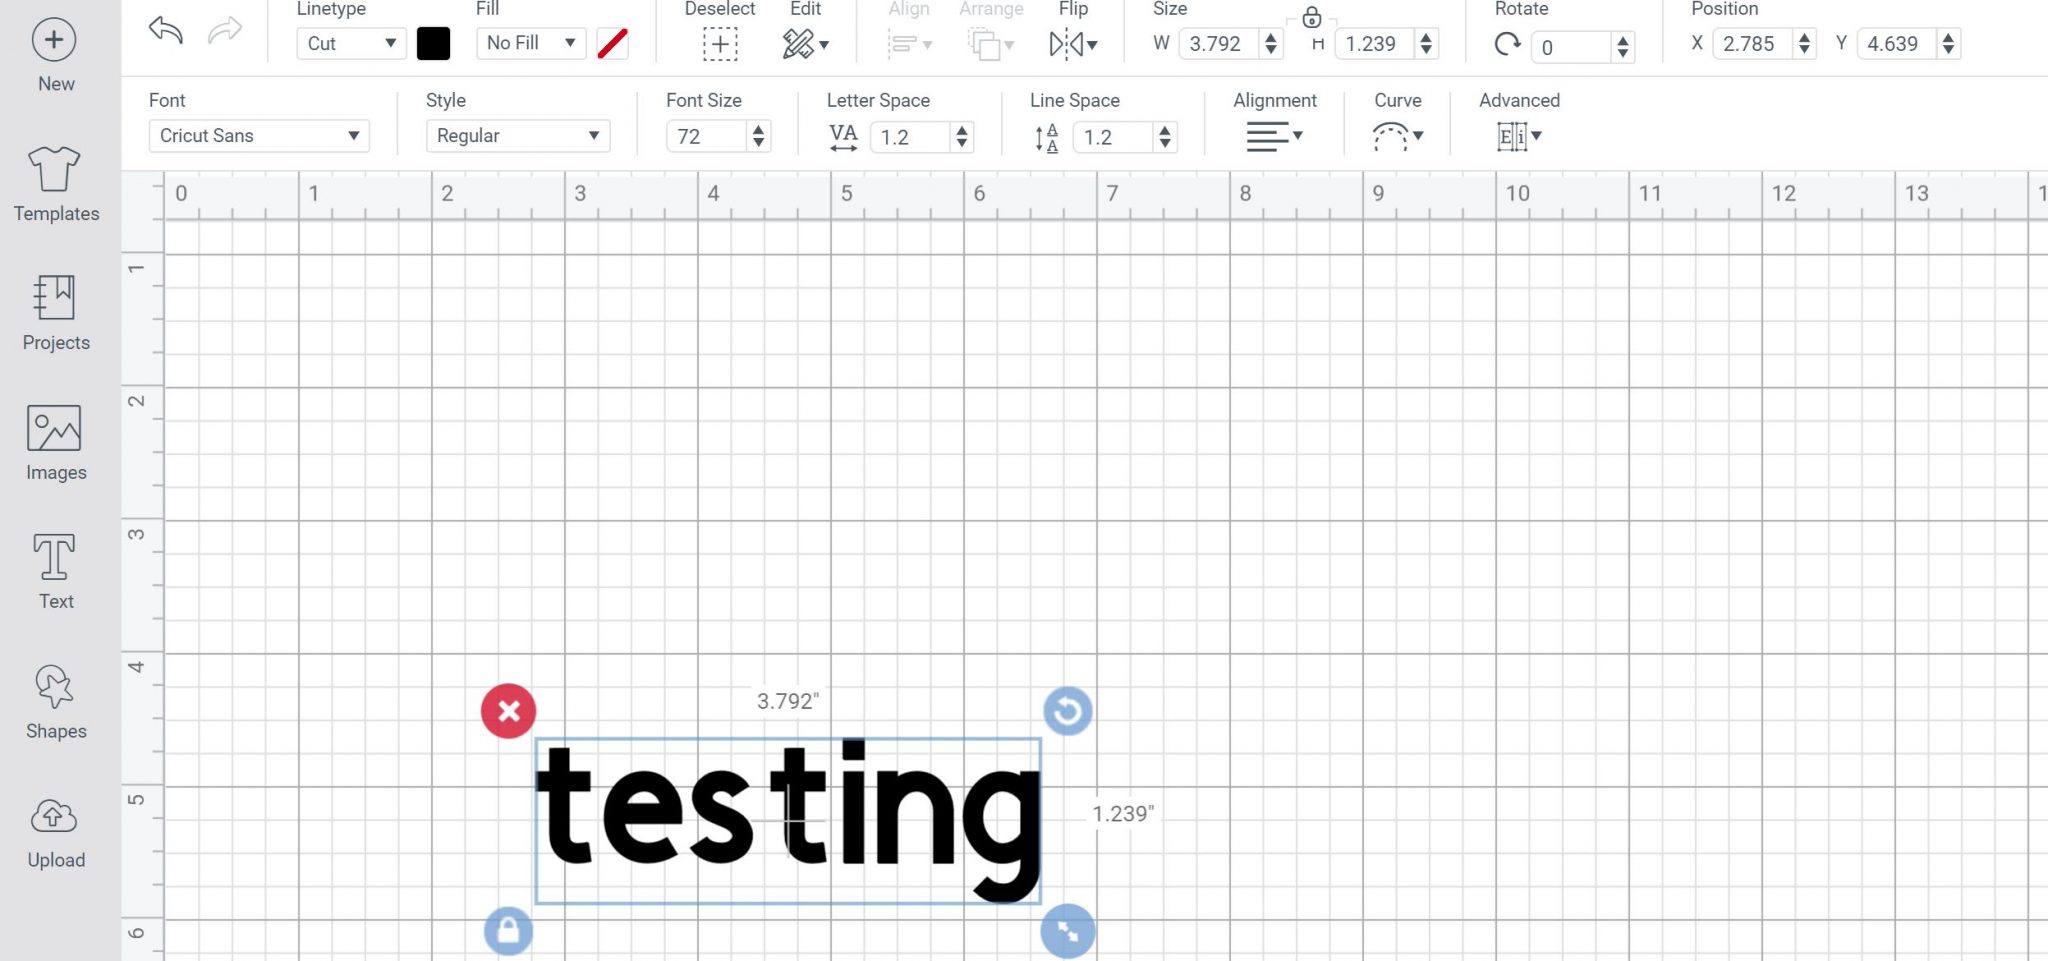
Text
If you click the text button, you can type any text that you would like and it opens up font options across the top. These options are as follows:
- Font box – You can change your font, just by clicking on a different font. The font options are all, system, and Cricut. System fonts are ones that are on your computer or your electronic device. Cricut fonts are already in Cricut Design Space. All will list both. Again, the A will indicate the ones that are free with access. And you can filter those down by a variety of options, including multilayer, single layer, writing. Or you can actually click my fonts and find those that are free. Your system fonts are always free because they’re on your computer. See how to add fonts to any device here.
- Regular, bold, italic, bold, and italic or writing – If you want to write with a pen, the best option is to choose writing here. This often only works with a Cricut font, so be aware of that.
- Size – You can also change your font size to a specific size here if you would like, just by typing that in.
- Letter spacing – This is most important on fonts that are cursive fonts so you can move the letters to where they are touching. Use the arrows or type in a number.
- Line spacing – You can move lines of text closer together or further apart again with the arrows or typing in a number.
- Alignment – With multi-line text, you can do left, center, or right alignment with this button.
- Advanced options – Now every font doesn’t play perfectly with the letter spacing, so we can ungroup to letters with the advanced features. This makes each letter its own piece. Then you can move those letters individually to wherever they need to be. You can also ungroup to lines with the advanced option. That means that each of the lines becomes a different cut. Then they move independently of one another.
- Curving text – This curve option is only available on a computer. To curve text, you can just move the slider to the right or left or type anything that you want right into the box.
Shapes
The only other option on the left is shapes. When you pick shapes, you can actually draw right in Cricut Design Space with a variety of shapes and even add score lines.
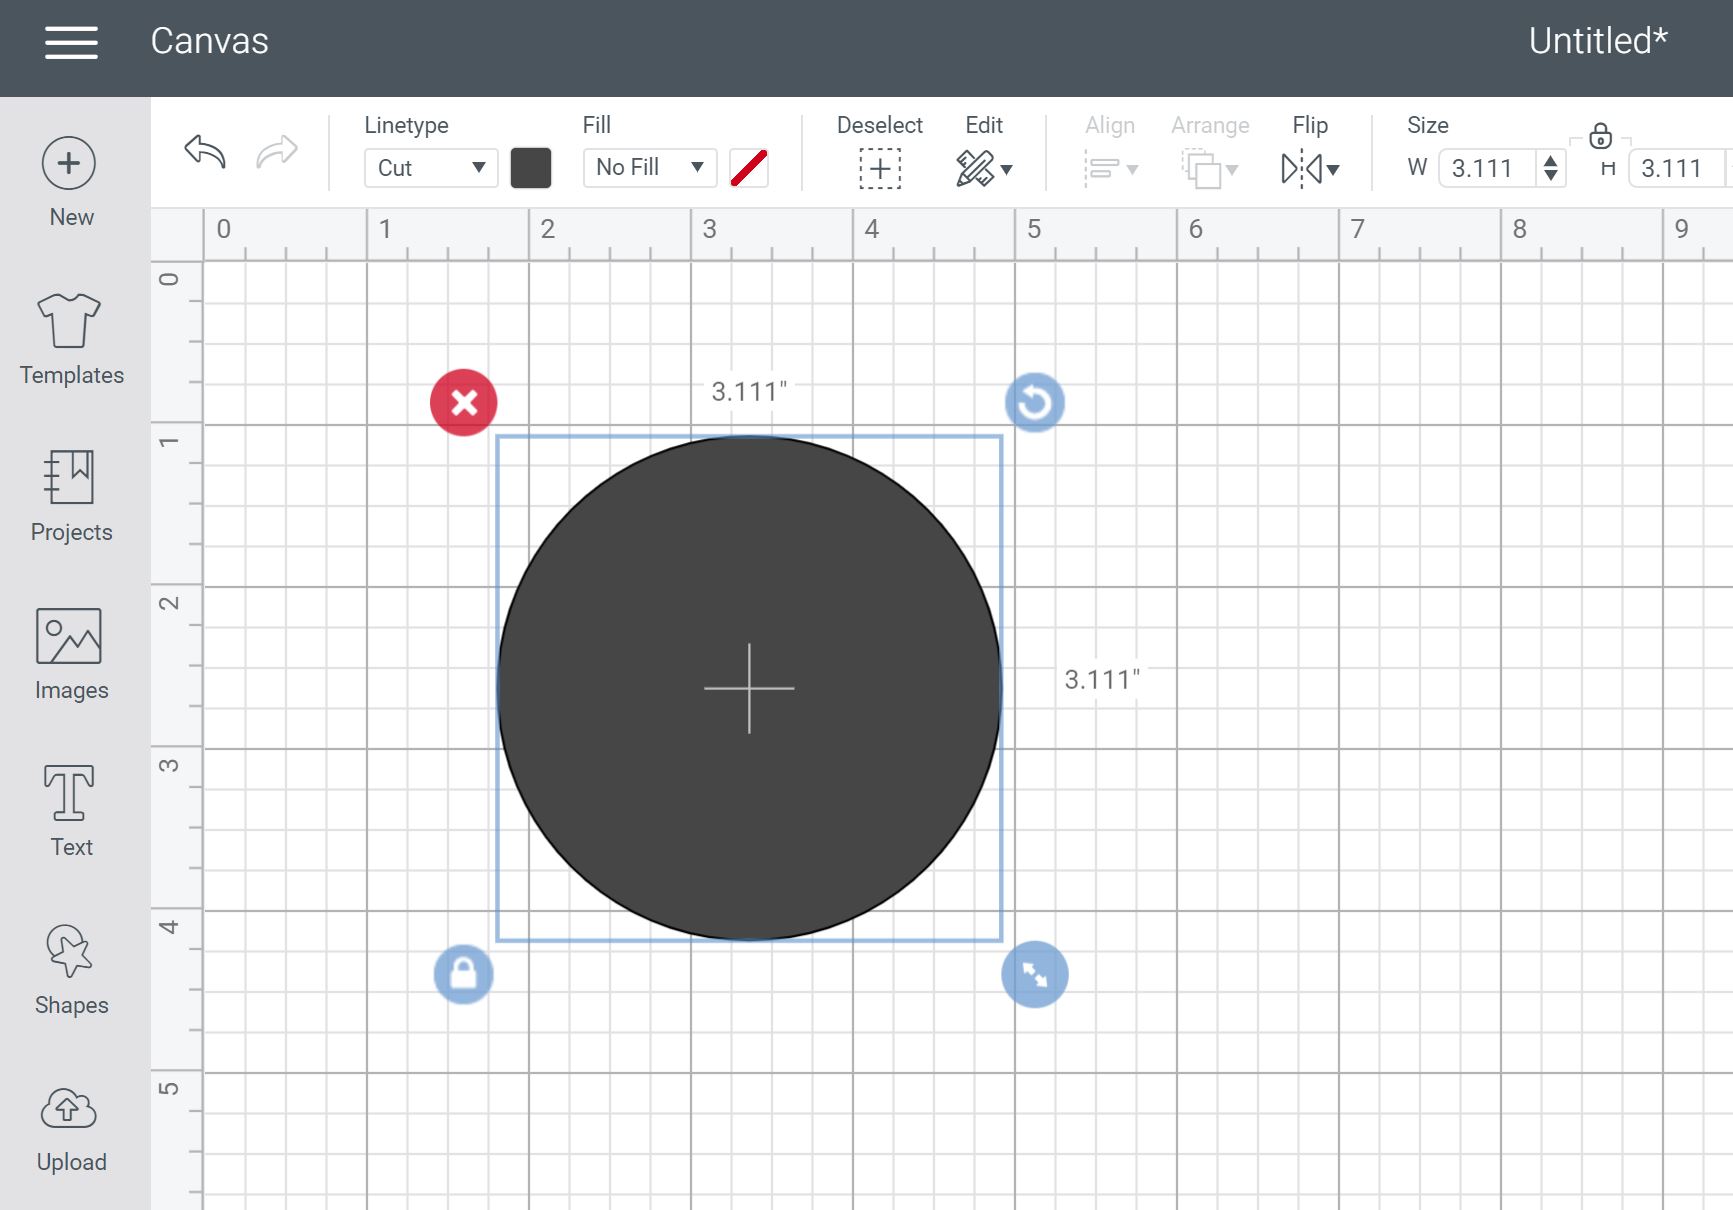
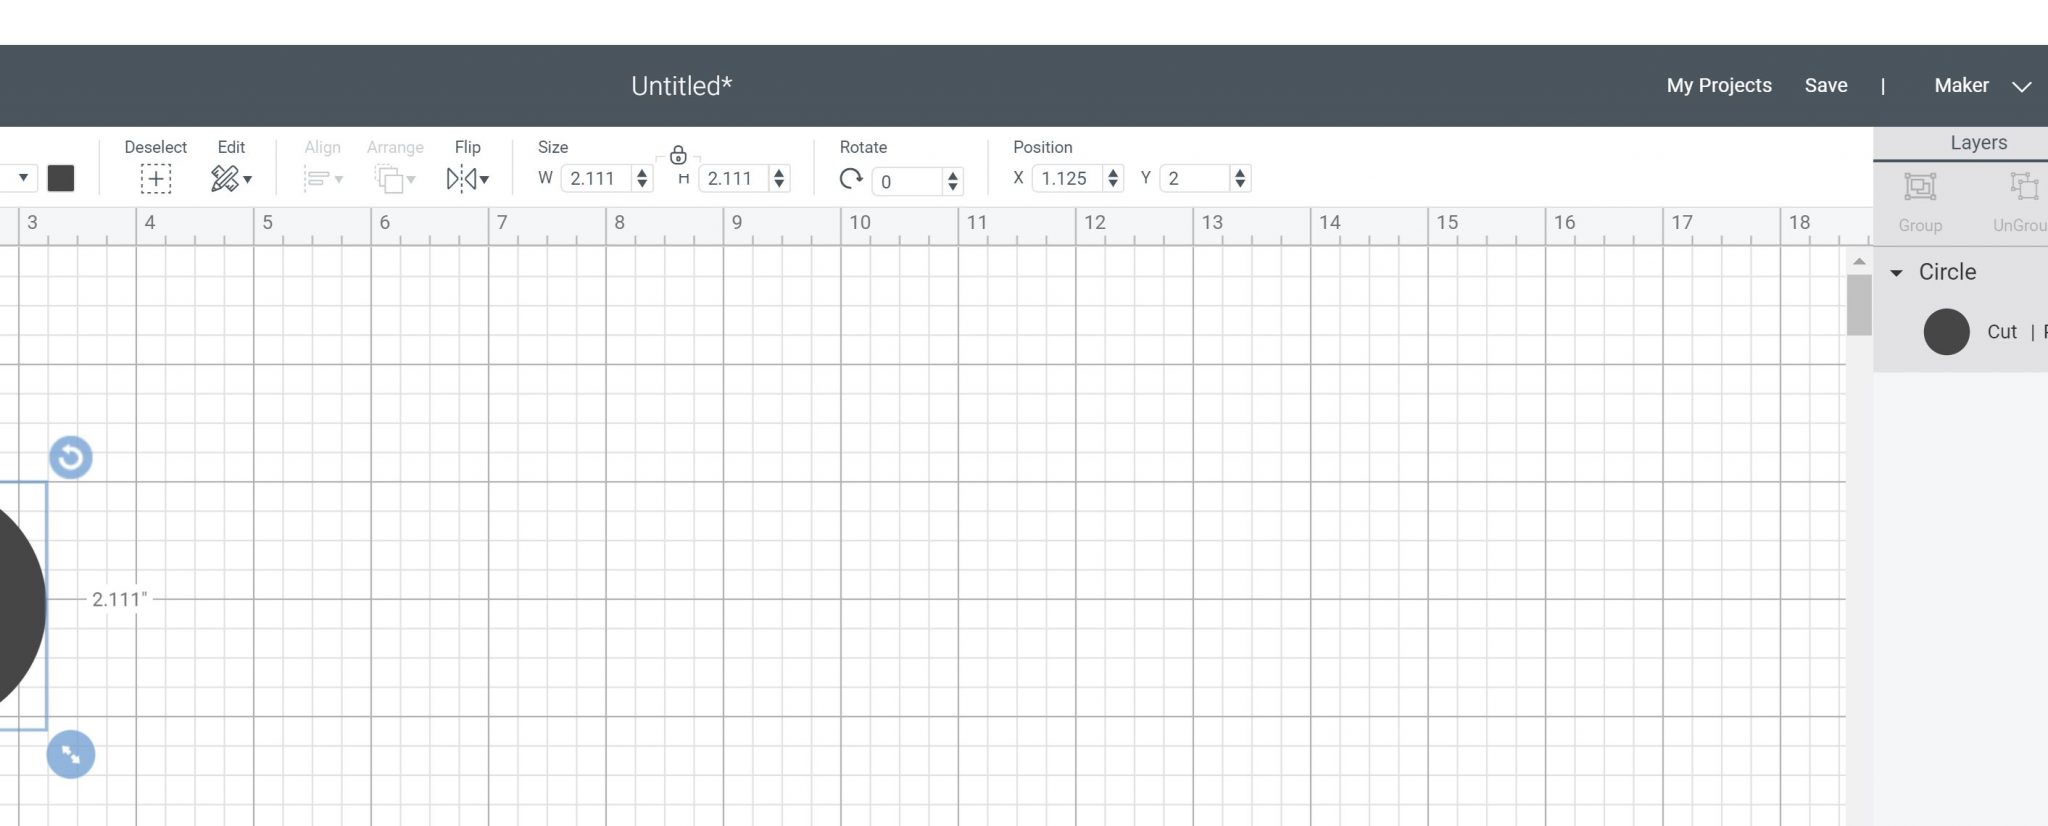
Buttons to Modify Shapes and Images
When you click on any object in Cricut Design Space, a few buttons appear. Here is what each of those do:
- Red X will delete the object. You can also use delete or backspace on your computer to do the same thing.
- Circular arrow will rotate the object. You can type a custom angle in the toolbar across the top as well.
- Button with two arrows allows you to resize the object. Again, you can type something custom into the boxes at the top.
- Lock button ensures both width and height change at the same rate. Click to unlock to skew the shape. Again this same button is on your top toolbar. Once you unlock, the button with two arrows will change to a button with four arrows.
Uploading Images and SVG Files
If you click upload on the left, you can upload your own images or patterns. You can find out more about how to do that on various devices here. Here are the various file types you can upload:
- JPG, GIF, PNG, BMP – these are all picture files that can be uploaded. Of these, PNG would work best.
- SVG – this stands for scalable vector graphic and is the best file type to upload to a Cricut.
- DXF – this is another drawing file type that will work as well.
If you scroll down on the upload screen, you can also see images that you’ve recently uploaded. And if you click view all, you see all that you’ve ever uploaded.
Undo and Redo
Up at the top, you have undo and redo. You can click undo at any time and it will undo the last operation. And then if you click redo, it will redo that operation that was just undone. You can also use keyboard shortcuts for this.
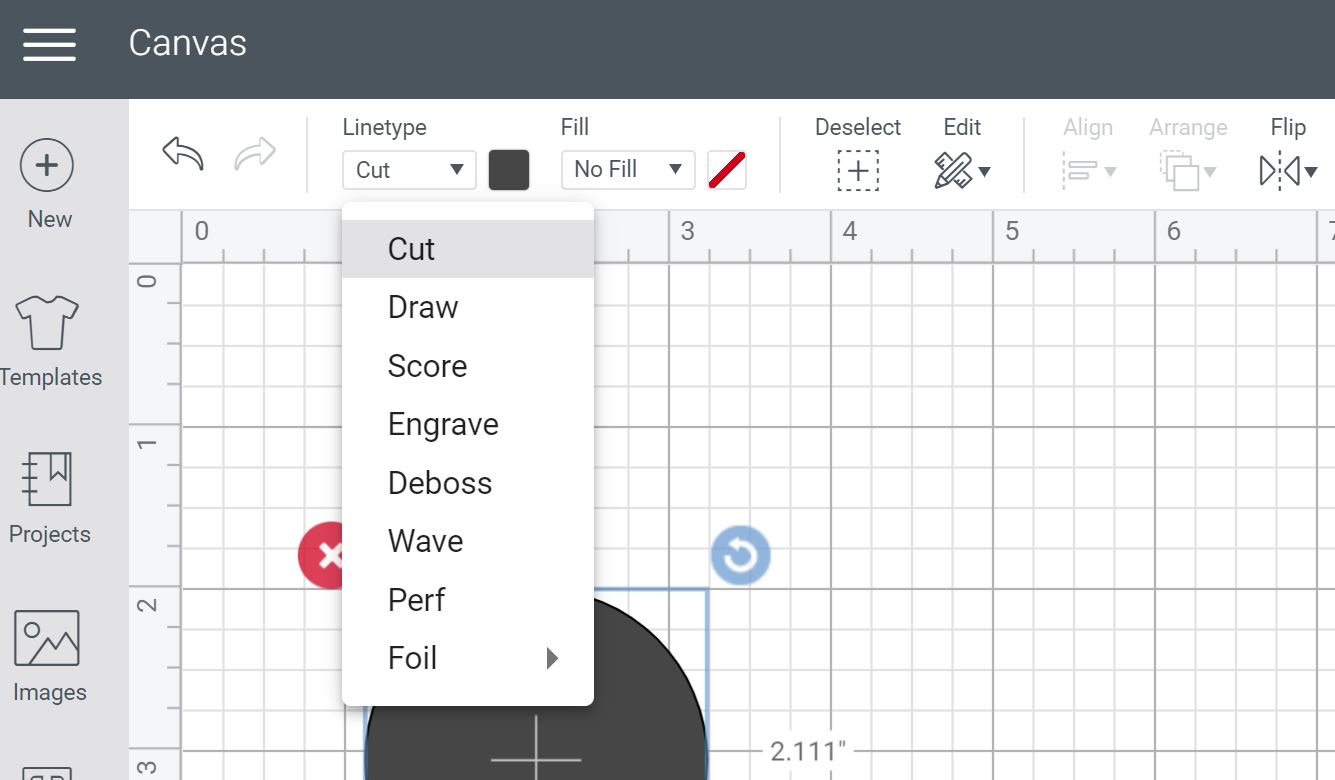
Line Types
There are several different line types in Cricut Design Space. Please note that the ones that show will depend on the machine you have selected but these are all of the options:
- Cut – lines that cut
- Draw – lines that draw with pens
- Score – scoring lines for folding
- Foil – adds metallic foil in fine, medium, and bold
- Engrave – engraves
- Deboss – debosses
- Wave – makes a wavy line
- Perf – makes a perforated line
Please note that if you pick some of these, the object will change to reflect. Like scoring is represented by a dashed line and foil a gold line. Some don’t change the look of the object at all.
Material Colors
Next to the line type, you will see a colored box. You can pull this down to pick a material color. Be sure to pick the same color for those items you want to cut on the same mat.
Fill Options and Patterns
If fill is set to “no fill”, the object will cut. If you want print then cut, you will want to set a fill. You can choose a color or a pattern. This is where those patterns that you can upload will go or there are a bunch already in Design Space. Once you pick fill, you will see print the cut on your layers panel to indicate the change.

Other Buttons
Here are a few more buttons and their function:
- Select all – click to select everything on the canvas
- Edit – from here you can cut, copy, or paste
- Align – choose two objects and align them with various options
- Arrange – move an object to the front or back
- Flip – flip horizontally or vertically (note that you can mirror on the mat screen)
- Position – move the object in the x or y direction on the mat
Saving Your Project
When you click save, you can name the project and save it. If I had all objects that are in Cricut Design Space, I could save my canvas as public otherwise it will be private only to you. Keep that in mind when you’re choosing your objects, whether you want to share it with other people or not.
Layers Panel
On the right, you will find your layers panel. Here are a few buttons you will find there and their function.
Group
What does group do? Group allows me to pick groups of objects easily and edit them all at once. However, if I click make it, they will still not be together on my canvas. The great thing about group is there’s an ungroup button, so you can always undo it.
Color Sync
Click and drag layers to the same color to easily make things cut on the same mat.
Attach
If you want objects to stay together on the mat, you will want to attach them together with the button at the bottom. Once attached, the button changes to detach so you can always undo this action. The cuts stay the same but the objects will not move around once you go to cut.
Weld
If you want to permanently put something together, weld is the best option. This merges two objects together so any overlapping cuts will be removed. Also, once you save, this action is permanent and you can’t go back.
Slice
If you want to remove one object from another, slice is the best option. This is, however, a permanent action once saved so use with caution. Also, you can only slice two objects at a time.
Cursive Lettering
With cursive, you will want them to cut as one piece so that it looks like one word that was written in cursive. To do this, I definitely recommend the weld function. Again, it can’t be undone so make sure everything is together correctly. Then click weld to make one piece that cuts all at one time.
Flatten
Flatten any object to make it a print then cut. I recommend flattening words to an object like a square. That way it will print the words and cut the shape. Once you flatten, the button does change to unflatten so you can undo this action at any time.
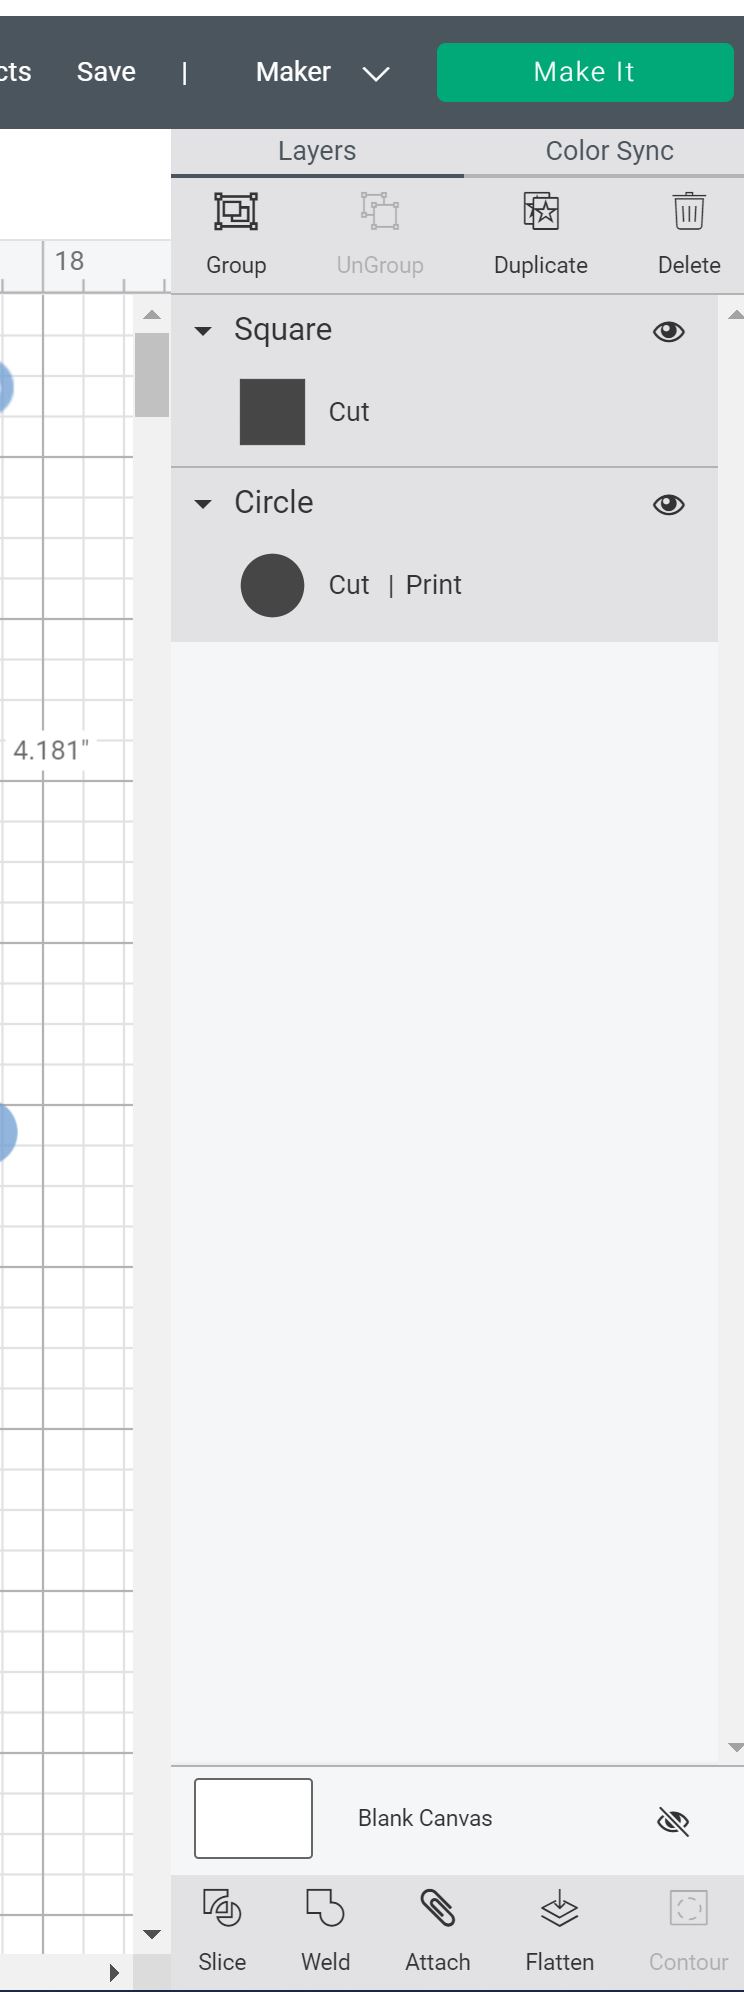
Contour
Click this button to remove any cuts within an object. Once the box pops up, just choose anything you don’t want to cut and click the “X” to close. You can hide as many or as few as you would like. Note that you can click this to add the contours back at any time so it is able to be undone.
Print Then Cut
Let’s talk a little bit about what happens when you do print-then-cut. Once you click make it, you will see your design with a box around it on a sheet. The box around the outside is called registration marks. So that’s what your Explore or Maker will look for with its sensor, so it knows exactly where to cut.
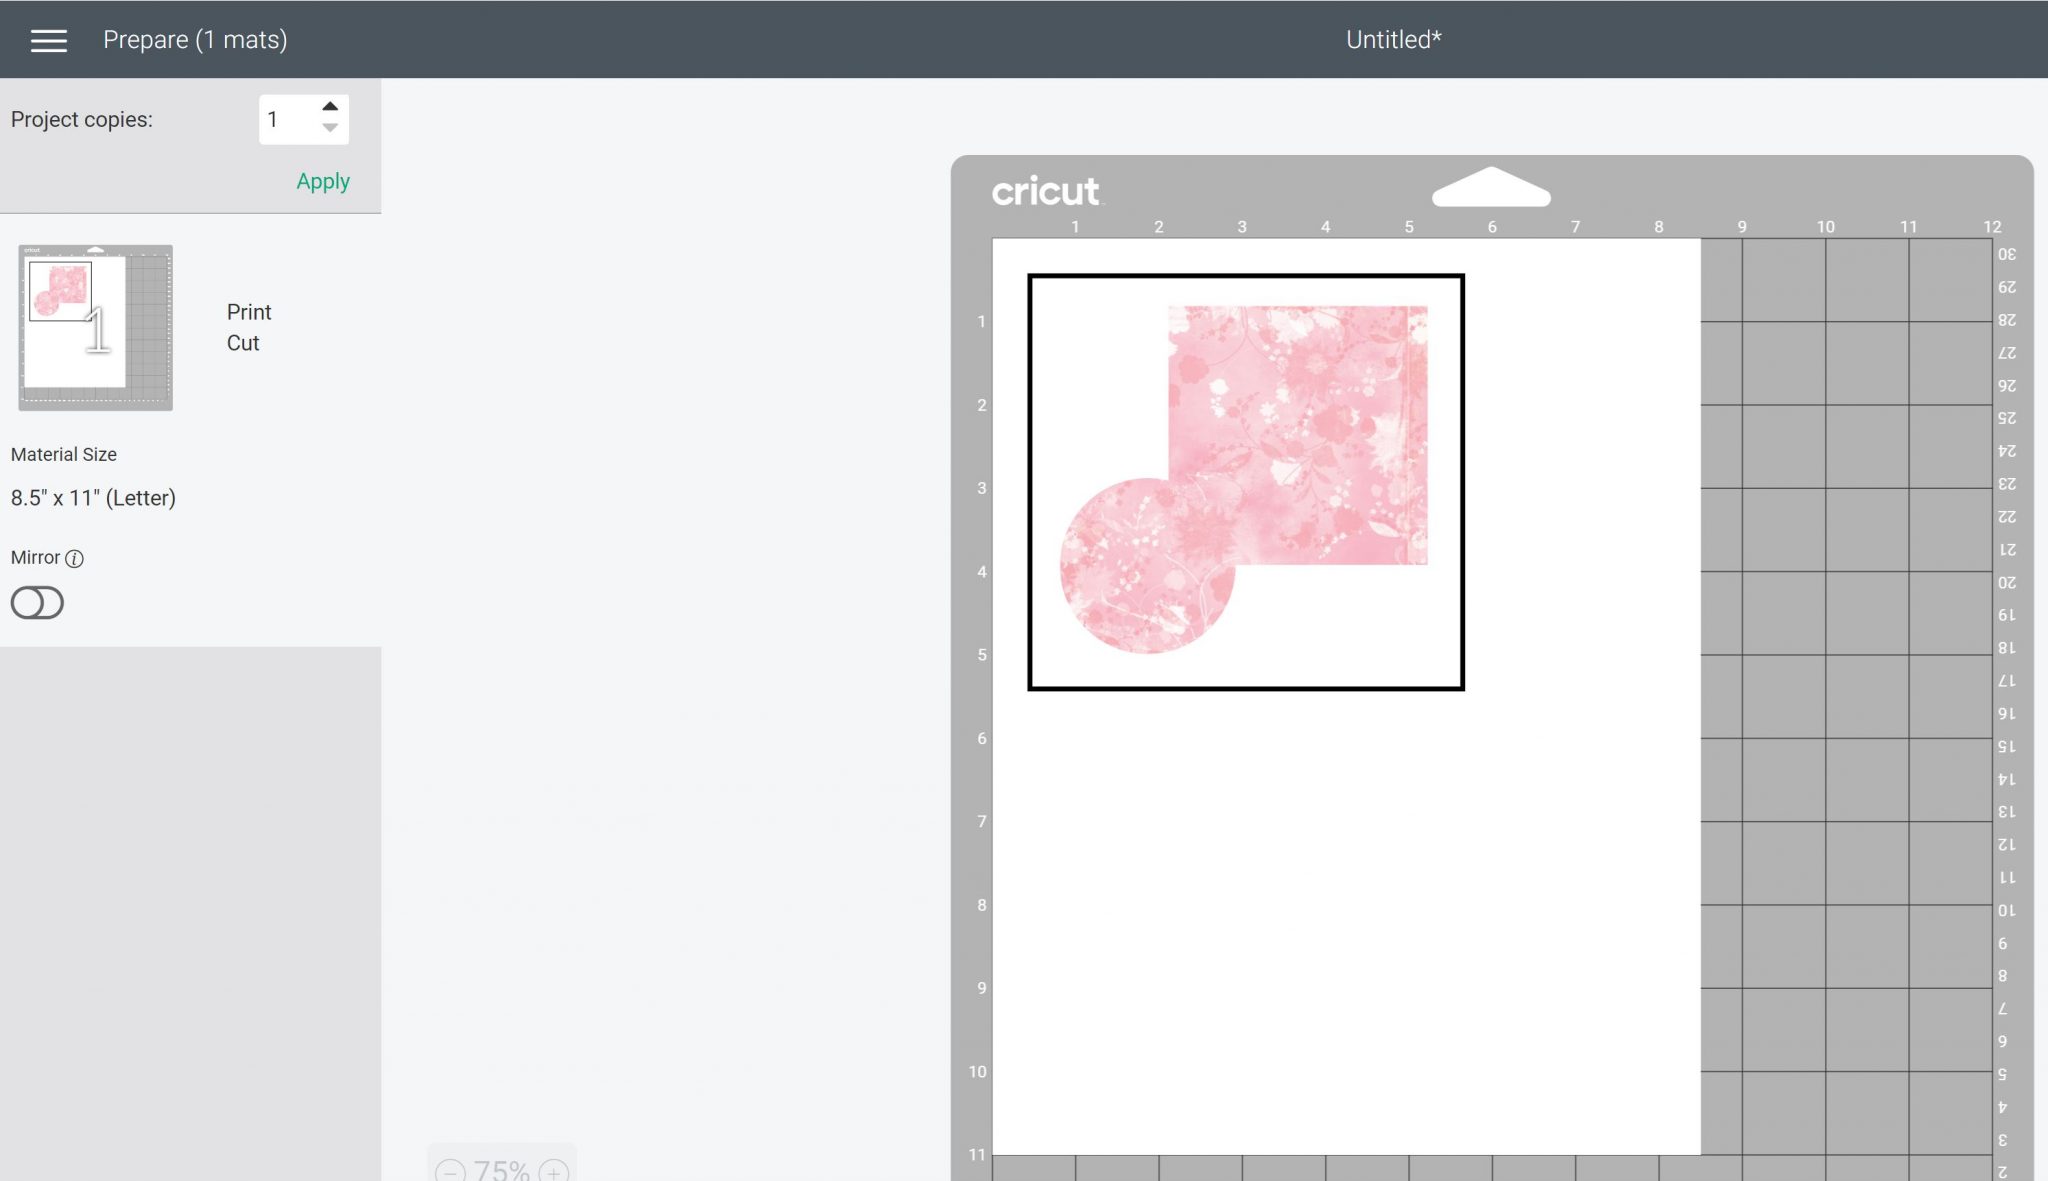
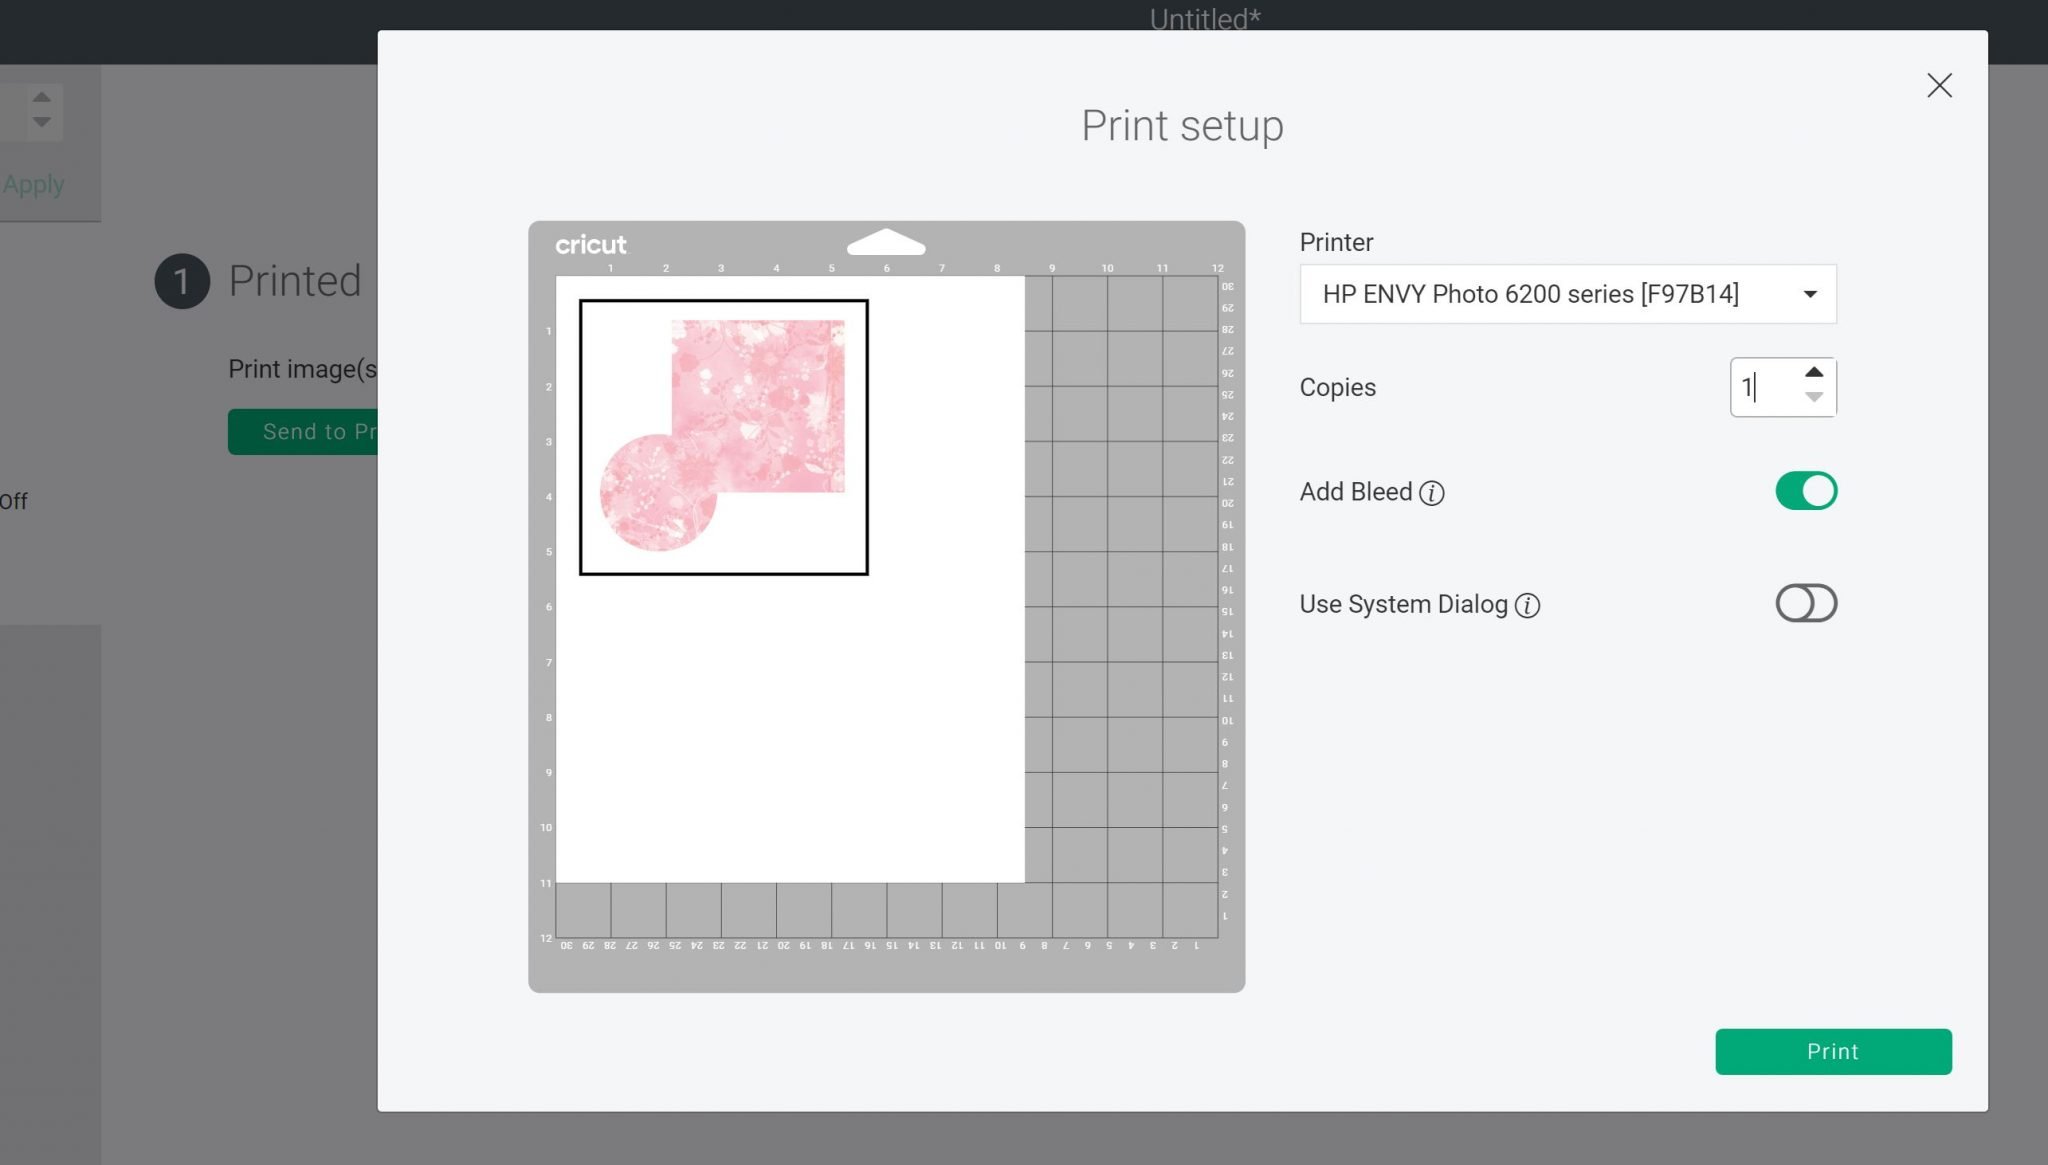
Then when you click continue, there’ll be a send to printer button for just that sheet. When you click to print, there are a few options. First, you’ll need to pick the printer you want to send it to, your number of copies, and whether or not you wanna add bleed.
Bleed is where it will print a faint outline around your objects. This is so if your Cricut doesn’t cut just exactly right, the bleed will cover that up a little bit. You can turn this on or off depending on what you are doing.
You can also choose to use the system dialogue. This means when you click print, the actual box for your system for the printer will pop up. That way, you can change settings like the quality of the print, etc before actually printing the design. Then once you print, you’re ready to cut with your machine.
Making It
Once you have your project designed, you click “make it” to actually start the Cricut and do the cutting. Here are a few things you need to know after you click “make it”.
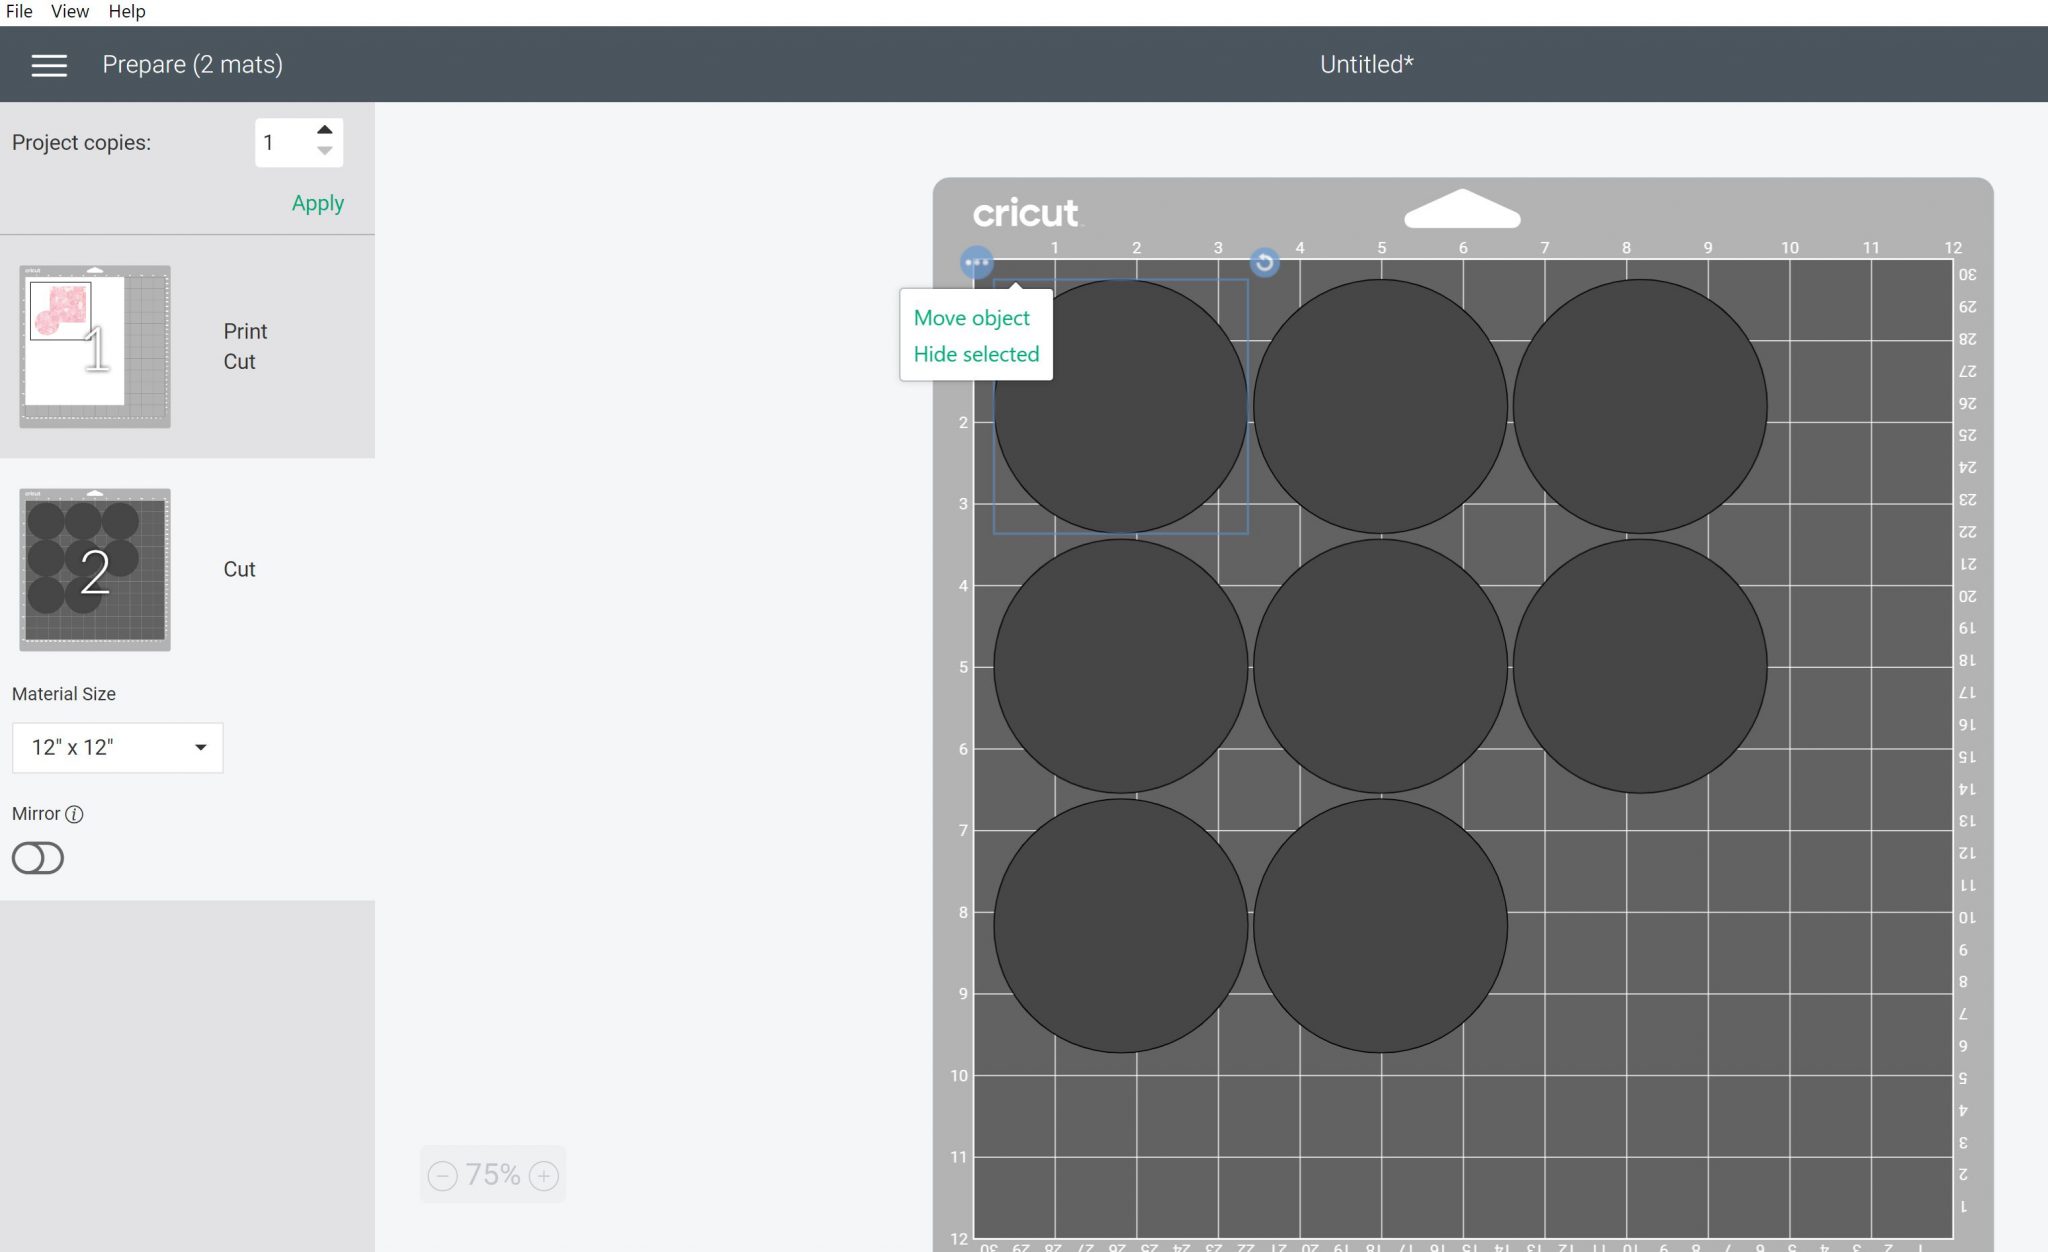
Moving Objects on the Mat
When you pull up a mat, you can click on any object and move it anywhere you would like. You can also rotate it on the mat. These two things are useful if you want to save material.
Duplicating Objects
You can change the project’s copies at the top of this screen. Just type in a number and click apply.
Saving Material
Move objects from one mat to another to save material. Click the three dots and click move to another mat. Then click the mat you want to move it to. Go to that mat and move it around to locate it.
Hiding Objects on the Mat
When clicking those three dots, you can also hide an object. That removes it from the mat completely and it won’t cut it.
Mirroring
Anything that is placed face down on the mat needs to be mirrored before cutting. Just toggle the switch on the mat screen to mirror the entire mat.
Changing Material Size
Pull down the size dropdown and change the material to whatever size you are using. This is handy if you have a 12×24 mat and larger material.
Using Scraps
Use the movement tools above to move your objects around and locate them on scraps. The grid lines shown on the mat screen will approximately line up to the lines on your actual mat. There is some error, however, so be sure to leave yourself plenty of room.
Connecting to Your Machine
Once you have everything in place, click continue then connect to your machine. You can do that through USB with the cord or with Bluetooth. NOTE: The Joy is Bluetooth only and cannot be connected with a cord.
Picking Your Material
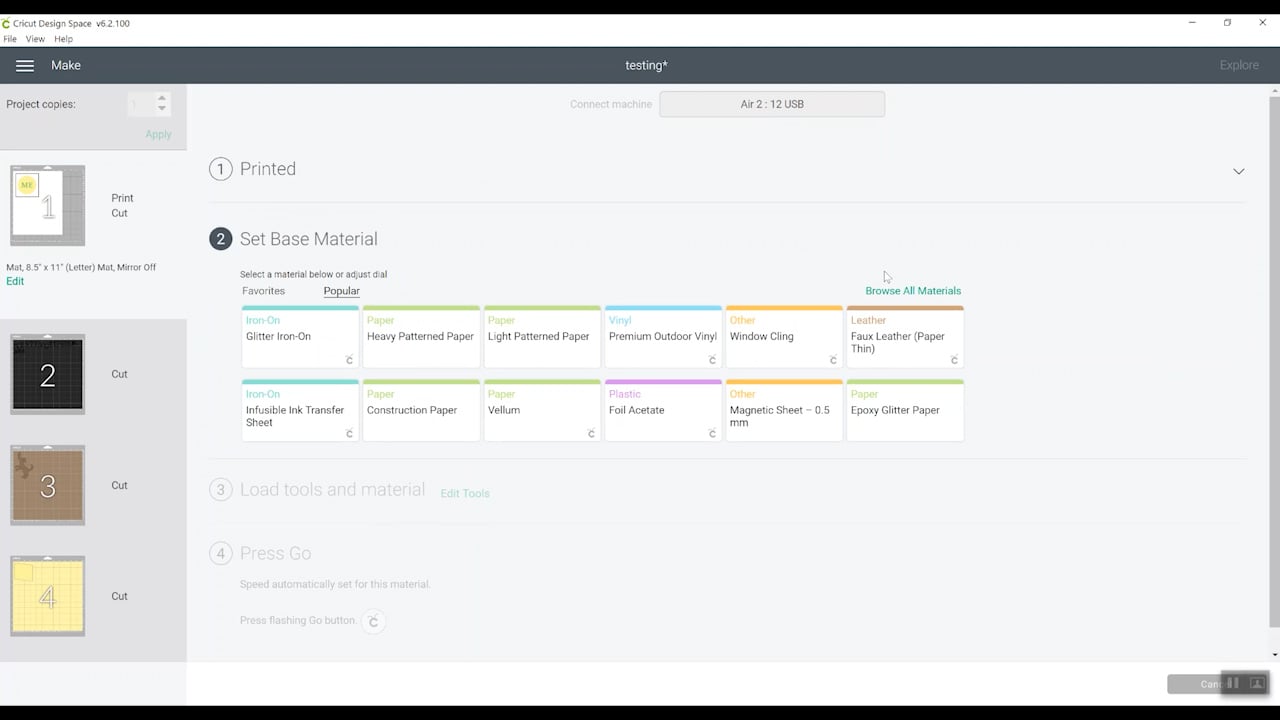
Once your machine is hooked up, you can pick your material in Design Space. The screen will open when you are using a Maker or Joy or have your Explore dial on custom. Pick any material or search for your material type. There are hundreds of materials to choose from.
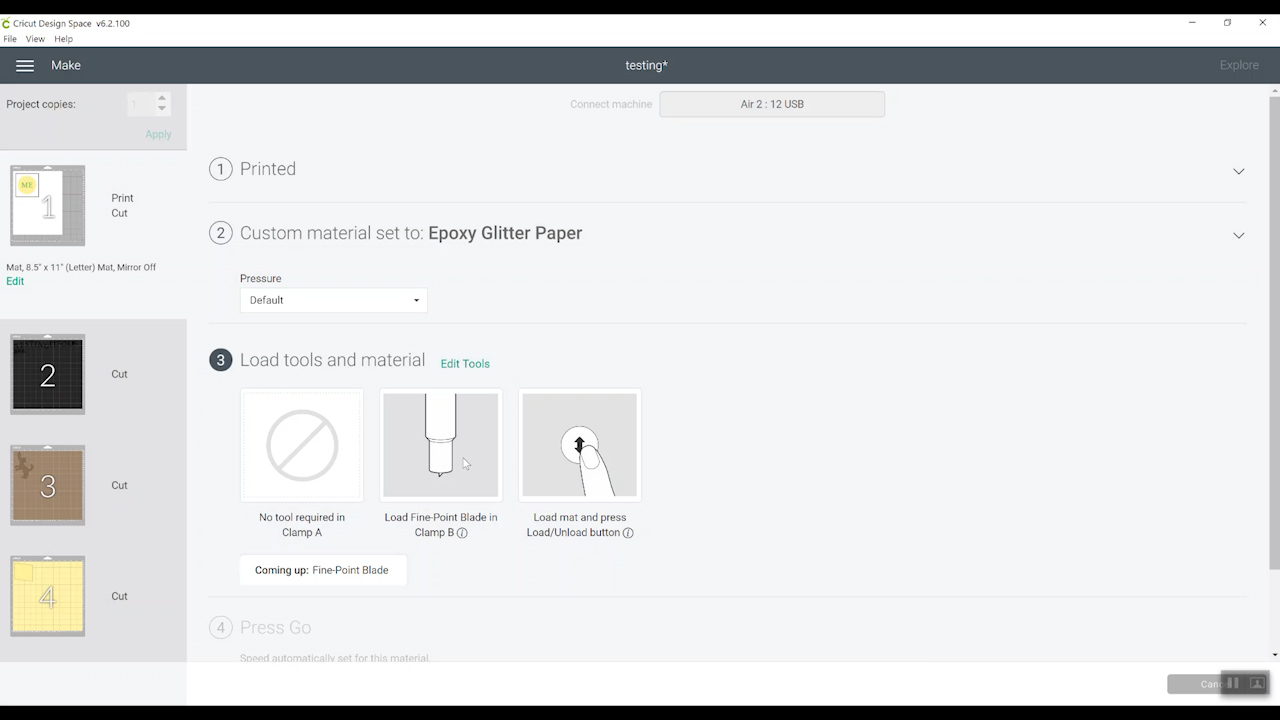
Choosing a Blade
Once you pick a material, it will tell you what blade is required and what clamp to put it in. You can also edit tools at times to change to a different blade type if desired.
Blanks
A blank or a substrate is what you put your material onto. It can be shirts, tumblers, mugs, glass, frames, wood, signs, and so much more. Anything that you put your material onto is called a blank or a substrate.
Materials
Materials, materials, materials, what do all those words mean? Let’s talk about them so you know the terms.
Adhesive Vinyl
Adhesive vinyl has a sticky backing and it comes on a backing paper or what is sometimes referred to as a carrier sheet. This is best for applying to glass, wood, or really any type of smooth surface. There are two different types, removable and permanent. Just like they sound, removable is intended for temporary things like putting on walls. Whereas permanent, I would put on a mug that I was gonna use every day for my coffee. Click here if you want to learn more about working with this material.
Transfer Tape
Now when you’re using vinyl, you want to use what’s referred to as transfer tape or transfer paper. So this is basically a tape or a big adhesive sheet that allows you to move all those small cut bits all at once to your surface. Then they stay in place more easily when transferring. Click here if you want to learn more about working with this material.
Window Cling
There are specialty vinyls as well and one example of this is window cling. Use this if you want to put something on a window and then easily remove it later.
Heat Transfer Vinyl
You have adhesive vinyl for all those smooth surfaces like glass but then you have something called iron-on. This is also referred to as heat transfer vinyl or HTV. All of those terms mean the same thing. They refer to a vinyl that has an adhesive on the back that is activated by heat. It is also on a carrier sheet face-down, however, since it is heat activated it’s not sticky. But you do need to do a few special things including mirroring. You would mirror anything that’s face-down on the mat. However, as a general rule, you don’t need transfer tape with iron-on to apply it. Click here if you want to learn more about working with this material.
Infusible Ink
Infusible ink is made exclusively by Cricut and comes in sheets and also pens and markers. It is an ink that is trapped inside of a sheet and you apply it to a polyester blank or substrate. Cricut makes its own line of blanks that are compatible with Infusible Ink. Now when you apply it to that polyester surface, there’s a chemical reaction and it infuses into the surface making a permanent design. The design is actually embedded into the material. Where adhesive vinyl or heat transfer vinyl or iron-on sit on top of the surface, infusible ink embeds itself inside. It is slightly advanced, where you need to know what you’re doing and you can click here to learn more.
Heat Resistant Tape
Another term you might also run into is heat tape or heat-resistant tape. There is a Cricut version of that too and it is used to hold down Infusible Ink while you press it so it doesn’t move.
Sublimation
Sublimation is a process with a printer and it’s pretty expensive to get into. The printer prints with sublimation ink and you put it on a polyester surface and it infuses into the surface. Infusible ink is a way to do that for the average crafter, without all of that expensive equipment.
Smart Materials
If you have a Cricut Joy, you can use smart materials which are versions of vinyl and iron-on. Basically, those are sized perfectly for your Cricut Joy so you can cut matless or without a mat.
Insert Cards
The other term with your Cricut Joy is insert cards. Insert cards are designed for that card mat we talked about earlier. They’re premade cards with inserts and there are specific designs in Cricut Design Space that you can use with these to make cards in minutes. You can see more about these here.
Foil Sheets
Foil sheets are used with the foil transfer tool to add a metallic shine. They are super-thin sheets with a metallic shimmer which gives a little something extra to your projects.
Fabric
When we talk about cutting fabric with your Cricut Maker, it is just regular fabric. When we talk about cutting fabric with your Cricut Explore, we talk about bonded fabric. Bonded fabric is just a fabric that has interfacing ironed to the back. And I have an entire video on how to do that here.
Cardstock
Cardstock is just a thick version of paper. When you hear 100 pound cardstock or 80 pound cardstock, that pound number refers to the thickness. The bigger the number, the thicker the cardstock. Cardstock comes in a wide variety of colors, finishes, and so much more.
Kraftboard
Cricut makes a product called Kraft board. I personally love it for projects. It is similar to the boxes that something like a frozen pizza from the grocery store would come in. You might think of kraft paper as only being brown. But Kraft board actually comes in white, black, and other colors. It can cut on any Cricut machine and it’s super easy to work with. I layer it sometimes to make thick embellishments.
Acetate
Acetate is a clear plastic sheet. It comes in plain, clear, and a version with foil designs on it.
Printable Materials
We talked about how the Explore and the Maker can do print-then-cut. You can buy specialty printable materials to use with that. Printable vinyl is one of my favorites, but they make printable fabric, printable sticker paper, and more. If you want to print on a material, be sure to look for “printable” on the label.
Felt
You may be familiar with felt in all your crafting, and you can cut just regular felt sheets. I do recommend the Maker for most of your thicker felt sheets. But Cricut makes felt and it’s thin enough and the right texture to cut with an Explore. So this material opens up felt crafting to those of you that have an Explore.
Leather and Suede
You have probably heard of leather and suede before, but have you tried faux leather? It is thinner and gives you that look of leather but you can cut it with an Explore super easily. I’ve even cut it with my Joy. There’s also a faux suede that you can try as well. If you wanted to get into real leather, you would look for genuine leather. I recommend only cutting genuine leather if you have a Maker, because it is a little tougher to cut. I have seen some people cut it successfully with an Explore but it will require some trial and error.
Chipboard
Chipboard is basically the paper version of plywood. Plywood is made with a bunch of wood bits all pressed together, chipboard is basically a bunch of paper bits all pressed together. It comes in varying thicknesses. The heavier versions you would cut on your Maker with the knife blade. There are also thinner versions that you could cut on your other machines.
Wood Veneer
Wood veneer is a super thin, almost as thin as paper, wood product. You can cut this with the Explore or Maker. You can then add it on top of something like the chipboard or the Kraft board and get a pretty thick embellishment that has that look of wood.
Balsa and Basswood
The Maker can cut basswood and balsa wood. Balsa wood comes in varying thicknesses, but it’s almost spongy and it’s super brittle. I don’t use it for my projects, but I do know that there are projects out there that it is good for. store. Basswood, however, is what I use with my Maker. I like the Cricut brand as I feel like it cuts best. There are other brands on the market, but I always have trouble cutting them with my Maker. Please note the thicknesses that your machine can cut in this post.
Butcher Paper
Butcher paper allows heat to escape from it. It is perfect for use with Infusible Ink. In fact, InfusibleIink sheets come with a sheet of butcher paper inside. But if you need more, you can purchase butcher paper on Amazon.
Parchment Paper
Parchment paper, while it can’t be used in the place of butcher paper, has its own uses. It is perfect to put on top if you’re layering iron-on. Especially, if you don’t have a protective sheet that’s made for iron-on, you can use parchment paper instead. You can also use it when layering adhesive vinyl for lining up your pieces.
Freezer Paper
I keep freezer paper in my kitchen because it makes a great stencil. One side of the freezer paper, when you iron it, adheres to your fabric just enough so you can stencil with it. And then it removes super easily. You can see more about how to do that here.
Wax Paper
I get asked all the time if wax paper can be used in place of any of the above materials. The answer is no. I would not use wax paper for anything where there’s heat. You do use parchment paper or wax paper for layering adhesive vinyl sometimes.
Weeding
When we’re talking about vinyl, iron-on, and Infusible Ink, you might hear the term weeding. Weeding is just the act of using weeding tools, tweezers, or your hands to remove any excess from the carrier sheet. You want to remove anything you don’t want transferred to your blank. That includes verything around the outside edge, things like the centers of letters, and the insides of designs.
Heat Press, EasyPress, and Iron
What are the differences between an iron, heat press, and EasyPress? You will need one of these for anything that’s heat activated. So heat transfer vinyl, HTV, iron-on, Infusible Ink, and then if you ever got into sublimation. Let’s look at the options for doing that.
Household Iron
You can use a standard household iron for HTV. Many people have trouble getting the consistent heat source that you would need to actually adhere HTV to a shirt. So, a lot of people opt to get one of the two options below.
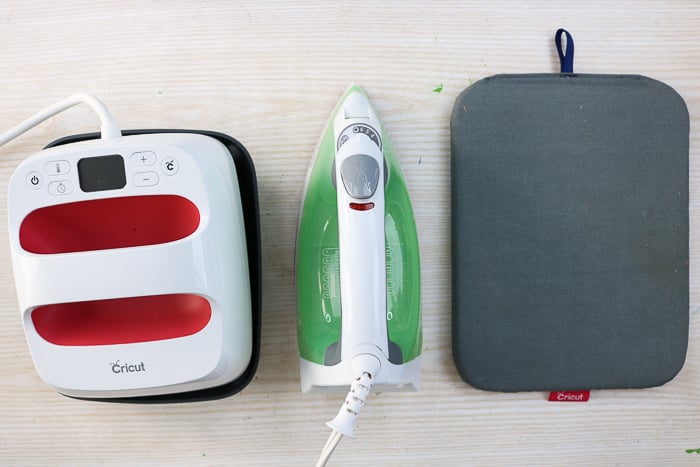
EasyPress
The Cricut EasyPress comes in three different sizes. Then in addition to that, there is the EasyPress mini, which is basically a mini iron. The regular-sized EasyPress comes in 6×7, 9×9, and 12×10. Now each of these works the same, you just need to kind of decide what you need for the projects you’re doing. The benefits of an EasyPress are basically a larger surface area, no holes for steam, and more consistent heat across the entire surface. They are also smaller than a traditional heat press making them perfect for home crafters.
EasyPress Mat
Now when you have an EasyPress, you might also want to consider an EasyPress mat. Again, those come in three different sizes to match up with the three different sizes of EasyPress. The EasyPress mat is the perfect thing for laying down your blank and then pressing on top with your EasyPress.
Protective Sheet
The other thing I’ve mentioned a couple of times is a protective sheet when you’re doing iron-on. So this is referred to as a Teflon sheet or iron-on protective sheet. You might see both terms, but basically, it refers to a sheet that you can use between your iron-on on the blank and your heat source.
Heat Press
The larger heat press is sometimes preferred by those running a T-shirt business. But the EasyPress, I find is perfect for home crafters and is actually what I recommend and what I use most often. But I do have a heat press in my craft room. These are made by a variety of manufacturers.
Now, did I forget a term? Is there something that you’re still confused about? I want you to drop down to the comment section and leave that term, so I can either point you to a video where I explain that or maybe do a future video on it. But I’ll definitely respond to your comment and let you know what the term means.
Hopefully this Cricut for Dummies lesson helped you to learn your Cricut machine and start using it!
GET OUR CRICUT BEGINNER’S GUIDE!
EVERYTHING YOU WANT TO KNOW ABOUT CRICUT DESIGN SPACE IN A FREE PRINTABLE GUIDE!
You have Successfully Subscribed!