
I’m back with Part 2 of this “how to reupholster a chair” tutorial, and buckle up, because there are a whole lot of photos coming your way!
After removing all of the old fabric, this is what the chair looked like…

As I said in the last post, the fabric goes on in the opposite order in which it came off. So reupholstering a chair always starts with the seat. First, we wrapped the seat with a new layer of batting, tucking it in at the back and sides and pulling it through. And it just wrapped around and under the chair on the front.

It had to be cut and split on the corners to wrap around the wood frame of the chair.

I didn’t bother stapling on the batting separately. I stapled the batting and the fabric together. So after the batting was smoothed out, we added the fabric. Since this chair has a separate seat cushion, I used the velvet fabric only on the front portion, and then plain (cheaper) fabric on the back portion that would be covered with the cushion. But I just followed the pattern that I had created with the old fabric, which was made this way as well. I smoothed out the fabric and tucked it in at the back and the sides. You can see my mom sitting behind the chair and pulling the fabric to the back as I made sure the velvet was lined up straight on the seat.

Once it was lined up straight and smoothed out, I flipped the chair onto its back side and stapled the front of that piece onto the chair underneath the front edge.

On the front of the chair, the fabric just went right up to the edge at the corner. The fabric piece for the arm would later cover this raw edge.

After stapling the front of that piece, I sat the chair upright again, and stapled the back of the fabric that had been pulled through to the back of the chair.

And finally, I stapled on the sides of that piece.

Once all four sides were stapled on, we cut off the excess fabric.

Here’s how the finished seat piece looked at this point.

Next, we moved on to the inside of the arms and wings, and this is where we ran into big trouble. I started by using the old fabric as a pattern, sewing on the cheaper fabric according to the original fabric pattern. (Again, I went over how to make these patterns in the first post, and how to annotate them so you know where to place seams, where to sew on the cheaper fabric, etc.)

With this piece prepped, we got it lined up on the inside of the arm and wing, pulled the white fabric through to the back, and began stapling at the bottom and working our way up.

But for some reason, no matter how many relief cuts we cut on the edge of the fabric, we couldn’t get that fabric to wrap around the curve of the wing and lie flat. I mean, I cut so many relief cuts! Nothing worked. I don’t know why, and I’m sure a professional could have easily done this in one piece, but we’re not professionals. So we ended up cutting this piece off at the arm, and then using a separate piece of fabric for the wing. Here’s where we cut the fabric off, and then I put a relief cut at the top in the middle so that the fabric wouldn’t create a dent in the foam.

Just look at all these relief cuts! And I had done that all the way up the wing, and it still wouldn’t lie flat.

Here’s what it looked like after we got the arms wrapped (but not trimmed).

Here’s the view from the back side of the chair where you can see where the arm fabric was pulled through and stapled.

So then we used a separate piece of fabric to cover the wing on each side.

You can see at the arrow where this piece of fabric was folded under to hide the raw edge, and then placed over the arm fabric to hide the raw edge and the relief cut. And then the left side was tucked in and stapled on the back, and the right side of the fabric was wrapped and stapled.

Here’s a closer look at where it was folded under.

And here’s how the side looked once the fabric was stapled on, but before the excess fabric was trimmed.

Here’s a look from the back where the fabric was pushed through between the wing and the chair back, and stapled along the back of the frame.

Once all of the excess fabric was trimmed off, it looked like this…

And here’s a look at the finished inside of the wing…

At the top of the wing, the fabric had to be notched to fit around the frame.

I left this raw flap of fabric sticking out that would be tucked under the back piece.

Next we attached the front piece on the chair back. I attached cheaper fabric on the sides and the bottom of this piece, according to the pattern I made from the original fabric.

The white pieces on the sides didn’t extend to the top of the velvet since the white had to wrap around the frame to the back, but the velvet had to also wrap around the top edge of the chair.

So we tucked the white pieces in on the sides and the bottom and started stapling those onto the back of the frame. And then on the top edge, we folded the raw edges under, made sure those were covering over the raw flaps from the wing fabric, and then wrapped and stapled the top edge of the fabric onto the back side of the frame. Here’s a look at that finished piece.

Here’s a view of the side fabric from the back of the chair where it’s pulled through and stapled to the frame.

It had to be notched to go around that middle support piece.

And then you can see where it was pulled through at the bottom and stapled to the frame.

Here’s a look at the top where the raw edge was folded underneath, and then the fabric was wrapped to the back and stapled to the frame on the back.

We didn’t get it perfectly wrinkle-free, but it’s pretty darn close!

And here’s how the top looked on the back of the chair once it was stapled into place.

And finally, we were ready to the outside of the chair. I started by reattaching the back cardboard piece which was covered with a very thin piece of foam. I used a few staples to attach this piece.

I also reattached the thin foam to the sides, making sure that the edges of the fabric that had been wrapped around and stapled on the inside of the arms and wings were hidden underneath the foam.

And then we added a new layer of batting. I started on one side, using as few staples as possible to keep the batting in place.

And then I flipped the chair to wrap the batting and attach it to the back, and then flipped the chair again and attached it to the other side. Then we trimmed off all of the excess batting.

And finally, we attached the back and side fabric. On this particular chair, the back and side pieces were sewn together on the original chair and attached as one piece, so that’s what we did. On some chairs, you might find that the back piece is attached separately from the outside arm pieces. That’s why it’s important to remove the fabric carefully, seeing exactly how they’re attached as you disassemble them, and marking them carefully so that you can know how everything fits back together.
After sewing these three pieces together to make one large, we lined up the seams on the corners of the chair, and then starting in the middle of the back, I stapled the fabric in place, and then worked my way out and around the wing and arm. I was stapling as my mom was pulling the fabric taut and pulling out the wrinkles. We didn’t get it perfect, but we were very pleased with it.

Here’s how this side looked after stapling the fabric in place all around the curves of the wing and the arm, and then wrapping and stapling the fabric on the bottom edge.

Here’s a closer look at the fabric stapled into place. This is where the trim will go to cover over that raw edge of the fabric, but I’ll share that process in Part 3 of this tutorial.

Once that half was done, I started back in the middle of the back of the chair, and repeated that process, working my way towards the other wing and arm.

Here’s what the loose side piece looked like, so you can see just how much adjusting, tugging, and pulling was required to get it into place so that it could be stapled. This really was a two-person job. My mom did all of the placing, pulling, and tugging, while I did all of the stapling.

And with that second side stapled into place, we had an upholstered chair!
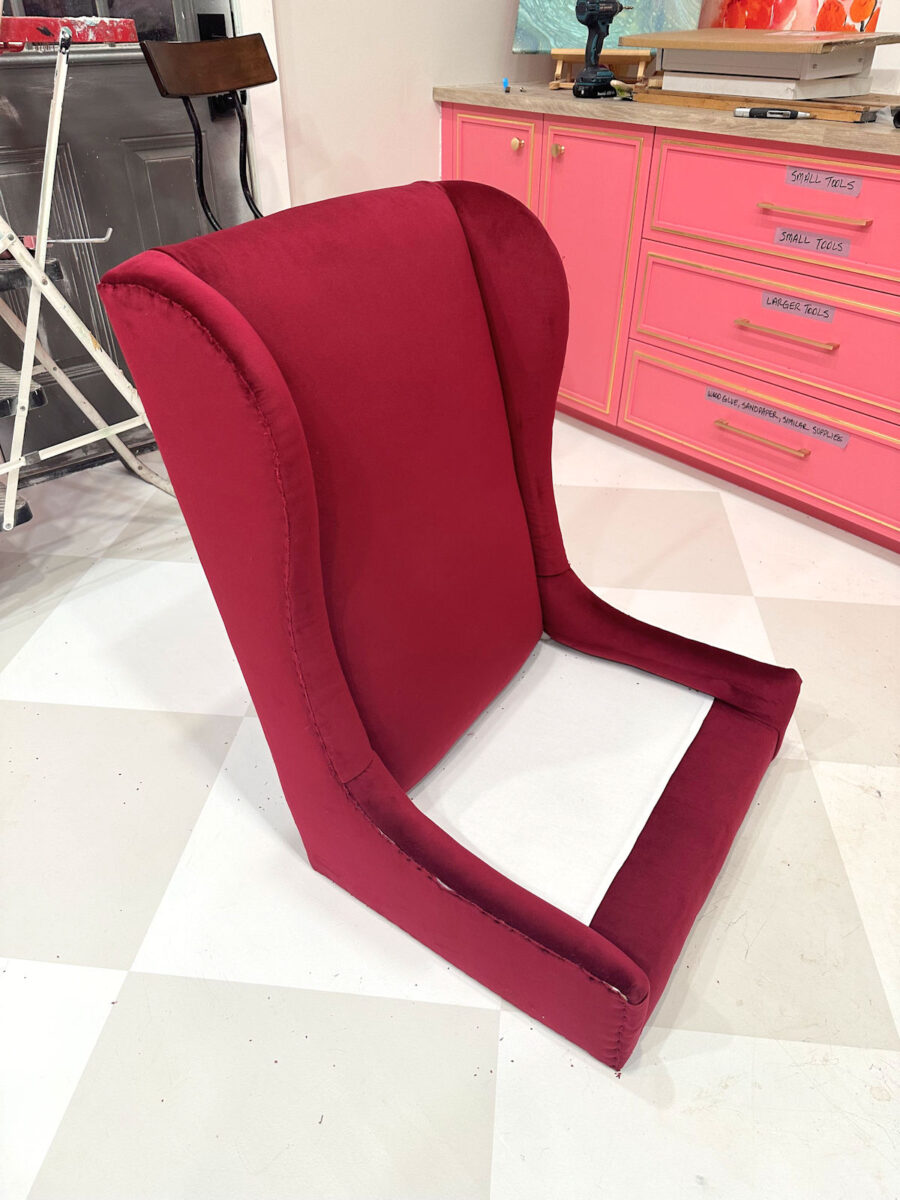
The hard part is done at this point. From here on out, we get to do the fun and pretty easy part, which is adding all of the trim that will cover those raw fabric edges, adding the nailheads, and making the separate chair cushion.

It’s getting there! I’m so excited about how this is looking. This velvet fabric is gorgeous!

The color is so deep and rich without being dark and dreary. It’s just perfect for my desk area.

So I will get this chair finished today, and I’ll be back tomorrow to show you Part 3 of this tutorial, as well as my finished chair!


Addicted 2 Decorating is where I share my DIY and decorating journey as I remodel and decorate the 1948 fixer upper that my husband, Matt, and I bought in 2013. Matt has M.S. and is unable to do physical work, so I do the majority of the work on the house by myself. You can learn more about me here.