
This desk makeover for my studio has been the epitome of “make it up as you go along.” When I started the makeover, I had a general idea of what I wanted the desk to look like when it was finished, but I had none of the details worked out. I knew I wanted to add some decorative panels to the sides, and I knew I wanted to add some drawers. Beyond that, the details have just evolved as I’ve progressed on this project.
But last night, I finally got the build for the base finished. Now I just need to do some sanding, caulking, priming, and painting, and the base will be finished. So let me show you what I’ve done to get to this point.
First, let me back up and remind you of the mistakes that I made on my first attempt. Not only did I install the side panels upside down. (To my eye, the vines needed to “grow” up and not down.) But I also made the mistake of thinking I could just add boards to the inside of the upper area to hide the drawers that I’ll be adding.
So what I ended up with was this — an upside down vine and an upper area that looked like it wanted to be an inset panel but failed because the board was set way too far back. And it looked awkward having the upper panel and the lower decorative panel set at different points on the 2″ x 2″ boards that formed the frame of the desk.

First, I needed to remove the decorative panel. I used my Dremel Multi-Max to cut along the edges, through the nails that were holding the panel in. That left some gouges in the frame pieces, so I had to fill those with wood filler and sand to smooth out the damage.

And then after cutting the piece for the upper panel on my table saw so that it would fit inside the frame pieces, I used a piece of 1/4-inch board as a spacer to attach it. This is one of those specialty boards that you can find at Home Depot or a craft store.

So I used this as a spacer while installing all of the panels to make sure they were all set into the desk frame at the same point.

Here’s what the top panel looked like set inside the frame as opposed to attaching behind the frame. It looked so much better this way! I attached it using 18-gauge nails shot through the frame pieces above and below the panel, and into the edges of the panel. (The desktop isn’t currently attached, so I moved it over to access the top frame piece so I could nail through it and into the top edge of the panel.)

And then I used the same spacer to re-install the decorative panel.

That looked so much better! Everything looked planned and intentional this time. Before, it looked haphazard and like an afterthought.

In the pictures below, you can really see the difference that it made to bring those upper panels forward inside the desk frame. Here’s what it looked like before with the boards attached to the back of the desk frame. Like this, the boards were set back 1.5 inches…

And here’s what it looks like after cutting the boards to fit inside the desk frame, and moving those boards forward inside the frame so that they’re set back only 1/4 inch…

After getting all of the panels in place, I started adding trim. This is where I really started making stuff up as I went along. 😀 I used some cabinet trim from Home Depot (the kind that is sold by the 8-foot piece and not by the linear foot) and decided to attach it to all of the horizontal desk frame pieces. I liked the trim, the panels, and the leaf design. What I didn’t like was how those square legs looked from the bottom trim to the floor.

It looked like I had taken a Parson’s table and added trim to it to make it look traditional in style. It looked very odd to my eye. So I headed to Home Depot and bought some furniture legs. The length of the leg from the bottom of that bottom trim to the floor was six inches. The only six-inch furniture legs that were narrow enough to use on my desk and that I could find locally were these…

They’re not my favorite, but I either had to use these or wait several days for an online order to show up, and I just wasn’t willing to wait. So I went with these.
So I flipped the desk over on its back…

And then I used a handsaw to cut off the leg below the trim…

And I was left with this…

Home Depot didn’t have the metal inserts that fit the screw on these legs, and the plates they sell to easily attach these legs to furniture were way too big to fit this area of my desk. So I just drilled a hole a size smaller than the screw top on the furniture leg, coated the top of the furniture leg with wood glue, and then screwed it in. Then I reinforced it with some nails shot at an angle through the top edge of the legs and angled into the bottom of the desk leg. Once the glue dried, the new legs were very secure.

After flipping the desk over and repeating that on the back leg, this is what it looked like. Even though these aren’t my favorite furniture feet, I thought this looked so much better than having those plain, square legs going all the way to the floor.

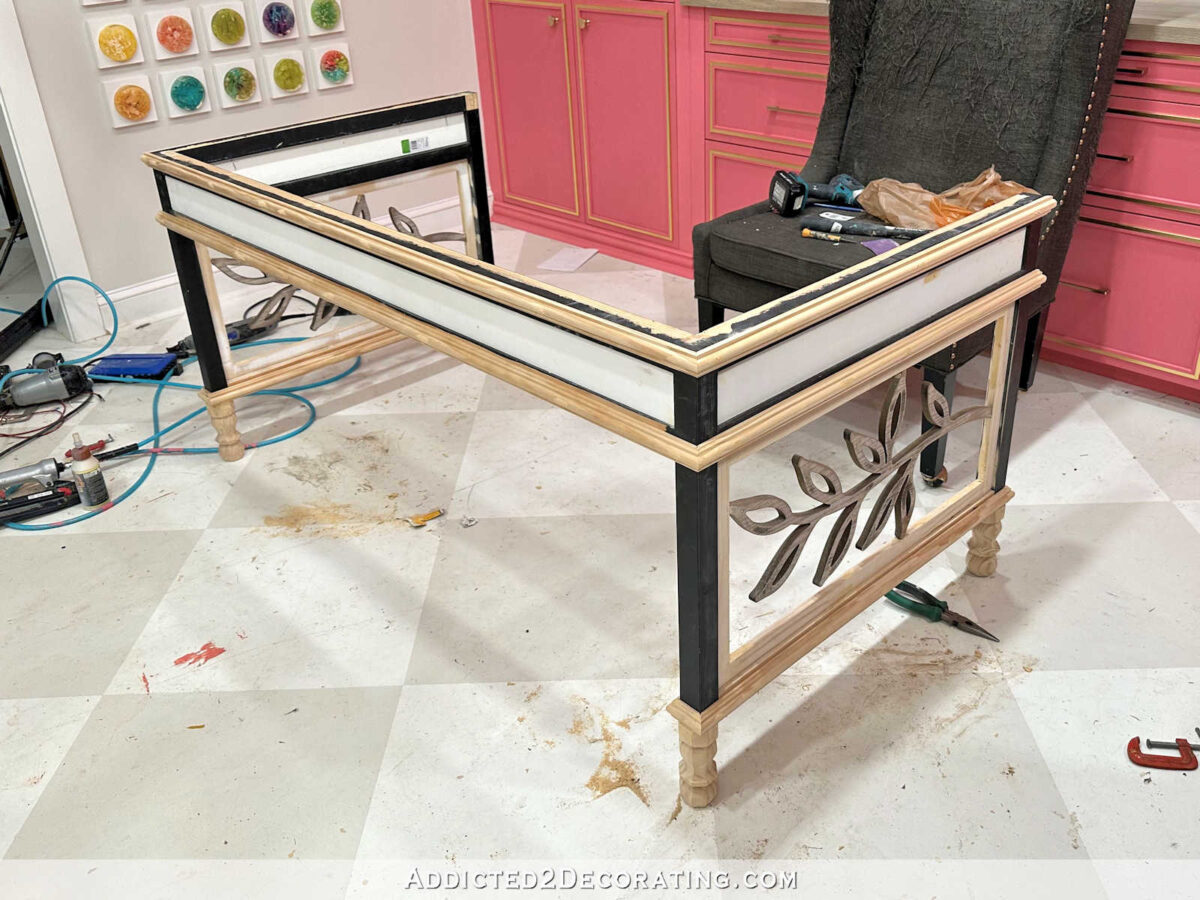
After repeating that process on the legs on the other side of the desk, the basic build for the desk base was finished.

I did get all of the wood filling done last night before I went to bed (nail holes, mitered trim corners, etc.), so I’m hoping that I can get this base finished today.

I’ll need to sand all of the wood filler, and then prime the whole thing and give it a quick sanding again before painting. I’ll also need to do some caulking to fix some of the areas around the decorative panels where my Dremel Multi-Max left some pretty rough cuts. But I’m really hoping that I can have this finished today and get started on the desktop. I won’t be able to attach the drawers until the desktop is finished and in place.

But it’s coming along! I was having my doubts about halfway through this. In fact, I starting thinking I should just get online and buy a new desk. The only reason I decided to push through is because I have already purchased the walnut veneer for the top, and I didn’t want that to go to waste. So I pressed on. And I’m so glad I did! I think once it’s finished, this desk is going to be really pretty, and another one-of-a-kind for my studio.

Addicted 2 Decorating is where I share my DIY and decorating journey as I remodel and decorate the 1948 fixer upper that my husband, Matt, and I bought in 2013. Matt has M.S. and is unable to do physical work, so I do the majority of the work on the house by myself. You can learn more about me here.