This post and photos may contain Amazon or other affiliate links. If you purchase something through any link, I may receive a small commission at no extra charge to you. Any supplies used may be given to me free of charge, however, all projects and opinions are my own.
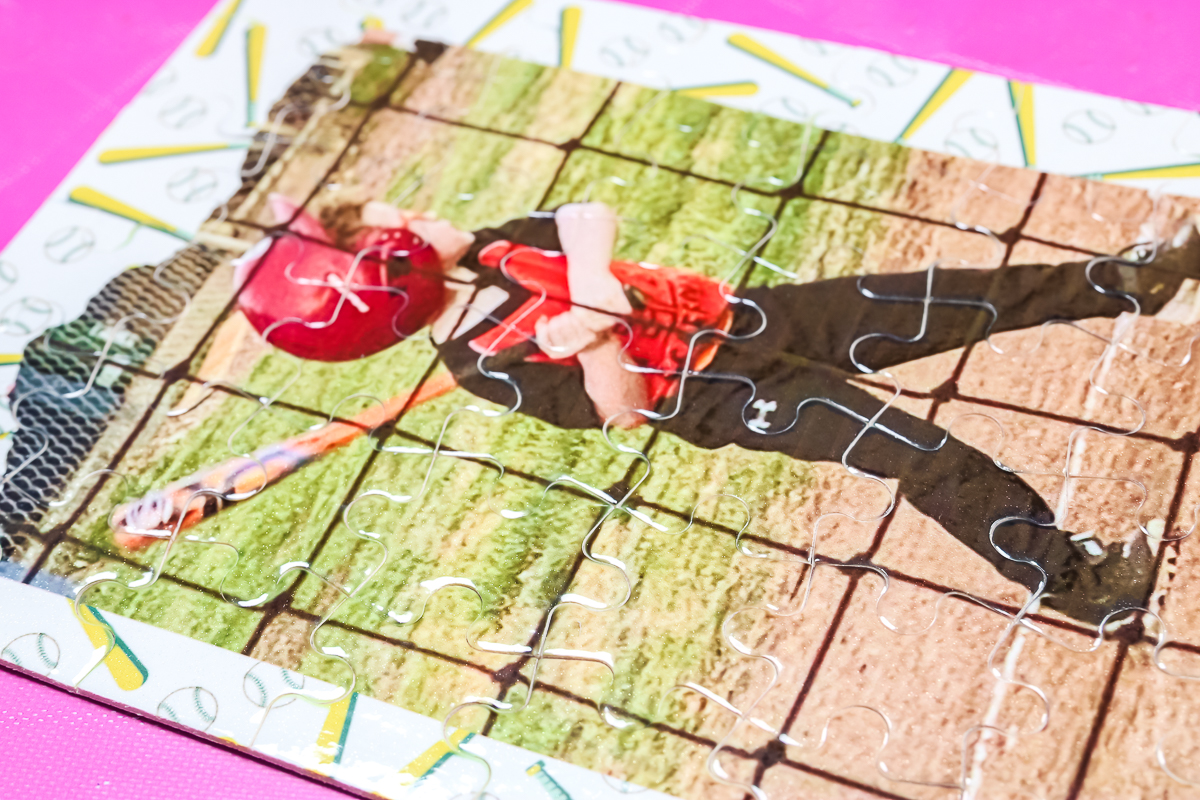
Are you looking for the perfect customized gift? You’re in luck! Today I’m going to teach you how to make custom sublimation puzzles. Custom sublimation puzzles make a perfect gift but are also great for invitations, save-the-date cards, thank-you notes, and more.
If you’re new to sublimation, my sublimation for beginner’s post will help you learn the tools you need and give you tips for getting started.
What is a Sublimation Puzzle?
Sublimation puzzles are pre-cut puzzles with poly-coating on one side. With this coating, you can apply a sublimation print or photo to create a custom puzzle perfect for gifting. Sublimation puzzles come in a variety of shapes and sizes which means there’s one just right for your project.
You can watch me create a sublimation puzzle from start to finish and learn my tips and tricks by pressing play on the video below.
Supplies Needed for Sublimation Puzzles
Remember, for this project, I’m using a sublimation print. That is a print made from printing sublimation ink onto sublimation paper from a sublimation printer.
How to Make a Custom Sublimation Puzzle
Most sublimation puzzles are cardboard. I have seen versions that are felt-type material. The version I’m using today is cardboard. The puzzle will come assembled and adding your sublimation print before taking it apart will give you the best finished result.
IMPORTANT: You want to sublimate the puzzle before you break it apart.
I’ve seen sublimation puzzles in all kinds of sizes including very large ones and different shapes. Regardless of what type of sublimation puzzle you purchase, the process will be similar to what I’m showing here.
If your puzzle is larger than your heat source, I would recommend putting it on some type of board so that when you move it to press different areas you won’t disturb or move the puzzle itself.
How to Create a Sublimation Design
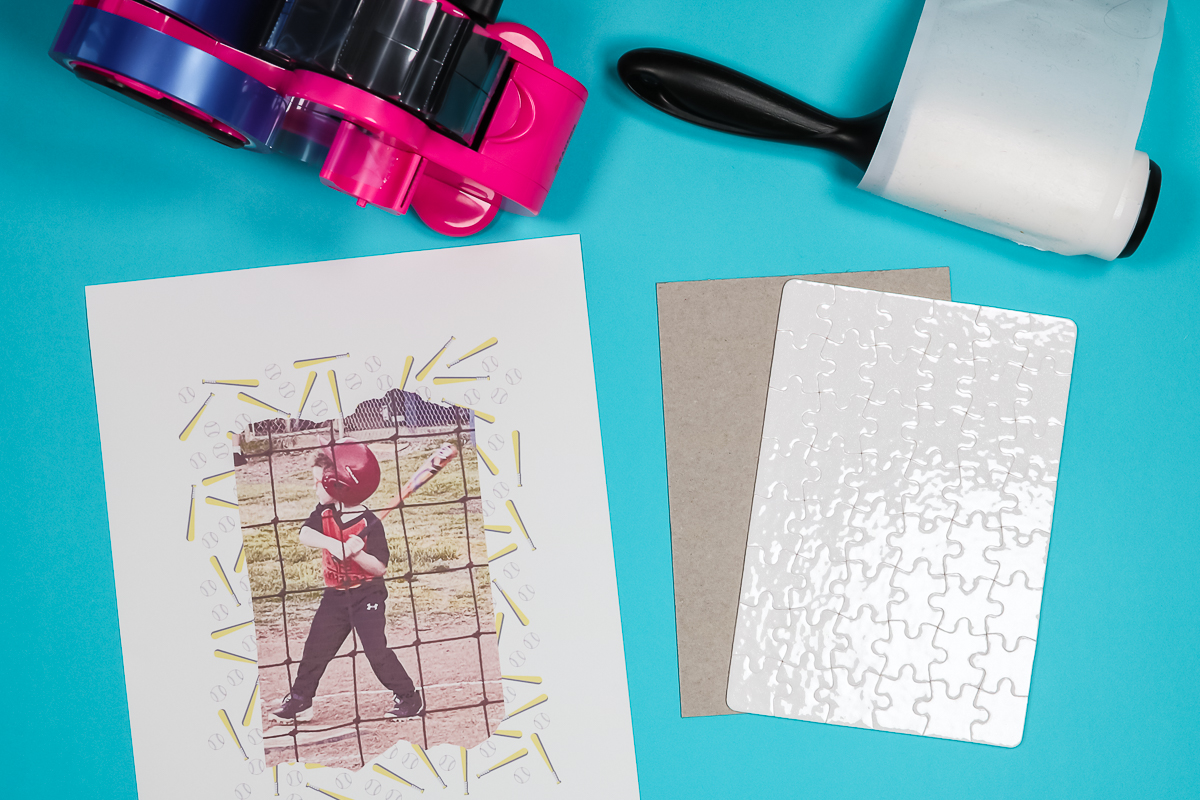
To create the design I used for my custom sublimation puzzle, let’s head over to Canva. I used Canva to create my design and I used the baseball design I included for free at the link above.
To begin, upload the baseball design and the photo you want to use into Canva.
I am using an 8.5″ x 11″ sized canvas because my puzzle is smaller than that size which means my whole puzzle will fit on the design. I do recommend making sure your design is a little oversized so the whole puzzle is covered.
Add the baseball design to the canvas and then add a frame. You can choose any type of frame you want. I chose a frame that has a torn look at the top and the bottom.
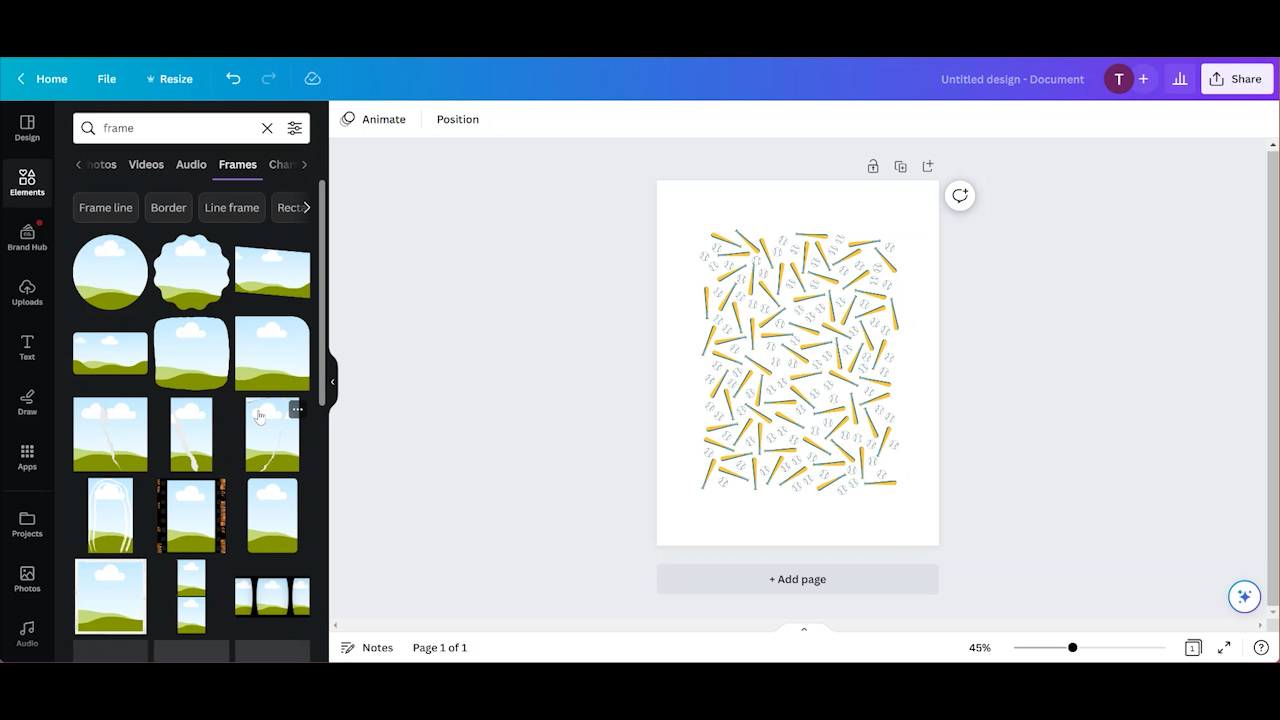
Once you add the frame over the baseball design you can resize it to whatever size you want and then just drag and drop your photo into the frame.
If you need to edit the photo, you can double-click on it and then drag it where you want it.

How to Download an Image from Canva
You actually can’t print an image from Canva. To download the image, click on Share and then Download. Download as a PNG file and up the quality to get the best print quality you can.
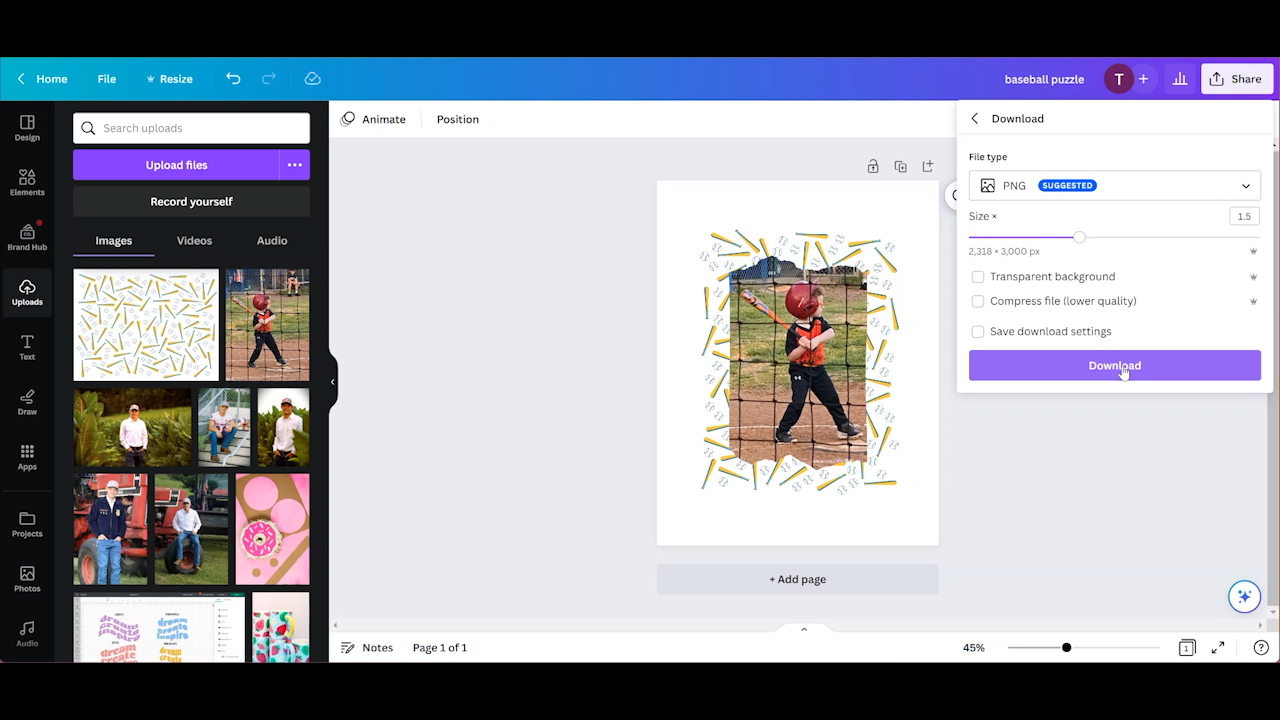
From here you can download it right onto your computer and then open it in the program you’re going to use for printing.
I’m using my Sawgrass printer to print my image so I’ll be using the Sawgrass Print Manager. You can learn more about that in my post all about the Sawgrass Print Manager.
How to Prepare Puzzles for Sublimating
When you open your sublimation puzzle package, you’ll find the puzzle all put together and a piece of cardboard in the package.
Don’t throw away that cardboard piece, we’re going to use it during the sublimation process.
The first thing you need to do is to clean your puzzle. Since we don’t want to take the puzzle apart before sublimating, I like to take a sheet off my lint roller and stick it to my shirt a couple of times to take away a little of the stickiness before using it to remove any debris from the puzzle. This should ensure it isn’t too sticky and the puzzle stays together.
Because these cardboard puzzles can have moisture in them, I recommend pre-heating them to remove any moisture that may be in them.
You can either hover your heat press over the puzzle for a little bit or you can close the heat press on the puzzle for 5-10 seconds. Doing this should remove any moisture from the blank in the safest way.
NOTE: If you’re having trouble sublimating puzzles, moisture may be the issue.
It’s important to allow your sublimation puzzle to cool completely before adding your sublimation print to avoid any ghosting.
Adding Sublimation Prints to Cardboard Puzzles
If you’ve ever done sublimation before, this process will be familiar. Place your sublimation puzzle, white side down, onto the sublimation print making sure it’s located how you want it.
If you’re not sure which side to sublimate on, the sublimation side should feel smooth and look shiny. The back has a rough texture and is off-white in color.
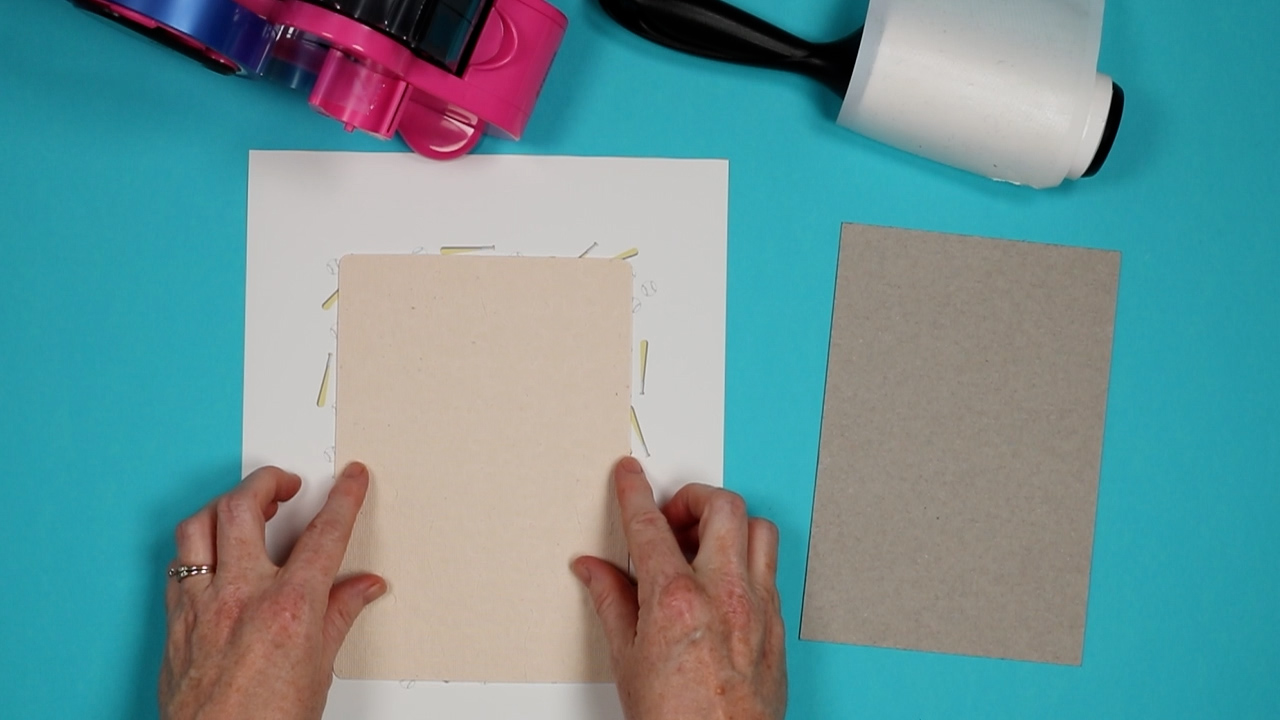
This is where we need that cardboard piece. Adding tape directly to the back of the sublimation puzzle will damage the puzzle itself.
With your puzzle located on the print, add the cardboard over the back of the puzzle and then tape the cardboard to the print. You want your sublimation puzzle sandwiched between the cardboard and the sublimation print. This way the tape will ruin the cardboard and not the puzzle.
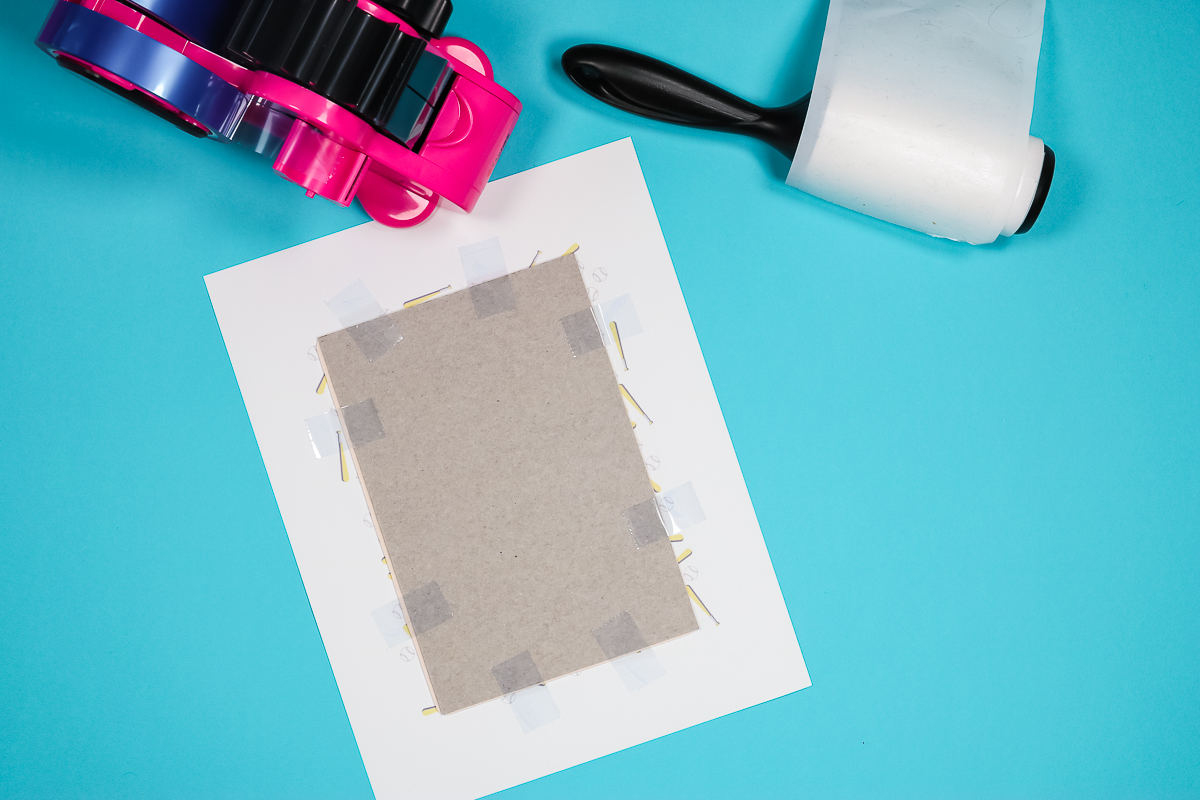
You can see that I have taped my image into place on all four sides of the puzzle with the tape on the cardboard.
How to Press Sublimation onto Puzzles
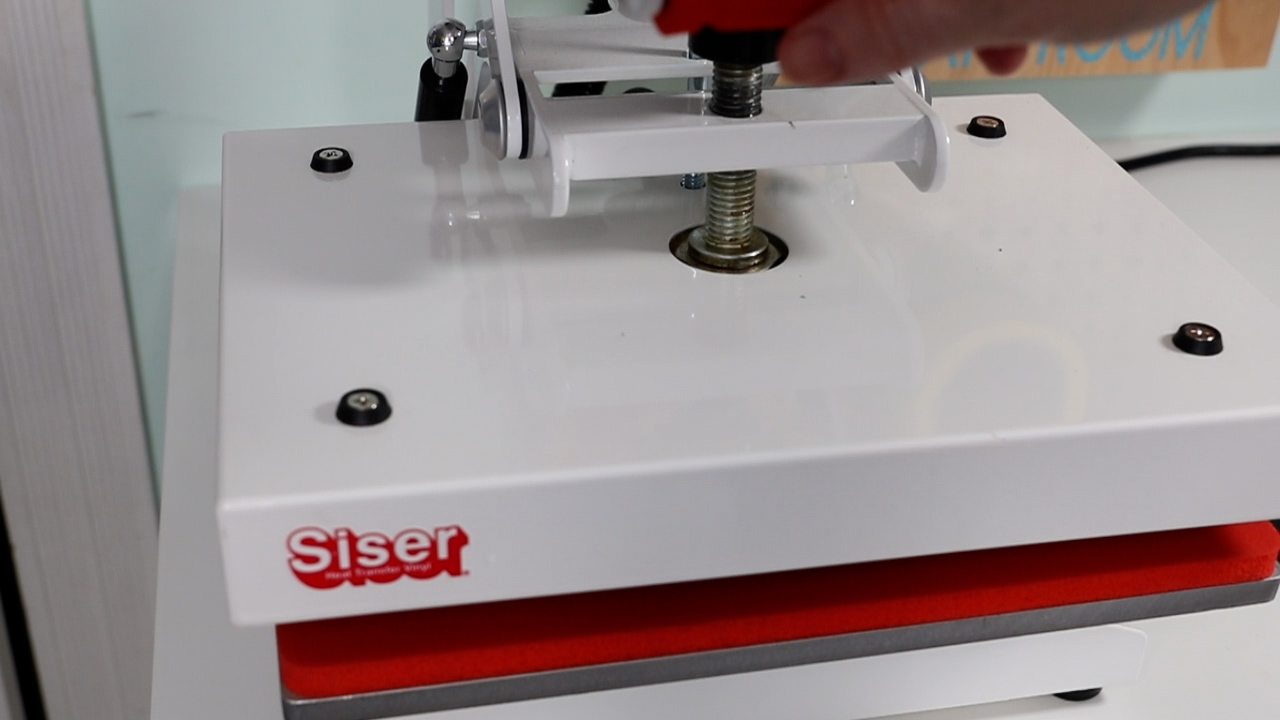
To press these puzzles, you’ll need to use medium pressure. If you’re using a Cricut Auto Press or an EasyPress, you’ll want to use a pressing mat that is solid and firm. I don’t recommend the mat that comes with the Auto Press or the EasyPress Mat.
Add a piece of protective paper on top of the mat, add the puzzle, sublimation image side up, and another sheet of protective paper to the top.
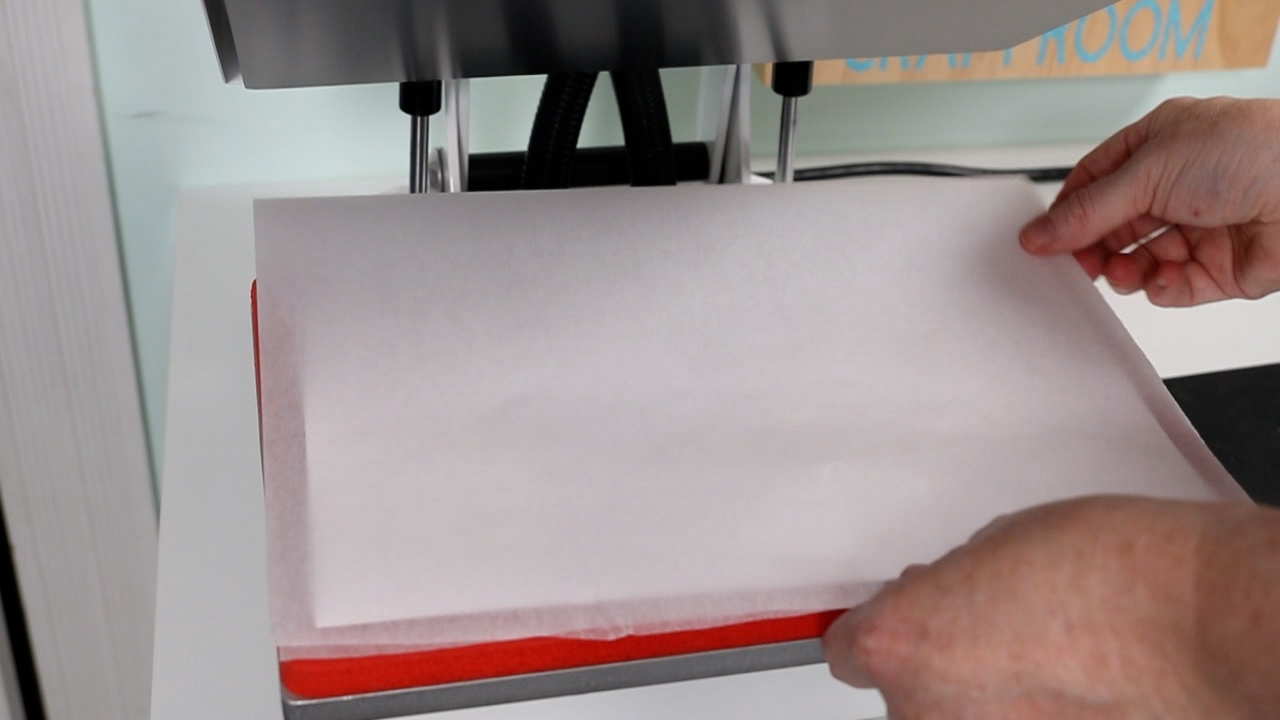
Adding protective paper to the top and bottom of your project will protect your mat and heat plate from any blowout ink. If you get sublimation ink on your heat press or mat, it will continue to transfer to other projects in the future ruining them.
My sublimation puzzle calls for a temperature of 374 degrees for 70 seconds with medium pressure.
If you’re having trouble with sublimation puzzles, pressure may be the issue. If you’re using an EasyPress, you want to make sure you’re adding pressure the entire time you’re pressing.
How to Finish Custom Sublimation Puzzles
Once the time is up remove the puzzle from the heat press. While wearing heat-resistant gloves, move the sublimation puzzle to a heat-resistant mat and allow it to cool a little bit.
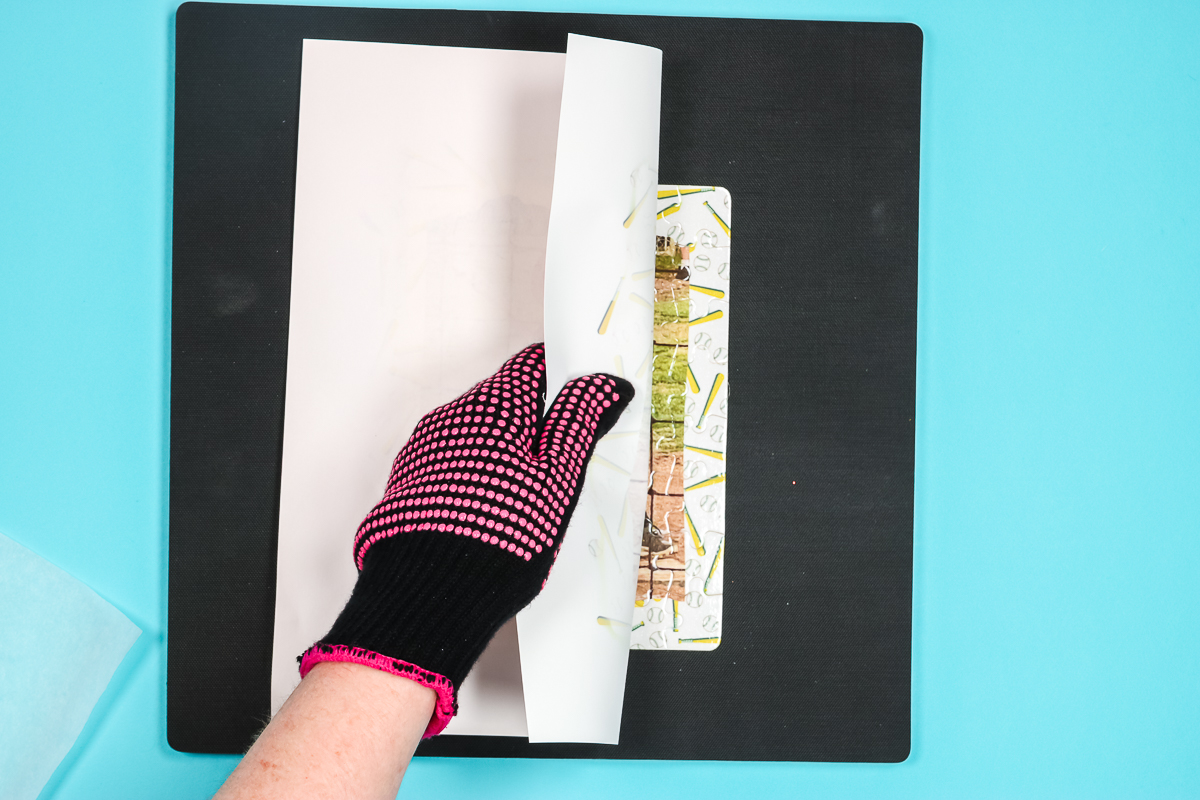
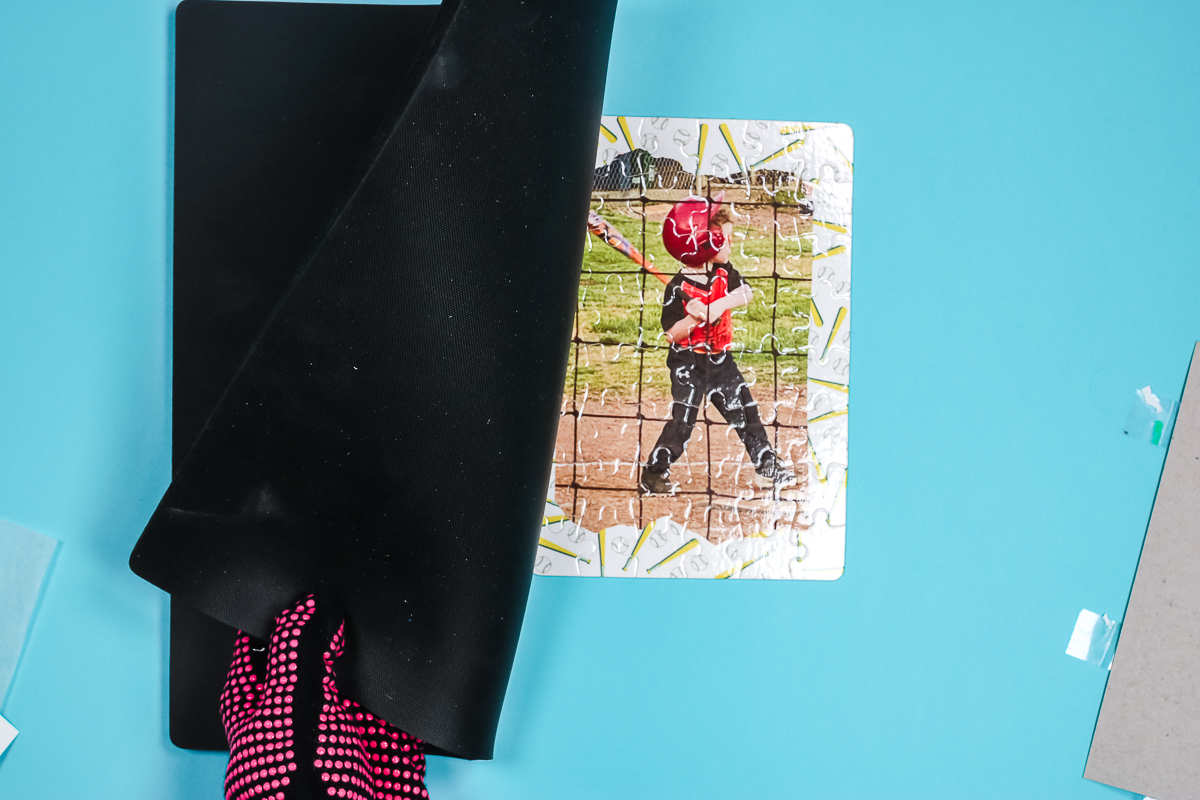
When it’s cooled remove the protective paper and peel away the sublimation print and reveal your custom sublimation puzzle!
Tip – because these puzzles are chipboard or cardboard you want to allow the puzzle to cool while it’s flat. I have found placing it under the heat-resistant mat with something heavy on top while it cools helps it stay completely flat. This should prevent any bowing of the puzzle while it’s cooling.
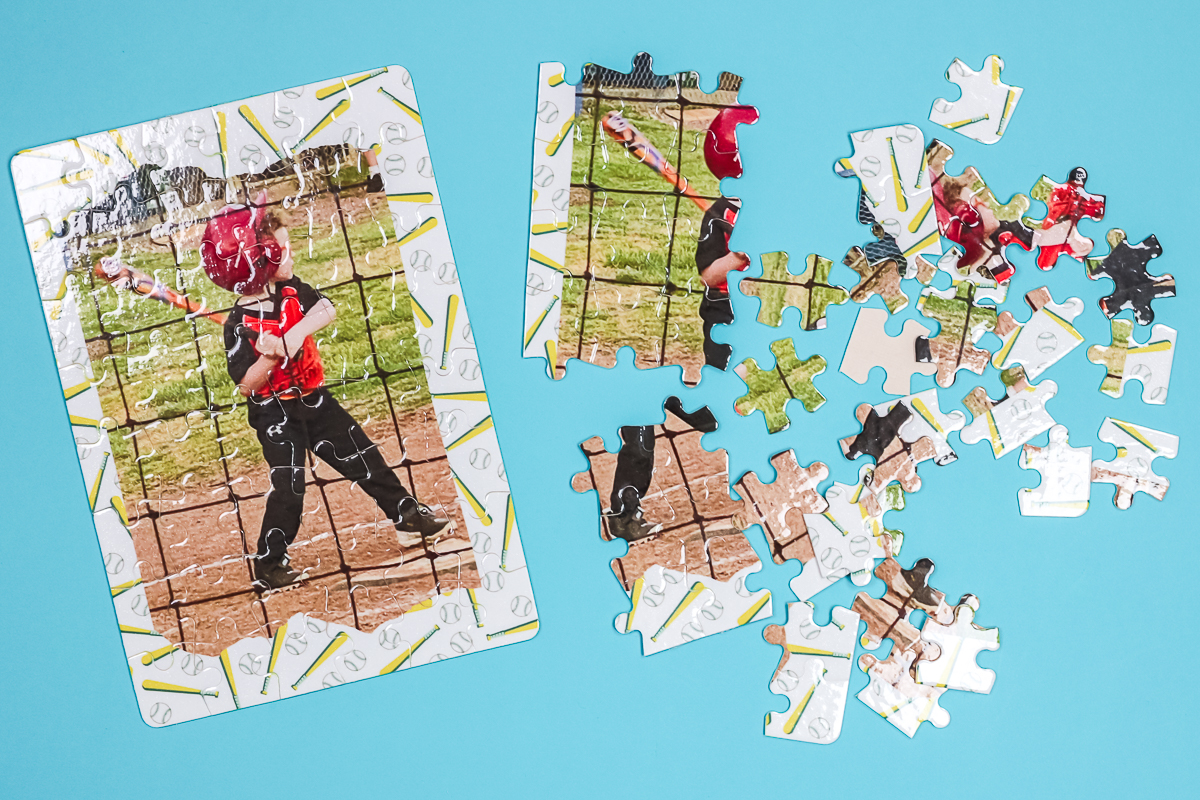
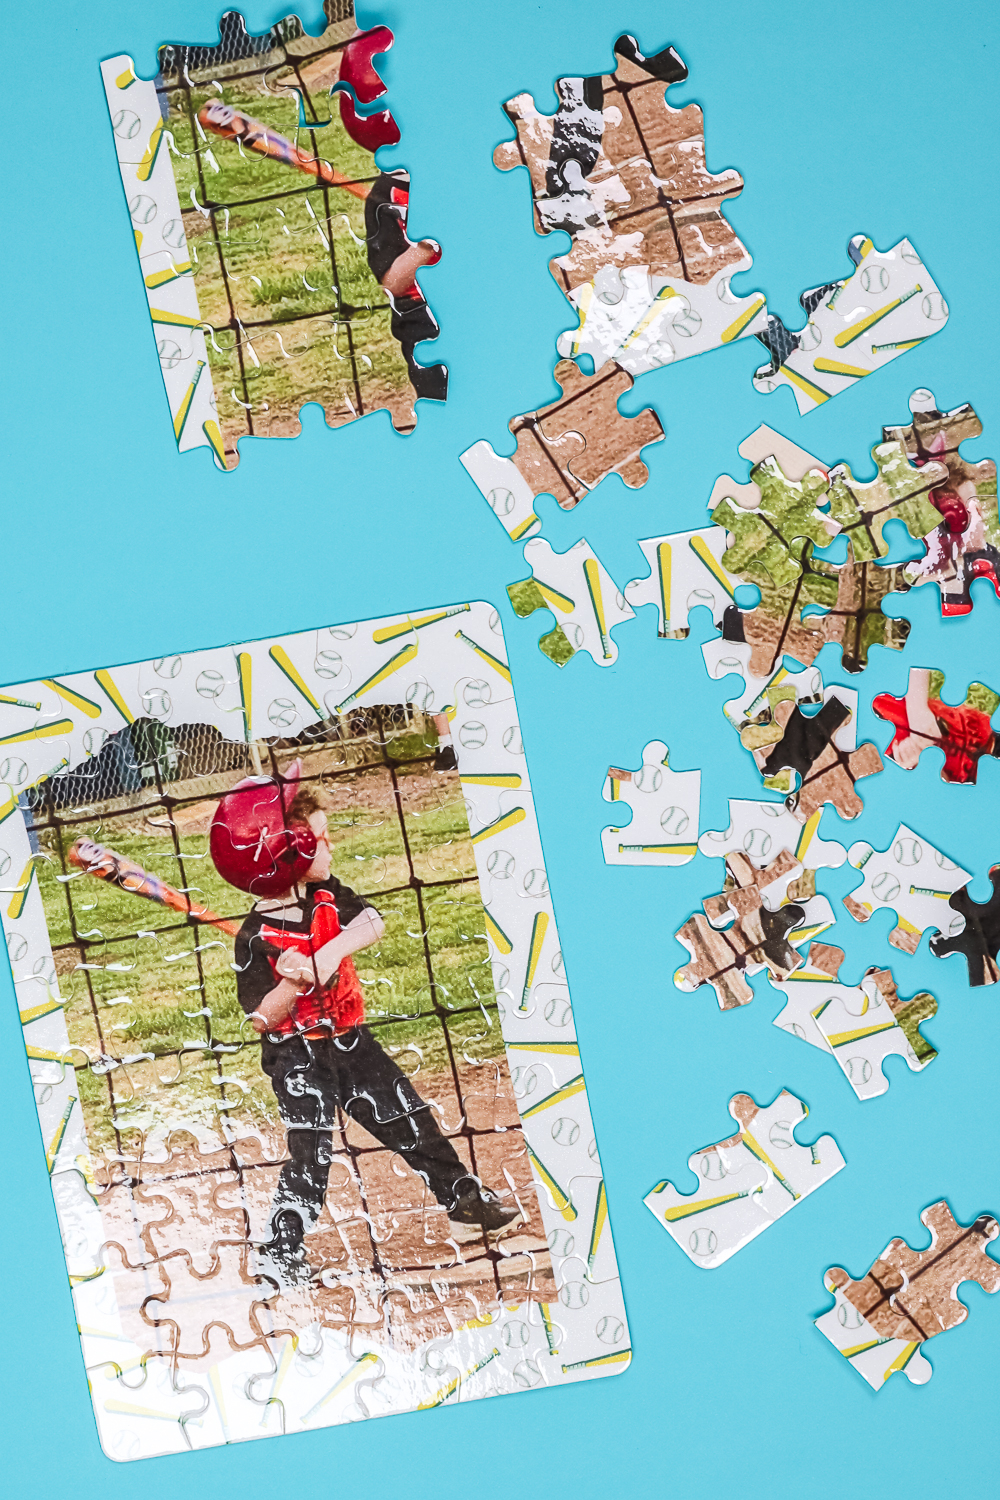
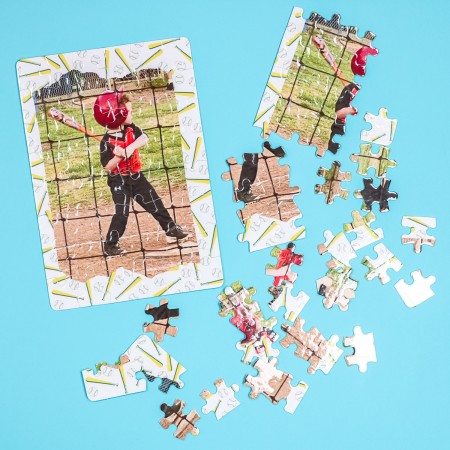
Once your puzzle is completely cool it’s ready to go! You can give the puzzle put together or take it apart and put it in a cute bag to gift. I’ve found these puzzles are easy to take apart and fun to put back together again!
Final Thoughts on Custom Sublimation Puzzles
I am a huge fan of custom puzzles. I love that they come in a wide variety of shapes and sizes. I’ve seen circles, hearts, rectangles, and more.
Today I showed you how to make a customized puzzle with a photo on it. While I love this project, I think my favorite use would be for a save-the-date card or another announcement. I just think it would be so fun to send out a puzzle and when the receiver puts it together they learn something.
Imagine the smile it would put on a parent’s face to get a puzzle and when they put it together they learn they’re going to be grandparents. I can’t stop imagining the fun scenarios you could use customized sublimation puzzles for.
I’ve made these sublimation puzzles many, many times. I’ve given them as gifts to adults and children alike and everyone loves them. If you love puzzles and you love sublimation like I do, you’re going to want to order some today.
I hope I’ve answered all the questions you have about making custom sublimation puzzles. If you have additional questions leave them in the comments below and I’ll answer those for you.
Love this project and want more ideas? Try the links below as well!
Are you looking for the perfect sublimation gift? Today I’m going to teach you how to make customized sublimation wind spinners that would make the most perfect gift and yard decor.

If you’ve ever wanted to add sublimation designs to cotton fabric, I will teach you the best products to use and how to turn your favorite cotton tee into a sublimated shirt.
You can also print the instructions for making sublimation puzzles using the card below!
Instructions
How to Create a Sublimation Design
-
To begin, upload the baseball frame and the photo you want to use into Canva.
-
I am using an 8.5″ x 11″ sized canvas because my puzzle is smaller than that size which means my whole puzzle will fit on the design. I do recommend making sure your design is a little oversized so the whole puzzle is covered.
-
Add the baseball design to the canvas and then add a frame. You can choose any type of frame you want. I chose a frame that has a torn look at the top and the bottom.
-
Once you add the frame over the baseball design you can resize it to whatever size you want and then just drag and drop your photo into the frame.
-
If you need to edit the photo you can double-click on it and then drag it where you want it.
How to Download an Image from Canva
-
You actually can’t print an image from Canva. To download the image click on Share and then Download. Download as a PNG file and up the quality to get the best print quality you can.
-
From here you can download it right onto your computer and then open it in the program you’re going to use for printing.
How to Prepare Puzzles for Sublimating
-
When you open your sublimation puzzle package you’ll find the puzzle all put together and a piece of cardboard in the package.
-
Don’t throw away that cardboard piece, we’re going to use it during the sublimation process.
-
The first thing you need to do is to clean your puzzle. Since we don’t want to take the puzzle apart before sublimating I like to take a sheet off my lint roller and stick it to my shirt a couple of times to take away a little of the stickiness before using it to remove any debris from the puzzle. This should ensure the puzzle stays together.
-
Because these cardboard puzzles can have moisture in them I recommend pre-heating them to remove any moisture that may be in them.
-
You can either hover your heat press over the puzzle for a little bit or you can close the heat press on the puzzle for 5-10 seconds. Doing this should remove any moisture from the blank in the safest way. If you’re having trouble sublimating puzzles moisture may be the issue.
Adding Sublimation Prints to Cardboard Puzzles
-
It’s important to allow your sublimation puzzle to cool completely before adding your sublimation print to avoid any ghosting.
-
Place your sublimation puzzle, white side down, onto the sublimation print making sure it’s located how you want it.
-
If you’re not sure which side to sublimate on, the sublimation side should feel smooth and look shiny. The back has a rough texture and is off-white in color.
-
This is where we need that cardboard piece. Adding tape directly to the back of the sublimation puzzle will damage the puzzle itself.
-
With your puzzle located on the print add the cardboard over the back of the puzzle and then tape the cardboard to the print. You want your sublimation puzzle sandwiched between the cardboard and the sublimation print. This way the tape will ruin the cardboard and not the puzzle.
-
You can see that I have taped my image into place on all four sides of the puzzle with the tape on the cardboard.
How to Press Sublimation onto Puzzles
-
To press these puzzles you’ll need to use medium pressure. If you’re using a Cricut Auto Press or an EasyPress you’ll want to use a pressing mat that is solid and firm. I don’t recommend the mat that comes with the Auto Press or the EasyPress Mat.
-
Add a piece of protective paper on top of the mat, add the puzzle sublimation image side up, and another sheet of protective paper to the top.
-
My sublimation puzzle calls for a temperature of 374 degrees for 70 seconds with medium pressure. If you’re having trouble with sublimation puzzles pressure may be the issue.
-
If you’re using an EasyPress you want to make sure you’re adding pressure the entire time you’re pressing.
How to Finish Custom Sublimation Puzzles
-
Once the time is up remove the heat and then while wearing heat-resistant gloves move the sublimation puzzle to a heat-resistant mat and allow it to cool a little bit.
-
When it’s cooled remove the protective paper and peel away the sublimation print and reveal your custom sublimation puzzle!
-
Tip – because these puzzles are chipboard or cardboard you want to allow the puzzle to cool while it’s flat. I have found placing it under the heat-resistant mat with something heavy on top while it cools helps it stay completely flat. This should prevent any bowing of the puzzle while it’s cooling.
-
Once your puzzle is completely cool it’s ready to go! You can gift the puzzle put together or take it apart and put it in a cute bag to gift.