This post and photos may contain Amazon or other affiliate links. If you purchase something through any link, I may receive a small commission at no extra charge to you. Any supplies used may be given to me free of charge, however, all projects and opinions are my own.
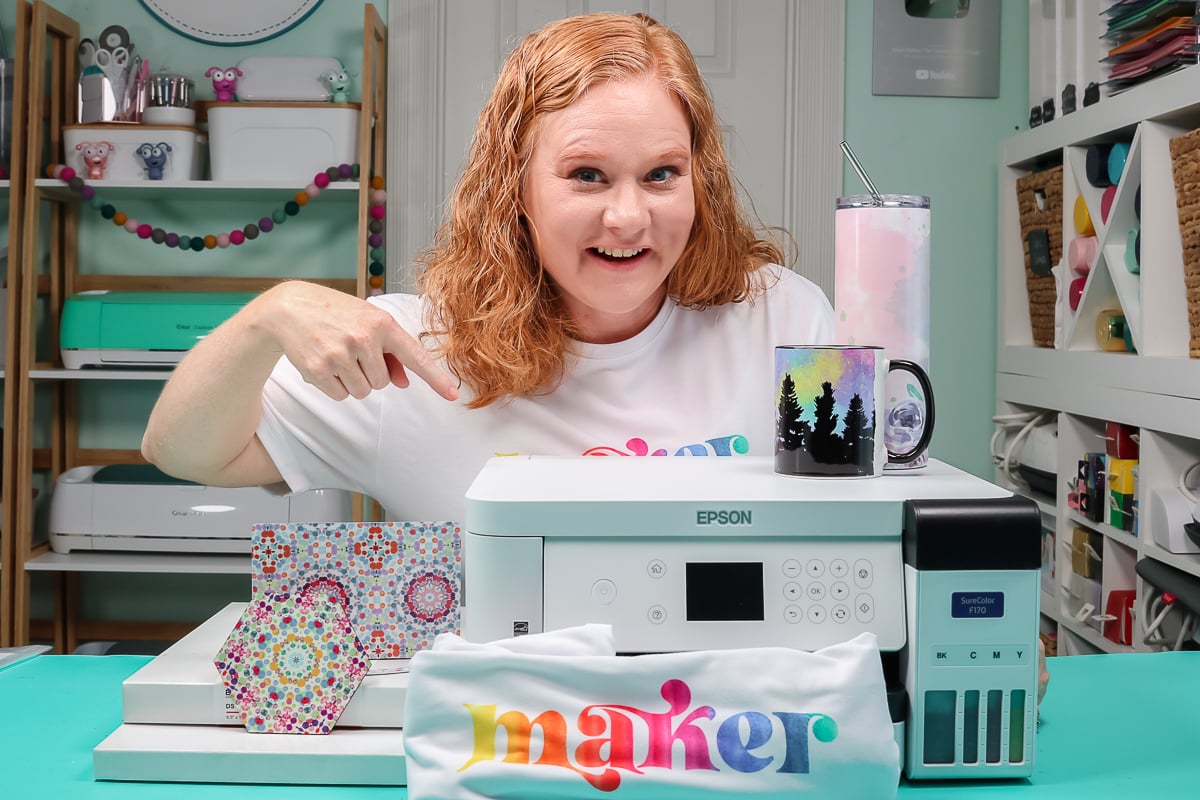
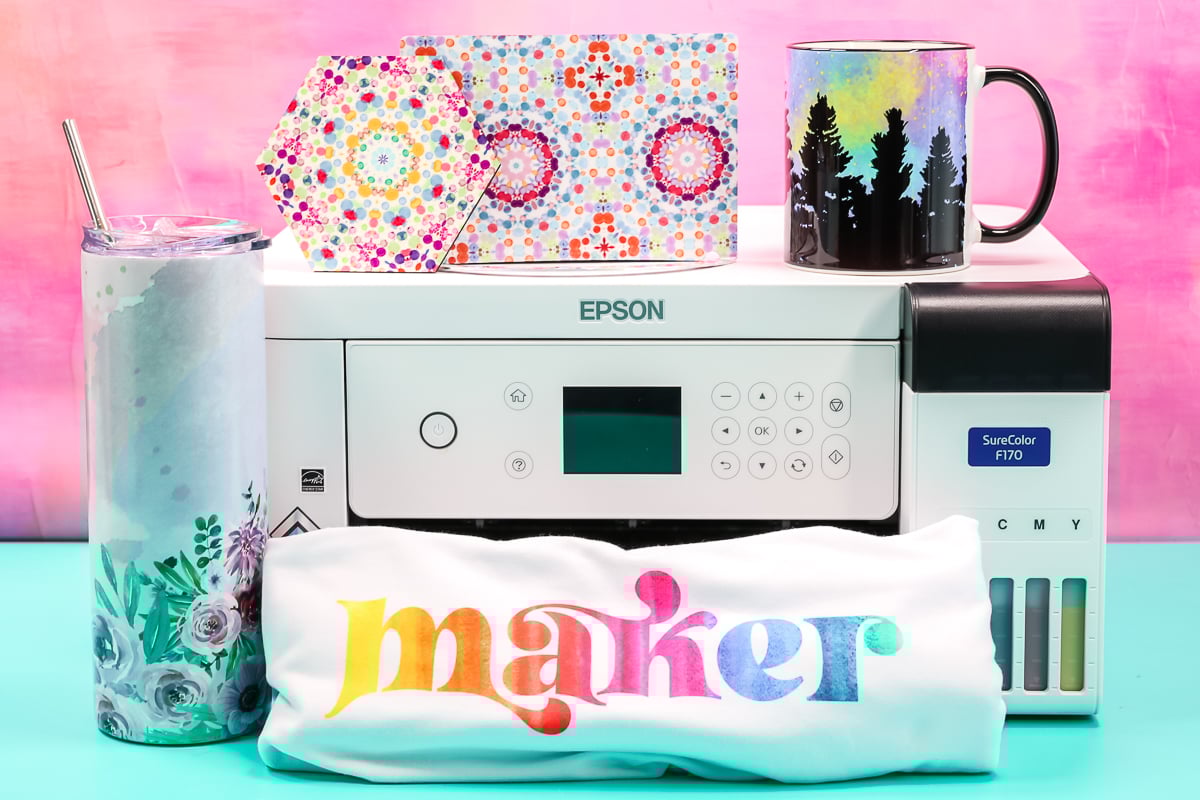
You’ve been asking for more sublimation printer reviews so I’m here with your guide to the Epson SureColor F170. Today I’m testing the Epson Sublimation Printer. I’ll walk through the whole setup process and even make a few projects so you can see how easy it is to use.
Are you just starting your sublimation journey? Check out my Sublimation for Beginners post here.

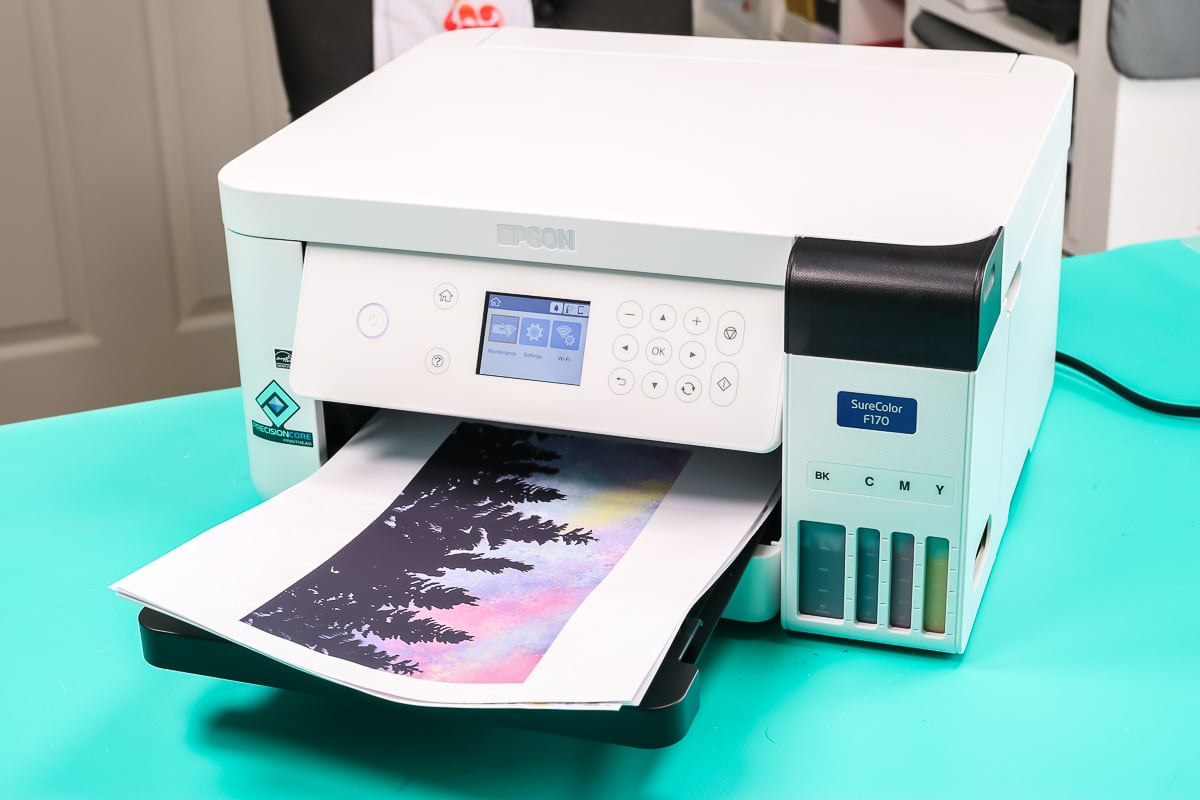
Epson SureColor F170 Sublimation Printer
I’ve been a fan of using an Epson EcoTank printer converted to a sublimation printer and have been using one for quite a while with great results. I’m excited to try a true sublimation printer without having to worry about converting anything.
I’m going to show you the full unboxing and setup as well as test out a variety of different sublimation blanks to see how each performs. You can watch me unbox and set up the printer, just click play on the video below.
What is a Sublimation Printer?
A sublimation printer is a special printer. It uses special ink and special paper to create your sublimation prints. With these sublimation prints, you can use a variety of different sublimation blanks to create professional-looking projects. A standard printer is something you’d use to print out a child’s school work or maybe a sticker sheet. You don’t want to use this printer for those projects.
What’s the Difference Between Sublimation Printers and Converted Printers?
Let’s talk about converted printers versus a dye-sublimation printer. The F170 is a dye-sublimation printer. It is made for sublimation. That means that the technology is in this printer for your sublimation needs. You might be familiar with the standard Epson EcoTank printer that’s actually an ink jet printer.
I want to note that when you convert a standard EcoTank printer to a dye-sub printer, the limited warranty doesn’t cover any damages covered by the dye-sub ink. This printer, the F170, is made for sublimation.
When you add the sublimation ink and set it up, it is exactly what this printer was intended to do. That means you are not going to void any warranty and you have full Epson support for the printer. Plus you get gorgeous colors from a true sublimation printer without the need for any color correction!
Supplies Needed for Sublimation
To use the Epson SureColor F170 Sublimation Printer you have to use specific items, here’s what I am using today:
Sublimation Blanks Used
How to Use an Epson SureColor F170 Sublimation Printer
I mentioned above that with a sublimation printer you need to have specific supplies. You cannot print sublimation ink on regular paper and have it work. Sublimation ink needs sublimation paper and a sublimation blank. When heat is applied a chemical reaction happens with any poly-coated blank which includes polyester shirts.
With shirts, you would need at least a 65% polyester count for the best results. With 100% polyester, you’ll get those big, bright, bold results. I am also using a poly-coated mug, poly-coated tumbler, a metal bookend, and a hardboard hexagon coaster. All of these are listed as a sublimation blank. Make sure you look for blanks that specify they are a sublimation blank.
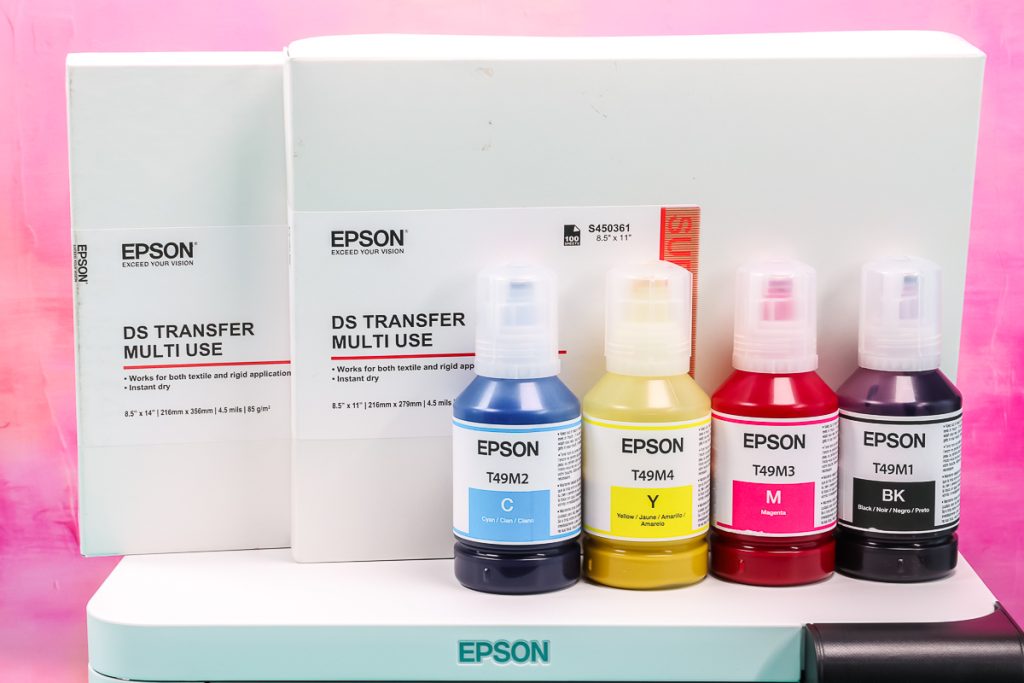
With the Epson SureColor F170 Sublimation Printer, I’m using the Epson sublimation ink that comes in the box and Epson sublimation paper. I am going to use a heat press, tumbler press, and mug press to see how the Epson F170 works with all of these different presses and blanks.
Unboxing the Epson SureColor F170 Sublimation Printer
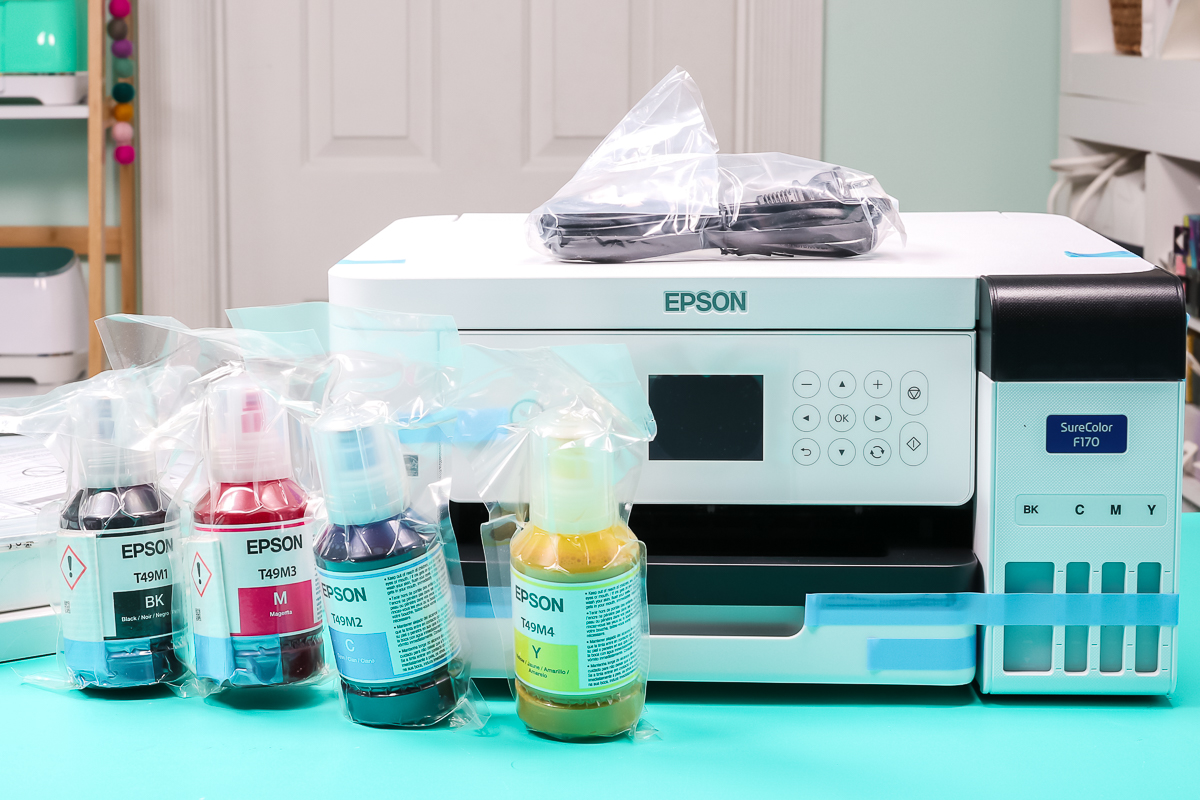
First, let’s see what comes in the box of the F170. Inside you will find the printer itself, four colors of sublimation ink, and a power cord. The box also includes a bag for storage or if you need to move the printer. It’s large enough for the printer to fit inside.
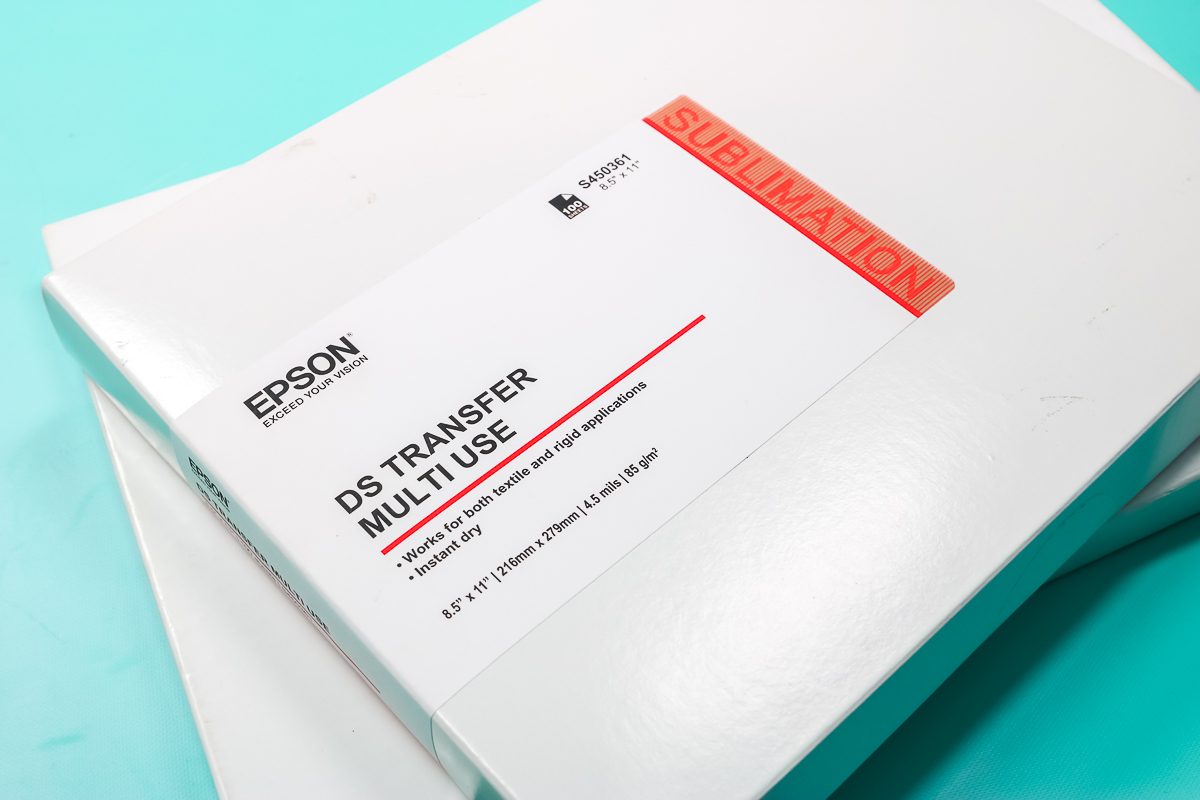
The printer doesn’t include any sublimation paper, you’ll need to purchase that separately. Epson has a paper that comes in 8 1/2 by 11 and 8 1/2 by 14 which both fit in the F170 printer.
For the Epson sublimation system to work correctly you’re going to need to use everything Epson. Anytime you refill the printer you will want to use the same Epson ink.
Now let’s look at the start guide to see the whole setup process. Resist the urge to do anything until you’ve read through the start guide.
Set your printer on a flat stable surface and remove all the packaging material. You’ll see various pieces of tape all over the printer, the tape is designed to keep things in place during shipment. Remove all of those tape pieces. You may need to open the printer to access all of the tape.
You’ll also need to make sure and remove any packaging from inside the printer. There’s also a clear, protective film over the front display. You can remove that at this time too.
Adding Ink to the Epson SureColor F170 Sublimation Printer
You may have noticed I haven’t mentioned plugging the printer in yet. Do not plug your printer in until the setup is complete.
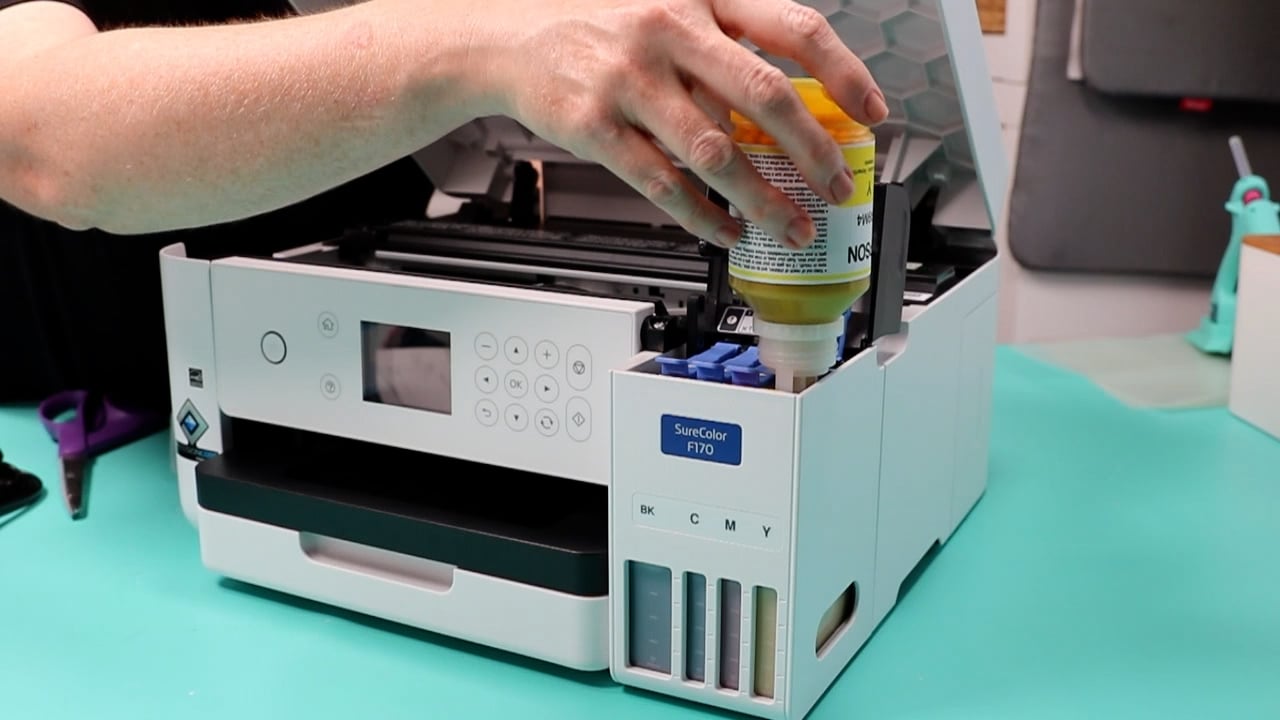
First, we need to add our Epson Sublimation ink. Do not open any of the ink containers yet. We’ll start with the black ink first. While it’s still in the packaging shake it at least 15 times.
Open the top of the printer and then open the black lid that exposes the ports for adding the ink. Each color is keyed to fit perfectly into the port for that color. If you find you’re having to force the bottle, triple-check that you are adding the right ink to the right port.
Add the colors one at a time. Open the black port and then open the black sublimation ink. Hold the ink bottle upright while opening the lid. Don’t touch the tip with your fingers at all. The bottle should slide right into place. Put the bottle into place on the port and it should sit right in the port.
How Long Will it Take to Add Ink to the Epson F170
The ink will start flowing into the tank, you don’t need to squeeze or touch the bottle at all. It will also stop automatically when the tank is full. This will take approximately 90 seconds to fill the tank completely. You can see lines on the front of the tanks which show the full line and the line that tells you when to refill the ink.
When the ink stops flowing you can remove the bottle. There may be some ink left in the bottle, replace the lid and set it aside. Remember to not touch the tip.
Repeat the process for each color of ink. If you spill any ink make sure you clean it up, it can stain your clothing, hands, the outside of the printer, etc.
Sublimation Printer Setup
Now that we have the printer filled with the ink close everything back up and let’s start the printer set up. Once the inkwells are full it’s time to plug the printer in.
Now that the printer is plugged in, we can power the printer on. Hold down the power button for about two seconds and the printer will come right on. Follow the prompts on the screen, the first thing you’ll do is pick your language. Once your language is selected click the OK button in the center of the panel. The printer will read processing for a few seconds while it loads.
Next, we will click “start here” and hold the question mark down for about five seconds and the screen should change. You’ll be asked to confirm the tanks are filled with ink, since we’ve already done that we can click OK.
Now the printer will fill the ink lines. This will take about 14 minutes, the printer will make noises during this time which is totally normal. This process is filling the entire printer with ink and it takes time to do it.
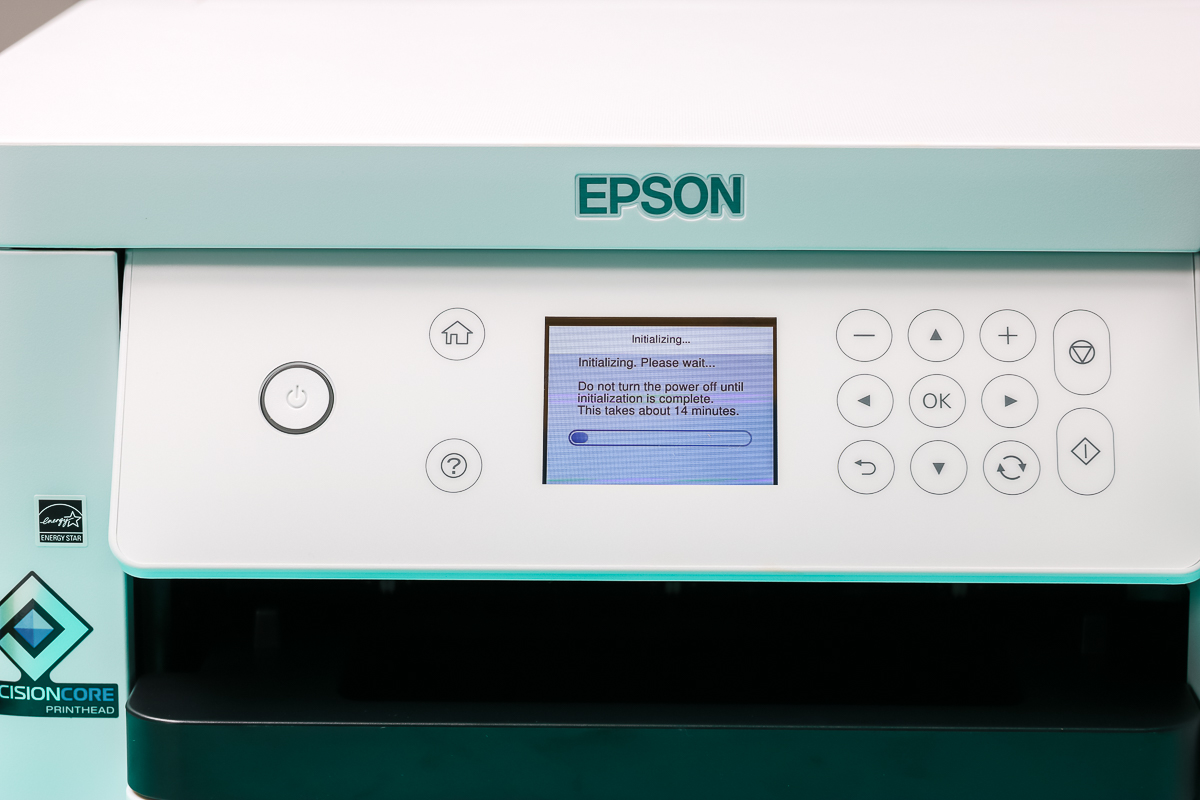
Once the charge is complete, it will display that on the display. You’ll likely notice that your ink levels have gone down. Mine dropped to about the first mark on the reservoir.
Printer Adjustment and Nozzle Check
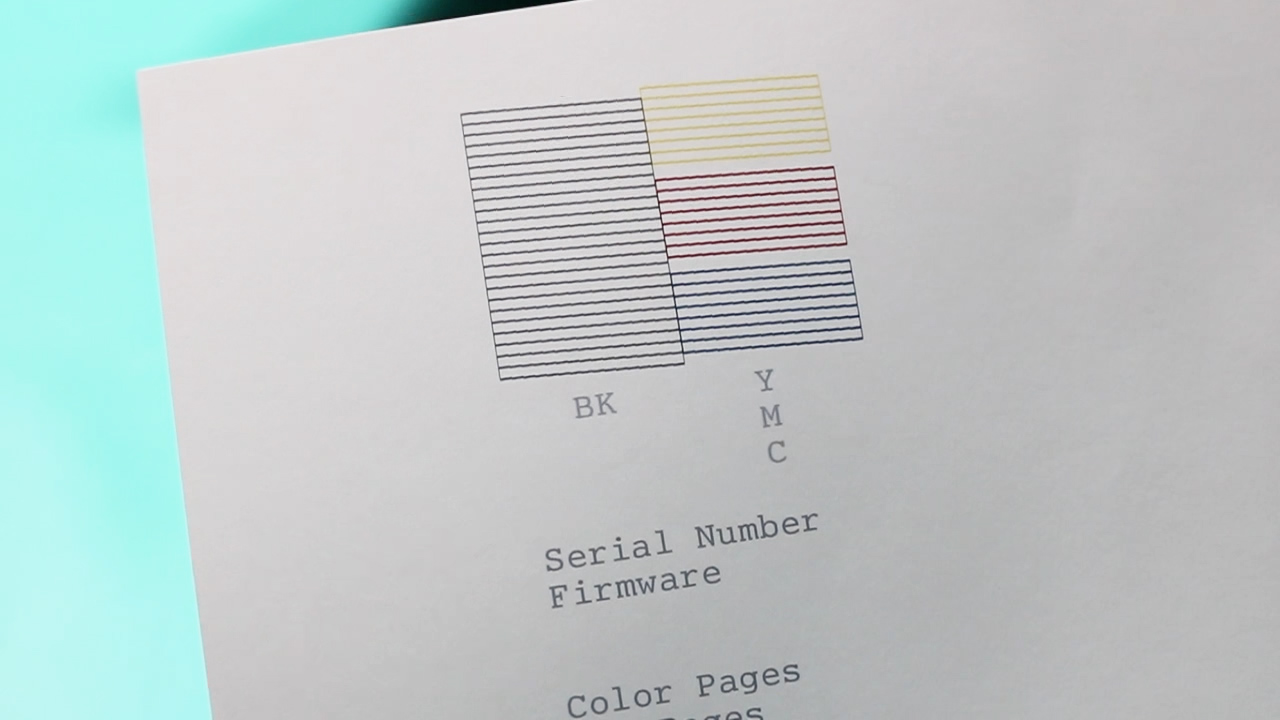
Now on the screen, we want to tap to adjust. Click OK on the adjustment screen and press OK to adjust. First, we’re going to print a head nozzle check, select that and click print. Here you’ll be prompted to load paper into the printer. For these different print checks, you can use regular printer paper. If you choose to use sublimation paper make sure you load it bright white side down. Load the paper by opening the bottom tray, you can move the feed guides by squeezing the blue tabs and pulling them apart.
Add paper, bright white side down, push it all the way in and make sure your guides are adjusted so that the paper is tight. Close the paper drawer and open the output tray so it can catch the paper as it prints.
Now we’ll allow the printer to do the nozzle check. Once it’s done we want to review the top of the page and make sure all the lines are complete. If they’re not you can tell the printer and it will make some adjustments and print the nozzle check again. Mine printed with no gaps so I selected the no gap option.
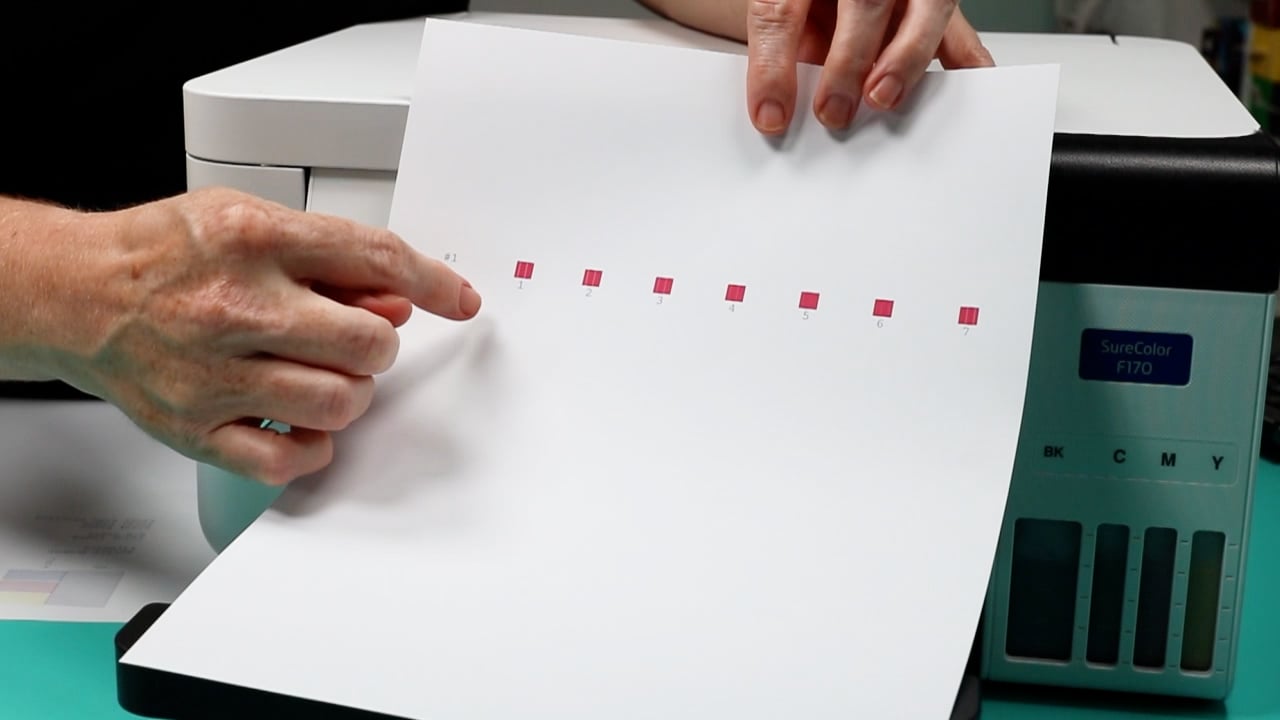
How to Align Epson F170
Now we can move on to the align printing option. Press OK until the alignment page prints. That page will have several options and you will select which option is the best on your page. You’re looking for the option with the fewest streaks and you’ll select that on your screen.
On the next print, you’ll choose which set of boxes is not overlapping or separated. Find which one looks best on your print and now your print head alignment is complete. Click okay to dismiss and we’re done with the printer setup in the printer itself.
NOTE: You can add the rest of the ink that was left in your bottles to the printer now if you would like to fill them back up and get rid of those bottles.
Epson SureColor F170 Sublimation Printer Software Set-Up
Once you’re done with the printer set up it’s time for the software portion of the process. Don’t let your computer find a driver for this printer. Go to the Epson website and get the software and drivers for this printer direct from Epson for the best results.
You can find the website address in the get started guide. From that website go to downloads and it should detect your operating system. If it doesn’t detect the right one or fails to detect it, you can pick it from the dropdown menu. Install the software utility as well as the print driver.
Going directly to the link in the get started guide allows you to have everything from Epson. The file will go to your downloads folder. You will need to open it in order to run it. And you might need to click a few buttons to allow it to make changes to your device.
Installing Epson F170 Software
Click OK to continue, and allow it to install. You’ll need to pick your language. You will need to accept the terms and conditions. Click install and it will install everything on your computer.
Then you need to make sure your printer’s on. Click Next to proceed. It will ask you to make sure that ink charging is complete. We did all that so we’re going to click that box and we’re going to click Next.
Now it will search for your printer. Next, it asks you what kind of connection you would like. The printer itself does not come with a USB cord. So we are going to click wireless connection and click Next. I’m going to try the Wi-Fi Auto Connect. Input your network name and password. It should do everything for you as far as connecting your printer to wifi. You can register your product as well or choose not to. Now your setup’s complete and you can click Finish.
I know reading all of that seems like a lot but the process is really quick.
How to Adjust Print Settings in the Epson SureColor F170
Now we’re ready to print. Will the F170 give me the colors I want right out of the box? Let’s find out.
To start with I’m going to open printers in Windows and select the F170 to open the printer and click manage. This will open the printing preferences menu and I want to walk you through a few things here. This box is what will pop up when you print from a lot of Windows programs.
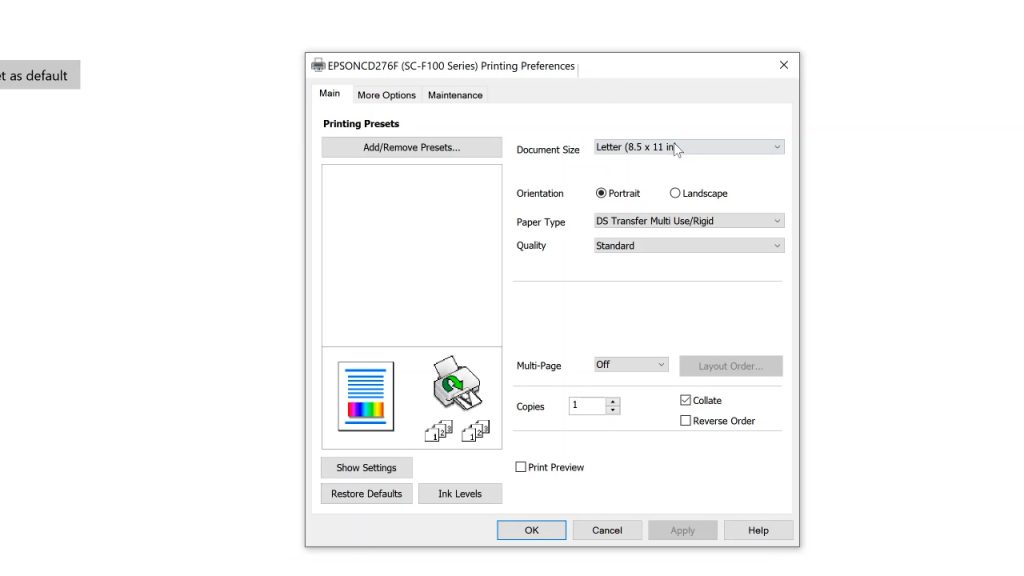
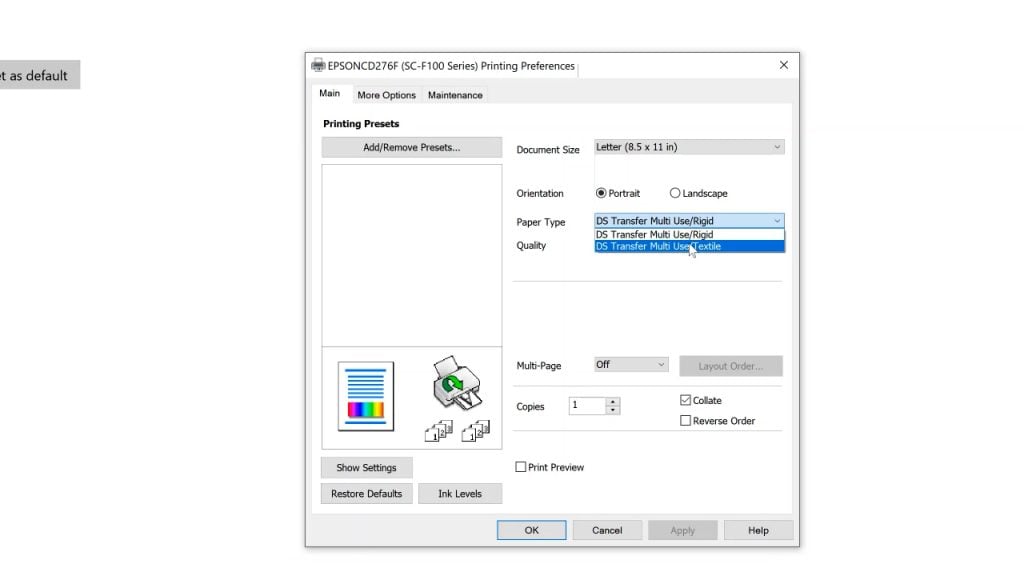
From here you have the option to select your paper size. This printer can print A4, letter, or legal. I will be printing on the letter setting. You can also select if your print will be portrait or landscape. Here you’ll also find two different paper types. There is a setting for rigid surfaces, things like hardboard, mugs, tumblers, and things that are not textiles. The second option is for textiles. Make sure you pick the paper type that corresponds to what you’re sublimation blank is.
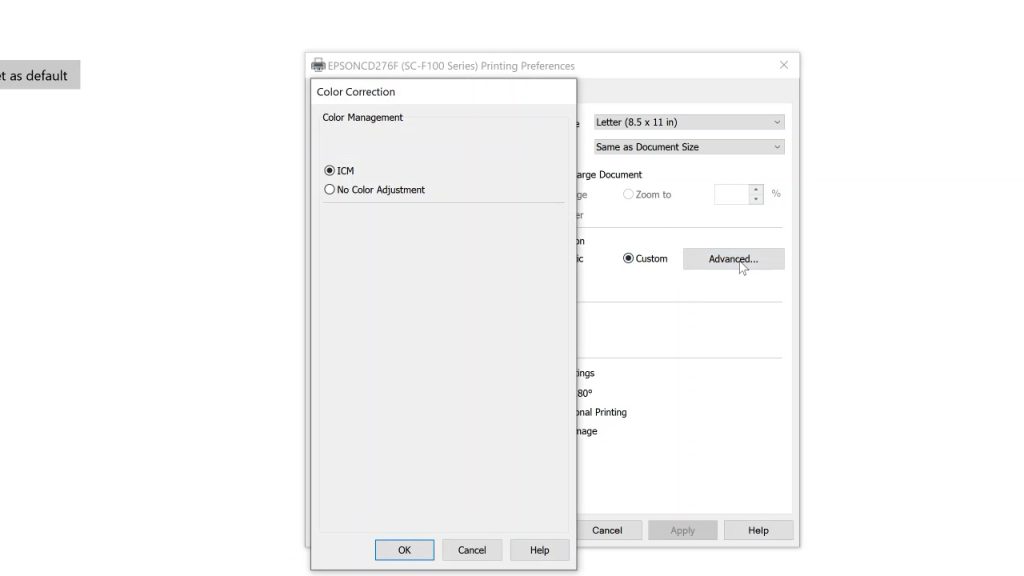
I always change the quality to high. Because I am using a sublimation printer I can leave the color correction at automatic which allows the printer to correct its own colors. I can also click custom then click advanced and select “use an ICM”. With that selected, the printer will use an ICM profile without me needing to use Photoshop to print.
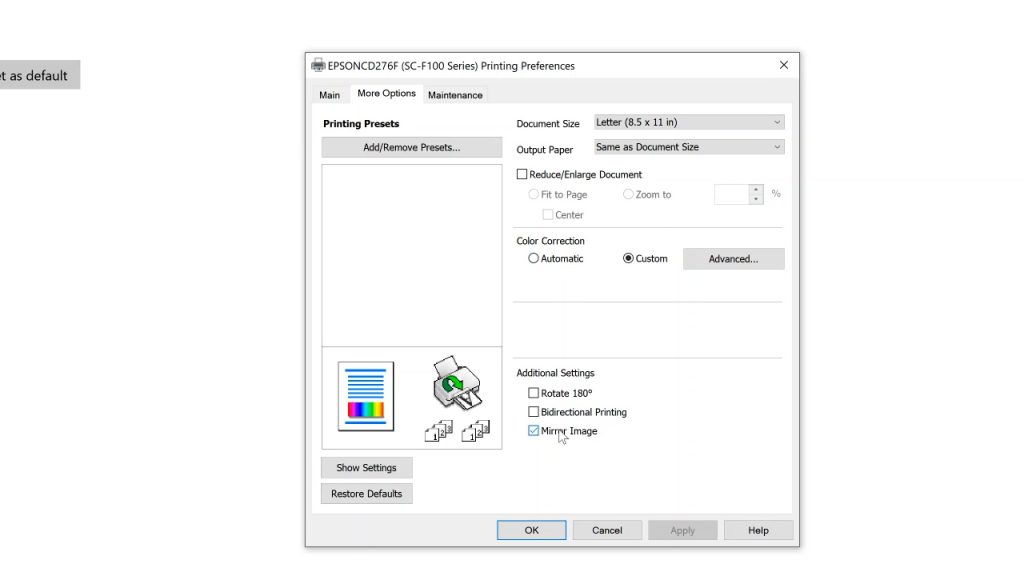
Then I am going to turn off bidirectional printing and leave the mirror image box checked.
Under the maintenance tab, you can do things like a print head nozzle check, a head cleaning, or a power cleaning if you were having printer issues. I do love the “print density” feature. With this slider, you can adjust how much ink is put on your paper. If you feel like you’re not getting enough ink or maybe too much that can be adjusted here.
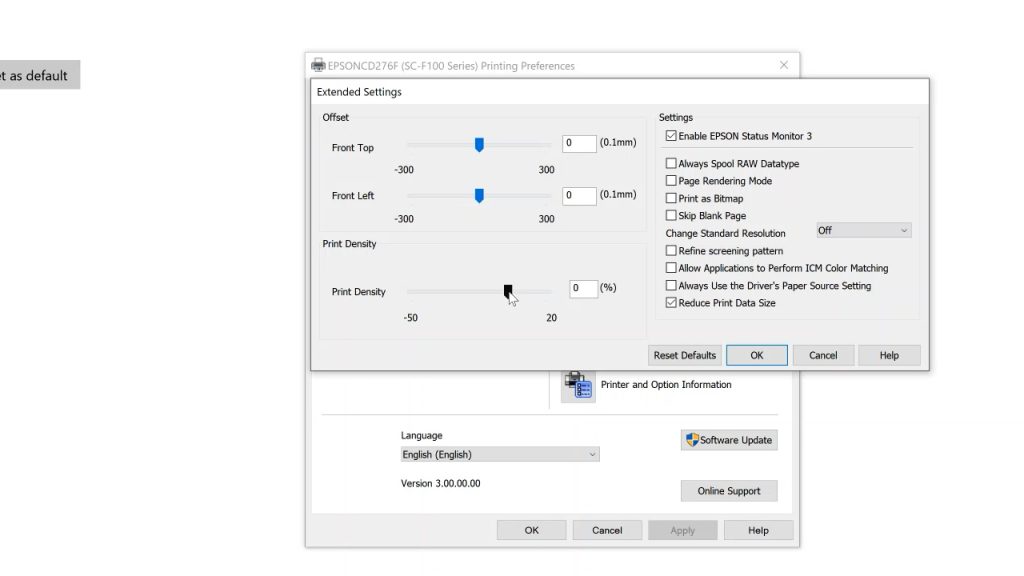
When you’re done, select OK to save your settings. I check these settings every single time when I’m printing, regardless of which program I’m printing from. This way I know I have things set how I want them each time.
Printing from the Epson SureColor F170 Sublimation Printer
To test the printer I am going to print straight from a Word document and also print from Photoshop. I have my image selected and will use it for both test prints.
Printing from PhotoShop
Let’s start with Photoshop. Open the image and click print. Change the setting to landscape and make sure the image is sized correctly. Click “Photoshop Manages Colors” and then select the ICC profile for the blank you’re using – rigid or textile. When I installed the printer it added the two ICC profiles to my computer for me, I didn’t have to go out and find them.
I’m selecting textile since I’m adding this image to a shirt. For Rendering Intent, I am going to click perceptual. You can try each of these settings if you want to see which one you’re happy with. I do love to test the settings to make sure I’m getting the best possible print.
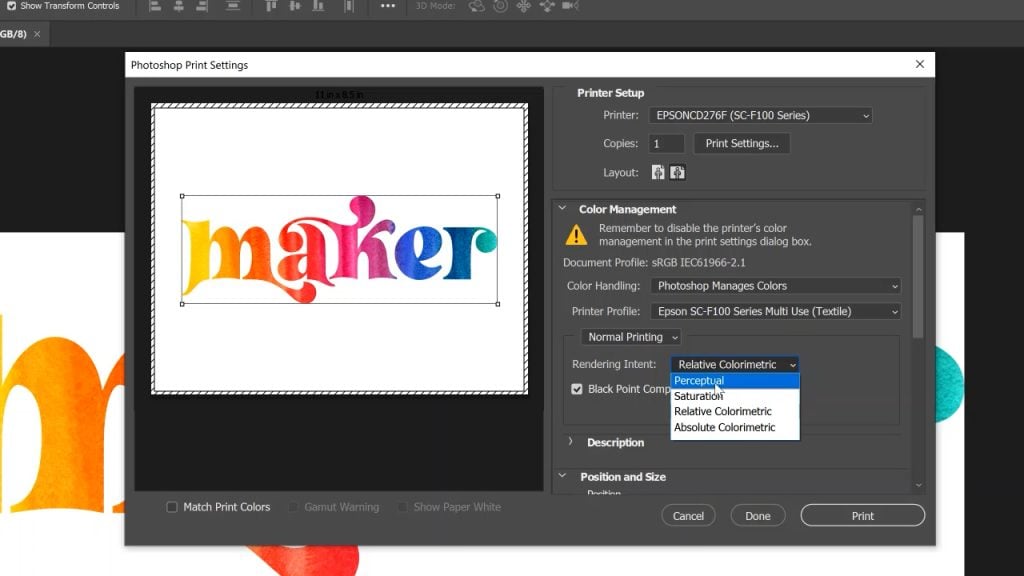
From there, click Print Settings and go through the steps that we listed above. I’ll select textile, high quality, my image is landscape, and I’m using 8 1/2 by 11 inch paper.
Click more options and make sure bidirectional is off and that we have mirror clicked on. Click on Advanced then Custom and select no color adjustment. I want Photoshop to manage my colors, I don’t want the printer to manage the colors at all. Click OK and then click print.
Printing from Microsoft Word
Open the image in Word and then click print. Choose the Epson Sure Color F170 Sublimation Printer and then click Printer Properties. In Printer Properties, go through the settings again. Select textile, high quality, and then click more options. Turn off bidirectional and select Custom, click Advanced, and pick ICM profile. Click OK to print.
There are options in Word just like Photoshop where you can change different things to see which print settings you like best but I am going to start here to see how the colors look.
Comparing Sublimation Prints
Let’s look at our sublimation prints! Here the top print was printed from Photoshop and the bottom print was printed directly from Word.
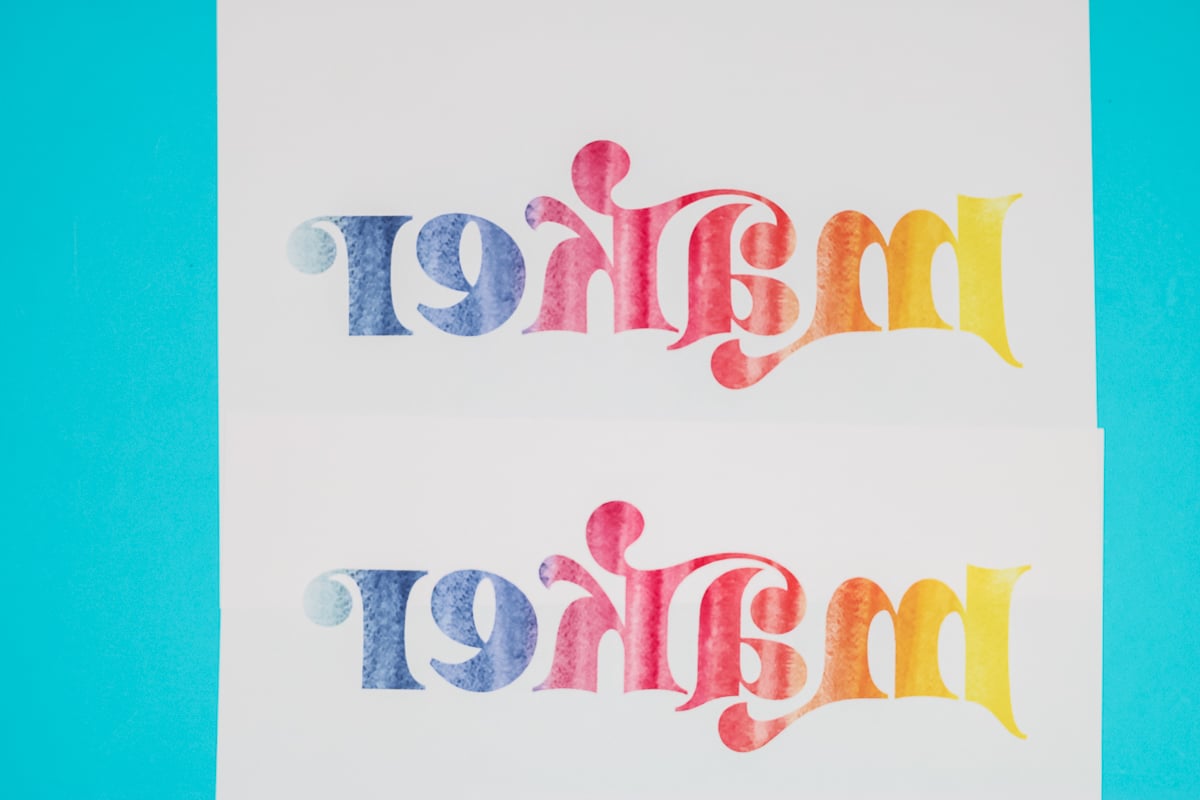
I can’t really tell much of a difference with the print itself. With sublimation prints, you really need to press them to actually compare the colors. I recommend pressing to 100% polyester. Let’s press both of these, remember the colors may appear more muted on the print than they do once they’re pressed.
You can find my full tutorial on sublimation on shirts here.
Below are my shirts after pressing. The top one is printed from Photoshop. The bottom one is printed from Word. I’ve also included both papers so you can see how much ink was left on the paper after pressing. I would say they’re both fairly equal. I might even like the Word version a little bit better.
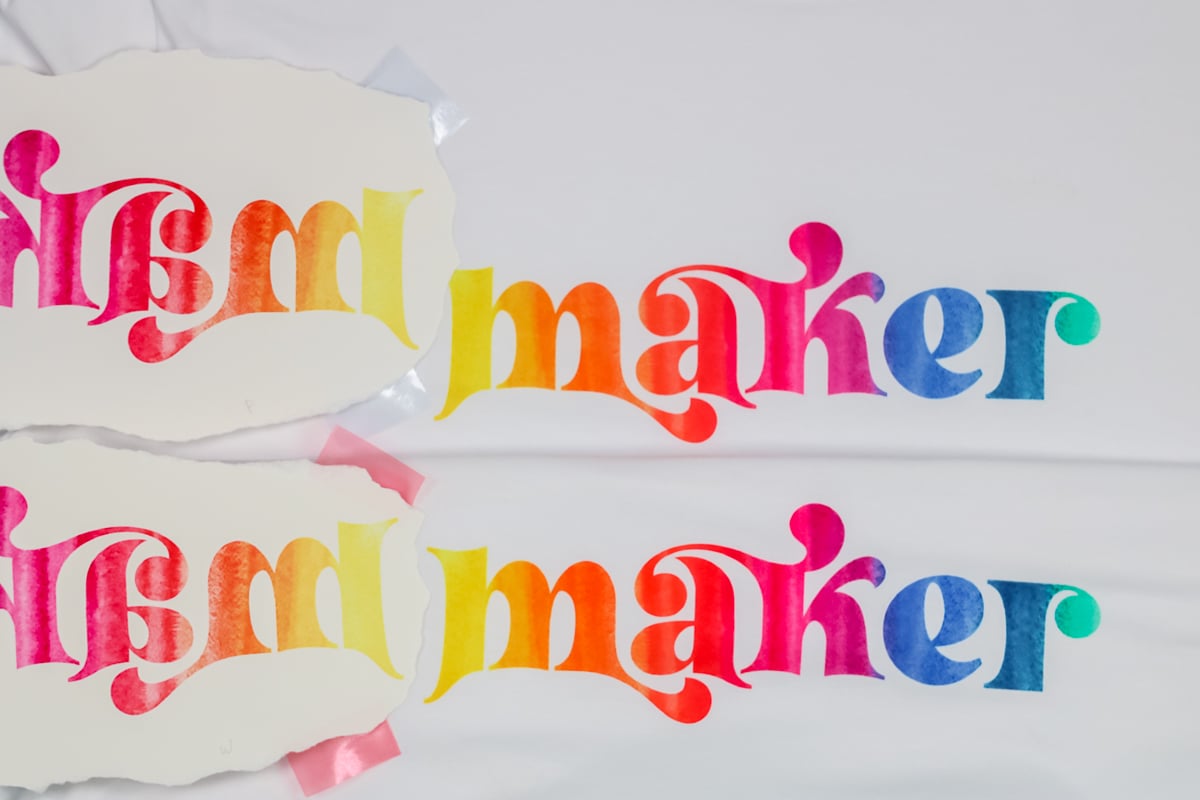
What I love about this is that I don’t have to print from a specific program. With the Epson SureColor F170 Sublimation Printer, I can print from any basic program that’s on my computer and get these stunning results. Because the ICC profiles are built into the print driver it’s ready to go, right out of the box! I’m really excited about this, in just a couple of minutes I’m printing from any program I want, no real experimentation required.
How to Make Sublimation Projects
Now I can just start printing some sublimation prints. I’m going to print a variety of different prints that we can apply to mugs, tumblers, coasters, and more. Let’s prep our blanks.
For each different blank make sure you’re following all the proper preparation steps that come with your blank. Remember you need to use a sublimation blank with a polyester coating to work with sublimation prints. The general instructions are as follows:
- For every sublimation blank, you’ll need to clean your surface. Use a lint roller or rubbing alcohol and a lint-free cloth to remove any dirt, dust, lint, etc.
- Apply your sublimation print to your surface with heat-resistant tape to make sure it’s held in place really well. You’ll also want to use protective paper on top of and under your project to protect your heat press from any ink bleed.
- If you’re sublimating a shirt or other fabric blanks, pre-press to remove any moisture and wrinkles. Also, make sure your protective paper is between the layers of your shirt to protect the back from ink transfer.
- Follow the time and temperature settings for your sublimation blanks. If you have no other reference a good starting point is 400 degrees for 60 seconds. You can also see my guide to finding a time and temperature here.
How to Make Sublimation Mugs
I’m using my Cricut Mug Press and this sublimation mug that has a black handle and black rim to make my sublimation mug.
You can find my full tutorial on making sublimation mugs here.
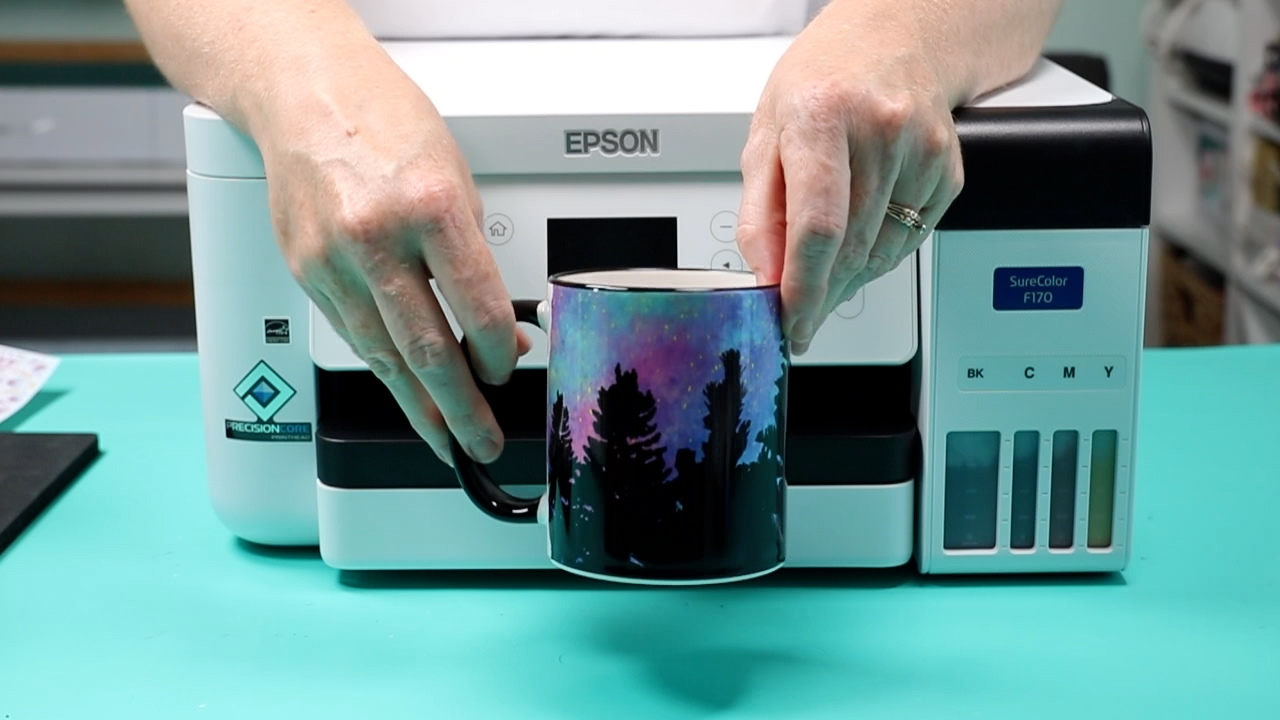
Here is that gorgeous mug. The colors on this mug came out perfectly. I went ahead and ripped the edges on this just to give the edges a cool look. I think the black handle, as well as the black rim, really adds to this design.
How to Make Sublimation Tumblers
To make my sublimation tumbler I’m using a tumbler press and a skinny tumbler.
You can find my full tutorial on sublimation tumblers here.

Look at how great this tumbler looks. I’m so happy with the way the colors are looking right out of the printer without any extra settings required.
How to Make Metal Sublimation Bookends
I’m using my Cricut AutoPress to make my Metal Bookends. It’s so cool because you press it flat but it’s foldable. I actually sublimated both sides so I can use it anywhere in my home.
You can find my full tutorial on sublimating on metal here.
This is a great example of how much the print pops after you press it. Don’t be scared if your print looks muted when they come out of your printer, they’ll look amazing once you press them.
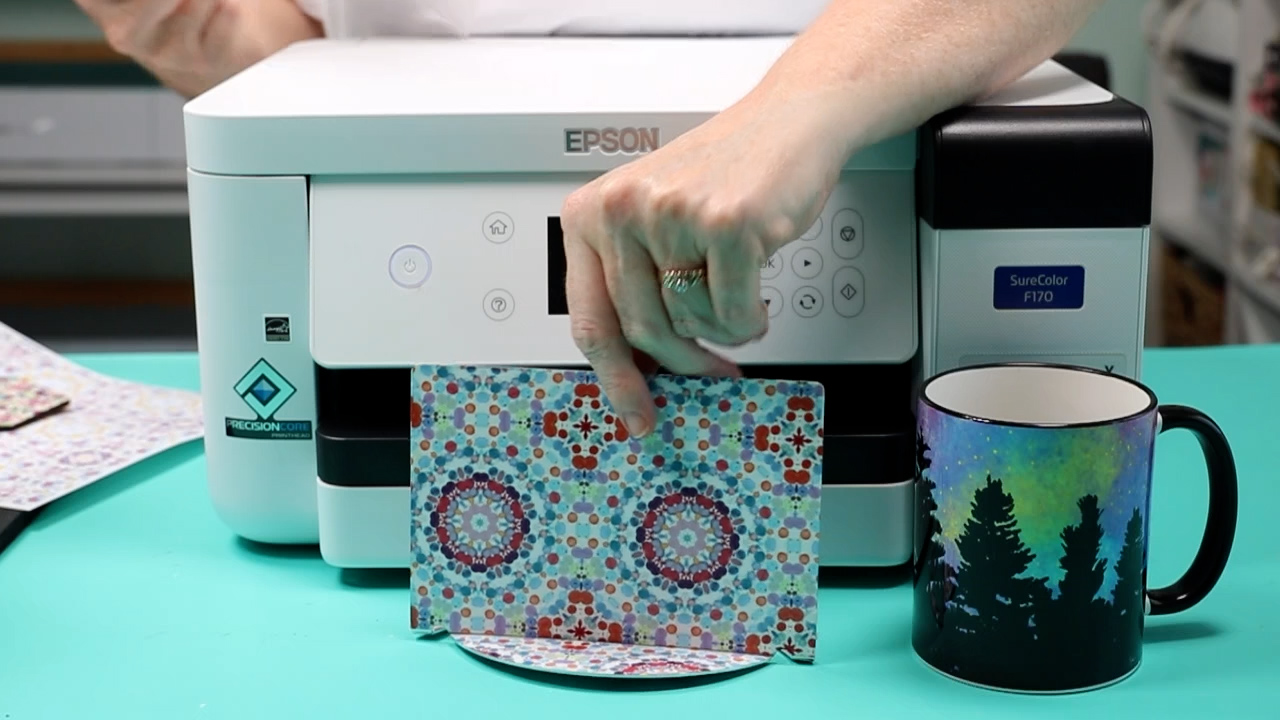
How to Make Sublimation Coasters
For my sublimation coasters, I’m using my AutoPress again. I used an all-over patterned print and you can see how much the colors change when you press them.
You can find my full tutorial on sublimating on coasters here.
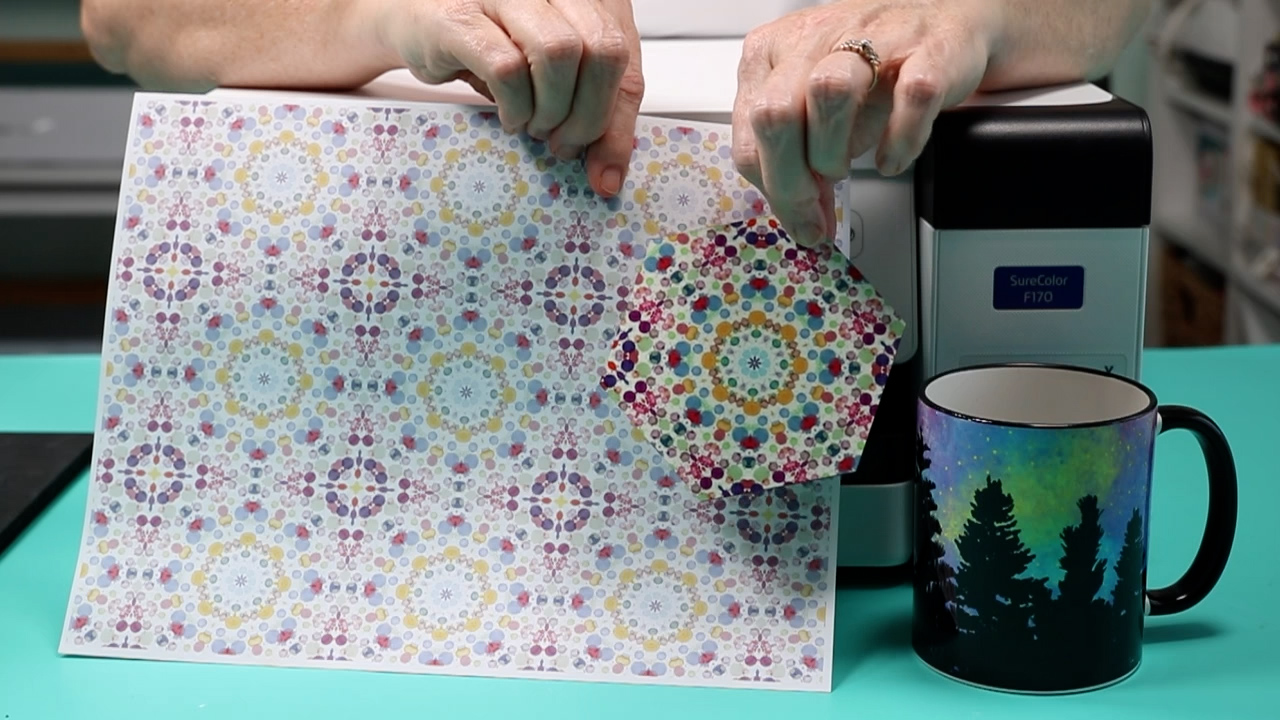
This print is straight out of the printer and this coaster shows you what it looks like after it’s pressed. You can see just how much more vibrant the ink is after it’s pressed.
Final Thoughts on the Epson SureColor F170 Sublimation Printer
I am so happy with the projects I made using the Epson SureColor F170 Sublimation Printer. It is super easy to set up. It’s great that I had two different color profiles for rigid and textile so that I could make sure my projects really pop right off the printer, no matter which project I was making.
I was also over the moon ecstatic that I could print from any program and get stunning results. You don’t have to worry about always using Photoshop. I can use basically any program on my computer, pick that color correction and it fixes the color for me. It looks amazing right out of the printer. No adjustment needed, no experimentation, no anything. That really thrilled me.
Easy setup. Great color. Overall, a really great printer.
Recommendations for Using Epson F170
Here are a few final recommendations if you get this printer:
- Always use Epson sublimation ink. When you need to reorder ink, make sure you’re getting Epson ink. If you use ink that isn’t Epson, they can’t guarantee the warranty.
- I also recommend using Epson sublimation paper. You can use 8 1/2 by 11 paper and 8 1/2 by 14 in the F170 printer.
- Stay in the Epson ecosystem for the best results. If you have used a different paper or ink and have found that you’re not getting the results you want, those are likely the reasons.
- Sublimation ink isn’t the same as regular printer ink. You want to make sure you print fairly regularly. I generally recommend every week or two for you to run a couple of prints. The prints do last a long time after you print them, just keep them out of the sun, out of humidity, and away from dust and they’ll last for you.
Epson F170 Troubleshooting
As an added bonus, the guide that came with the printer has tons of troubleshooting steps. If you ever have a problem with your printer, keep that guide and you can walk through those troubleshooting steps.
You can also contact Epson. You have full Epson support. If you have trouble during the setup process or afterward be sure to contact Epson for help and support with your printer, colors, or whatever.
I hope you found this review helpful. If you have any questions feel free to leave them in the comments below!